Install Analysis Services in Power Pivot Mode
Applies to:  SQL Server 2019 and earlier Analysis Services
  Azure Analysis Services
  Fabric/Power BI Premium
Important
Data mining was deprecated in SQL Server 2017 Analysis Services and now discontinued in SQL Server 2022 Analysis Services. Documentation is not updated for deprecated and discontinued features. To learn more, see Analysis Services backward compatibility.
The procedures in this topic guide you through a single server installation of a SQL Server Analysis Services server in Power Pivot mode for a SharePoint deployment. The steps include running the SQL Server installation wizard as well as configuration tasks that use SharePoint Central Administration.
Background
Power Pivot for SharePoint is a collection of middle-tier and backend services that provide Power Pivot data access in a SharePoint 2016, or SharePoint 2013, farm.
Backend services: If you use Power Pivot for Excel to create workbooks that contain analytical data, you must have Power Pivot for SharePoint to access that data in a server environment. You can run SQL Server Setup on a computer that has SharePoint Server installed, or on a different computer that has no SharePoint software. SQL Server Analysis Services does not have any dependencies on SharePoint.
Note: This topic describes the installation of the SQL Server Analysis Services server and the backend services.
Middle-tier: Enhancements to the Power Pivot experiences in SharePoint including Power Pivot Gallery, Schedule data refresh, Management dashboard, and data providers. For more information on installing and configuring the middle-tier, see the following:
Prerequisites
You must be a local administrator to run SQL Server Setup.
SharePoint Server enterprise edition is required for Power Pivot for SharePoint. You can also use the evaluation enterprise edition.
The computer must be joined to a domain in the same Active Directory forest as the Office Online Server (SharePoint 2016) or Excel Services (SharePoint 2013).
The Power Pivot instance name must be available. You cannot have an existing Power Pivot-named instance on the computer on which you are installing Analysis Services in Power Pivot mode.
Note: The instance name must be POWERPIVOT.
Review Hardware and Software Requirements for Analysis Services Server in SharePoint Mode.
Review the release notes at SQL Server 2016 Release Notes.
SQL Server Edition Requirements
Business intelligence features are not all available in all editions of SQL Server 2017. For details, see Analysis Services Features Supported by the Editions of SQL Server 2016 and Editions and Components of SQL Server 2016.
Step 1: Install Power Pivot for SharePoint
In this step, you run SQL Server Setup to install an SQL Server Analysis Services server in Power Pivot mode. In a subsequent step, you configure Excel Services to use this server for workbook data models.
Run the SQL Server Installation Wizard (Setup.exe).
select Installation in the left navigation.
select New SQL Server stand-alone installation or add features to an existing installation.
If you see the Product Key page, specify the evaluation edition or enter a product key for a licensed copy of the enterprise edition. select Next. For more information on editions, see Editions and Components of SQL Server 2016.
Review and accept the Microsoft Software License Terms of agreement, and then select Next.
If you see the Global Rules page, review any rules information the setup wizard displays.
On the Microsoft Update page, it is recommended you use Microsoft Update to check for updates, then select Next.
The Install Setup Files page runs for several minutes. Review any rule warnings or failed rules, and then select Next.
If you see another Setup Support Rules, review any warnings and select Next.
Note: Because Windows Firewall is enabled, you see a warning to open ports to enable remote access.
On the Setup Role page, select SQL Server Feature Installation.
Select Next.
On the Feature Selection page, select Analysis Services. This option allows you to install any of the three SQL Server Analysis Services modes. You will select the mode in a later step. Select Next.
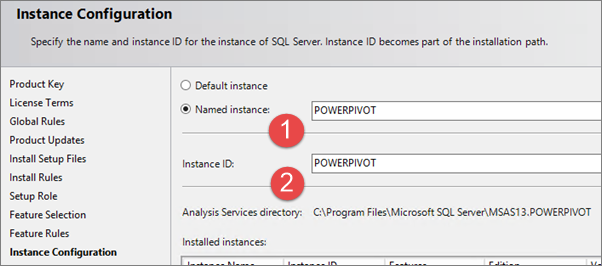
On the Instance Configuration page, select Named Instance and type POWERPIVOT for the instance name Click Next.

On the Server Configuration page, configure all of the services for Automatic Startup Type. Specify the desired domain account and password for SQL Server Analysis Services, (1) in the following diagram.
For SQL Server Analysis Services, you can use a domain user account or NetworkService account. Do not use LocalSystem or LocalService accounts.
If you added the SQL Server Database Engine and SQL Server Agent, you can configure the services to run under domain user accounts or under the default virtual account.
Never provision service accounts with your own domain user account. Doing so grants the server the same permissions that you have to the resources in your network. If a malicious user compromises the server, that user is logged in under your domain credentials. The user has the permissions to download or use the same data and applications that you do.
Select Next.

If you are installing the Database Engine, the Database Engine Configuration page appears. In Database Engine Configuration, select Add Current User to grant your user account administrator permissions on the Database Engine instance.
Select Next.
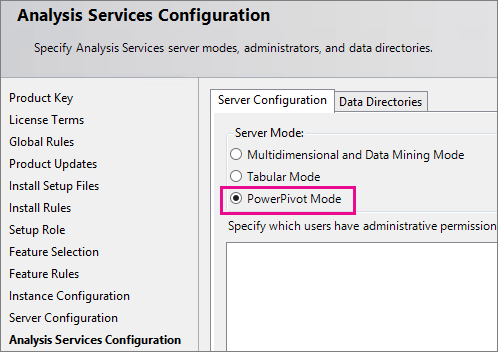
On the Analysis Services Configuration page, select PowerPivot Mode under Server Mode

On the Analysis Services Configuration page, select Add Current User to grant your user account administrative permissions. You will need administrative permission to configure the server after Setup is finished.
In the same page, add the Windows user account of any person who also requires administrative permissions. For example, any user who wants to connect to the Analysis Services service instance in SQL Server Management Studio to troubleshoot database connection problems must have system administrator permissions. Add the user account of any person who might need to troubleshoot or administer the server now.
-
Note
All service applications that require access to the Analysis Services server instance need to have Analysis Services Administrative permissions. For example, add the service accounts for Excel Services, Power View, and Performance Point Services. Also, add the SharePoint farm account, which is used as the identity of the web application that hosts Central Administration.
Select Next.
On the Error Reporting page, select Next.
On the Ready to Install page, select Install.
If you see the dialog Computer Restart Required, select OK.
When the installation is complete, select Close.
Restart the computer.
If you have a firewall in your environment, review the SQL Server Books Online topic, Configure the Windows Firewall to Allow Analysis Services Access.
Verify the SQL Server Installation
Verify that the Analysis Services Service is running.
In Microsoft Windows click Start, select All Programs, and select the Microsoft SQL Server group.
Select SQL Server Management Studio.
Connect to the Analysis Services instance, for example [your server name]\POWERPIVOT. If you can connect to the instance, you have verified the Service is running.
Step 2: Configure Basic Analysis Services SharePoint Integration
The following steps describe configuration changes needed so you can interact with Excel advanced data models inside a SharePoint document library. Complete these steps after you install SharePoint and SQL Server Analysis Services.
SharePoint 2016
Excel Services was removed from SharePoint 2016 , and instead uses Office Online Server for hosting Excel.
Grant Office Online Server machine account Administration Rights on Analysis Services
You do not need to complete this section if during the Analysis Services installation; you added the Office Online Server machine account as an Analysis Services administrator.
On the Analysis Services server, start SQL Server Management Studio and connect to the Analysis Services instance, for example
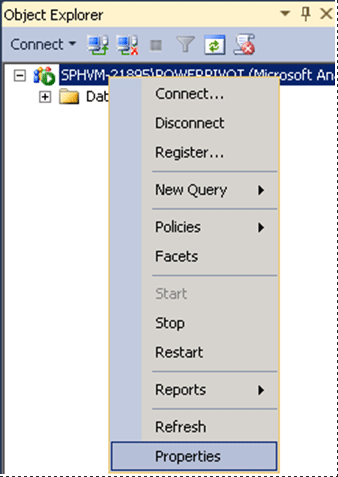
[MyServer]\POWERPIVOT.In Object Explorer, right-click the instance name and select Properties.

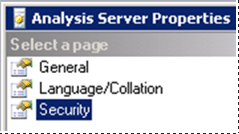
In the left pane, select Security. Add the machine account that the Office Online Server is installed on.

Register Analysis Services server with Office Online Server
You will want to perform these steps on the Office Online Server.
Open a PowerShell command window as an administrator.
Load the
OfficeWebAppsPowerShell module.Import-Module OfficeWebAppsAdd the Analysis Services server, for example
[MyServer]\POWERPIVOT.New-OfficeWebAppsExcelBIServer -ServerId [MyServer]\POWERPIVOT]
SharePoint 2013
Grant Excel Services Server Administration Rights on Analysis Services
You do not need to complete this section if during the Analysis Services installation; you added the Excel Services Application service account as an Analysis Services administrator.
On the Analysis Services server, start SQL Server Management Studio and connect to the Analysis Services instance, for example
[MyServer]\POWERPIVOT.In Object Explorer, right-click the instance name and select Properties.

In the left pane, select Security. Add the domain login you configured for the Excel Services Application in step 1.

Configure Excel Services for Analysis Services integration
In SharePoint Central Administration, in the Application Management group, click Manage Service Applications.
Click the name of your service application, the default is Excel Services Application.
On the Manage Excel Services Application page, click Data Model Settings.
Click Add Server.
In Server Name, type the Analysis Services server name and the Power Pivot instance name. For example
MyServer\POWERPIVOT. The Power Pivot instance name is required.Type a description.
Click Ok.
The changes will take effect in a few minutes or you can Stop and Start the service Excel Calculation Services. To
Another option is to open a command prompt with administrative privileges, and type
iisreset /noforce.You can verify the server is recognized by Excel Services by reviewing entries in the ULS log. You will see entries similar to the following:
Excel Services Application            Data Model        27           Medium                Check Administrator Access ([ServerName]\POWERPIVOT): Pass.        f127bd9b-bae3-e0e0-9b48-3f7b5ad1eae6
Excel Services Application            Data Model        27           Medium                Check Server Version ([ServerName]\POWERPIVOT): Pass (11.0.2809.24 >= 11.0.2800.0).         f127bd9b-bae3-e0e0-9b48-3f7b5ad1eae6
Excel Services Application            Data Model        27           Medium                Check Deployment Mode ([ServerName]\POWERPIVOT): Pass.            f127bd9b-bae3-e0e0-9b48-3f7b5ad1eae6
Step 3: Verify the Integration
The following steps walk you through creating and uploading a new workbook to verify the Analysis Services integration. You will need a SQL Server database to complete the steps.
Note: If you already have an advanced workbook with slicers or filters, you can upload it to your SharePoint document library and verify you are able to interact with the slicers and filters from the document library view.
Start a new workbook in Excel.
On the Data tab, select From Other Sources on the ribbon in the Get External Data.
Select From SQL Server.
In the Data Connection Wizard, enter the name of the SQL Server instance that has the database you want to use.
Under Log on credentials, verify that Use Windows Authentication is selected, and then select Next.
Select the database you want to use.
Verify that the Connect to specific table checkbox is selected.
Select the Enable selection of multiple tables and add tables to the Excel Data Model checkbox.
Select the tables you want to import.
Select the checkbox Import relationships between selected tables, and then select Next. Importing multiple tables from a relational database lets you work with tables that are already related. You save steps because you don't have to build the relationships manually.
In the Save Data Connection File and Finish page of the wizard,, type a dame for your connection and select Finish.
The Import Data dialog box will appear. Choose PivotTable Report, and then select Ok.
A PivotTable Field List appears in the workbook.
On the field list, select the All tabAdd fields to the Row, Columns, and Value areas in the field list.
Add a slicer or a filter to the PivotTable. Do not skip this step. A slicer or filter is the element that will help you verify your Analysis Services installation.
Save the workbook to a document library in your SharePoint farm. You can also save the workbook to a file share and then upload it to the SharePoint document library.
Select the name of your workbook to view it in Excel Online and click the slicer or change the filter that you previously added. If a data update occurs, you know that Analysis Services is installed and available to Excel. If you open the workbook in Excel you will be using a cached copy and not using the Analysis Services server.
Configure the Windows Firewall to Allow Analysis Services Access
Use the information in the topic Configure the Windows Firewall to Allow Analysis Services Access to determine whether you need to unblock ports in a firewall to allow access to Analysis Services or Power Pivot for SharePoint. You can follow the steps provided in the topic to configure both port and firewall settings. In practice, you should perform these steps together to allow access to your Analysis Services server.
Upgrade Workbooks and Scheduled Data Refresh
The steps required to upgrade workbooks created in previous versions of Power Pivot depend on what version of Power Pivot created the workbook. For more information, see Upgrade Workbooks and Scheduled Data Refresh (SharePoint 2013).
Beyond the Single-Server Installation - Power Pivot for Microsoft SharePoint
Web front-end (WFE) or Middle-tier:: To use an SQL Server Analysis Services server in SharePoint mode in a larger SharePoint farm and to install additional Power Pivot features into the farm, run the installer package spPowerPivot16.msi (SharePoint 2016), or spPowerPivot.msi (SharePoint 2013), on each of the SharePoint servers. The spPowerPivot16.msi, or spPowerPivot.msi, installs required data providers and the Power Pivot for SharePoint 2016, or 2013, Configuration tool.
For more information on installing and configuring the middle-tier, see the following:
Install or Uninstall the Power Pivot for SharePoint Add-in (SharePoint 2013)
Install or Uninstall the Power Pivot for SharePoint Add-in (SharePoint 2013)
To download the .msi, see Microsoft SQL Server 2016 Power Pivot for Microsoft SharePoint 2016
Configure Power Pivot and Deploy Solutions (SharePoint 2013)
Redundancy and server load: Installing a second, or more SQL Server Analysis Services servers in Power Pivot mode will provide redundancy of the SQL Server Analysis Services server functionality. Additional servers will also spread the load across servers. For more information, see the following:
Configure Analysis Services for processing data models in Excel Services (SharePoint 2013).
Manage Excel Services data model settings (SharePoint 2013).
 Submit feedback and contact information through SQL Server Feedback.
See Also
Migrate Power Pivot to SharePoint 2013
Install or Uninstall the Power Pivot for SharePoint Add-in (SharePoint 2013)
Upgrade Workbooks and Scheduled Data Refresh (SharePoint 2013)