Use the sentiment analysis prebuilt model in Power Automate
In this article, we will create a flow that uses the AI Builder sentiment analysis prebuilt model.
Sign in to Power Automate.
Select My flows in the left pane, and then select New flow > Instant cloud flow.
Name your flow, select Manually trigger a flow under Choose how to trigger this flow, and then select Create.
Expand Manually trigger a flow, and then select +Add an input > Text.
Replace Input with My Text (also known as the title).
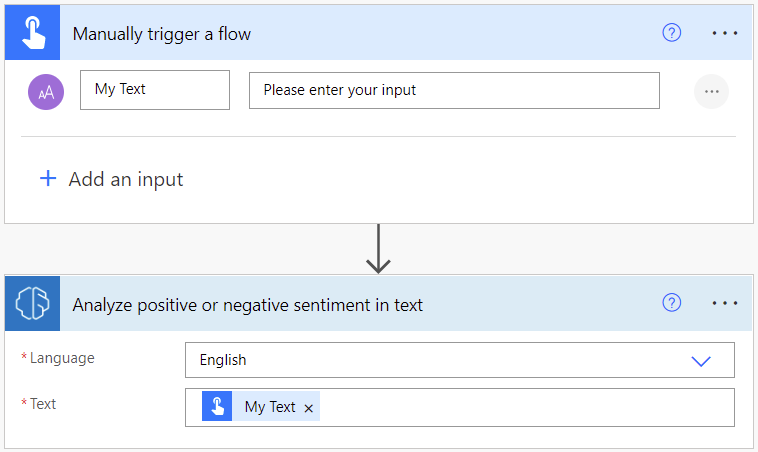
Select + New step > AI Builder, and then select Analyze positive or negative sentiment in the list of actions.
In the Language input, select or enter your language.
In the Text input, select My Text from the Dynamic content list:

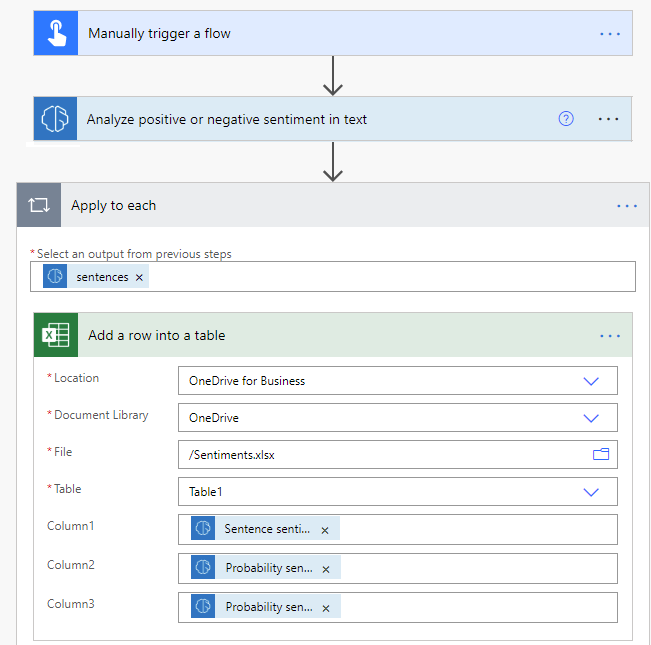
In the successive actions, you can use any columns extracted by the AI Builder model. For example, you can add lines to an Excel file for each sentence using Sentence sentiment, Probability sentence is positive and Probability sentence is negative:

Congratulations! You've created a flow that uses the sentiment analysis model. Select Save on the top right, and then select Test to try out your flow.
Parameters
Input
| Name | Required | Type | Description | Values |
|---|---|---|---|---|
| Text | Yes | string | Text to analyze | Text sentences |
| Language | Yes | string | Language of the text to analyze | Item in a list of predefined languages or a language code (ex.: "en", "fr", "zh_chs", "ru") |
Output
| Name | Type | Description | Values |
|---|---|---|---|
| Overall text sentiment | string | Overall sentiment of the analyzed text | Positive, neutral or negative |
| Probability overall text is positive | float | Probability of the positive sentiment in the analyzed text | Value in the range of 0 to 1. Values close to 1 indicate greater confidence that the identified sentiment is accurate |
| Probability overall text is negative | float | Probability of the negative sentiment in the analyzed text | Value in the range of 0 to 1. Values close to 1 indicate greater confidence that the identified sentiment is accurate |
| Probability overall text is neutral | float | Probability of the neutral sentiment in the analyzed text | Value in the range of 0 to 1. Values close to 1 indicate greater confidence that the identified sentiment is accurate |
| documentScores | object | Object containing overall scores | Positive, neutral and negative scores |
| sentences | List | List of sentence data structures containing sentences overall sentiment and scores | Sentence sentiment, positive, neutral and negative scores |
| Sentence sentiment | string | Sentiment of the analyzed sentence | Positive, neutral or negative |
| Probability sentence is positive | float | Probability of the positive sentiment in the analyzed sentence | Value in the range of 0 to 1. Values close to 1 indicate greater confidence that the identified sentiment is accurate |
| Probability sentence is negative | float | Probability of the negative sentiment in the analyzed sentence | Value in the range of 0 to 1. Values close to 1 indicate greater confidence that the identified sentiment is accurate |
| Probability sentence is neutral | float | Probability of the neutral sentiment in the analyzed sentence | Value in the range of 0 to 1. Values close to 1 indicate greater confidence that the identified sentiment is accurate |
| sentenceScores | object | Data structure containing sentence scores | Positive, neutral, and negative scores |
Use sentiment analysis to analyze incoming Dynamics 365 emails
Power Automate provides a template that enables you to analyze incoming Dynamics 365 emails by using AI Builder sentiment analysis. This template requires some customization of your Microsoft Dataverse email table before you can use it.
Create an attribute in your Email Messages table in which to save the sentiment analysis results.
For information about how to create an attribute, see Create and edit column for Dataverse using Power Apps portal.
Sign in to Power Automate.
In the left pane, select Templates, and then search for ai builder sentiment.
Select Analyze sentiment of Dynamics emails using AI Builder.
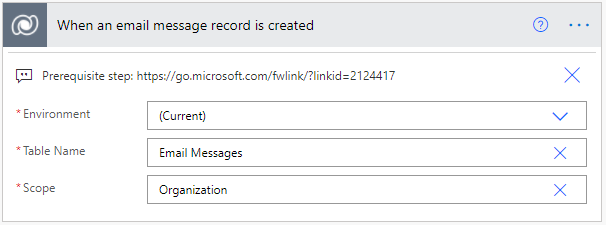
Select your environment, and then select Continue.
Type Email Messages in the Entity Name input.
Type Organization in the Scope input.

Next, the template shows messages from draft emails and received emails. You can filter these if you want to perform sentiment analysis only on selected email statuses. For a list of status codes, see StatusCode choices.
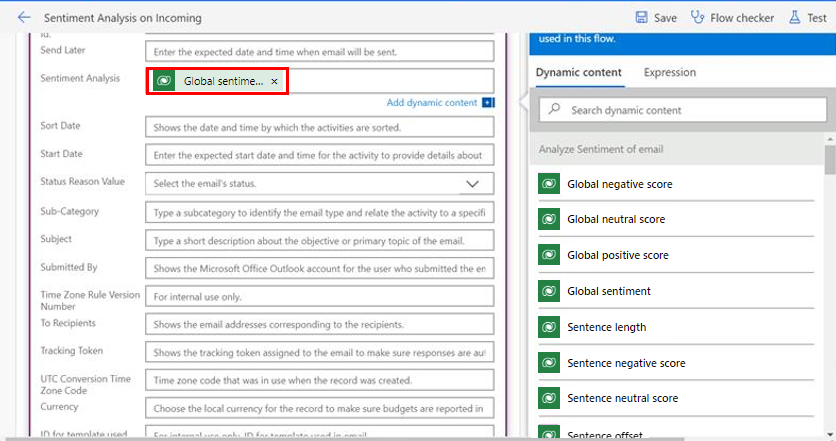
Select Add sentiment to CDS Email Entity, select Show advanced options, and then locate the attribute you added in step 1.
Finally, add Global sentiment from the Dynamic content list.

If you want this column to be visible in your email grid view, follow these steps:
Go to the view/form designer, and add the custom column you created in step 1 of the preceding procedure. For information about how to add the column to your view, see Add a column to your view.
Add a field to the form. For details, see Add a field to a form.