Migrate Application Live View to Spring Boot Admin
Note
The Basic, Standard, and Enterprise plans will be deprecated starting from mid-March, 2025, with a 3 year retirement period. We recommend transitioning to Azure Container Apps. For more information, see the Azure Spring Apps retirement announcement.
The Standard consumption and dedicated plan will be deprecated starting September 30, 2024, with a complete shutdown after six months. We recommend transitioning to Azure Container Apps. For more information, see Migrate Azure Spring Apps Standard consumption and dedicated plan to Azure Container Apps.
This article applies to: ❎ Basic/Standard ✅ Enterprise
This article describes the migration path from Application Live View to Spring Boot Admin.
Spring Boot Admin is a powerful tool for managing and monitoring Spring Boot applications. Built on Spring Boot Actuators, it provides insights into the internal workings of running applications through accessible HTTP endpoints. Spring Boot Admin gathers data and facilitates interaction with your applications by using these endpoints.
Set up Spring Boot Admin Server
Azure Spring Apps previously provided built-in integration with Tanzu Application Live View to help you manage your applications. However, due to changes in product features, this functionality is no longer available. To ensure you can continue to easily manage your applications, the following steps guide you through configuring and using Spring Boot Admin Server as an alternative solution:
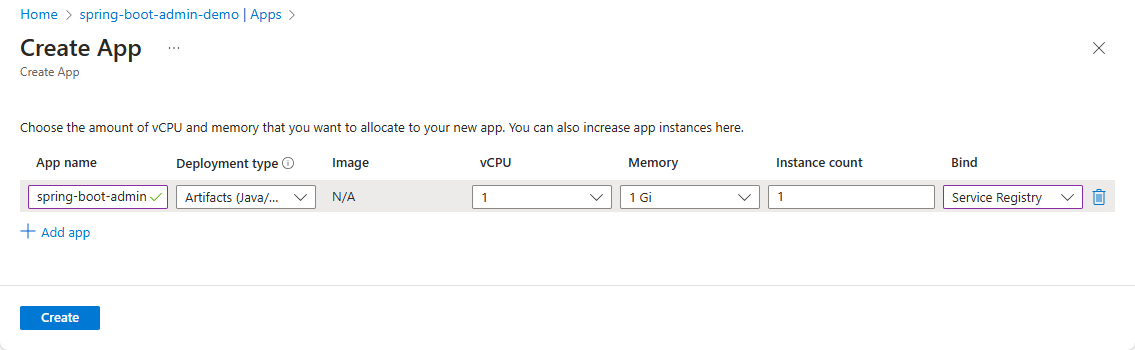
Create a new app.
Use the following steps to create a Spring Boot Admin Server app:
- Navigate to your Azure Spring Apps enterprise instance in the Azure portal.
- From the navigation pane, open the Apps pane to view apps for your service instance.
- Select Create App to open Create App pane.
- Name the application spring-boot-admin.
- Leave Deployment type as Artifacts (Java/Polyglot) unchanged.
- Open Bind dropdown and select Service Registry.
- Select Create to create the app.
Build the Spring Boot Admin Service.
After you create the app, the next step is to build the Spring Boot Admin service app. Follow the instructions in the Spring Boot Admin Get Started documentation.
You can reference the following example code:
SpringBootAdminApplication.java
@SpringBootApplication
@Configuration
@EnableAutoConfiguration // Use a discovery service instead of Spring Boot Admin Clinet. The rest is done by our AutoConfiguration.
@EnableDiscoveryClient  // Enables the service to register with a discovery service
@EnableAdminServer
public class SpringBootAdminApplication {
  public static void main(String[] args) {
     SpringApplication.run(SpringBootAdminApplication.class, args);
  }
}
pom.xml
Add the following Spring Boot Admin dependencies:
<!-- Spring Boot Admin -->
<dependency>
  <groupId>de.codecentric</groupId>
  <artifactId>spring-boot-admin-starter-server</artifactId>
  <version>${spring-boot-admin.version}</version>
</dependency>
<dependency>
  <groupId>de.codecentric</groupId>
  <artifactId>spring-boot-admin-server-ui</artifactId>
  <version>${spring-boot-admin.version}</version>
</dependency>
Deploy the app.
After building the Spring Boot Admin service, deploy it using the Azure CLI:
cd <path-to-maven-or-gradle-source-root>
az spring app deploy \
    --resource-group <resource-group-name> \
    --service <Azure-Spring-Apps-service-instance-name> \
    --name spring-boot-admin \
    --source-path
Assign a public endpoint.
Make the Spring Boot Admin server accessible by assigning a public endpoint through Azure Spring Apps.

Spring Boot Admin doesn't include authorization by default. Spring Boot Admin is a normal Spring Boot application, so you can secure it with spring security. See also Securing Spring Boot Admin Server.
Register apps to Spring Boot Admin
Use the discovery service
Spring Boot Admin can discover applications by relying on the discovery service. After apps are registered with the Tanzu Service Registry, Spring Boot Admin server recognizes them automatically.
For more information on how to register apps with the Tanzu Service Registry, see Use Tanzu Service Registry.
Spring Boot Admin seamlessly connects to and monitors Spring Boot applications that have custom actuator settings.
Use a Spring Boot Admin Client
You can also register apps as Spring Boot Admin Clients. This approach doesn't depend on a discovery service but requires modifying your apps to include Spring Boot Admin Client dependencies. For more information, see Getting started in the Spring Boot Admin documentation.
Use Spring Boot Admin to monitor your apps
Spring Boot Admin lets you view live metrics for Spring Boot applications. Spring Boot Admin is based on the concept of Spring Boot Actuators.
Follow these steps to deploy an app and monitor it in Spring Boot Admin:
Add the actuator dependency. Add the following dependency to your application's pom.xml file.
<dependency>
    <groupId>org.springframework.boot</groupId>
    <artifactId>spring-boot-starter-actuator</artifactId>
 </dependency>
Enable the actuator endpoints. In your application's application.properties file, add the following configuration to expose the necessary endpoints:
management.endpoints.web.exposure.include=info,healthBuild the application. Use the following command to build your app locally:
mvn clean package -DskipTestsDeploy the application. Deploy the app to Azure Spring Apps by using the following commands:
az spring app create \
    --resource-group <resource-group-name> \
    --service <Azure-Spring-Apps-service-instance-name> \
    --name <app-name>
cd <path-to-maven-or-gradle-source-root>
az spring app deploy \
    --resource-group <resource-group-name> \
    --service <Azure-Spring-Apps-service-instance-name> \
    --name <app-name> \
    --source-path
Disable Application Live View
After all Spring Boot applications are registered in Spring Boot Admin, you can disable the Application Live View feature in Azure Spring Apps by following these steps:
- Navigate to your Azure Spring Apps service instance, and then select Developer Tools.
- Select Manage Tools.
- Uncheck the Enable App Live View checkbox, and then select Save.
- You can then view the state of Application Live View on the Developer Tools.
Known limitations
- If you register apps with Service Registry, the EUREKA-SERVER application appears in the Spring Boot Admin dashboard with an OFFLINE status, and it can't be hidden or removed.
- By default, single sign-on (SSO) isn't supported.