Get started with Azure Data Box to import data into Azure
This quickstart describes how to deploy the Azure Data Box using the Azure portal for an import order. The steps include how to cable, configure, and copy data to Data Box so that it uploads to Azure. The quickstart steps are performed in the Azure portal and on the local web UI of the device.
For detailed step-by-step deployment and tracking instructions, go to Tutorial: Order Azure Data Box
This guide describes how to deploy the Azure Data Box for import using the Azure portal. The steps include review the prerequisites, cable and connect your device, and copy data to your device so that it uploads to Azure.
Prerequisites
Before you begin:
Make sure that the subscription you use for Data Box service is one of the following types:
- Microsoft Customer Agreement (MCA) for new subscriptions or Microsoft Enterprise Agreement (EA) for existing subscriptions. Read more about MCA for new subscriptions and EA subscriptions.
- Cloud Solution Provider (CSP). Learn more about Azure CSP program.
- Microsoft Azure Sponsorship. Learn more about Azure sponsorship program.
Ensure that you have owner or contributor access to the subscription to create a Data Box order.
Register the Microsoft.DataBox resource provider against this subscription in the Azure portal.
Review the safety guidelines for your Data Box.
You have a host computer that has the data that you want to copy over to Data Box. Your host computer must
- Run a Supported operating system.
- Be connected to high-speed network. We recommend that you have at least one 100-GbE connection. If a 100-GbE connection isn't available, you can use a 10-GbE or 1-GbE data link, though copy speeds are impacted.
You must have access to a flat surface where you can place the Data Box. If you want to place the device on a standard rack shelf, you need a 7U slot in your datacenter rack. You can place the device flat or upright in the rack.
You have the following cables to connect your Data Box to the host computer. These cables are recommended, however, the next generation devices will work with 10G cables too.
- 2 x 10G-BaseT RJ-45 cables (CAT-5e or CAT6)
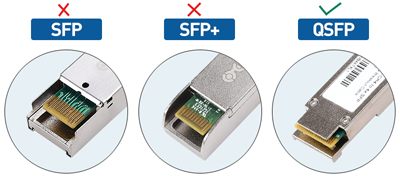
- 2 x 100-GbE QSFP28 passive direct attached cable (use with DATA 1, DATA 2 network interfaces)
Important
Data Box Next Gen 120TB and 525TB devices use QSFP28 cables. SFP+/SFP28 cables used with the original 80TB devices cannot be inserted directly into Data Box Next Gen devices without an appropriate adapter.

Make sure that the subscription you use for Data Box service is one of the following types:
- Microsoft Customer Agreement (MCA) for new subscriptions or Microsoft Enterprise Agreement (EA) for existing subscriptions. Read more about MCA for new subscriptions and EA subscriptions.
- Cloud Solution Provider (CSP). Learn more about Azure CSP program.
- Microsoft Azure Sponsorship. Learn more about Azure sponsorship program.
Ensure that you have owner or contributor access to the subscription to create a Data Box order.
Review the safety guidelines for your Data Box.
You have a host computer that has the data that you want to copy over to Data Box. Your host computer must
- Run a Supported operating system.
- Be connected to high-speed network. We strongly recommend that you have at least one 10-GbE connection. If a 10-GbE connection isn't available, a 1-GbE data link can be used but the copy speeds are impacted.
You must have access to a flat surface where you can place the Data Box. If you want to place the device on a standard rack shelf, you need a 7U slot in your datacenter rack. You can place the device flat or upright in the rack.
You have procured the following cables to connect your Data Box to the host computer.
- Two 10-GbE SFP+ Twinax copper cables (use with DATA 1, DATA 2 network interfaces)
- One RJ-45 CAT 6 network cable (use with MGMT network interface)
- One RJ-45 CAT 6A OR one RJ-45 CAT 6 network cable (use with DATA 3 network interface configured as 10 Gbps or 1 Gbps respectively)
Sign in to Azure
Sign in to the Azure portal.
Order
This step takes roughly 5 minutes.
- Create a new Azure Data Box resource in Azure portal.
- Select an existing subscription enabled for this service and choose transfer type as Import. Provide the Source country where the data resides and Azure destination region for the data transfer.
- Select Data Box. The maximum usable capacity is 120 TB or 525 TB and you can create multiple orders for larger data sizes.
- Enter the order details and shipping information. If the service is available in your region, provide notification email addresses, review the summary, and then create the order.
- Create a new Azure Data Box resource in Azure portal.
- Select an existing subscription enabled for this service and choose transfer type as Import. Provide the Source country where the data resides and Azure destination region for the data transfer.
- Select Data Box. The maximum usable capacity is 80 TB and you can create multiple orders for larger data sizes.
- Enter the order details and shipping information. If the service is available in your region, provide notification email addresses, review the summary, and then create the order.
After the order is created, the device is prepared for shipment.
Cable
When you receive the Data Box, perform the following steps to cable, connect, and turn on the device. This step requires approximately 10 minutes.
Don't proceed if evidence of tampering or damage is observed. Contact Microsoft Support to request a replacement device.
Before cabling your device, ensure that you have the following cables:
- 1 x power cable (included).
- 2 x 10G-BaseT RJ-45 cables (CAT-5e or CAT6) (not included).
- 2 x 100-GbE QSFP28 passive direct attached cable (not included).
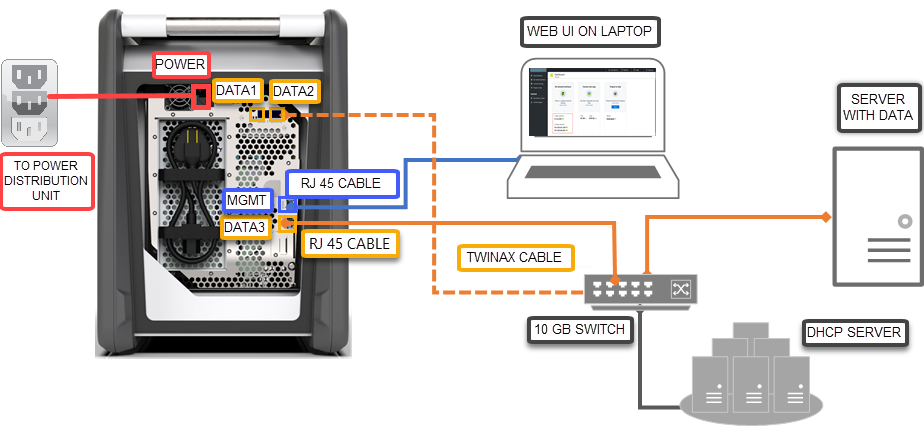
Remove and place the device on a flat surface.
Cable the device as described in the following steps.

- Connect the power cable to the device.
- Use the RJ-45 CAT 6 network cable to connect your host computer to the management port (MGMT) on the device.
- Use the QSFP28 copper cable to connect at least one 100 Gbps (preferred over 10 Gbps or 1 Gbps) network interface, DATA 1 or DATA 2 for data.
- Turn on the device. The power button is on the front panel of the device.
If there is any evidence that the device is tampered with or damaged, do not proceed. Contact Microsoft Support to ship you a replacement device.
Before you cable your device, ensure that you have the following cables:
- (Included) grounded power cord rated at 10 A or greater with an IEC60320 C-13 connector at one end to connect to the device.
- (Not included) One RJ-45 CAT 6 network cable (use with MGMT network interface)
- (Not included) Two 10-GbE SFP+ Twinax copper cables (use with 10 Gbps DATA 1, DATA 2 network interfaces)
- (Not included) One RJ-45 CAT 6A OR one RJ-45 CAT 6 network cable (use with DATA 3 network interface configured as 10 Gbps or 1 Gbps respectively)
Remove and place the device on a flat surface.
Cable the device as shown below.
- Connect the power cable to the device.
- Use the RJ-45 CAT 6 network cable to connect your host computer to the management port (MGMT) on the device.
- Use the SFP+ Twinax copper cable to connect at least one 10 Gbps (preferred over 1 Gbps) network interface, DATA 1 or DATA 2 for data.
- Turn on the device. The power button is on the front panel of the device.
Connect
This step takes about 5-7 minutes to complete.
- To get the device password, go to General > Device details in the Azure portal.
- Assign a static IP address of 192.168.100.5 and subnet 255.255.255.0 to the Ethernet adapter on the computer you're using to connect to Data Box. Access the local web UI of the device at
https://192.168.100.10. The connection could take up to 5 minutes after you turned on the device. - Sign in using the password from the Azure portal. You see an error indicating a problem with the website’s security certificate. Follow the browser-specific instructions to proceed to the web page.
- By default, the network settings for the 100-Gbps data interface (or 1 Gbps) are configured as DHCP. If needed, you can configure this interface as static and provide an IP address.
- To get the device password, go to General > Device details in the Azure portal.
- Assign a static IP address of 192.168.100.5 and subnet 255.255.255.0 to the Ethernet adapter on the computer you are using to connect to Data Box. Access the local web UI of the device at
https://192.168.100.10. The connection could take up to 5 minutes after you turned on the device. - Sign in using the password from the Azure portal. You see an error indicating a problem with the website’s security certificate. Follow the browser-specific instructions to proceed to the web page.
- By default, the network settings for the 10 Gbps data interface (or 1 Gbps) are configured as DHCP. If needed, you can configure this interface as static and provide an IP address.
Copy data
The time to complete this operation depends upon your data size and network speed.
- If using a Windows host, use an SMB compatible file copy tool such as Robocopy. For NFS host, use
cpcommand orrsyncto copy the data. Connect the tool to your device and begin copying data to the shares. For more information on how to use Robocopy to copy data, go to Robocopy. - Connect to the shares using the path:
\\<IP address of your device>\ShareName. To get the share access credentials, go to the Connect & copy page in the local web UI of the Data Box. - Make sure that the share and folder names, and the data follow guidelines described in the Azure Storage and Data Box service limits.
Ship to Azure
This operation takes about 10-15 minutes to complete.
- Go to Prepare to ship page in the local web UI and start the ship preparation.
- After the Prepare to ship process completes successfully with no critical errors, download and print the return shipping label.
- Turn off the device from the local web UI. Remove the cables from the device.
- Pack the device in the original box and secure firmly. Paste the return shipping label on the box and remove any previous labels and barcode stickers from the external packaging.
- Follow local return shipping instructions and ship the device back to Microsoft.
- Go to Prepare to ship page in the local web UI and start the ship preparation.
- Turn off the device from the local web UI. Remove the cables from the device.
- The return shipping label should be visible on the E-ink display. If the E-ink display is not displaying the label, download shipping label from the Azure portal and insert in the clear sleeve attached to the device.
- Lock the case and ship to Microsoft.
Verify data
The time to complete this operation depends upon your data size.
When the Data Box device is connected to the Azure datacenter network, the data upload to Azure starts automatically.
Azure Data Box service notifies you that the data copy is complete via the Azure portal.
- Check error logs for any failures and take appropriate actions.
- Verify that your data is in the storage accounts before you delete it from the source.
When the Data Box device is connected to the Azure datacenter network, the data upload to Azure starts automatically.
Azure Data Box service notifies you that the data copy is complete via the Azure portal.
- Check error logs for any failures and take appropriate actions.
- Verify that your data is in the storage account(s) before you delete it from the source.
Clean up resources
This step takes 2-3 minutes to complete.
You can cancel the Data Box order in the Azure portal before the order is processed. Once the order is processed, the order can't be canceled. The order progresses until it reaches the completed stage. To cancel the order, go to Overview and select Cancel from the command bar.
You can delete the order once the status shows as Completed or Canceled in the Azure portal. To delete the order, go to Overview and select Delete from the command bar.
Next steps
In this quickstart, you deployed an Azure Data Box to help import your data into Azure. To learn more about Azure Data Box management, advance to the following tutorial: