Tutorial: Create a cache-aside leaderboard on ASP.NET
In this tutorial, you update the ContosoTeamStats ASP.NET web app---created in the ASP.NET quickstart for Azure Cache for Redis---to include a leaderboard that uses the cache-aside pattern with Azure Cache for Redis. The sample application displays a list of team statistics from a database. It also demonstrates different ways to use Azure Cache for Redis to store and retrieve data from the cache to improve performance. When you complete the tutorial, you have a running web app that reads and writes to a database, optimized with Azure Cache for Redis, and hosted in Azure.
In this tutorial, you learn how to:
- Improve data throughput and reduce database load by storing and retrieving data using Azure Cache for Redis.
- Use a Redis sorted set to retrieve the top five teams.
- Provision the Azure resources for the application using a Resource Manager template.
- Publish the application to Azure using Visual Studio.
If you don't have an Azure subscription, create an Azure free account before you begin.
Prerequisites
To complete this tutorial, you must have the following prerequisites:
- This tutorial continues where you left off in ASP.NET quickstart for Azure Cache for Redis. If you haven't already, follow the quickstart first.
- Install Visual Studio 2019 with the following workloads:
- ASP.NET and web development
- Azure Development
- .NET desktop development with SQL Server Express LocalDB or SQL Server 2017 Express edition.
Add a leaderboard to the project
In this section of the tutorial, you configure the ContosoTeamStats project with a leaderboard that reports the win, loss, and tie statistics for a list of fictional teams.
Add the Entity Framework to the project
In Visual Studio, open the ContosoTeamStats Solution that you created in the ASP.NET quickstart for Azure Cache for Redis.
Select Tools > NuGet Package Manager > Package Manager Console.
Run the following command from the Package Manager Console window to install EntityFramework:
Install-Package EntityFramework
For more information about this package, see the EntityFramework NuGet page.
Add the Team model
Right-click Models in Solution Explorer, and choose Add, Class.
Enter
Teamfor the class name and select Add.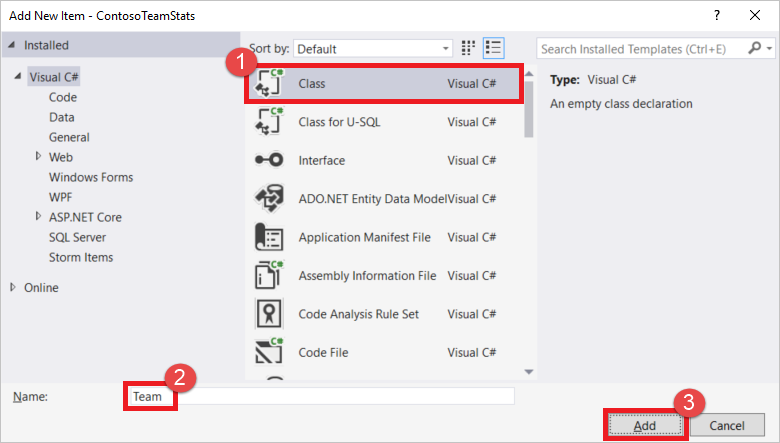
Replace the
usingstatements at the top of the Team.cs file with the followingusingstatements:using System; using System.Collections.Generic; using System.Data.Entity; using System.Data.Entity.SqlServer;Replace the definition of the
Teamclass with the following code snippet that contains an updatedTeamclass definition and some other Entity Framework helper classes. This tutorial is using the code first approach with Entity Framework. This approach allows Entity Framework to create the database from your code. For more information on the code first approach to Entity Framework that's used in this tutorial, see Code first to a new database.public class Team { public int ID { get; set; } public string Name { get; set; } public int Wins { get; set; } public int Losses { get; set; } public int Ties { get; set; } static public void PlayGames(IEnumerable<Team> teams) { // Simple random generation of statistics. Random r = new Random(); foreach (var t in teams) { t.Wins = r.Next(33); t.Losses = r.Next(33); t.Ties = r.Next(0, 5); } } } public class TeamContext : DbContext { public TeamContext() : base("TeamContext") { } public DbSet<Team> Teams { get; set; } } public class TeamInitializer : CreateDatabaseIfNotExists<TeamContext> { protected override void Seed(TeamContext context) { var teams = new List<Team> { new Team{Name="Adventure Works Cycles"}, new Team{Name="Alpine Ski House"}, new Team{Name="Blue Yonder Airlines"}, new Team{Name="Coho Vineyard"}, new Team{Name="Contoso, Ltd."}, new Team{Name="Fabrikam, Inc."}, new Team{Name="Lucerne Publishing"}, new Team{Name="Northwind Traders"}, new Team{Name="Consolidated Messenger"}, new Team{Name="Fourth Coffee"}, new Team{Name="Graphic Design Institute"}, new Team{Name="Nod Publishers"} }; Team.PlayGames(teams); teams.ForEach(t => context.Teams.Add(t)); context.SaveChanges(); } } public class TeamConfiguration : DbConfiguration { public TeamConfiguration() { SetExecutionStrategy("System.Data.SqlClient", () => new SqlAzureExecutionStrategy()); } }In Solution Explorer, double-click Web.config to open it.
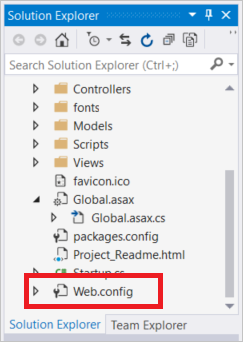
Add the following
connectionStringssection inside theconfigurationsection. The name of the connection string must match the name of the Entity Framework database context class, which isTeamContext.This connection string assumes you've met the Prerequisites and installed that SQL Server Express LocalDB that is part of the .NET desktop development workload installed with Visual Studio 2019.
<connectionStrings>
    <add name="TeamContext" connectionString="Data Source=(LocalDB)\MSSQLLocalDB;AttachDbFilename=|DataDirectory|\Teams.mdf;Integrated Security=True" providerName="System.Data.SqlClient" />
</connectionStrings>
The following example shows the new
connectionStringssection followingconfigSectionsinside theconfigurationsection:<configuration> <configSections> <section name="entityFramework" type="System.Data.Entity.Internal.ConfigFile.EntityFrameworkSection, EntityFramework, Version=6.0.0.0, Culture=neutral, PublicKeyToken=b77a5c561934e089" requirePermission="false" /> </configSections> <connectionStrings> <add name="TeamContext" connectionString="Data Source=(LocalDB)\MSSQLLocalDB;AttachDbFilename=|DataDirectory|\Teams.mdf;Integrated Security=True" providerName="System.Data.SqlClient" /> </connectionStrings> ...
Add the TeamsController and views
In Visual Studio, build the project.
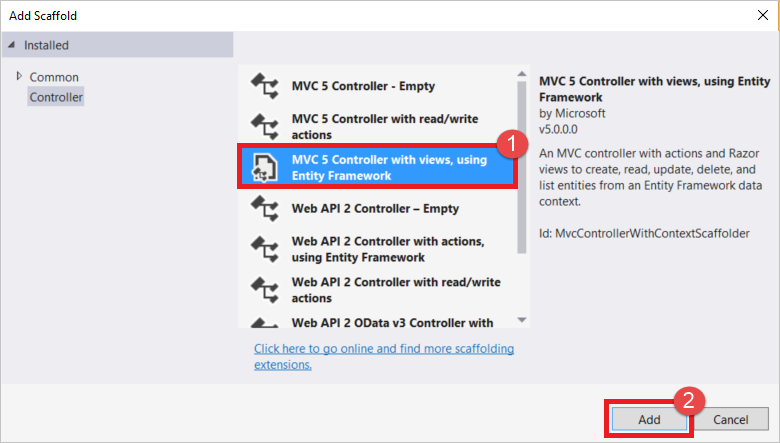
In Solution Explorer, right-click the Controllers folder and choose Add, Controller.
Choose MVC 5 Controller with views, using Entity Framework, and select Add. If you get an error after selecting Add, ensure that you have built the project first.
Select Team (ContosoTeamStats.Models) from the Model class drop-down list. Select TeamContext (ContosoTeamStats.Models) from the Data context class drop-down list. Type
TeamsControllerin the Controller name textbox (if it isn't automatically populated). Select Add to create the controller class and add the default views.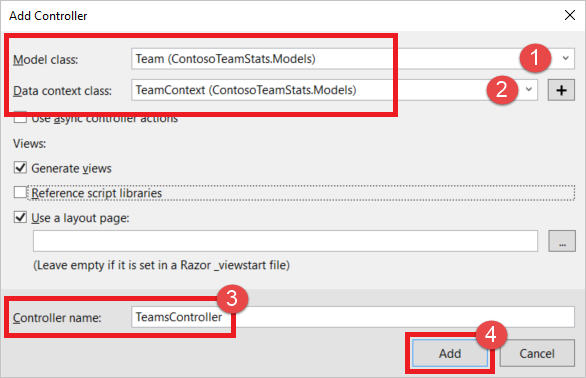
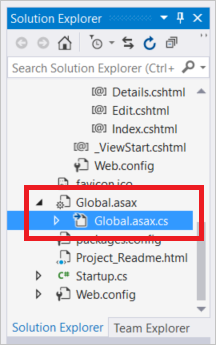
In Solution Explorer, expand Global.asax and double-click Global.asax.cs to open it.
Add the following two
usingstatements at the top of the file under the otherusingstatements:using System.Data.Entity; using ContosoTeamStats.Models;Add the following line of code at the end of the
Application_Startmethod:Database.SetInitializer<TeamContext>(new TeamInitializer());In Solution Explorer, expand
App_Startand double-clickRouteConfig.cs.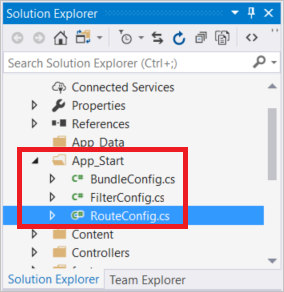
In the
RegisterRoutesmethod, replacecontroller = "Home"in theDefaultroute withcontroller = "Teams"as shown in the following example:routes.MapRoute( name: "Default", url: "{controller}/{action}/{id}", defaults: new { controller = "Teams", action = "Index", id = UrlParameter.Optional } );
Configure the Layout view
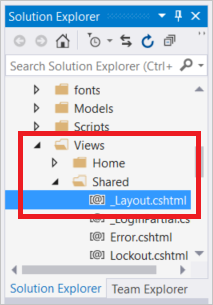
In Solution Explorer, expand the Views folder and then the Shared folder, and double-click _Layout.cshtml.
Change the contents of the
titleelement and replaceMy ASP.NET ApplicationwithContoso Team Statsas shown in the following example:<title>@ViewBag.Title - Contoso Team Stats</title>In the
bodysection, add the following newHtml.ActionLinkstatement for Contoso Team Stats just below the link for Azure Cache for Redis Test.@Html.ActionLink("Contoso Team Stats", "Index", "Teams", new { area = "" }, new { @class = "navbar-brand" })`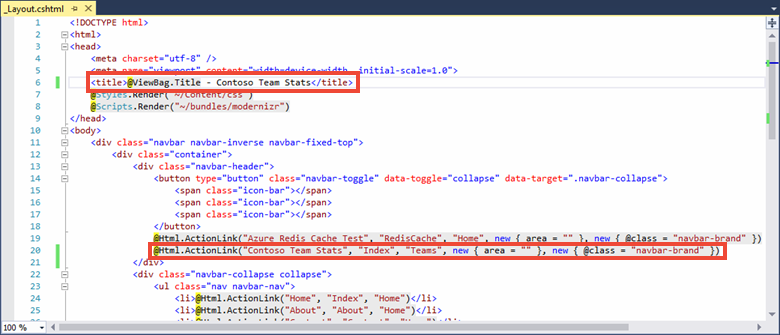
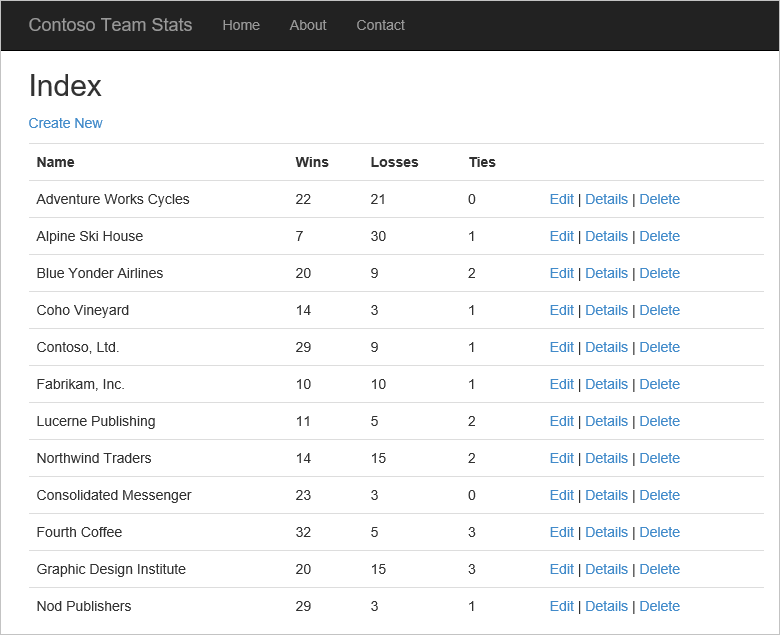
Press Ctrl+F5 to build and run the application. This version of the application reads the results directly from the database. Note the Create New, Edit, Details, and Delete actions that were automatically added to the application by the MVC 5 Controller with views, using Entity Framework scaffold. In the next section of the tutorial, you'll add Azure Cache for Redis to optimize the data access and provide more features to the application.
Configure the app for Azure Cache for Redis
In this section of the tutorial, you configure the sample application to store and retrieve Contoso team statistics from an Azure Cache for Redis instance by using the StackExchange.Redis cache client.
Add a cache connection to the Teams Controller
You already installed the StackExchange.Redis client library package in the quickstart. You also have already configured the CacheConnection app setting to be used locally, and with the published App Service. Use this same client library and CacheConnection information in the TeamsController.
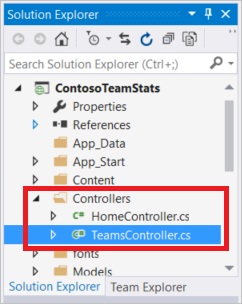
In Solution Explorer, expand the Controllers folder and double-click TeamsController.cs to open it.
Add the following two
usingstatements to TeamsController.cs:using System.Configuration; using StackExchange.Redis;Add the following two properties to the
TeamsControllerclass:// Redis Connection string info private static Lazy<ConnectionMultiplexer> lazyConnection = new Lazy<ConnectionMultiplexer>(() => { string cacheConnection = ConfigurationManager.AppSettings["CacheConnection"].ToString(); return ConnectionMultiplexer.Connect(cacheConnection); }); public static ConnectionMultiplexer Connection { get { return lazyConnection.Value; } }
Update the TeamsController to read from the cache or the database
In this sample, team statistics can be retrieved from the database or from the cache. Team statistics are stored in the cache as a serialized List<Team>, and also as a sorted set using Redis data types. When retrieving items from a sorted set, you can retrieve some, all, or query for certain items. In this sample, you'll query the sorted set for the top five teams ranked by number of wins.
It isn't required to store the team statistics in multiple formats in the cache to use Azure Cache for Redis. This tutorial uses multiple formats to demonstrate some of the different ways and different data types you can use to cache data.
Add the following
usingstatements to theTeamsController.csfile at the top with the otherusingstatements:using System.Diagnostics; using Newtonsoft.Json;Replace the current
public ActionResult Index()method implementation with the following implementation:// GET: Teams public ActionResult Index(string actionType, string resultType) { List<Team> teams = null; switch(actionType) { case "playGames": // Play a new season of games. PlayGames(); break; case "clearCache": // Clear the results from the cache. ClearCachedTeams(); break; case "rebuildDB": // Rebuild the database with sample data. RebuildDB(); break; } // Measure the time it takes to retrieve the results. Stopwatch sw = Stopwatch.StartNew(); switch(resultType) { case "teamsSortedSet": // Retrieve teams from sorted set. teams = GetFromSortedSet(); break; case "teamsSortedSetTop5": // Retrieve the top 5 teams from the sorted set. teams = GetFromSortedSetTop5(); break; case "teamsList": // Retrieve teams from the cached List<Team>. teams = GetFromList(); break; case "fromDB": // Retrieve results from the database. default: teams = GetFromDB(); break; } sw.Stop(); double ms = sw.ElapsedTicks / (Stopwatch.Frequency / (1000.0)); // Add the elapsed time of the operation to the ViewBag.msg. ViewBag.msg += " MS: " + ms.ToString(); return View(teams); }Add the following three methods to the
TeamsControllerclass to implement theplayGames,clearCache, andrebuildDBaction types from the switch statement added in the previous code snippet.The
PlayGamesmethod updates the team statistics by simulating a season of games, saves the results to the database, and clears the now outdated data from the cache.void PlayGames() { ViewBag.msg += "Updating team statistics. "; // Play a "season" of games. var teams = from t in db.Teams select t; Team.PlayGames(teams); db.SaveChanges(); // Clear any cached results ClearCachedTeams(); }The
RebuildDBmethod reinitializes the database with the default set of teams, generates statistics for them, and clears the now outdated data from the cache.void RebuildDB() { ViewBag.msg += "Rebuilding DB. "; // Delete and re-initialize the database with sample data. db.Database.Delete(); db.Database.Initialize(true); // Clear any cached results ClearCachedTeams(); }The
ClearCachedTeamsmethod removes any cached team statistics from the cache.void ClearCachedTeams() { IDatabase cache = Connection.GetDatabase(); cache.KeyDelete("teamsList"); cache.KeyDelete("teamsSortedSet"); ViewBag.msg += "Team data removed from cache. "; }Add the following four methods to the
TeamsControllerclass to implement the various ways of retrieving the team statistics from the cache and the database. Each of these methods returns aList<Team>, which is then displayed by the view.The
GetFromDBmethod reads the team statistics from the database.List<Team> GetFromDB() { ViewBag.msg += "Results read from DB. "; var results = from t in db.Teams orderby t.Wins descending select t; return results.ToList<Team>(); }The
GetFromListmethod reads the team statistics from cache as a serializedList<Team>. If the statistics aren't present in the cache, a cache miss occurs. For a cache miss, the team statistics are read from the database and then stored in the cache for the next request. In this sample, JSON.NET serialization is used to serialize the .NET objects to and from the cache.List<Team> GetFromList() { List<Team> teams = null; IDatabase cache = Connection.GetDatabase(); string serializedTeams = cache.StringGet("teamsList"); if (!String.IsNullOrEmpty(serializedTeams)) { teams = JsonConvert.DeserializeObject<List<Team>>(serializedTeams); ViewBag.msg += "List read from cache. "; } else { ViewBag.msg += "Teams list cache miss. "; // Get from database and store in cache teams = GetFromDB(); ViewBag.msg += "Storing results to cache. "; cache.StringSet("teamsList", JsonConvert.SerializeObject(teams)); } return teams; }The
GetFromSortedSetmethod reads the team statistics from a cached sorted set. If there's a cache miss, the team statistics are read from the database and stored in the cache as a sorted set.List<Team> GetFromSortedSet() { List<Team> teams = null; IDatabase cache = Connection.GetDatabase(); // If the key teamsSortedSet is not present, this method returns a 0 length collection. var teamsSortedSet = cache.SortedSetRangeByRankWithScores("teamsSortedSet", order: Order.Descending); if (teamsSortedSet.Count() > 0) { ViewBag.msg += "Reading sorted set from cache. "; teams = new List<Team>(); foreach (var t in teamsSortedSet) { Team tt = JsonConvert.DeserializeObject<Team>(t.Element); teams.Add(tt); } } else { ViewBag.msg += "Teams sorted set cache miss. "; // Read from DB teams = GetFromDB(); ViewBag.msg += "Storing results to cache. "; foreach (var t in teams) { Console.WriteLine("Adding to sorted set: {0} - {1}", t.Name, t.Wins); cache.SortedSetAdd("teamsSortedSet", JsonConvert.SerializeObject(t), t.Wins); } } return teams; }The
GetFromSortedSetTop5method reads the top five teams from the cached sorted set. It starts by checking the cache for the existence of theteamsSortedSetkey. If this key isn't present, theGetFromSortedSetmethod is called to read the team statistics and store them in the cache. Next, the cached sorted set is queried for the top five teams, which are returned.List<Team> GetFromSortedSetTop5() { List<Team> teams = null; IDatabase cache = Connection.GetDatabase(); // If the key teamsSortedSet is not present, this method returns a 0 length collection. var teamsSortedSet = cache.SortedSetRangeByRankWithScores("teamsSortedSet", stop: 4, order: Order.Descending); if(teamsSortedSet.Count() == 0) { // Load the entire sorted set into the cache. GetFromSortedSet(); // Retrieve the top 5 teams. teamsSortedSet = cache.SortedSetRangeByRankWithScores("teamsSortedSet", stop: 4, order: Order.Descending); } ViewBag.msg += "Retrieving top 5 teams from cache. "; // Get the top 5 teams from the sorted set teams = new List<Team>(); foreach (var team in teamsSortedSet) { teams.Add(JsonConvert.DeserializeObject<Team>(team.Element)); } return teams; }
Update the Create, Edit, and Delete methods to work with the cache
The scaffolding code that was generated as part of this sample includes methods to add, edit, and delete teams. Anytime a team is added, edited, or removed, the data in the cache becomes outdated. In this section, you'll modify these three methods to clear the cached teams so that the cache will be refreshed.
Browse to the
Create(Team team)method in theTeamsControllerclass. Add a call to theClearCachedTeamsmethod, as shown in the following example:// POST: Teams/Create // To protect from overposting attacks, please enable the specific properties you want to bind to, for // more details see https://go.microsoft.com/fwlink/?LinkId=317598. [HttpPost] [ValidateAntiForgeryToken] public ActionResult Create([Bind(Include = "ID,Name,Wins,Losses,Ties")] Team team) { if (ModelState.IsValid) { db.Teams.Add(team); db.SaveChanges(); // When a team is added, the cache is out of date. // Clear the cached teams. ClearCachedTeams(); return RedirectToAction("Index"); } return View(team); }Browse to the
Edit(Team team)method in theTeamsControllerclass. Add a call to theClearCachedTeamsmethod, as shown in the following example:// POST: Teams/Edit/5 // To protect from overposting attacks, please enable the specific properties you want to bind to, for // more details see https://go.microsoft.com/fwlink/?LinkId=317598. [HttpPost] [ValidateAntiForgeryToken] public ActionResult Edit([Bind(Include = "ID,Name,Wins,Losses,Ties")] Team team) { if (ModelState.IsValid) { db.Entry(team).State = EntityState.Modified; db.SaveChanges(); // When a team is edited, the cache is out of date. // Clear the cached teams. ClearCachedTeams(); return RedirectToAction("Index"); } return View(team); }Browse to the
DeleteConfirmed(int id)method in theTeamsControllerclass. Add a call to theClearCachedTeamsmethod, as shown in the following example:// POST: Teams/Delete/5 [HttpPost, ActionName("Delete")] [ValidateAntiForgeryToken] public ActionResult DeleteConfirmed(int id) { Team team = db.Teams.Find(id); db.Teams.Remove(team); db.SaveChanges(); // When a team is deleted, the cache is out of date. // Clear the cached teams. ClearCachedTeams(); return RedirectToAction("Index"); }
Add caching methods to the Teams Index view
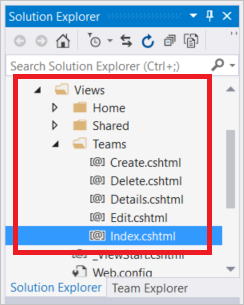
In Solution Explorer, expand the Views folder, then the Teams folder, and double-click Index.cshtml.
Near the top of the file, look for the following paragraph element:
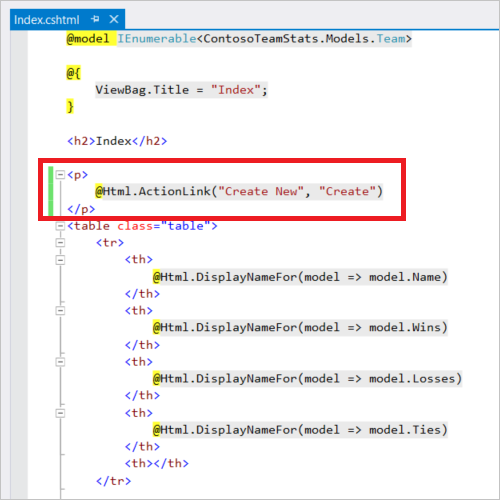
This link creates a new team. Replace the paragraph element with the following table. This table has action links for creating a new team, playing a new season of games, clearing the cache, retrieving the teams from the cache in several formats, retrieving the teams from the database, and rebuilding the database with fresh sample data.
<table class="table">
    <tr>
        <td>
            @Html.ActionLink("Create New", "Create")
        </td>
        <td>
            @Html.ActionLink("Play Season", "Index", new { actionType = "playGames" })
        </td>
        <td>
            @Html.ActionLink("Clear Cache", "Index", new { actionType = "clearCache" })
        </td>
        <td>
            @Html.ActionLink("List from Cache", "Index", new { resultType = "teamsList" })
        </td>
        <td>
            @Html.ActionLink("Sorted Set from Cache", "Index", new { resultType = "teamsSortedSet" })
        </td>
        <td>
            @Html.ActionLink("Top 5 Teams from Cache", "Index", new { resultType = "teamsSortedSetTop5" })
        </td>
        <td>
            @Html.ActionLink("Load from DB", "Index", new { resultType = "fromDB" })
        </td>
        <td>
            @Html.ActionLink("Rebuild DB", "Index", new { actionType = "rebuildDB" })
        </td>
    </tr>
</table>
Scroll to the bottom of the Index.cshtml file and add the following
trelement so that it's the last row in the last table in the file:<tr><td colspan="5">@ViewBag.Msg</td></tr>This row displays the value of
ViewBag.Msg, which contains a status report about the current operation. TheViewBag.Msgis set when you select any of the action links from the previous step.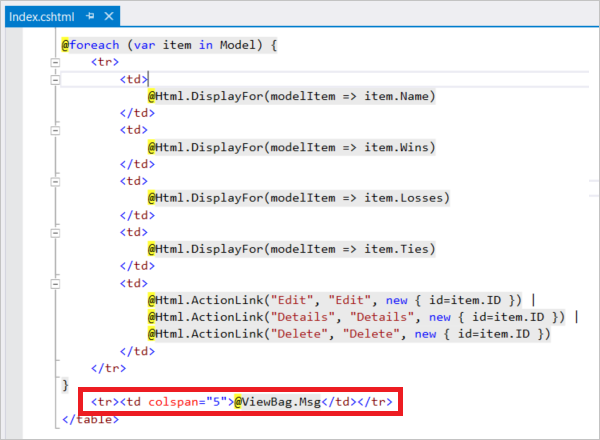
Press F6 to build the project.
Run the app locally
Run the application locally on your machine to verify the functionality that has been added to support the teams.
In this test, the application and database, are both running locally. The Azure Cache for Redis is not local. It is hosted remotely in Azure. That's why the cache will likely under-perform the database slightly. For best performance, the client application and Azure Cache for Redis instance should be in the same location.
In the next section, you deploy all resources to Azure to see the improved performance from using a cache.
To run the app locally:
Press Ctrl+F5 to run the application.
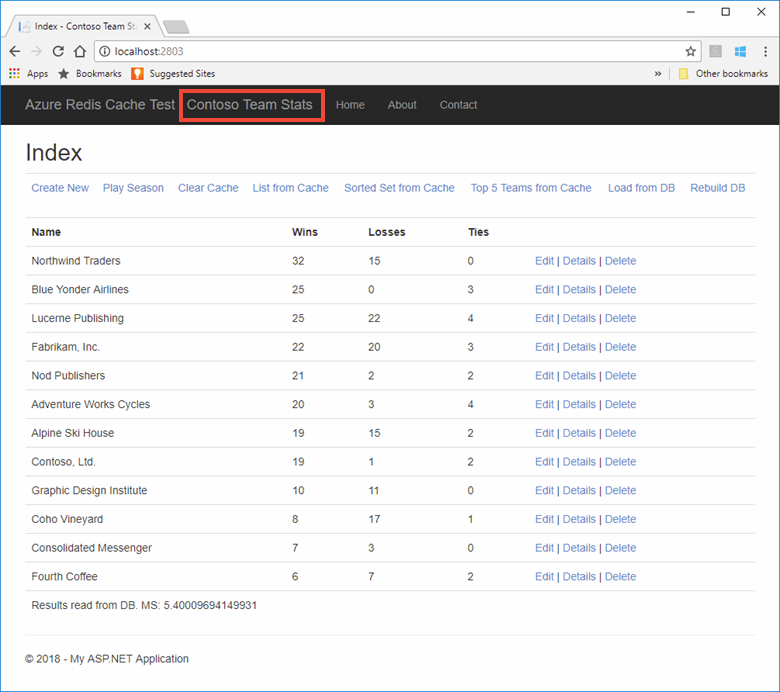
Test each of the new methods that were added to the view. Since the cache is remote in these tests, the database should slightly outperform the cache.
Publish and run in Azure
Provision a database for the app
In this section, you will provision a new database in SQL Database for the app to use while hosted in Azure.
In the Azure portal, Select Create a resource in the upper left-hand corner of the Azure portal.
On the New page, select Databases > SQL Database.
Use the following settings for the new SQL Database:
Setting Suggested value Description Database name ContosoTeamsDatabase For valid database names, see Database Identifiers. Subscription Your subscription Select the same subscription you used to create the cache and host the App Service. Resource group TestResourceGroup Select Use existing and use the same resource group where you placed your cache and App Service. Select source Blank database Start with a blank database. Under Server, select Configure required settings > Create a new server and provide the following information and then use the Select button:
Setting Suggested value Description Server name Any globally unique name For valid server names, see Naming rules and restrictions. Server admin login Any valid name For valid login names, see Database Identifiers. Password Any valid password Your password must have at least 8 characters and must contain characters from three of the following categories: upper case characters, lower case characters, numbers, and non-alphanumeric characters. Location East US Select the same region where you created the cache and App Service. Select Pin to dashboard and then Create to create the new database and server.
Once the new database is created, select Show database connection strings and copy the ADO.NET connection string.

In the Azure portal, navigate to your App Service and select Application Settings, then Add new connection string under the Connection strings section.
Add a new connection string named TeamContext to match the Entity Framework database context class. Paste the connection string for your new database as the value. Be sure to replace the following placeholders in the connection string and select Save:
Placeholder Suggested value {your_username} Use the server admin login for the server you just created. {your_password} Use the password for the server you just created. By adding the username and password as an Application Setting, your username and password aren't included in your code. This approach helps protect those credentials.
Publish the application updates to Azure
In this step of the tutorial, you'll publish the application updates to Azure to run it in the cloud.
Right-select the ContosoTeamStats project in Visual Studio and choose Publish.
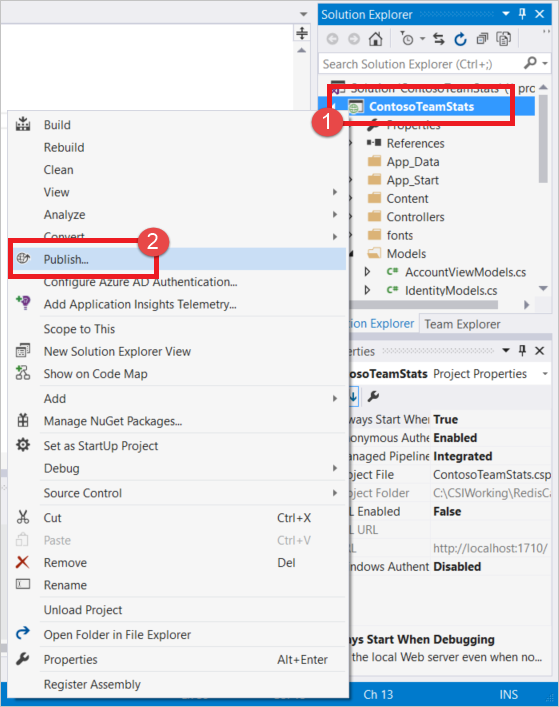
Select Publish to use the same publishing profile you created in the quickstart.
Once publishing is complete, Visual Studio launches the app in your default web browser.
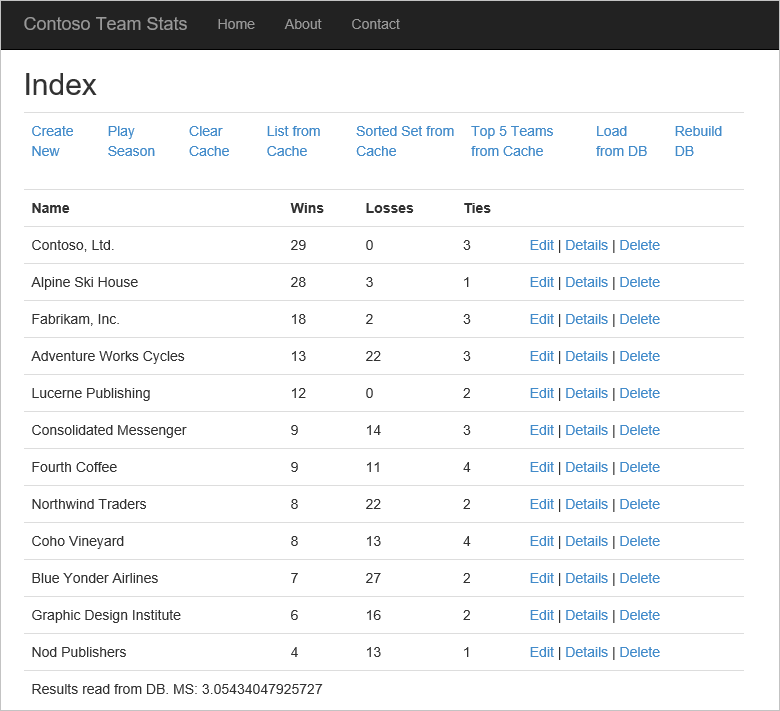
The following table describes each action link from the sample application:
Action Description Create New Create a new Team. Play Season Play a season of games, update the team stats, and clear any outdated team data from the cache. Clear Cache Clear the team stats from the cache. List from Cache Retrieve the team stats from the cache. If there's a cache miss, load the stats from the database and save to the cache for next time. Sorted Set from Cache Retrieve the team stats from the cache using a sorted set. If there's a cache miss, load the stats from the database and save to the cache using a sorted set. Top 5 Teams from Cache Retrieve the top 5 teams from the cache using a sorted set. If there's a cache miss, load the stats from the database and save to the cache using a sorted set. Load from DB Retrieve the team stats from the database. Rebuild DB Rebuild the database and reload it with sample team data. Edit / Details / Delete Edit a team, view details for a team, delete a team.
Select some of the actions and experiment with retrieving the data from the different sources. Note the differences in the time it takes to complete the various ways of retrieving the data from the database and the cache.
Clean up resources
When you're finished with the sample tutorial application, you can delete the Azure resources to conserve cost and resources. All of your resources should be contained in the same resource group. You can delete them together in one operation by deleting the resource group. The instructions in this article used a resource group named TestResources.
Important
Deleting a resource group is irreversible and that the resource group and all the resources in it are permanently deleted. Make sure that you do not accidentally delete the wrong resource group or resources. If you created the resources for hosting this sample inside an existing resource group, that contains resources you want to keep, you can delete each resource individually on the left.
Sign in to the Azure portal and select Resource groups.
Type the name of your resource group into the Filter items... textbox.
Select ... to the right of your resource group and select Delete resource group.
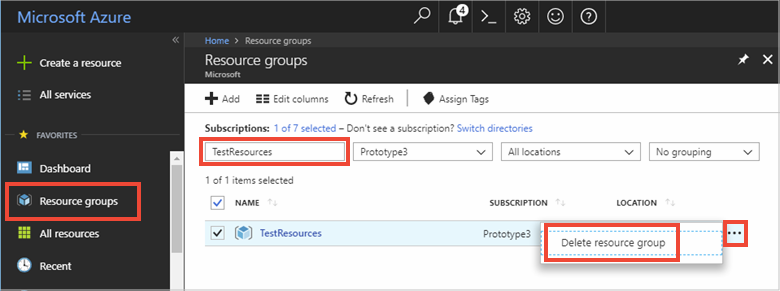
You're asked to confirm the deletion of the resource group. Type the name of your resource group to confirm, and select Delete.
After a few moments, the resource group and all of its contained resources are deleted.