Tutorial: Train an ML.NET classification model to categorize images
Learn how to train a classification model to categorize images using a pretrained TensorFlow model for image processing.
The TensorFlow model was trained to classify images into a thousand categories. Because the TensorFlow model knows how to recognize patterns in images, the ML.NET model can make use of part of it in its pipeline to convert raw images into features or inputs to train a classification model.
In this tutorial, you learn how to:
- Understand the problem
- Incorporate the pretrained TensorFlow model into the ML.NET pipeline
- Train and evaluate the ML.NET model
- Classify a test image
You can find the source code for this tutorial at the dotnet/samples repository. By default, the .NET project configuration for this tutorial targets .NET core 2.2.
Prerequisites
Select the right machine learning task
Deep learning
Deep learning is a subset of Machine Learning, which is revolutionizing areas like computer vision and speech recognition.
Deep learning models are trained by using large sets of labeled data and neural networks that contain multiple learning layers. Deep learning:
- Performs better on some tasks like computer vision.
- Requires huge amounts of training data.
Image classification is a specific classification task that allows us to automatically classify images into categories such as:
- Detecting a human face in an image or not.
- Detecting cats vs. dogs.
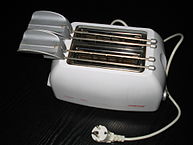
Or as in the following images, determining if an image is a food, toy, or appliance:


Note
The preceding images belong to Wikimedia Commons and are attributed as follows:
- "220px-Pepperoni_pizza.jpg" Public Domain, https://commons.wikimedia.org/w/index.php?curid=79505,
- "119px-Nalle_-_a_small_brown_teddy_bear.jpg" By Jonik - Self-photographed, CC BY-SA 2.0, https://commons.wikimedia.org/w/index.php?curid=48166.
- "193px-Broodrooster.jpg" By M.Minderhoud - Own work, CC BY-SA 3.0, https://commons.wikimedia.org/w/index.php?curid=27403
Training an image classification model from scratch requires setting millions of parameters, a ton of labeled training data and a vast amount of compute resources (hundreds of GPU hours). While not as effective as training a custom model from scratch, using a pretrained model allows you to shortcut this process by working with thousands of images vs. millions of labeled images and build a customized model fairly quickly (within an hour on a machine without a GPU). This tutorial scales that process down even further, using only a dozen training images.
The Inception model is trained to classify images into a thousand categories, but for this tutorial, you need to classify images in a smaller category set, and only those categories. You can use the Inception model's ability to recognize and classify images to the new limited categories of your custom image classifier.
- Food
- Toy
- Appliance
This tutorial uses the TensorFlow Inception deep learning model, a popular image recognition model trained on the ImageNet dataset. The TensorFlow model classifies entire images into a thousand classes, such as “Umbrella”, “Jersey”, and “Dishwasher”.
Because the Inception model has already been pretrained on thousands of different images, internally it contains the image features needed for image identification. We can make use of these internal image features in the model to train a new model with far fewer classes.
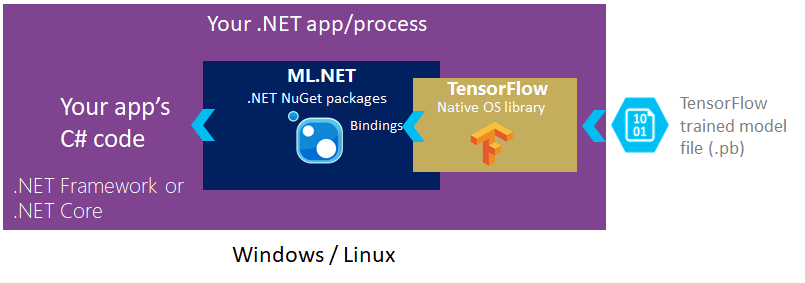
As shown in the following diagram, you add a reference to the ML.NET NuGet packages in your .NET or .NET Framework applications. Under the covers, ML.NET includes and references the native TensorFlow library that allows you to write code that loads an existing trained TensorFlow model file.

Multiclass classification
After using the TensorFlow inception model to extract features suitable as input for a classical machine learning algorithm, you add an ML.NET multiclass classifier.
The specific trainer used in this case is the multinomial logistic regression algorithm.
The algorithm implemented by this trainer performs well on problems with a large number of features, which is the case for a deep learning model operating on image data.
For more information, see Deep learning vs. machine learning.
Data
There are two data sources: the .tsv file, and the image files. The tags.tsv file contains two columns: the first one is defined as ImagePath and the second one is the Label corresponding to the image. The following example file doesn't have a header row, and looks like this:
broccoli.jpg	food
pizza.jpg	food
pizza2.jpg	food
teddy2.jpg	toy
teddy3.jpg	toy
teddy4.jpg	toy
toaster.jpg	appliance
toaster2.png	appliance
The training and testing images are located in the assets folders that you'll download in a zip file. These images belong to Wikimedia Commons.
Wikimedia Commons, the free media repository. Retrieved 10:48, October 17, 2018 from: https://commons.wikimedia.org/wiki/Pizza https://commons.wikimedia.org/wiki/Toaster https://commons.wikimedia.org/wiki/Teddy_bear
Setup
Create a project
Create a C# Console Application called "TransferLearningTF". Click the Next button.
Choose .NET 8 as the framework to use. Click the Create button.
Install the Microsoft.ML NuGet Package:
Note
This sample uses the latest stable version of the NuGet packages mentioned unless otherwise stated.
- In Solution Explorer, right-click on your project and select Manage NuGet Packages.
- Choose "nuget.org" as the Package source, select the Browse tab, search for Microsoft.ML.
- Select the Install button.
- Select the OK button on the Preview Changes dialog.
- Select the I Accept button on the License Acceptance dialog if you agree with the license terms for the packages listed.
- Repeat these steps for Microsoft.ML.ImageAnalytics, SciSharp.TensorFlow.Redist, and Microsoft.ML.TensorFlow.
Download assets
Download The project assets directory zip file, and unzip.
Copy the
assetsdirectory into your TransferLearningTF project directory. This directory and its subdirectories contain the data and support files (except for the Inception model, which you'll download and add in the next step) needed for this tutorial.Download the Inception model, and unzip.
Copy the contents of the
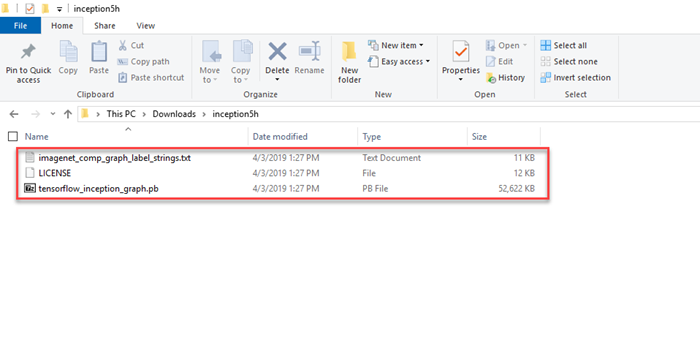
inception5hdirectory just unzipped into your TransferLearningTF projectassets/inceptiondirectory. This directory contains the model and additional support files needed for this tutorial, as shown in the following image:
In Solution Explorer, right-click each of the files in the asset directory and subdirectories and select Properties. Under Advanced, change the value of Copy to Output Directory to Copy if newer.
Create classes and define paths
Add the following additional
usingdirectives to the top of the Program.cs file:using Microsoft.ML; using Microsoft.ML.Data;Add the following code to the line right below the
usingdirectives to specify the asset paths:string _assetsPath = Path.Combine(Environment.CurrentDirectory, "assets"); string _imagesFolder = Path.Combine(_assetsPath, "images"); string _trainTagsTsv = Path.Combine(_imagesFolder, "tags.tsv"); string _testTagsTsv = Path.Combine(_imagesFolder, "test-tags.tsv"); string _predictSingleImage = Path.Combine(_imagesFolder, "toaster3.jpg"); string _inceptionTensorFlowModel = Path.Combine(_assetsPath, "inception", "tensorflow_inception_graph.pb");Create classes for your input data, and predictions.
public class ImageData { [LoadColumn(0)] public string? ImagePath; [LoadColumn(1)] public string? Label; }ImageDatais the input image data class and has the following String fields:ImagePathcontains the image file name.Labelcontains a value for the image label.
Add a new class to your project for
ImagePrediction:public class ImagePrediction : ImageData { public float[]? Score; public string? PredictedLabelValue; }ImagePredictionis the image prediction class and has the following fields:Scorecontains the confidence percentage for a given image classification.PredictedLabelValuecontains a value for the predicted image classification label.
ImagePredictionis the class used for prediction after the model has been trained. It has astring(ImagePath) for the image path. TheLabelis used to reuse and train the model. ThePredictedLabelValueis used during prediction and evaluation. For evaluation, an input with training data, the predicted values, and the model are used.
Initialize variables
Initialize the
mlContextvariable with a new instance ofMLContext. Replace theConsole.WriteLine("Hello World!")line with the following code:MLContext mlContext = new MLContext();The MLContext class is a starting point for all ML.NET operations, and initializing
mlContextcreates a new ML.NET environment that can be shared across the model creation workflow objects. It's similar, conceptually, toDBContextin Entity Framework.
Create a struct for Inception model parameters
The Inception model has several parameters you need to pass in. Create a struct to map the parameter values to friendly names with the following code, just after initializing the
mlContextvariable:struct InceptionSettings { public const int ImageHeight = 224; public const int ImageWidth = 224; public const float Mean = 117; public const float Scale = 1; public const bool ChannelsLast = true; }
Create a display utility method
Since you'll display the image data and the related predictions more than once, create a display utility method to handle displaying the image and prediction results.
Create the
DisplayResults()method, just after theInceptionSettingsstruct, using the following code:void DisplayResults(IEnumerable<ImagePrediction> imagePredictionData) { }Fill in the body of the
DisplayResultsmethod:foreach (ImagePrediction prediction in imagePredictionData) { Console.WriteLine($"Image: {Path.GetFileName(prediction.ImagePath)} predicted as: {prediction.PredictedLabelValue} with score: {prediction.Score?.Max()} "); }
Create a method to make a prediction
Create the
ClassifySingleImage()method, just before theDisplayResults()method, using the following code:void ClassifySingleImage(MLContext mlContext, ITransformer model) { }Create an
ImageDataobject that contains the fully qualified path and image file name for the singleImagePath. Add the following code as the next lines in theClassifySingleImage()method:var imageData = new ImageData() { ImagePath = _predictSingleImage };Make a single prediction, by adding the following code as the next line in the
ClassifySingleImagemethod:// Make prediction function (input = ImageData, output = ImagePrediction) var predictor = mlContext.Model.CreatePredictionEngine<ImageData, ImagePrediction>(model); var prediction = predictor.Predict(imageData);To get the prediction, use the Predict() method. The PredictionEngine is a convenience API, which allows you to perform a prediction on a single instance of data.
PredictionEngineis not thread-safe. It's acceptable to use in single-threaded or prototype environments. For improved performance and thread safety in production environments, use thePredictionEnginePoolservice, which creates anObjectPoolofPredictionEngineobjects for use throughout your application. See this guide on how to usePredictionEnginePoolin an ASP.NET Core Web API.Note
PredictionEnginePoolservice extension is currently in preview.Display the prediction result as the next line of code in the
ClassifySingleImage()method:Console.WriteLine($"Image: {Path.GetFileName(imageData.ImagePath)} predicted as: {prediction.PredictedLabelValue} with score: {prediction.Score?.Max()} ");
Construct the ML.NET model pipeline
An ML.NET model pipeline is a chain of estimators. No execution happens during pipeline construction. The estimator objects are created but not executed.
Add a method to generate the model
This method is the heart of the tutorial. It creates a pipeline for the model, and trains the pipeline to produce the ML.NET model. It also evaluates the model against some previously unseen test data.
Create the
GenerateModel()method, just after theInceptionSettingsstruct and just before theDisplayResults()method, using the following code:ITransformer GenerateModel(MLContext mlContext) { }Add the estimators to load, resize, and extract the pixels from the image data:
IEstimator<ITransformer> pipeline = mlContext.Transforms.LoadImages(outputColumnName: "input", imageFolder: _imagesFolder, inputColumnName: nameof(ImageData.ImagePath))
                // The image transforms transform the images into the model's expected format.
                .Append(mlContext.Transforms.ResizeImages(outputColumnName: "input", imageWidth: InceptionSettings.ImageWidth, imageHeight: InceptionSettings.ImageHeight, inputColumnName: "input"))
                .Append(mlContext.Transforms.ExtractPixels(outputColumnName: "input", interleavePixelColors: InceptionSettings.ChannelsLast, offsetImage: InceptionSettings.Mean))
The image data needs to be processed into the format that the TensorFlow model expects. In this case, the images are loaded into memory, resized to a consistent size, and the pixels are extracted into a numeric vector.
Add the estimator to load the TensorFlow model, and score it:
.Append(mlContext.Model.LoadTensorFlowModel(_inceptionTensorFlowModel).
    ScoreTensorFlowModel(outputColumnNames: new[] { "softmax2_pre_activation" }, inputColumnNames: new[] { "input" }, addBatchDimensionInput: true))
This stage in the pipeline loads the TensorFlow model into memory, then processes the vector of pixel values through the TensorFlow model network. Applying inputs to a deep learning model, and generating an output using the model, is referred to as Scoring. When using the model in its entirety, scoring makes an inference, or prediction.
In this case, you use all of the TensorFlow model except the last layer, which is the layer that makes the inference. The output of the penultimate layer is labeled
softmax_2_preactivation. The output of this layer is effectively a vector of features that characterize the original input images.This feature vector generated by the TensorFlow model will be used as input to an ML.NET training algorithm.
Add the estimator to map the string labels in the training data to integer key values:
.Append(mlContext.Transforms.Conversion.MapValueToKey(outputColumnName: "LabelKey", inputColumnName: "Label"))The ML.NET trainer that is appended next requires its labels to be in
keyformat rather than arbitrary strings. A key is a number that has a one to one mapping to a string value.Add the ML.NET training algorithm:
.Append(mlContext.MulticlassClassification.Trainers.LbfgsMaximumEntropy(labelColumnName: "LabelKey", featureColumnName: "softmax2_pre_activation"))Add the estimator to map the predicted key value back into a string:
.Append(mlContext.Transforms.Conversion.MapKeyToValue("PredictedLabelValue", "PredictedLabel"))
.AppendCacheCheckpoint(mlContext);
Train the model
Load the training data using the LoadFromTextFile wrapper. Add the following code as the next line in the
GenerateModel()method:IDataView trainingData = mlContext.Data.LoadFromTextFile<ImageData>(path: _trainTagsTsv, hasHeader: false);Data in ML.NET is represented as an IDataView interface.
IDataViewis a flexible, efficient way of describing tabular data (numeric and text). Data can be loaded from a text file or in real time (for example, SQL database or log files) to anIDataViewobject.Train the model with the data loaded above:
ITransformer model = pipeline.Fit(trainingData);The
Fit()method trains your model by applying the training dataset to the pipeline.
Evaluate the accuracy of the model
Load and transform the test data, by adding the following code to the next line of the
GenerateModelmethod:IDataView testData = mlContext.Data.LoadFromTextFile<ImageData>(path: _testTagsTsv, hasHeader: false); IDataView predictions = model.Transform(testData); // Create an IEnumerable for the predictions for displaying results IEnumerable<ImagePrediction> imagePredictionData = mlContext.Data.CreateEnumerable<ImagePrediction>(predictions, true); DisplayResults(imagePredictionData);There are a few sample images that you can use to evaluate the model. Like the training data, these need to be loaded into an
IDataView, so that they can be transformed by the model.Add the following code to the
GenerateModel()method to evaluate the model:MulticlassClassificationMetrics metrics = mlContext.MulticlassClassification.Evaluate(predictions, labelColumnName: "LabelKey", predictedLabelColumnName: "PredictedLabel");Once you have the prediction set, the Evaluate() method:
- Assesses the model (compares the predicted values with the test dataset
labels). - Returns the model performance metrics.
- Assesses the model (compares the predicted values with the test dataset
Display the model accuracy metrics
Use the following code to display the metrics, share the results, and then act on them:
Console.WriteLine($"LogLoss is: {metrics.LogLoss}");
Console.WriteLine($"PerClassLogLoss is: {String.Join(" , ", metrics.PerClassLogLoss.Select(c => c.ToString()))}");
The following metrics are evaluated for image classification:
Log-loss- see Log Loss. You want Log-loss to be as close to zero as possible.Per class Log-loss. You want per class Log-loss to be as close to zero as possible.
Add the following code to return the trained model as the next line:
return model;
Run the application
Add the call to
GenerateModelafter the creation of the MLContext class:ITransformer model = GenerateModel(mlContext);Add the call to the
ClassifySingleImage()method after the call to theGenerateModel()method:ClassifySingleImage(mlContext, model);Run your console app (Ctrl + F5). Your results should be similar to the following output. (You may see warnings or processing messages, but these messages have been removed from the following results for clarity.)
=============== Training classification model ===============
Image: broccoli2.jpg predicted as: food with score: 0.8955513
Image: pizza3.jpg predicted as: food with score: 0.9667718
Image: teddy6.jpg predicted as: toy with score: 0.9797683
=============== Classification metrics ===============
LogLoss is: 0.0653774699265059
PerClassLogLoss is: 0.110315812569315 , 0.0204391272836966 , 0
=============== Making single image classification ===============
Image: toaster3.jpg predicted as: appliance with score: 0.9646884
Congratulations! You've now successfully built a classification model in ML.NET to categorize images by using a pretrained TensorFlow for image processing.
You can find the source code for this tutorial at the dotnet/samples repository.
In this tutorial, you learned how to:
- Understand the problem
- Incorporate the pretrained TensorFlow model into the ML.NET pipeline
- Train and evaluate the ML.NET model
- Classify a test image
Check out the Machine Learning samples GitHub repository to explore an expanded image classification sample.
