Create sample network environment for Azure IoT Layered Network Management (preview)
To use Azure IoT Layered Network Management (preview) service, you need to configure an isolated network environment. For example, the ISA-95/Purdue Network architecture. This page provides few examples for setting up a test environment depends on how you want to achieve the isolation.
- Physical segmentation - The networks are physically separated. In this case, the Layered Network Management (preview) needs to be deployed to a dual NIC (Network Interface Card) host to connect to both the internet-facing network and the isolated network.
- Logical segmentation - The network is logically segmented with configurations such as VLAN, subnet, or firewall. The Layered Network Management has a single endpoint and configured to be visible to its own network layer and the isolated layer.
Both approaches require you to configure a custom DNS in the isolated network layer to direct the network traffic to the Layered Network Management instance in upper layer.
Important
The network environments outlined in Layered Network Management documentation are examples for testing the Layered Network Management. It's not a recommendation of how you build your network and cluster topology for production.
Configure isolated network with physical segmentation
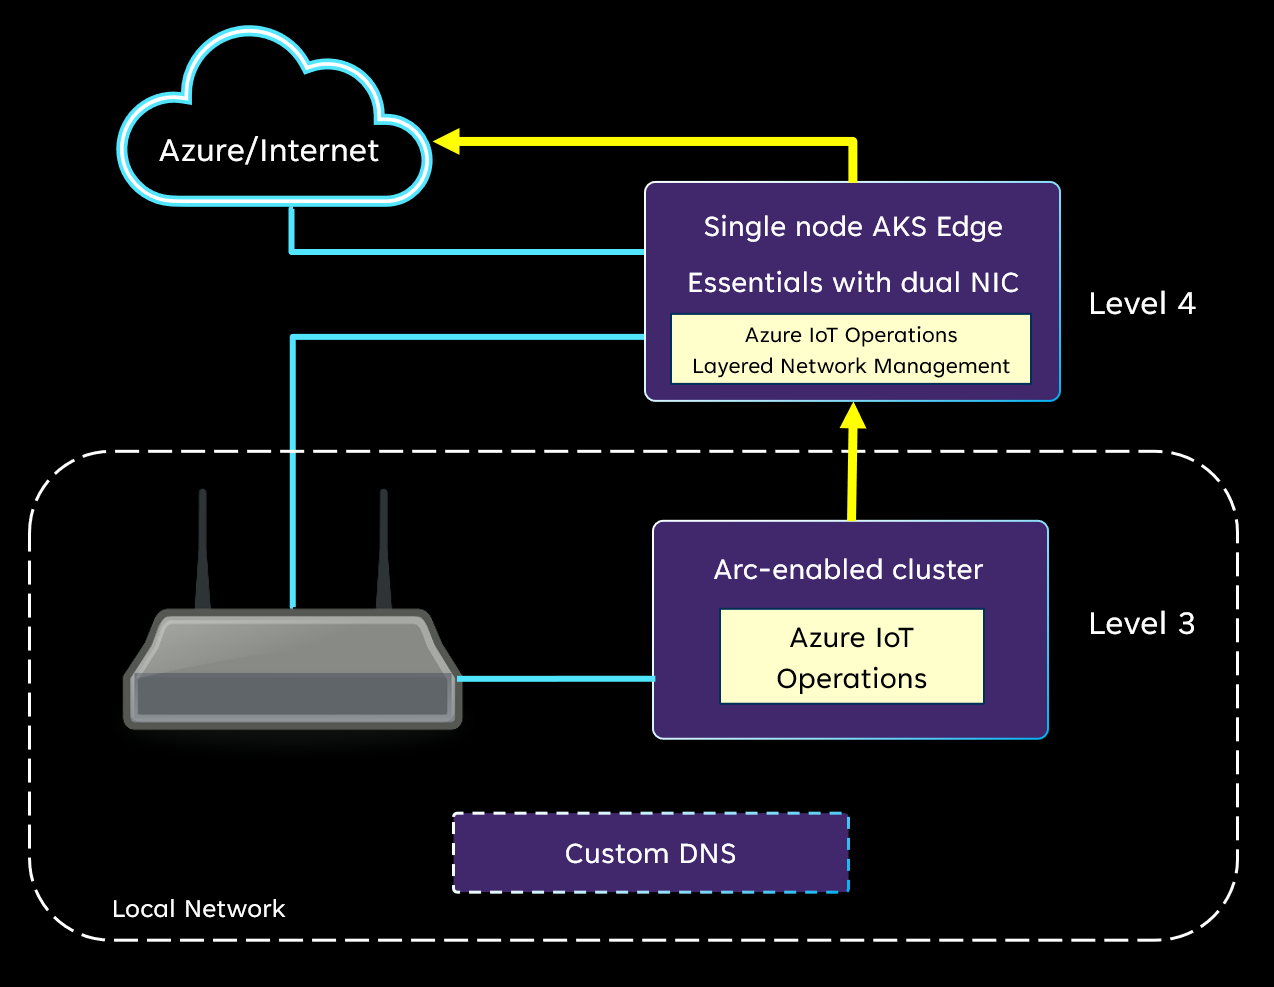
The following example configuration is a simple isolated network with minimum physical devices.

- The wireless access point is used for setting up a local network and doesn't provide internet access.
- Level 4 cluster is a single node cluster hosted on a dual network interface card (NIC) physical machine that connects to internet and the local network.
- Level 3 cluster is a single node cluster hosted on a physical machine. This device cluster only connects to the local network.
Layered Network Management is deployed to the dual NIC cluster. The cluster in the local network connects to Layered Network Management as a proxy to access Azure and Arc services. In addition, it would need a custom DNS in the local network to provide domain name resolution and point the traffic to Layered Network Management. For more information, see Configure custom DNS.
Configure Isolated Network with logical segmentation
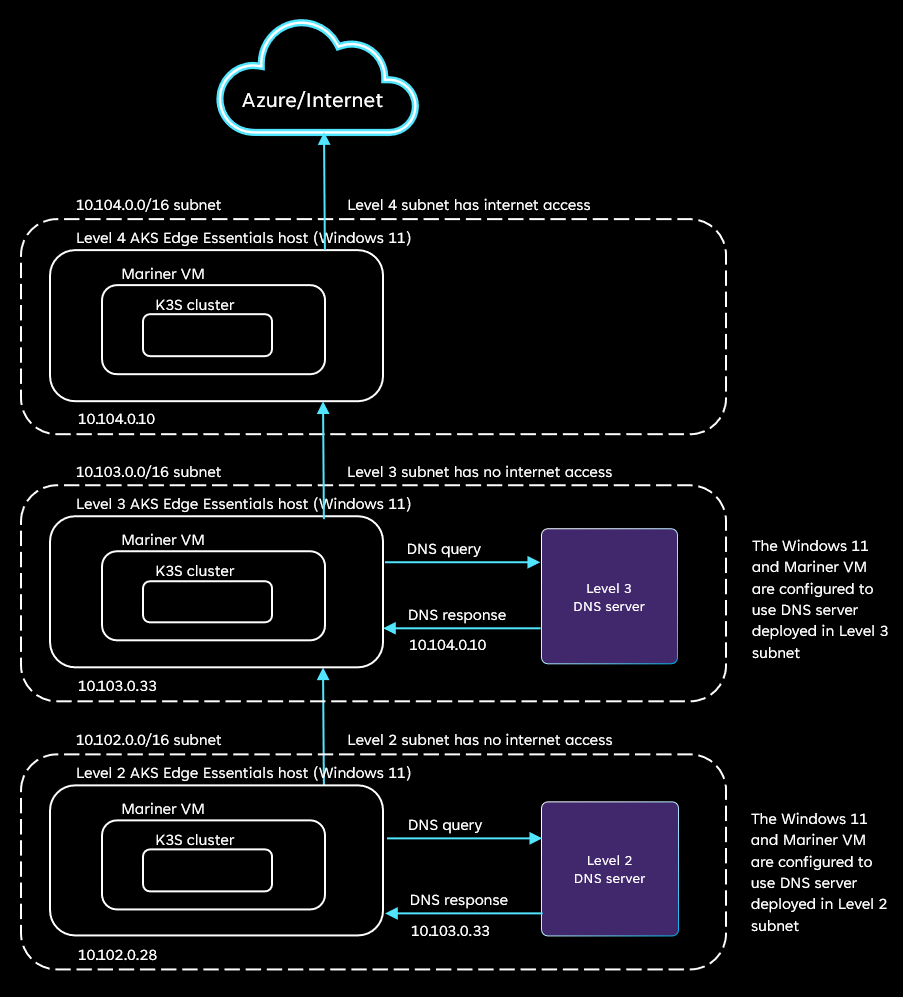
The following diagram illustrates an isolated network environment where each level is logically segmented with subnets. In this test environment, there are multiple clusters one at each level. The clusters can be AKS Edge Essentials or K3S. The Kubernetes cluster in the level 4 network has direct internet access. The Kubernetes clusters in level 3 and below don't have internet access.

The multiple levels of networks in this test setup are accomplished using subnets within a network:
- Level 4 subnet (10.104.0.0/16) - This subnet has access to the internet. All the requests are sent to the destinations on the internet. This subnet has a single Windows 11 machine with the IP address 10.104.0.10.
- Level 3 subnet (10.103.0.0/16) - This subnet doesn't have access to the internet and is configured to only have access to the IP address 10.104.0.10 in Level 4. This subnet contains a Windows 11 machine with the IP address 10.103.0.33 and a Linux machine that hosts a DNS server. The DNS server is configured using the steps in Configure custom DNS. All the domains in the DNS configuration must be mapped to the address 10.104.0.10.
- Level 2 subnet (10.102.0.0/16) - Like level 3, this subnet doesn't have access to the internet. It's configured to only have access to the IP address 10.103.0.33 in level 3. This subnet contains a Windows 11 machine with the IP address 10.102.0.28 and a Linux machine that hosts a DNS server. There's one Windows 11 machine (node) in this network with IP address 10.102.0.28. All the domains in the DNS configuration must be mapped to the address 10.103.0.33.
Refer to the following examples for setup this type of network environment.
Example of logical segmentation with minimum hardware
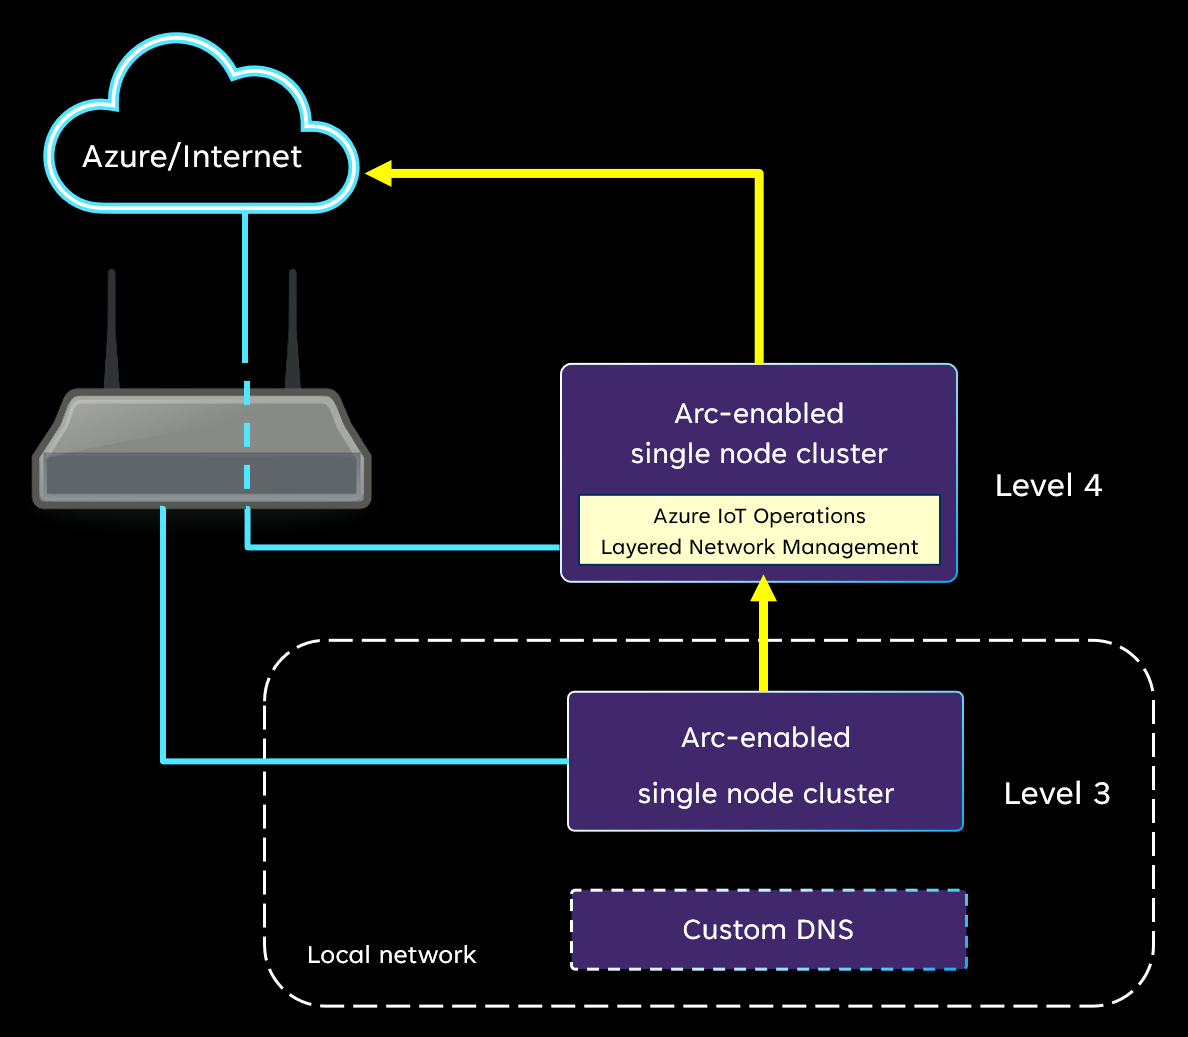
In this example, both machines are connected to an access point (AP) which connects to the internet. The level 4 host machine can access the internet. The level 3 host is blocked for accessing the internet with the AP's configuration. For example, firewall or client control. As both machines are in the same network, the Layered Network Management instance hosted on level 4 cluster is by default visible to the level 3 machine and cluster. An extra custom DNS needs to be set up in the local network to provide domain name resolution and point the traffic to Layered Network Management. For more information, see Configure custom DNS.

Example of logical segmentation in Azure
In this example, a test environment is created with a virtual network and a Linux virtual machine in Azure.
Important
Virtual environment is for exploration and evaluation only. For more information, see supported environments for Azure IoT Operations.
- Create a virtual network in your Azure subscription. Create subnets for at least two layers (level 4 and level 3).

- It's optional to create an extra subnet for the jumpbox or developer machine to remotely access the machine or cluster across layers. This setup is convenient if you plan to create more than two network layers. Otherwise, you can connect the jumpbox machine to level 4 network.
- Create network security groups for each level and attach to the subnet accordingly.
- You can use the default value for level 4 security group.
- You need to configure additional inbound and outbound rules for level 3 (and lower level) security group.
- Add inbound and outbound security rules to deny all network traffic.
- With a higher priority, add inbound and outbound security rules to allow network traffic to and from the IP range of level 4 subnet.
- [Optional] If you create a jumpbox subnet, create inbound and outbound rules for allowing traffic to and from this subnet.

- Create Linux VMs in level 3 and level 4.
- Refer to supported environments for specification of the VM.
- When creating the VM, connect the machine to the subnet that is created in earlier steps.
- Skip the security group creation for VM.
Configure custom DNS
A custom DNS is needed for level 3 and below. It ensures that DNS resolution for network traffic originating within the cluster is pointed to the parent level Layered Network Management instance. In an existing or production environment, incorporate the following DNS resolutions into your DNS design. If you want to set up a test environment for Layered Network Management service and Azure IoT Operations, you can refer to the following examples.
Configure CoreDNS
While the DNS setup can be achieved many different ways, this example uses an extension mechanism provided by CoreDNS that is the default DNS server for K3S clusters. URLs on the allowlist, which need to be resolved are added to the CoreDNS.
Important
The CoreDNS approach is only applicable to K3S cluster on Ubuntu host at level 3.
Create configmap from level 4 Layered Network Management
After the level 4 cluster and Layered Network Management are ready, perform the following steps.
Confirm the IP address of Layered Network Management service with the following command:
kubectl get services -n azure-iot-operationsThe output should look like the following. The IP address of the service is
20.81.111.118.NAME TYPE CLUSTER-IP EXTERNAL-IP PORT(S) AGE lnm-level4 LoadBalancer 10.0.141.101 20.81.111.118 80:30960/TCP,443:31214/TCP 29sView the config maps with following command:
kubectl get cm -n azure-iot-operationsThe output should look like the following example:
NAME                           DATA   AGE
aio-lnm-level4-config          1      50s
aio-lnm-level4-client-config   1      50s
Customize the
aio-lnm-level4-client-config. This configuration is needed as part of the level 3 setup to forward traffic from the level 3 cluster to the top level Layered Network Management instance.# set the env var PARENT_IP_ADDR to the ip address of level 4 LNM instance. export PARENT_IP_ADDR="20.81.111.118" # run the script to generate a config map yaml kubectl get cm aio-lnm-level4-client-config -n azure-iot-operations -o yaml | yq eval '.metadata = {"name": "coredns-custom", "namespace": "kube-system"}' -| sed 's/PARENT_IP/'"$PARENT_IP_ADDR"'/' > configmap-custom-level4.yamlThis step creates a file named
configmap-custom-level4.yaml
Configure level 3 CoreDNS of K3S
After setting up the K3S cluster and moving it to the level 3 isolated layer, configure the level 3 K3S's CoreDNS with the customized client-config that was previously generated.
Copy the
configmap-custom-level4.yamlto the level 3 host, or to the system where you're remotely accessing the cluster.Run the following commands:
# Create a config map called coredns-custom in the kube-system namespace
kubectl apply -f configmap-custom-level4.yaml

# Restart coredns
kubectl rollout restart deployment/coredns -n kube-system

# validate DNS resolution
kubectl run -it --rm --restart=Never busybox --image=busybox:1.28 -- nslookup east.servicebus.windows.net

# You should see the following output.
kubectl run -it --rm --restart=Never busybox --image=busybox:1.28 -- nslookup east.servicebus.windows.net
Server:    10.43.0.10
Address 1: 10.43.0.10 kube-dns.kube-system.svc.cluster.local

Name:      east.servicebus.windows.net
Address 1: 20.81.111.118
pod "busybox" deleted

# Note: confirm that the resolved ip address matches the ip address of the level 4 Layered Network Management instance.
The previous step sets the DNS configuration to resolve the allowlisted URLs inside the cluster to level 4. To ensure that DNS outside the cluster is doing the same, you need to configure systemd-resolved to forward traffic to CoreDNS inside the K3S cluster. Run the following commands on the K3S host: Create the following directory:
sudo mkdir /etc/systemd/resolved.conf.dCreate a file named
lnm.confwith the following contents. The IP address should be the level 3 cluster IP address of the kube-dns service that is running in the kube-system namespace.[Resolve] DNS=<PUT KUBE-DNS SERVICE IP HERE> DNSStubListener=noRestart the DNS resolver:
sudo systemctl restart systemd-resolved