Migrate Azure CDN from Edgio to Azure Front Door
Azure CDN from Edgio will be retired on January 15, 2025. You must migrate your workload to Azure Front Door before this date to avoid service disruption. This article provides guidance on how to migrate your workloads from Azure CDN from Edgio to Azure Front Door using Azure Traffic Manager. The migration process in this article can also be used to migrate workloads from a legacy CDN to Azure Front Door.
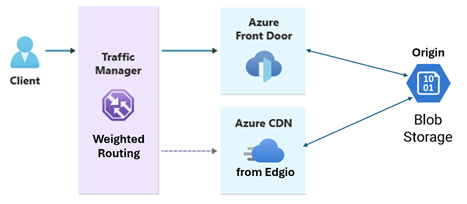
Azure Traffic Manager initially routes all traffic to the Azure CDN from Edgio. After you set up Azure Front Door, you can update the Traffic Manager profile to incrementally route traffic to the Azure Front Door. This approach allows you to validate if Azure Front Door is compatible with your workloads before fully migrating.
We recommend that your plan this migration well in advance and test the functionality over the course of a few days to ensure a smooth transition.
Important
- If you plan to migrate to Azure Front Door, set the Feature Flag DoNotForceMigrateEdgioCDNProfiles before January 7, 2025 using Set up preview feature. This will prevent Microsoft from auto-migrating your profiles to Azure Front Door. Auto-migration is on a best effort basis and may cause issues with billing, features, availability, and performance. Note you will have until January 14, 2025 to complete your migration to another CDN, but again Microsoft cannot guarantee your services will be available on the Edgio platform before this date.
- This guide only works if you are already using custom domains on Azure CDN from Edgio. If you don't use custom domains, you won't be able to use traffic manager to gradually shift traffic to Front Door. You will have to update the clients to directly point to the new Front Door endpoint. Another temporary option will be to migrate to Front Door while retaining your
<endpointname>.azureedge.netdomain.
Prerequisites
- Review the feature differences between Azure CDN and Azure Front Door to determine if there are any compatibility gaps.
- You need access to a VM connected to the internet that can run Wget on Linux or Invoke-WebRequest on Windows using PowerShell.
- You need access to a monitoring tool such as CatchPoint or ThousandEyes to verify the availability of your URLs before and after the migration. These tools are the most ideal because they can monitor the availability of your URLs from different locations around the world.
webpagetest.orgis another option, but it only provides a limited view of your URLs from a few locations.
Note
If you have multiple endpoints in your Azure CDN from Edgio profile, you will have to repeat the migration steps for each endpoint. You will have to create corresponding endpoints in Azure Front Door for facilitating migration.
Migrate your workloads
The followings steps assume you're using an Azure Blob Storage account as your origin. If you're using a different origin, adjust the steps accordingly.

Gather information
Collect the following information from your Azure CDN from Edgio profile:
- Endpoints
- Origin configurations
- Custom domains
- Caching settings
- Compression settings
- Web application firewall (WAF) settings
- Custom rules settings
Determine which tier of Azure Front Door is suitable for your workloads. For more information, see Azure Front Door comparison.
Review the origin settings of your Azure CDN from Edgio endpoint.
Determine a test URL with your Azure CDN from Edgio endpoint and perform a
wgetorInvoke-WebRequestto obtain the HTTP header information.Enter the URL into the monitoring tool to understand the geographic availability of your URL.
Set up Azure Front Door
From the Azure portal, select + Create a resource, then search for Front Door.
Select Front Door and CDN profiles and then select Create.
On the Compare offerings pages, select Azure Front Door and then select Custom create.
Select Continue to create a Front Door.
Select the subscription and resource group. Enter a name for the Azure Front Door profile. Then select the tier that best suits your workloads and select the Endpoint tab.
Select Add an endpoint. Enter a name for the endpoint, then select Add. The endpoint name will look like
<endpointname>-<hash>.xxx.azurefd.net.Select + Add a route. Enter a name for the route and note the Domain selected. Leave the Patterns to match and Accepted protocols as the default settings.
Note
A CDN profile can have multiple endpoints, so you may need to create multiple routes.
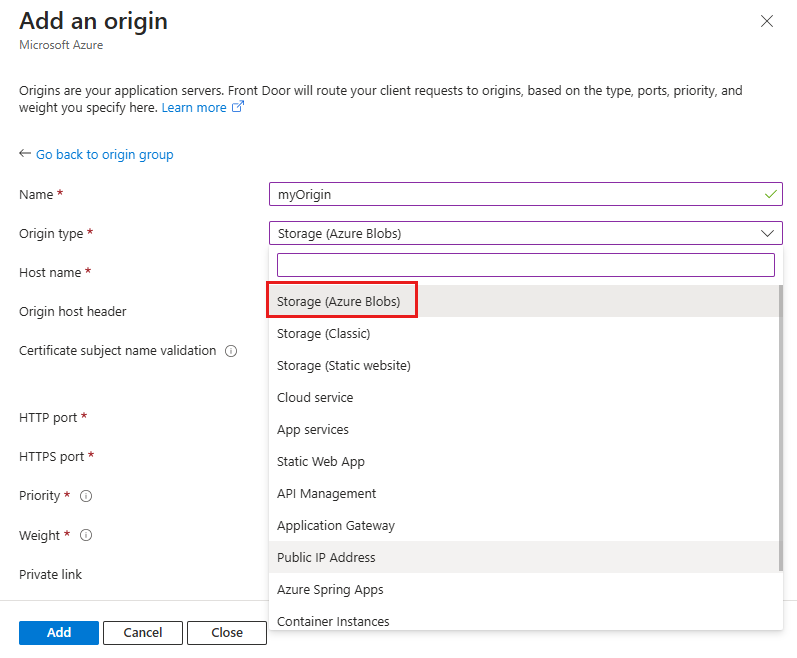
Select Add a new origin group. Enter a name for the origin group and select the + Add an origin button. Enter the origin name and select the origin type. This example uses Azure Blob Storage, so select Storage as the origin type. Select the hostname of the Azure Blob Storage account and leave the rest of the settings as default. Select Add.

Leave the rest of the settings as default and select Add.
If caching was enabled in your Azure CDN from Edgio endpoint, select Enable caching and set the caching rules.
Note
Azure CDN from Edgio Standard-cache is equivalent to Azure Front Door Ignore query string caching.
Select Enable compression if you have compression enabled in your Azure CDN from Edgio endpoint. Ensure the origin path matches the path in your Azure CDN from Edgio endpoint. If this isn't set correctly, the origin won't be able to serve the content and will return a 4xx error.
Select Add to create the route.
Select + Add a policy to set up web application firewall (WAF) settings and set up custom rules you determined in the previous steps.
Select Review + create and then select Create.
Set up the custom domain for the Azure Front Door profile. For more information, see Custom domains. You may have multiple custom domains in your Azure CDN from Edgio profile. Ensure you add all custom domains to the Azure Front Door profile and associate them with the correct routes.
Set up Traffic Manager
The steps in this section need to be repeated for each endpoint in your Azure CDN from Edgio profile. It is critical that the health check is set up correctly to ensure that the Traffic Manager profile routes traffic to the Azure CDN or Azure Front Door.
From the Azure portal, select + Create a resource, then search for Traffic Manager profile.
Enter a name for the Traffic Manager profile.
Select the routing method Weighted.
Select the same subscription and resource group as the Azure Front Door profile then select Create.
Select Endpoints from the left-hand menu, and then select + Add.
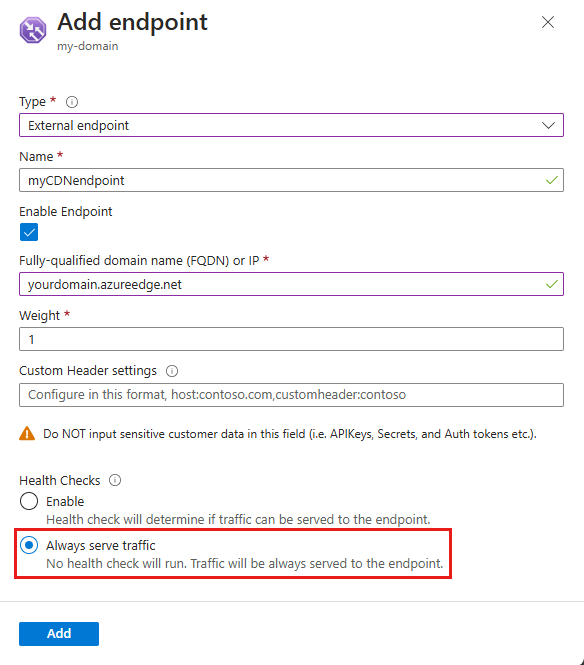
For the Type, select External endpoint.
Enter a name for the endpoint and leave the Enable Endpoint checked.
Enter the Fully-qualified domain name (FQDN) of the Azure CDN from Edgio endpoint. For example,
yourdomain.azureedge.net.Set the Weight to 100.
For Health check, select Always serve traffic. This setting disables the health check and always routes traffic to the endpoint.

Add another endpoint for the Azure Front Door endpoint and select External endpoint.
Enter a name for the endpoint and uncheck the Enable Endpoint setting.
Enter the Fully-qualified domain name (FQDN) of the Azure Front Door endpoint. For example,
your-new-endpoint-name.azurefd.net.Set the Weight to 1.
Since the endpoint is disabled, the Health check setting isn't relevant.
Internal testing of Traffic Manager profile
Perform a DNS dig to test the Traffic Manager profile:
dig your-profile.trafficmanager.net. The dig command should always return the CNAME of the Azure CDN from Edgio endpoint:yourdomain.azureedge.net.Test the Azure Front Door endpoint by manually adding a DNS entry in your local hosts file pointing to the Azure Front Door endpoint:
Get the IP address of the Azure Front Door endpoint by performing a DNS dig.
Add a new line to your hosts file with the IP address followed by a space and then
your-new-endpoint-name.azurefd.net. For example,203.0.113.254 your-new-endpoint-name.azurefd.net.For Windows, the hosts file is located at
C:\Windows\System32\drivers\etc\hosts.For Linux, the hosts file is located at
/etc/hosts.
Test the functionality of the Azure Front Door endpoint locally and ensure everything is working as expected.
Remove the entry from the hosts file when testing is complete.
Configure Traffic Manager with CNAME
We only recommend this step after you have fully tested the Azure Front Door endpoint and are confident that it is working as expected.
Sign into your DNS provider and locate the CNAME record for the Azure CDN from Edgio endpoint.
Locate the custom domain you want to migrate to Azure Front Door and set the time-to-live (TTL) to 600 secs (10 minutes).
Update the CNAME record to point to the Traffic Manager profile:
your-profile.trafficmanager.net.In the Azure portal, navigate to the Traffic Manager profile and select Endpoints.
Enable the Azure Front Door endpoint and select Always serve traffic for the health check.
Use a tool like dig or nslookup to verify that the DNS change propagated and pointed to the correct Traffic Manager profile.
Verify that the Azure CDN from Edgio endpoint is working properly by checking the monitoring tool you set up earlier.
Gradual traffic shift
The initial traffic distribution starts by routing a small percentage of traffic to the Azure Front Door endpoint. Monitor the performance of the Azure Front Door endpoint and gradually increase the traffic percentage until all traffic is routed to the Azure Front Door endpoint.
Start by routing 10% of the traffic to the Azure Front Door endpoint and the rest to the Azure CDN from Edgio endpoint.
Monitor the performance of the Azure Front Door endpoint and the Azure CDN from Edgio endpoint using the monitoring tool you set up earlier. Review your internal applications and systems logs to ensure that the Azure Front Door endpoint is working as expected. Look at metrics and logs to observe for 4xx/5xx errors, cache/byte hit ratios, and origin health.
Note
If you don't have access to a third-party tool, you can use Webpagetest to verify the availability of your endpoint from a remote location. However, this tool only provides a limited view of your URLs from a few locations around the world, so you may not see any changes until you have fully shifted traffic to the Azure Front Door endpoint.
Gradually increase the traffic percentage to the Azure Front Door endpoint by 10% increments until all traffic is routed to the Azure Front Door endpoint. Ensure that you're testing and monitoring the performance of the Azure Front Door endpoint at each increment.
Once you're confident that the Azure Front Door endpoint is working as expected, update the Traffic Manager profile to route all traffic to the Azure Front Door endpoint.
Ensure the Azure Front Door endpoint is enabled, Weight is set to 100, and the health check is set to Always serve traffic.
Ensure the Azure CDN from Edgio endpoint is disabled.
Note
If you're currently utilizing azureedge.net within your codebase, you'll need to update your code to utilize `<YourNewAFDEndpoint.azurefd.net>. If this is a significant concern for you organization, contact support for further assistance.
Remove Azure Traffic Manager
Sign in to your DNS provider. Change the CNAME record from the Traffic Manager profile to the Azure Front Door endpoint:
<endpointname>-<hash>.xxx.azurefd.net.Over the next few hours, begin testing using dig, and monitor using the monitoring tool to ensure the DNS is fully propagated correctly around the world.
Set the DNS TTL back to the original value (60 minutes).
At this stage you have fully migrated all traffic from Azure CDN from Edgio to Azure Front Door.
Next steps
Learn about best practices for Azure Front Door.