Tutorial: Migrate Oracle WebLogic Server to Azure Kubernetes Service (AKS) with geo-redundancy
This tutorial shows you a straightforward and effective way to implement a business continuity and disaster recovery (DR) strategy for Java using Oracle WebLogic Server (WLS) on Azure Kubernetes Service (AKS). The solution illustrates how to back up and restore a WLS workload using a simple database-driven Jakarta EE application running on AKS. Geo-redundancy is a complex topic, with many possible solutions. The best solution depends on your unique requirements. For other ways to implement geo-redundancy, see the resources at the end of this article.
In this tutorial, you learn how to:
- Use Azure optimized best practices to achieve high availability and disaster recovery (HA/DR).
- Set up a Microsoft Azure SQL Database failover group in paired regions.
- Set up and configure primary WLS clusters on AKS.
- Configure geo-redundancy using Azure Backup.
- Restore a WLS cluster in a secondary region.
- Set up an Azure Traffic Manager.
- Test failover.
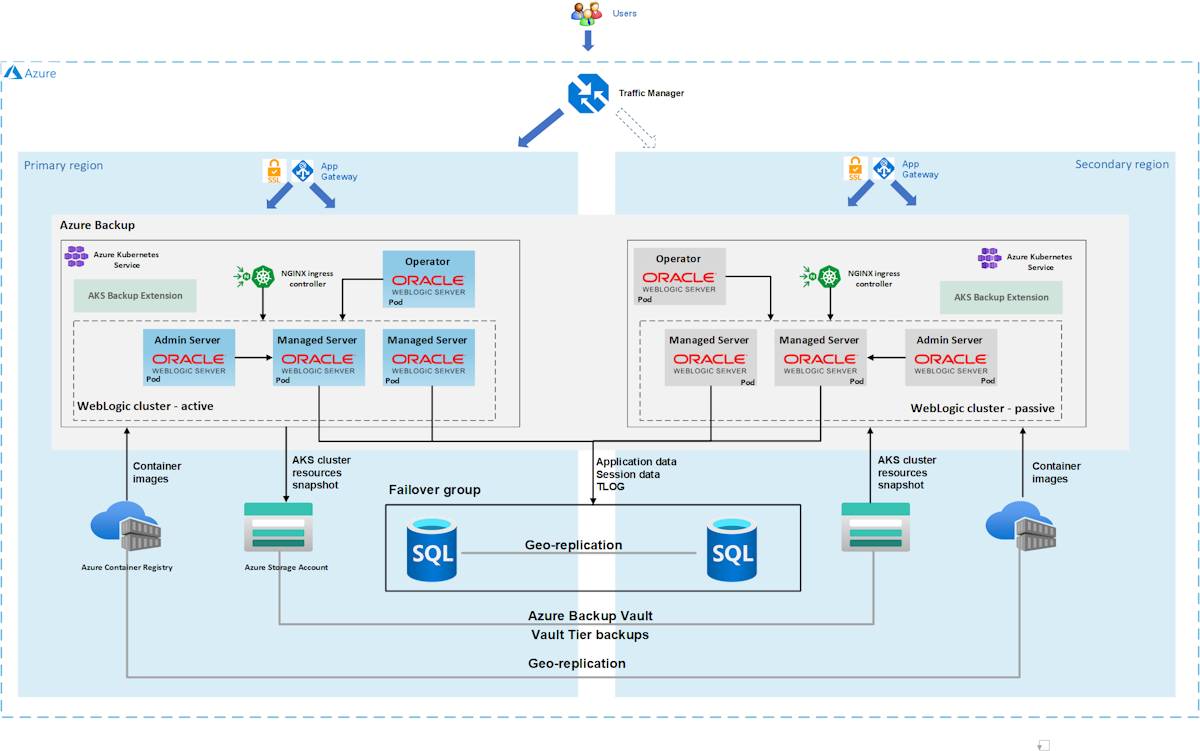
The following diagram illustrates the architecture you build:
Azure Traffic Manager checks the health of your regions and routes the traffic accordingly to the application tier. The primary region has a full deployment of the WLS cluster. Only the primary region is actively servicing network requests from the users. The secondary region restores the WLS cluster from backups of the primary region if there's a disaster or declared DR event. The secondary region is activated to receive traffic only when the primary region experiences a service disruption.
Azure Traffic Manager uses the health check feature of the Azure Application Gateway and the WebLogic Kubernetes Operator (WKO) to implement this conditional routing. WKO deeply integrates with AKS health checks, enabling Azure Traffic Manager to have a high level of awareness of the health of your Java workload. The primary WLS cluster is running and the secondary cluster is shut down.
The geo-failover recovery time objective (RTO) of the application tier depends on the time for starting AKS and running the secondary WLS cluster, which is typically less than an hour. The application data is persisted and replicated in the Azure SQL Database failover group, with an RTO of minutes or hours and a recovery point objective (RPO) of minutes or hours. In this architecture, Azure backup has only one Vault-standard backup for the WLS configuration every day. For more information, see What is Azure Kubernetes Service (AKS) backup?
The database tier consists of an Azure SQL Database failover group with a primary server and a secondary server. The primary server is in active read-write mode and connected to the primary WLS cluster. The secondary server is in passive ready-only mode and connected to the secondary WLS cluster. A geo-failover switches all secondary databases in the group to the primary role. For geo-failover RPO and RTO of Azure SQL Database, see Overview of Business Continuity.
This article was written with the Azure SQL Database service because the article relies on the high availability (HA) features of that service. Other database choices are possible, but you must consider the HA features of whatever database you choose. For more information, including information on how to optimize the configuration of data sources for replication, see Configuring Data Sources for Oracle Fusion Middleware Active-Passive Deployment.
This article uses Azure Backup to protect AKS. For region availability, supported scenarios, and limitations, see Azure Kubernetes Service backup support matrix. Currently, Azure Backup supports Vault Tier backups and restoring across regions, which are available in public preview. For more information, see Enable Vault Tier backups for AKS and restore across regions by using Azure Backup.
Note
In this article, you must frequently create unique identifiers for various resources. This article uses the convention of <initials><sequence-number> as a prefix. For example, if your name is Emily Juanita Bernal, a unique identifier would be ejb01. For additional disambiguity, you could append today's date in MMDD format, such as ejb010307.
Prerequisites
An Azure subscription. If you don't have an Azure subscription, create a free account before you begin.
Make sure you have either the
Ownerrole or theContributorandUser Access Administratorroles in the subscription. You can verify the assignment by following the steps in List Azure role assignments using the Azure portal.Prepare a local machine with Windows, Linux, or macOS installed.
To run Azure CLI commands, install the Azure CLI, version 2.54.0 or later.
Install and set up kubectl.
Install and set up Git.
Install a Java SE implementation, version 17 or later - for example, the Microsoft build of OpenJDK.
Install Maven, version 3.9.3 or later.
Have the credentials for an Oracle single sign-on (SSO) account. To create one, see Create Your Oracle Account.
Use the following steps to accept the license terms for WLS:
- Visit the Oracle Container Registry and sign in.
- If you have a support entitlement, select Middleware, then search for and select weblogic_cpu.
- If you don't have a support entitlement from Oracle, select Middleware, then search for and select weblogic.
- Accept the license agreement.
Running WLS on AKS requires an understanding of WLS domains. For more information on WLS domains, see the Decide whether to use the prebuilt Azure Marketplace offer section of Migrate WebLogic Server applications to Azure Kubernetes Service. This article assumes that you're running WLS on AKS using the model in image domain home source type, with transaction logs and stores in an external database, and no external storage.
Set up an Azure SQL Database failover group in paired regions
In this section, you create an Azure SQL Database failover group in paired regions for use with your WLS clusters and app. In a later section, you configure WLS to store its session data and transaction log (TLOG) data to this database. This practice is consistent with Oracle's Maximum Availability Architecture (MAA). This guidance provides an Azure adaptation for MAA. For more information on MAA, see Oracle Maximum Availability Architecture.
First, create the primary Azure SQL Database by following the Azure portal steps in Quickstart: Create a single database - Azure SQL Database. Follow the steps up to, but not including, the "Clean up resources" section. Use the following directions as you go through the article, then return to this article after you create and configure the Azure SQL Database:
When you reach the section Create a single database, use the following steps:
- In step 4 for creating new resource group, save aside the Resource group name value - for example, myResourceGroup.
- In step 5 for database name, save aside the Database name value - for example, mySampleDatabase.
- In step 6 for creating the server, use the following steps:
- Save aside the unique server name - for example, sqlserverprimary-ejb120623.
- For Location, select (US) East US.
- For Authentication method, select Use SQL authentication.
- Save aside the Server admin login value - for example, azureuser.
- Save aside the Password value.
- In step 8, for Workload environment, select Development. Look at the description and consider other options for your workload.
- In step 11, for Backup storage redundancy, select Locally-redundant backup storage. Consider other options for your backups. For more information, see the Backup storage redundancy section of Automated backups in Azure SQL Database.
- In step 14, in the Firewall rules configuration, for Allow Azure services and resources to access this server, select Yes.
When you reach the section Query the database, use the following steps:
In step 3, enter your SQL authentication server admin sign-in information to sign in.
Note
If sign-in fails with an error message similar to Client with IP address 'xx.xx.xx.xx' is not allowed to access the server, select Allowlist IP xx.xx.xx.xx on server <your-sqlserver-name> at the end of the error message. Wait until the server firewall rules complete updating, then select OK again.
After you run the sample query in step 5, clear the editor and create tables.
To create the schema, enter the following queries:
To create the schema for the TLOG, enter the following query:
create table TLOG_msp1_WLStore (ID DECIMAL(38) NOT NULL, TYPE DECIMAL(38) NOT NULL, HANDLE DECIMAL(38) NOT NULL, RECORD VARBINARY(MAX) NOT NULL, PRIMARY KEY (ID));
create table TLOG_msp2_WLStore (ID DECIMAL(38) NOT NULL, TYPE DECIMAL(38) NOT NULL, HANDLE DECIMAL(38) NOT NULL, RECORD VARBINARY(MAX) NOT NULL, PRIMARY KEY (ID));
create table TLOG_msp3_WLStore (ID DECIMAL(38) NOT NULL, TYPE DECIMAL(38) NOT NULL, HANDLE DECIMAL(38) NOT NULL, RECORD VARBINARY(MAX) NOT NULL, PRIMARY KEY (ID));
create table TLOG_msp4_WLStore (ID DECIMAL(38) NOT NULL, TYPE DECIMAL(38) NOT NULL, HANDLE DECIMAL(38) NOT NULL, RECORD VARBINARY(MAX) NOT NULL, PRIMARY KEY (ID));
create table TLOG_msp5_WLStore (ID DECIMAL(38) NOT NULL, TYPE DECIMAL(38) NOT NULL, HANDLE DECIMAL(38) NOT NULL, RECORD VARBINARY(MAX) NOT NULL, PRIMARY KEY (ID));
create table wl_servlet_sessions (wl_id VARCHAR(100) NOT NULL, wl_context_path VARCHAR(100) NOT NULL, wl_is_new CHAR(1), wl_create_time DECIMAL(20), wl_is_valid CHAR(1), wl_session_values VARBINARY(MAX), wl_access_time DECIMAL(20), wl_max_inactive_interval INTEGER, PRIMARY KEY (wl_id, wl_context_path));
After a successful run, you should see the message
Query succeeded: Affected rows: 0.These database tables are used for storing transaction log (TLOG) and session data for your WLS clusters and app. For more information, see Using a JDBC TLOG Store and Using a Database for Persistent Storage (JDBC Persistence).
To create the schema for the sample application, enter the following query:
CREATE TABLE COFFEE (ID NUMERIC(19) NOT NULL, NAME VARCHAR(255) NULL, PRICE FLOAT(32) NULL, PRIMARY KEY (ID));
CREATE TABLE SEQUENCE (SEQ_NAME VARCHAR(50) NOT NULL, SEQ_COUNT NUMERIC(28) NULL, PRIMARY KEY (SEQ_NAME));
After a successful run, you should see the message
Query succeeded: Affected rows: 0.
You're now finished with the article "Quickstart: Create a single database - Azure SQL Database".
Next, create an Azure SQL Database failover group by following the Azure portal steps in Configure a failover group for Azure SQL Database. You just need the following sections: Create failover group and Test planned failover. Use the following steps as you go through the article, then return to this article after you create and configure the Azure SQL Database failover group:
When you reach the section Create failover group, use the following steps:
- In step 5 for creating the failover group, select the option to create a new secondary server and then use the following steps:
- Enter and save aside the failover group name - for example, failovergroupname-ejb120623.
- Enter and save aside the unique server name - for example, sqlserversecondary-ejb120623.
- Enter the same server admin and password as your primary server.
- For Location, select a different region than the one you used for the primary database.
- Make sure Allow Azure services to access server is selected.
- In step 5 for configuring the Databases within the group, select the database you created in the primary server - for example, mySampleDatabase.
- In step 5 for creating the failover group, select the option to create a new secondary server and then use the following steps:
After you complete all the steps in the section Test planned failover, keep the failover group page open and use it for the failover test of the WLS clusters later.
Get the JDBC connection string and database admin username for the failover group
The following steps direct you to get the JDBC connection string and database username for the database within the failover group. These values are different than the corresponding values for the primary database.
In the Azure portal, find the resource group into which you deployed the primary database.
In the list of resources, select the primary database with type SQL database.
Under Settings, select Connection strings.
Select JDBC.
In the text area under JDBC (SQL authentication), select the copy icon to put the value of the JDBC connection string on the clipboard.
In a text editor, paste the value. You edit it in another step.
Return to the resource group.
Select the resource of type SQL Server that contains the database you just looked at in the previous steps.
Under Data management, select Failover groups.
In the table in the middle of the page, select the failover group.
In the text area under Read/write listener endpoint, select the copy icon to put the value of the JDBC connection string on the clipboard.
Paste the value on a new line in your text editor. Your text editor should now have lines similar to the following example:
jdbc:sqlserver://ejb010307db.database.windows.net:1433;database=ejb010307db;user=azureuser@ejb010307db;password={your_password_here};encrypt=true;trustServerCertificate=false;hostNameInCertificate=*.database.windows.net;loginTimeout=30;
ejb010307failover.database.windows.net
Create a new line using the following modifications:
Copy the entire first line.
Change the hostname part of the URL to use the hostname from the Read/write listener endpoint line.
Remove everything after the
name=valuepair fordatabase. In other words, remove everything including and after the;immediately afterdatabase=ejb010307db.When you're done, the string should look similar to the following example:
jdbc:sqlserver://ejb010307failover.database.windows.net:1433;database=ejb010307dbThis value is the JDBC connection string.
In the same text editor, derive the database username by getting the value of the
userparameter from the original JDBC connection string and replacing the database name with the first part of the Read/write listener endpoint line. Continuing with the previous example, the value would beazureuser@ejb010307failover. This value is the database admin username.
Set up and configure the primary WLS clusters on AKS
In this section, you create a WLS cluster on AKS using the Oracle WebLogic Server on AKS offer. The cluster in East US is the primary and is configured as the active cluster.
Note
You can find more information about Oracle WebLogic Server on AKS offer from the following articles:
Prepare a sample app
In this section, you build and package a sample CRUD Java/JakartaEE application that you later deploy and run on WLS clusters for failover testing.
The app uses WebLogic Server JDBC session persistence to store HTTP session data. The datasource jdbc/WebLogicCafeDB stores the session data to enable failover and load balancing across a cluster of WebLogic Servers. It configures a persistence schema to persist application data coffee in the same datasource jdbc/WebLogicCafeDB.
Use the following steps to build and package the sample:
Use the following commands to clone the sample repository and check out the tag corresponding to this article:
git clone https://github.com/Azure-Samples/azure-cafe.git
cd azure-cafe
git checkout 20231206
If you see a message about
Detached HEAD, it's safe to ignore.Use the following commands to navigate to the sample directory, and then compile and package the sample:
cd weblogic-cafe
mvn clean package
When the package is successfully generated, you can find it at <parent-path-to-your-local-clone>/azure-cafe/weblogic-cafe/target/weblogic-cafe.war. If you don't see the package, you must troubleshoot and resolve the issue before you continue.
Create a storage account and storage container to hold the sample application
Use the following steps to create a storage account and container. Some of these steps direct you to other guides. After completing the steps, you can upload a sample application to deploy on WLS.
Sign in to the Azure portal.
Create a storage account by following the steps in Create a storage account. Use the following specializations for the values in the article:
- Create a new resource group for the storage account.
- For Region, select East US.
- For Storage account name, use the same value as the resource group name.
- For Performance, select Standard.
- For Redundancy, select Locally-redundant storage (LRS).
- The remaining tabs need no specializations.
Proceed to validate and create the account, then return to this article.
Create a storage container within the account by following the steps in the Create a container section of Quickstart: Upload, download, and list blobs with the Azure portal.
Using the same article, upload the azure-cafe/weblogic-cafe/target/weblogic-cafe.war package that you built previously by following the steps in the Upload a block blob section. Then, return to this article.
Deploy WLS on AKS
Use the following steps to deploy WLS on AKS:
Open the Oracle WebLogic Server on AKS offer in your browser and select Create. You should see the Basics pane of the offer.
Use the following steps to fill out the Basics pane:
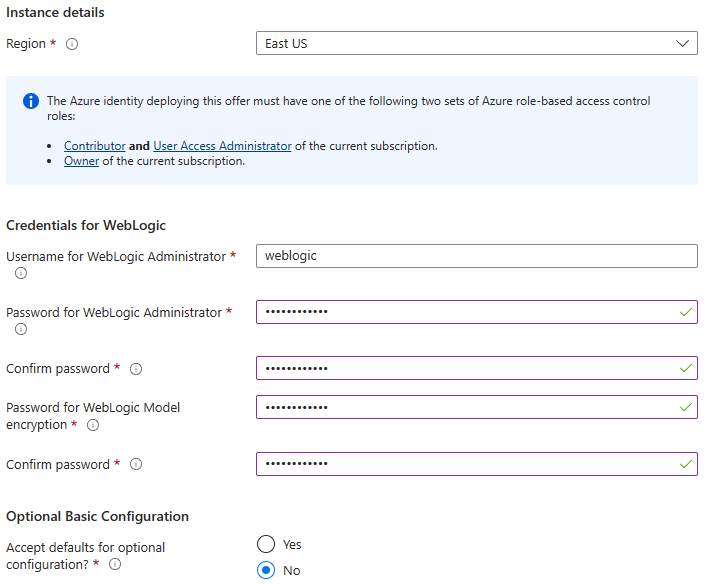
Ensure that the value shown for Subscription is the same one that has the roles listed in the prerequisites section.
In the Resource group field, select Create new and fill in a unique value for the resource group - for example, wlsaks-eastus-20240109.
Under Instance details, for Region, select East US.
Under Credentials WebLogic, provide a password for WebLogic Administrator and WebLogic Model encryption, respectively. Save aside the username and password for WebLogic Administrator.
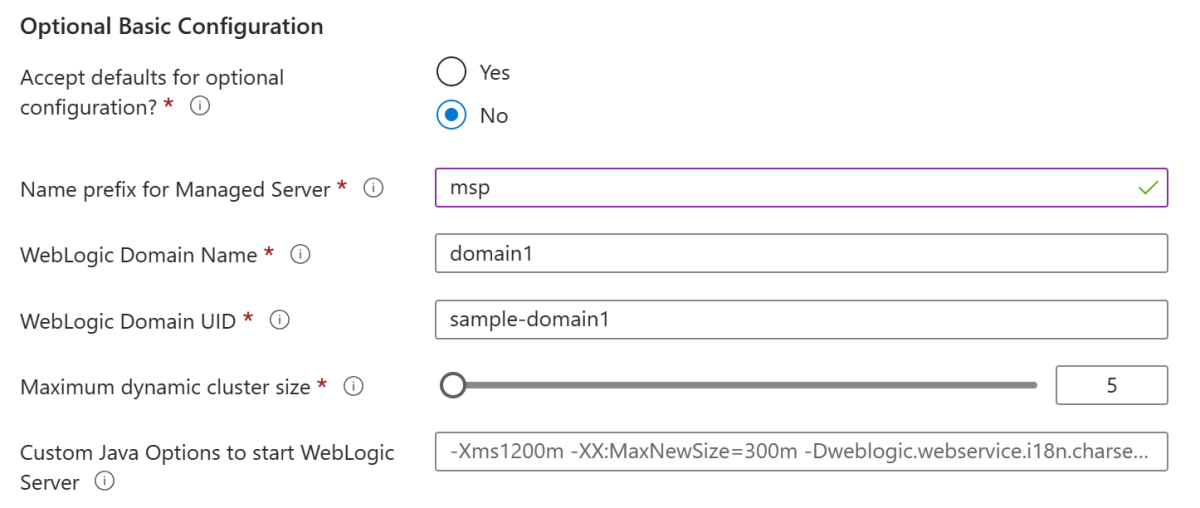
Under Optional Basic Configuration, for Accept defaults for optional configuration?, select No. The optional configuration shows.
For Name prefix for Managed Server, fill in msp. You configure WLS TLOG table with prefix
TLOG_${serverName}_later. This article creates TLOG table with nameTLOG_msp${index}_WLStore. If you want a different managed server name prefix, make sure the value matches Microsoft SQL Server Table Naming Conventions and the real table names.Leave the defaults for the other fields.
Select Next to go to the AKS pane.
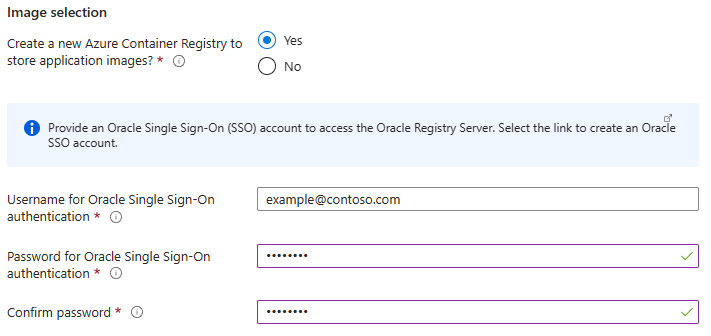
Under Image selection, provide the following information:
- For Username for Oracle Single Sign-On authentication, fill in your Oracle SSO username from the preconditions.
- For Password for Oracle Single Sign-On authentication, fill in your Oracle SSO credentials from the preconditions.
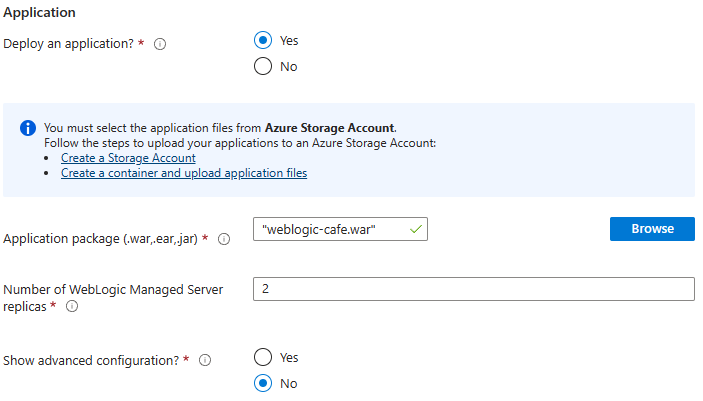
Under Application, use the following steps:
- In the Application section, next to Deploy an application?, select Yes.
- Next to Application package (.war,.ear,.jar), select Browse.
- Start typing the name of the storage account from the previous section. When the desired storage account appears, select it.
- Select the storage container from the previous section.
- Select the checkbox next to weblogic-cafe.war, which you uploaded in the previous section. Select Select.
- Leave the defaults for the other fields.
Select Next.
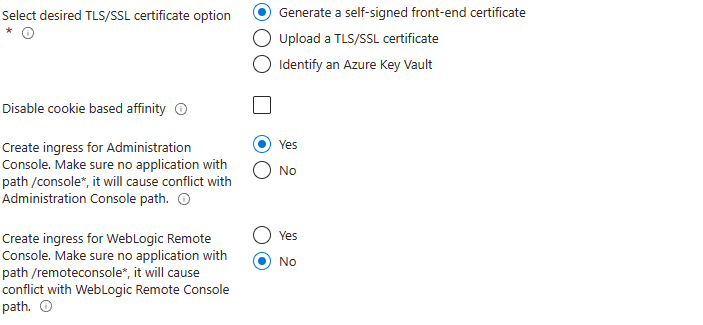
Leave the defaults in the TLS/SSL Configuration pane, and then select Next to go to the Load Balancing pane.
In the Load Balancing pane, next to Create ingress for Administration Console. Make sure no application with path /console*, it will cause conflict with Administration Console path, select Yes.
Leave the defaults for the other fields and select Next
Leave the default values in the DNS pane and select Next to go to the Database pane.
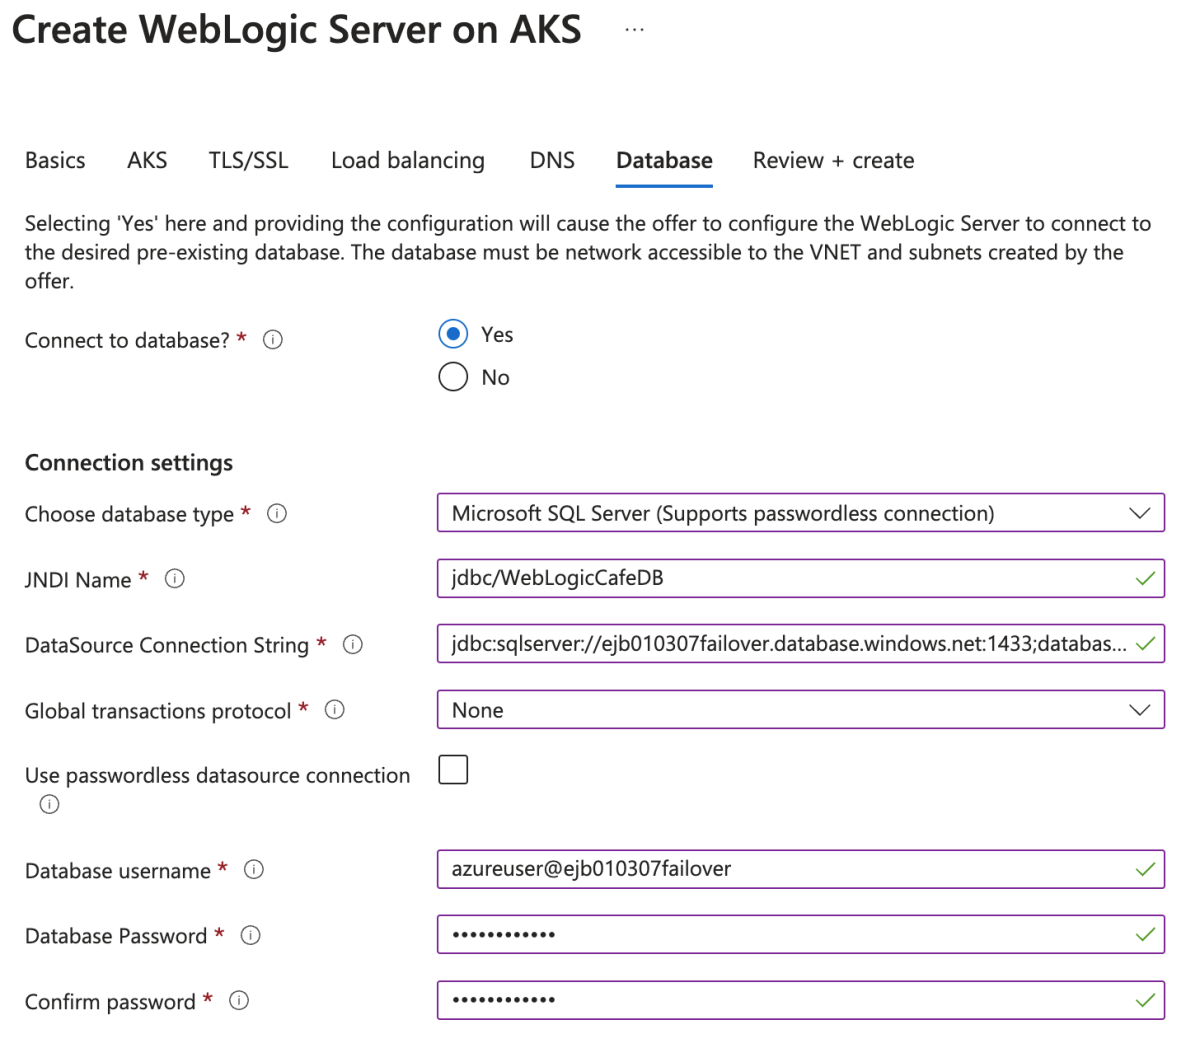
Enter the following values in the Database pane:
- For Connect to database?, select Yes.
- For Choose database type, select Microsoft SQL Server (Supports passwordless connection) .
- For JNDI Name, enter jdbc/WebLogicCafeDB.
- For DataSource Connection String, paste the value you saved for JDBC connection string in the Get the JDBC connection string and database admin username for the failover group section.
- For Global transaction protocol, select None.
- For Database username, paste the value you saved for database admin username in the Get the JDBC connection string and database admin username for the failover group section.
- Enter the database server admin sign-in password that you saved aside previously for Database Password. Enter the same value for Confirm password.
- Leave the defaults for the other fields.
Select Review + create.
Wait until Running final validation... successfully completes, then select Create. After a while, you should see the Deployment page where Deployment is in progress is displayed.
Note
If you see any problems during Running final validation..., fix them and try again.
Depending on network conditions and other activity in your selected region, the deployment can take up to 70 minutes to complete. After that, you should see the text Your deployment is complete displayed on the deployment page.
Configure the storage of TLOG data
In this section, you configure the storage of TLOG data by overriding the WLS image model with a ConfigMap. For more information about the ConfigMap, see WebLogic Deploy Tooling model ConfigMap.
This section requires a Bash terminal with the Azure CLI and kubectl installed. Use the following steps to derive the necessary YAML to and configure the storage of TLOG data:
Use the following steps to connect to your AKS cluster:
- Open the Azure portal and go to the resource group that you provisioned in the Deploy WLS on AKS section.
- Select the AKS cluster from the resource list, and then select Connect to connect to the AKS cluster.
- Select Azure CLI and follow the steps to connect to the AKS cluster in your local terminal.
Use the following steps to obtain the
topology:entry from the WLS image model YAML:- Open the Azure portal and go to the resource group that you provisioned in the Deploy WLS on AKS section.
- Select Settings > Deployments. Select the first deployment whose name starts with oracle.20210620-wls-on-aks.
- Select Outputs. Copy the shellCmdtoOutputWlsImageModelYaml value to the clipboard. The value is a shell command that decodes the base64 string of the model file and saves the content in a file named model.yaml.
- Paste the value into your Bash terminal and run the command to produce the model.yaml file.
- Edit the file to remove all content except for the top-level
topology:entry. There should be no top-level entries in your file except fortopology:. - Save the file.
Use the following steps to obtain the
ConfigMapname and namespace name from the WLS domain model YAML:Open the Azure portal and go to the resource group that was provisioned in the Deploy WLS on AKS section.
Select Settings > Deployments. Select the first deployment whose name starts with oracle.20210620-wls-on-aks.
Select Outputs. Copy value of shellCmdtoOutputWlsDomainYaml to clipboard. The value is a shell command to decode base64 string of model file and save content in model.yaml.
Paste the value to your terminal and you get a file named domain.yaml.
Look in the domain.yaml for the following values.
spec.configuration.model.configMap. If you accepted the defaults, this value issample-domain1-wdt-config-map.metadata.namespace. If you accepted the defaults, this value issample-domain1-ns.
For your convenience, you can use the following command to save these values as shell variables:
export CONFIG_MAP_NAME=sample-domain1-wdt-config-map
export WLS_NS=sample-domain1-ns
Use the following command to get the
ConfigMapYAML:kubectl get configmap ${CONFIG_MAP_NAME} -n ${WLS_NS} -o yaml > configMap.yamlUse the following steps to create the tlog-db-model.yaml file:
In a text editor, create an empty file called tlog-db-model.yaml.
Insert the contents of your model.yaml, add a blank line, and then insert the contents of your configMap.yaml file.
In your tlog-db-model.yaml file, locate the line ending with
ListenPort: 8001. Append this text on the following line, taking extreme care thatTransactionLogJDBCStoreis exactly underListenPortand the remaining lines in the following snippet are indented by two, as shown in the following example:TransactionLogJDBCStore: Enabled: true DataSource: jdbc/WebLogicCafeDB PrefixName: TLOG_${serverName}_The completed tlog-db-model.yaml should look very close to the following example:
topology:
  Name: "@@ENV:CUSTOM_DOMAIN_NAME@@"
  ProductionModeEnabled: true
  AdminServerName: "admin-server"
  Cluster:
    "cluster-1":
      DynamicServers:
        ServerTemplate: "cluster-1-template"
        ServerNamePrefix: "@@ENV:MANAGED_SERVER_PREFIX@@"
        DynamicClusterSize: "@@PROP:CLUSTER_SIZE@@"
        MaxDynamicClusterSize: "@@PROP:CLUSTER_SIZE@@"
        MinDynamicClusterSize: "0"
        CalculatedListenPorts: false
  Server:
    "admin-server":
      ListenPort: 7001
  ServerTemplate:
    "cluster-1-template":
      Cluster: "cluster-1"
      ListenPort: 8001
      TransactionLogJDBCStore:
        Enabled: true
        DataSource: jdbc/WebLogicCafeDB
        PrefixName: TLOG_${serverName}_
  SecurityConfiguration:
    NodeManagerUsername: "@@SECRET:__weblogic-credentials__:username@@"
    NodeManagerPasswordEncrypted: "@@SECRET:__weblogic-credentials__:password@@"

resources:
  JDBCSystemResource:
    jdbc/WebLogicCafeDB:
      Target: 'cluster-1'
      JdbcResource:
        JDBCDataSourceParams:
          JNDIName: [
            jdbc/WebLogicCafeDB
          ]
          GlobalTransactionsProtocol: None
        JDBCDriverParams:
          DriverName: com.microsoft.sqlserver.jdbc.SQLServerDriver
          URL: '@@SECRET:ds-secret-sqlserver-1709938597:url@@'
          PasswordEncrypted: '@@SECRET:ds-secret-sqlserver-1709938597:password@@'
          Properties:
            user:
              Value: '@@SECRET:ds-secret-sqlserver-1709938597:user@@'
        JDBCConnectionPoolParams:
            TestTableName: SQL SELECT 1
            TestConnectionsOnReserve: true
Override the WLS model with the
ConfigMap. To override the WLS model, replace the existingConfigMapwith the new model. For more information, see Updating an existing model in the Oracle documentation. Run the following commands to recreate theConfigMap:export CM_NAME_FOR_MODEL=sample-domain1-wdt-config-map kubectl -n sample-domain1-ns delete configmap ${CM_NAME_FOR_MODEL} # replace path of tlog-db-model.yaml kubectl -n sample-domain1-ns create configmap ${CM_NAME_FOR_MODEL} \ --from-file=tlog-db-model.yaml kubectl -n sample-domain1-ns label configmap ${CM_NAME_FOR_MODEL} \ weblogic.domainUID=sample-domain1Restart the WLS cluster by using the following commands. You need to cause a rolling update to make the new model work.
export RESTART_VERSION=$(kubectl -n sample-domain1-ns get domain sample-domain1 '-o=jsonpath={.spec.restartVersion}')
# increase restart version
export RESTART_VERSION=$((RESTART_VERSION + 1))

kubectl -n sample-domain1-ns patch domain sample-domain1 \
    --type=json \
    '-p=[{"op": "replace", "path": "/spec/restartVersion", "value": "'${RESTART_VERSION}'" }]'
Make sure the WLS pods are running before you move on. You can use the following command to watch status of the pods:
kubectl get pod -n sample-domain1-ns -w
Note
In this article, WLS models are included in the application container image, which was created by the WLS on AKS offer. TLOG is configured by overriding the existing model with the WDT ConfigMap that contains the model file and uses the domain CRD configuration.model.configMap field to reference the map. In production scenarios, auxiliary images are the recommended best approach for including Model in Image model files, application archive files, and the WebLogic Deploy Tooling installation, in your pods. This feature eliminates the need to provide these files in the image specified in domain.spec.image.
Configure geo-redundancy using Azure Backup
In this section, you use Azure Backup to back up AKS clusters by using the Backup extension, which must be installed in the cluster.
Use the following steps to configure geo-redundancy:
Create a new storage container for the AKS backup extension in the storage account you created in the Create a storage account and storage container to hold the sample application section.
Use the following commands to install the AKS backup extension and enable the CSI drivers and snapshots for your cluster:
#replace with your resource group name.
export RG_NAME=wlsaks-eastus-20240109
export AKS_NAME=$(az aks list \
    --resource-group ${RG_NAME} \
    --query "[0].name" \
    --output tsv)

az aks update \
    --resource-group ${RG_NAME} \
    --name ${AKS_NAME} \
    --enable-disk-driver \
    --enable-file-driver \
    --enable-blob-driver \
    --enable-snapshot-controller --yes
It takes about 5 minutes to enable the drivers. Make sure the commands complete without error before moving on.
Open the resource group that has AKS deployed. Select the AKS cluster from the resources list.
On the AKS landing page, select Settings > Back up > Install Extension.
On the Install AKS Backup extension page, select Next. Select the storage account and Blob container created in preceding steps. Select Next and then Create. It takes about five minutes to complete this step.
Open the Azure portal, in the search bar on the top, search for Backup vaults. You should see it listed under Services. Select it.
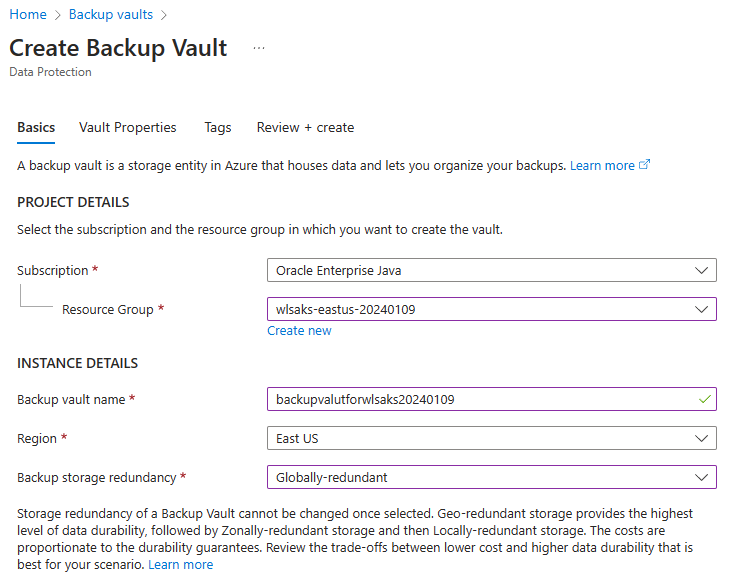
To enable AKS Backup, follow the steps in Back up Azure Kubernetes Service by using Azure Backup up to, but not including, the "Use hooks during AKS backup" section. Make the adjustments indicated in the following steps.
When you reach the "Create a Backup vault" section, make the following adjustments:
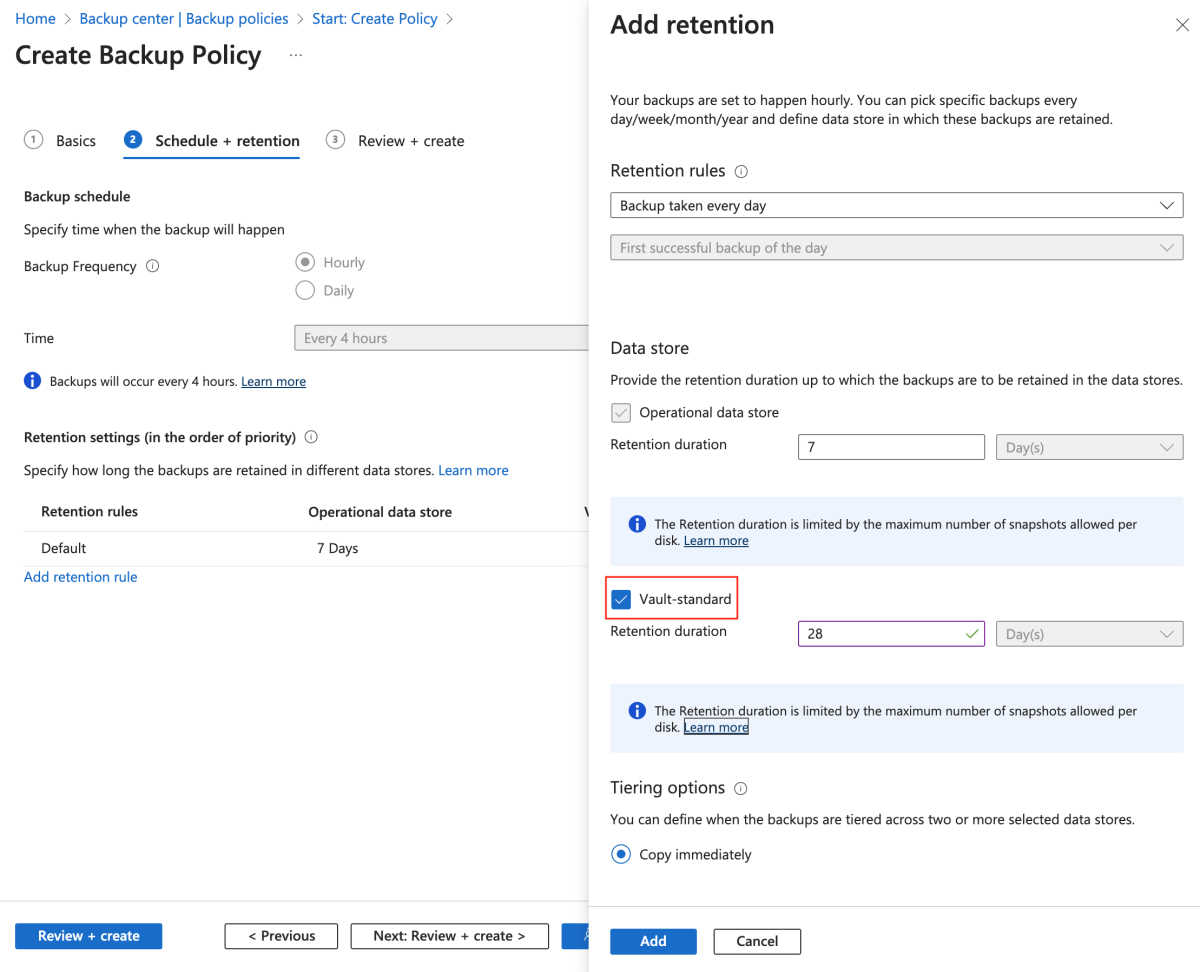
When you reach the "Create a backup policy" section, make the following adjustments when asked to create a retention policy:
When you reach "Configure backups" section, make the following adjustments. Step 1-5 are for AKS Extension installation. Skip step 1-5 and start from step 6.
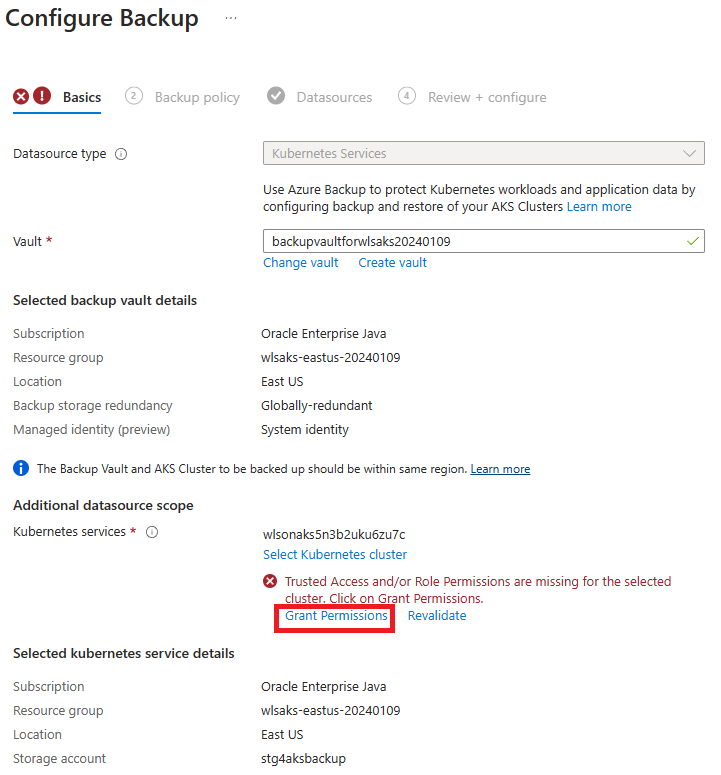
For step 7, you run into permission errors. Select Grant Permission to move on. After the permission deployment completes, if the error still shows, select Revalidate to refresh the role assignments.
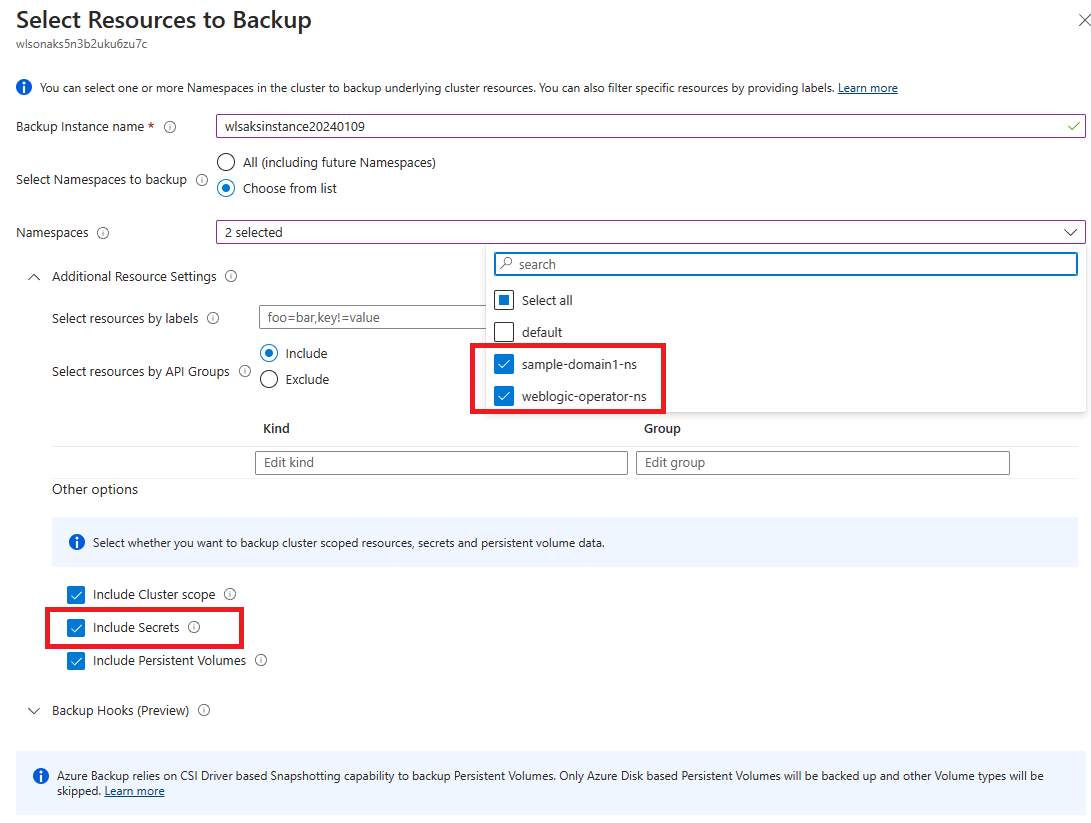
For step 10, find Select Resources to Backup, and make the following adjustments:
- For Backup Instance name, fill in a unique name.
- For Namespaces, select namespaces for WebLogic Operator and WebLogic Server. In this article, select weblogic-operator-ns and sample-domain1-ns.
- For Other options, select all the options. Make sure Include Secrets is selected.
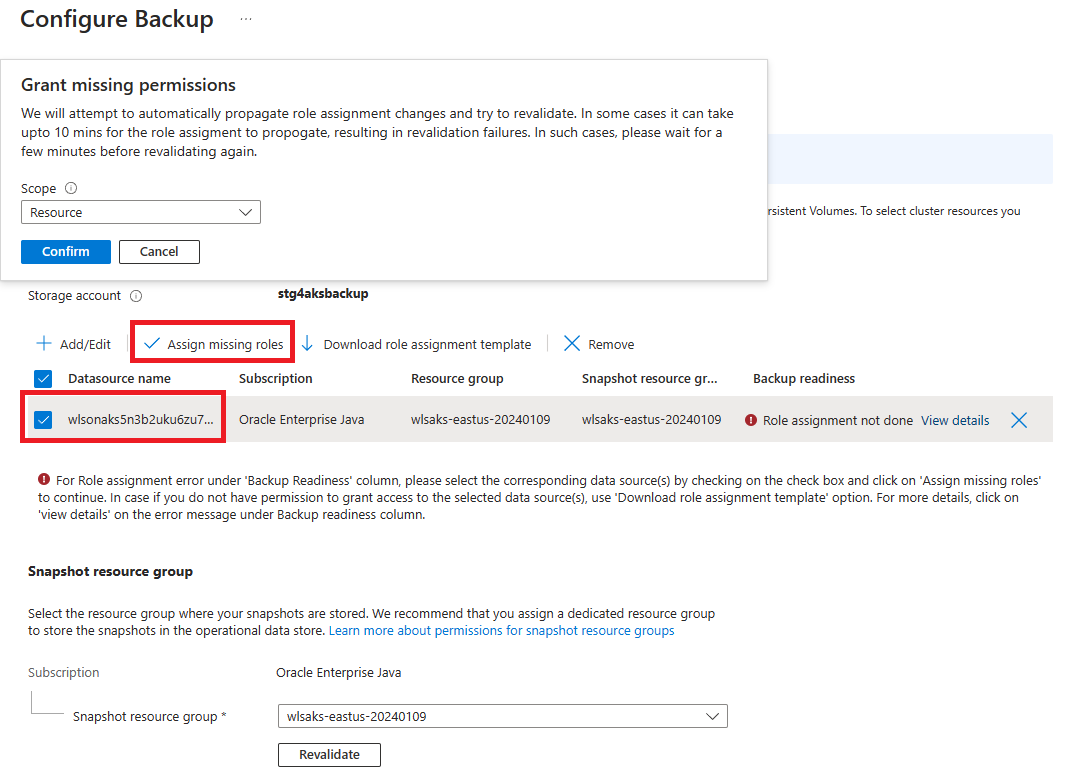
For step 11, you run into a role assignment error. Select your datasource from the list, and select Assign missing roles to mitigate the error.
Prepare to restore the WLS cluster in a secondary region
In this section, you prepare to restore the WLS cluster in the secondary region. Here, the secondary region is West US 2. Before restoring, you must have an AKS cluster with AKS Backup Extension installed in the West US 2 region.
Configure Azure Container Registry for geo-replication
Use the following steps to configure Azure Container Registry (ACR) for geo-replication, which contains the WLS image you created in the Deploy WLS on AKS section. To enable ACR replication, you have to upgrade it to the Premium pricing plan. For more information, see Geo-replication in Azure Container Registry.
- Open the resource group that you provisioned in the Deploy WLS on AKS section. From the resource list, select the ACR whose name starts with wlsaksacr.
- In the ACR landing page, select Settings > Properties. For Pricing plan, select Premium, and then select Save.
- In the navigation pane, select Services > Geo-replications. Select Add to add replication region in the page.
- In the Create replication page, for Location, select West US 2, and then select Create.
After the deployment finishes, the ACR is enabled for geo-replication.
Create a storage account in a secondary region
To enable the AKS Backup Extension, you must provide a storage account with an empty container in the same region.
To restore backup cross region, you must provide a staging location where the backup data is hydrated. This staging location includes a resource group and a storage account in it within the same region and subscription as the target cluster for restoration.
Use the following steps to create a storage account and container. Some of these steps direct you to other guides.
- Sign in to the Azure portal.
- Create a storage account by following the steps in Create a storage account. You don't need to perform all the steps in the article. Fill out the fields shown on the Basics pane. For Region, select West US 2, then select Review + create to accept the default options. Proceed to validate and create the account, then return to this article.
- Create a storage container for the AKS Backup Extension by following the steps in the Create a container section of Quickstart: Upload, download, and list blobs with the Azure portal.
- Create a storage container as a staging location for use during restoration.
Prepare an AKS cluster in a secondary region
The following sections show you how to create an AKS cluster in a secondary region.
Create a new AKS cluster
This article exposes a WLS application using Application Gateway Ingress Controller. In this section, you create a new AKS cluster in the West US 2 region. Then, you enable the ingress controller add-on with a new application gateway instance. For more information, see Enable the ingress controller add-on for a new AKS cluster with a new application gateway instance.
Use the following steps to create the AKS cluster:
Use the following commands to create a resource group in the secondary region:
export RG_NAME_WESTUS=wlsaks-westus-20240109

az group create --name ${RG_NAME_WESTUS} --location westus
Use the following commands to deploy an AKS cluster with the add-on enabled:
export AKS_NAME_WESTUS=${RG_NAME_WESTUS}aks
export GATEWAY_NAME_WESTUS=${RG_NAME_WESTUS}gw

az aks create \
    --resource-group ${RG_NAME_WESTUS} \
    --name ${AKS_NAME_WESTUS} \
    --network-plugin azure \
    --enable-managed-identity \
    --enable-addons ingress-appgw \
    --appgw-name ${GATEWAY_NAME_WESTUS} \
    --appgw-subnet-cidr "10.225.0.0/16" \
    --generate-ssh-keys
This command automatically creates a
Standard_v2 SKUapplication gateway instance with the name${RG_NAME_WESTUS}gwin the AKS node resource group. The node resource group is namedMC_resource-group-name_cluster-name_locationby default.Note
The AKS cluster that you provisioned in the Deploy WLS on AKS section runs across three availability zones in the East US region. Availability zones aren't supported in the West US 2 region. The AKS cluster in West US 2 isn't zone-redundant. If your production environment requires zone redundancy, make sure your paired region supports availability zones. For more information, see the Overview of availability zones for AKS clusters section of Create an Azure Kubernetes Service (AKS) cluster that uses availability zones.
Use the following commands to get the public IP address of the application gateway instance. Save aside the IP address, which you use later in this article.
export APPGW_ID=$(az aks show \
    --resource-group ${RG_NAME_WESTUS} \
    --name ${AKS_NAME_WESTUS} \
    --query 'addonProfiles.ingressApplicationGateway.config.effectiveApplicationGatewayId' \
    --output tsv)
echo ${APPGW_ID}
export APPGW_IP_ID=$(az network application-gateway show \
    --id ${APPGW_ID} \
    --query frontendIPConfigurations\[0\].publicIPAddress.id \
    --output tsv)
echo ${APPGW_IP_ID}
export APPGW_IP_ADDRESS=$(az network public-ip show \
    --id ${APPGW_IP_ID} \
    --query ipAddress \
    --output tsv)
echo "App Gateway public IP address: ${APPGW_IP_ADDRESS}"
Use the following command to attach a domain name service (DNS) name label to the public IP address resource. Replace
<your-chosen-DNS-name>with an appropriate value - for example,ejb010316.az network public-ip update --ids ${APPGW_IP_ID} --dns-name <your-chosen-DNS-name>You can check the fully qualified domain name (FQDN) of the public IP with
az network public-ip show. The following example shows an FQDN with DNS labelejb010316:az network public-ip show \ --id ${APPGW_IP_ID} \ --query dnsSettings.fqdn \ --output tsvThis command produces output similar to the following example:
ejb010316.westus.cloudapp.azure.com
Note
If you're working with an existing AKS cluster, complete the following two actions before you move on:
- Enable the ingress controller add-on by following the steps in Enable application gateway ingress controller add-on for an existing AKS cluster.
- If you have WLS running in the target namespace, to avoid conflicts, clean up WLS resources in the WebLogic Operator namespace and WebLogic Server namespace. In this article, the WLS on AKS offer provisioned the WebLogic Operator in namespace
weblogic-operator-nsand the WebLogic Server in namespacesample-domain1-ns. Runkubectl delete namespace weblogic-operator-ns sample-domain1-nsto delete the two namespaces.
Enable the AKS Backup Extension
Before you continue, use the following steps to install the AKS Backup Extension to the cluster in the secondary region:
Use the following command to connect to the AKS cluster in the West US 2 region:
az aks get-credentials \
    --resource-group ${RG_NAME_WESTUS} \
    --name ${AKS_NAME_WESTUS}
Use the following command to enable the CSI drivers and snapshots for your cluster:
az aks update \
    --resource-group ${RG_NAME_WESTUS} \
    --name ${AKS_NAME_WESTUS} \
    --enable-disk-driver \
    --enable-file-driver \
    --enable-blob-driver \
    --enable-snapshot-controller --yes
Open the resource group that has AKS deployed. Select the AKS cluster from the resources list.
On the AKS landing page, select Settings > Back up > Install Extension.
On the Install AKS Backup extension page, select Next. Select the storage account and Blob container created in preceding steps. Select Next and then Create. It takes about five minutes to complete this step.
Note
To save costs, you can stop the AKS cluster in the secondary region by following the steps in Stop and start an Azure Kubernetes Service (AKS) cluster. Start it before you restore the WLS cluster.
Wait for a Vault-standard backup to happen
In AKS, the Vault-standard Tier is the only tier that supports Geo-redundancy and Cross Region Restore. As stated in Which backup storage tier does AKS backup support?, "Only one scheduled recovery point per day is moved to Vault Tier." You must wait for a Vault-standard backup to happen. A good lower bound is to wait 24 hours after completing the previous step before continuing.
Stop the primary cluster
The primary WLS cluster and secondary WLS cluster are configured with the same TLOG database. Only one cluster can own the database at the same time. To ensure the secondary cluster works correctly, stop the primary WLS cluster. In this article, stop the AKS cluster to disable the WLS cluster by using the following steps:
- Open the Azure portal and go to the resource group that you provisioned in the Deploy WLS on AKS section.
- Open the AKS cluster listed in the resource group.
- Select Stop to stop the AKS cluster. Make sure the deployment finishes before moving on.
Restore the WLS cluster
AKS backup supports both Operational Tier and Vault Tier backups. Only backups stored in Vault Tier can be used to do a restore to a cluster in a different region (Azure Paired Region). As per the retention rules set in the backup policy, the first successful backup of a day is moved to the blob container cross region. For more information, see the Which backup storage tier does AKS backup support? section of What is Azure Kubernetes Service backup?
After you configured geo-redundancy in the Configure geo-redundancy using Azure Backup section, it takes at least a day for Vault Tier backups to become available for restoring.
Use the following steps to restore the WLS cluster:
Open the Azure portal and search for Backup center. Select Backup center under Services.
Under Manage, select Backup instances. Filter on the datasource type Kubernetes Services to find the backup instance you created in the previous section.
Select the backup instance to see the restore points list. In this article, the instance name is a string similar to
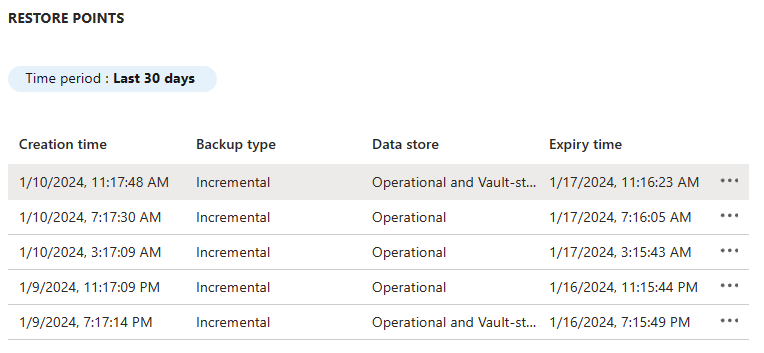
wlsonaks*\wlsaksinstance20240109.Select the latest Operational and Vault-standard backup, then select More options. Select Restore to start the restore process.
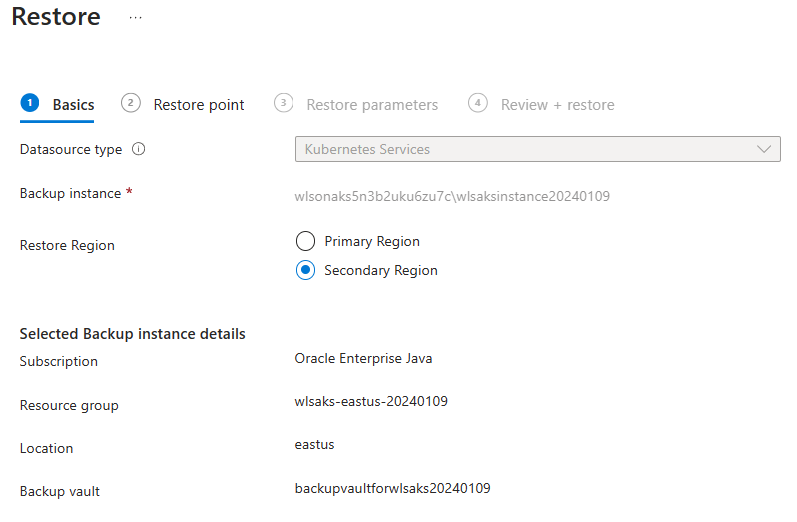
On the Restore page, the default pane is Restore point. Select Previous to change to the Basics pane. For Restore Region, select Secondary Region, then select Next: Restore point.
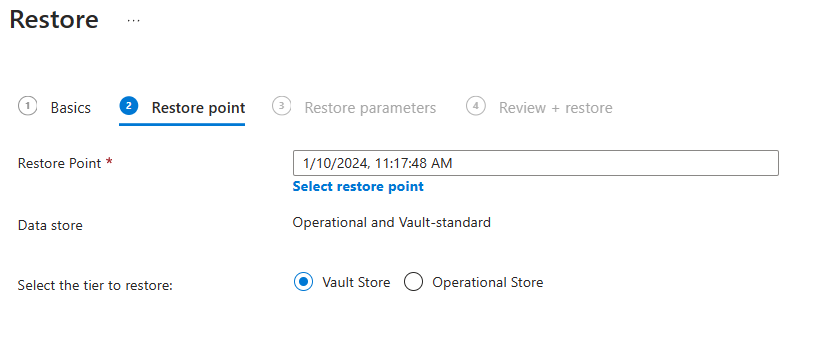
On the Restore point pane, for Select the tier to restore, select Vault Store, then select Next:Restore parameters.
On the Restore parameters pane, use the following steps:
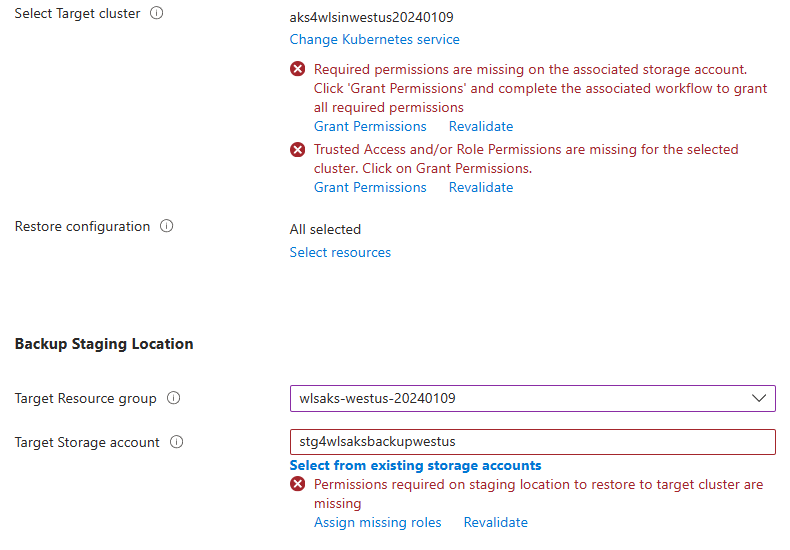
For Select Target cluster, select the AKS cluster that you created in the West US 2 region. You run into a permission issue as the following screenshot shows. Select Grant Permission to mitigate the errors.
For Backup Staging Location, select the Storage Account that you created in West US 2. You run into a permission issue as the following screenshot shows. Select Assign missing roles to mitigate the errors.
If the errors still happen after role assignments finishes, select Revalidate to refresh the permissions.
When granting missing permissions, if asked to specify a Scope, accept the default value.
Select Validate. You should see the message, Validation completed successfully. Otherwise, troubleshoot and resolve the problem before continuing.
Select Next:Review + restore, then select Restore. It takes about 10 minutes to restore the WLS cluster.
You can monitor the restore process from Backup center > Monitoring + reporting > Backup jobs, as shown in the following screenshot:
Select Refresh to see the latest progress.
After the process completes without error, stop the backup AKS cluster. Failure to do so causes ownership conflicts when you access the TLOG database in later steps.
Start the primary cluster.
Set up an Azure Traffic Manager
In this section, you create an Azure Traffic Manager for distributing traffic to your public facing applications across the global Azure regions. The primary endpoint points to the Azure Application Gateway in the primary WLS cluster, and the secondary endpoint points to the Azure Application Gateway in the secondary WLS cluster.
Create an Azure Traffic Manager profile by following the steps in Quickstart: Create a Traffic Manager profile using the Azure portal. Skip the "Prerequisites" section. You just need the following sections: Create a Traffic Manager profile, Add Traffic Manager endpoints, and Test Traffic Manager profile. Use the following steps as you go through these sections, then return to this article after you create and configure the Azure Traffic Manager:
When you reach the section Create a Traffic Manager profile, in step 2 Create Traffic Manager profile, use the following steps:
- Save aside the unique Traffic Manager profile name for Name - for example, tmprofile-ejb120623.
- Save aside the new resource group name for Resource group - for example, myResourceGroupTM1.
When you reach the section Add Traffic Manager endpoints, use the following steps:
- After the step Select the profile from the search results, use the following steps:
- Under Settings, select Configuration.
- For DNS time to live (TTL), enter 10.
- Under Endpoint monitor settings, for Path, enter /weblogic/ready.
- Under Fast endpoint failover settings, use the following values:
- For Probing internal, enter 10.
- For Tolerated number of failures, enter 3.
- For Probe timeout, 5.
- Select Save. Wait until it completes.
- In step 4 for adding the primary endpoint
myPrimaryEndpoint, use the following steps:- For Target resource type, select Public IP address.
- Select the Choose public IP address dropdown and enter the IP address of Application Gateway deployed in the East US WLS cluster that you saved aside previously. You should see one entry matched. Select it for Public IP address.
- In step 6 for adding a failover / secondary endpoint myFailoverEndpoint, use the following steps:
- For Target resource type, select Public IP address.
- Select the Choose public IP address dropdown and enter the IP address of Application Gateway deployed in the West US WLS cluster that you saved aside previously. You should see one entry matched. Select it for Public IP address.
- Wait for a while. Select Refresh until the Monitor status reaches the following states:
- The primary endpoint is Online.
- The failover endpoint is Degraded.
- After the step Select the profile from the search results, use the following steps:
When you reach the section Test Traffic Manager profile, use the following steps:
- In subsection Check the DNS name, in step 3, save aside the DNS name of your Traffic Manager profile - for example,
http://tmprofile-ejb120623.trafficmanager.net. - In subsection View Traffic Manager in action, use the following steps:
- In step 1 and 3, append /weblogic/ready to the DNS name of your Traffic Manager profile in your web browser - for example,
http://tmprofile-ejb120623.trafficmanager.net/weblogic/ready. You should see an empty page without any error message. - In step 4, you can't access /weblogic/ready, which is expected because the secondary cluster is stopped.
- Re-enable the primary endpoint.
- In step 1 and 3, append /weblogic/ready to the DNS name of your Traffic Manager profile in your web browser - for example,
- In subsection Check the DNS name, in step 3, save aside the DNS name of your Traffic Manager profile - for example,
Now, the primary endpoint has the states Enabled and Online and the failover endpoint has the states Enabled and Degraded in the Traffic Manager profile. Keep the page open for monitoring the endpoint status later.
Test failover from primary to secondary
To test failover, you manually fail your primary database server and WLS cluster over to the secondary database server and WLS cluster in this section.
Since the primary cluster is up and running, it acts as the active cluster and handles all user requests routed by your Traffic Manager profile.
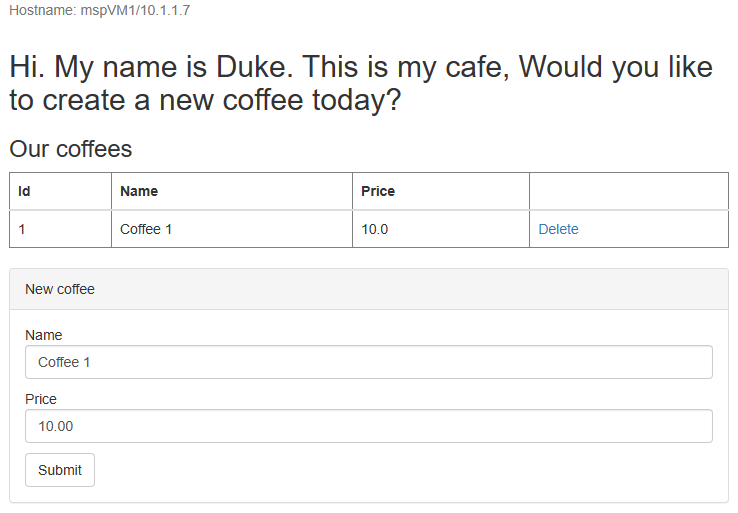
Open the DNS name of your Azure Traffic Manager profile in a new tab of the browser, appending the context root /weblogic-cafe of the deployed app - for example, http://tmprofile-ejb120623.trafficmanager.net/weblogic-cafe. Create a new coffee with name and price - for example, Coffee 1 with price 10. This entry is persisted into both the application data table and the session table of the database. The UI that you see should be similar to the following screenshot:
If your UI doesn't look similar, troubleshoot and resolve the problem before you continue.
Keep the page open so you can use it for failover testing later.
Failover to the secondary site
Use the following steps to fail over from primary to secondary.
First, use the following steps to stop the primary AKS cluster:
- Open the Azure portal and go to the resource group that was provisioned in the Deploy WLS on AKS section.
- Open the AKS cluster listed in the resource group.
- Select Stop to stop the AKS cluster. Make sure the deployment finishes before moving on.
Next, use the following steps to fail over the Azure SQL Database from the primary server to the secondary server.
- Switch to the browser tab of your Azure SQL Database failover group.
- Select Failover > Yes.
- Wait until it completes.
Next, use the following steps to start the secondary cluster.
- Open the Azure portal and go to the resource group that has AKS cluster in secondary region.
- Open the AKS cluster listed in the resource group.
- Select Start to start the AKS cluster. Make sure the deployment finishes before moving on.
Finally, use the following steps to verify the sample app after the endpoint myFailoverEndpoint is in the Online state:
Switch to the browser tab of your Traffic Manager, then refresh the page until you see that the Monitor status value of the endpoint
myFailoverEndpointenters the Online state.Switch to the browser tab of the sample app and refresh the page. You should see the same data persisted in the application data table and the session table displayed in the UI, as shown in the following screenshot:
If you don't observe this behavior, it might be because the Traffic Manager is taking time to update DNS to point to the failover site. The problem could also be that your browser cached the DNS name resolution result that points to the failed site. Wait for a while and refresh the page again.
Note
A production-ready HA/DR solution would account for continually copying the WLS configuration from the primary to the secondary clusters on a regular schedule. For information on how to do this, see the references to the Oracle documentation at the end of this article.
To automate the failover, consider using alerts on Traffic Manager metrics and Azure Automation. For more information, see the Alerts on Traffic Manager metrics section of Traffic Manager metrics and alerts and Use an alert to trigger an Azure Automation runbook.
Fail back to the primary site
To fail back to the primary site, you have to ensure the two clusters have a mirror backup configuration. You can achieve this state by using the following steps:
- Enable the AKS cluster backups in the West US 2 region by following the steps in the Configure geo-redundancy using Azure Backup section, starting from step 4.
- Restore the latest Vault Tier backup to the cluster in the East US region by following the steps in the Prepare to restore the WLS cluster in a secondary region section. Skip the steps you already completed.
- Use similar steps in the Failover to the secondary site section to fail back to the primary site including database server and cluster.
Clean up resources
If you're not going to continue to use the WLS clusters and other components, use the following steps to delete the resource groups to clean up the resources used in this tutorial:
- In the search box at the top of the Azure portal, enter Backup vaults and select the backup vaults from the search results.
- Select Manage > Properties > Soft delete > Update. Next to Enable soft Delete, unselect the checkbox.
- Select Manage > Backup instances. Select the instance you created and delete it.
- Enter the resource group name of Azure SQL Database servers - for example,
myResourceGroup- in the search box at the top of the Azure portal, and select the matched resource group from the search results. - Select Delete resource group.
- In Enter resource group name to confirm deletion, enter the resource group name.
- Select Delete.
- Repeat steps 4-7 for the resource group of the Traffic Manager - for example,
myResourceGroupTM1. - Repeat steps 4-7 for the resource group of the primary WLS cluster - for example,
wls-aks-eastus-20240109. - Repeat steps 4-7 for the resource group of the secondary WLS cluster - for example,
wls-aks-westus-20240109.
Next steps
In this tutorial, you set up an HA/DR solution consisting of an active-passive application infrastructure tier with an active-passive database tier, and in which both tiers span two geographically different sites. At the first site, both the application infrastructure tier and the database tier are active. At the second site, the secondary domain is shut down, and the secondary database is on standby.
Continue to explore the following references for more options to build HA/DR solutions and run WLS on Azure:
