Create and manage users on an on-premises management console (Legacy)
Important
Defender for IoT now recommends using Microsoft cloud services or existing IT infrastructure for central monitoring and sensor management, and plans to retire the on-premises management console on January 1st, 2025.
For more information, see Deploy hybrid or air-gapped OT sensor management.
Microsoft Defender for IoT provides tools for managing on-premises user access in the OT network sensor, and the on-premises management console. Azure users are managed at the Azure subscription level using Azure RBAC.
This article describes how to manage on-premises users directly on an on-premises management console.
Default privileged users
By default, each on-premises management console is installed with the privileged support and cyberx users, which have access to advanced tools for troubleshooting and setup.
When setting up an on-premises management console for the first time, sign in with one of these privileged users, create an initial user with an Admin role, and then create extra users for security analysts and read-only users.
For more information, see Install OT monitoring software on an on-premises management console and Default privileged on-premises users.
Add new on-premises management console users
This procedure describes how to create new users for an on-premises management console.
Prerequisites: This procedure is available for the support and cyberx users, and any user with the Admin role.
To add a user:
Sign in to the on-premises management console and select Users > + Add user.
Select Create user and then define the following values:
Name Description Username Enter a username. Email Enter the user's email address. First Name Enter the user's first name. Last Name Enter the user's last name. Role Select a user role. For more information, see On-premises user roles. Remote Sites Access Group Available for the on-premises management console only.
Select either All to assign the user to all global access groups, or Specific to assign them to a specific group only, and then select the group from the drop-down list.
For more information, see Define global access permission for on-premises users.Password Select the user type, either Local or Active Directory User.
For local users, enter a password for the user. Password requirements include:
- At least eight characters
- Both lowercase and uppercase alphabetic characters
- At least one number
- At least one symbolTip
Integrating with Active Directory lets you associate groups of users with specific permission levels. If you want to create users using Active Directory, first configure Active Directory on the on-premises management console and then return to this procedure.
Select Save when you're done.
Your new user is added and is listed on the sensor Users page.
To edit a user, select the Edit ![]() button for the user you want to edit, and change any values as needed.
button for the user you want to edit, and change any values as needed.
To delete a user, select the Delete ![]() button for the user you want to delete.
button for the user you want to delete.
Change a user's password
This procedure describes how Admin users can change local user passwords. Admin users can change passwords for themselves or for other Security Analyst or Read Only users. Privileged users can change their own passwords, and the passwords for Admin users.
Tip
If you need to recover access to a privileged user account, see Recover privileged access to an on-premises management console.
Prerequisites: This procedure is available only for the support or cyberx users, or for users with the Admin role.
To reset a user's password on the on-premises management console:
Sign into the on-premises management console and select Users.
On the Users page, locate the user whose password needs to be changed.
At the right of that user row, select the Edit
 button.
In the Edit user pane that appears, scroll down to the Change password section. Enter and confirm the new password.
Passwords must be at least 16 characters, contain lowercase and uppercase alphabetic characters, numbers, and one of the following symbols: #%*+,-./:=?@[]^_{}~
Select Update when you're done.
Recover privileged access to an on-premises management console
This procedure describes how to recover either the support or cyberx user password on an on-premises management console. For more information, see Default privileged on-premises users.
Prerequisites: This procedure is available for the support and cyberx users only.
To recover privileged access to an on-premises management console:
Start signing in to your on-premises management console. On the sign-in screen, under the Username and Password fields, select Password recovery.
In the Password Recovery dialog, select either CyberX or Support from the drop-down menu, and copy the unique identifier code that's displayed to the clipboard.
Go the Defender for IoT Sites and sensors page in the Azure portal. You may want to open the Azure portal in a new browser tab or window, keeping your on-premises management console open.
In your Azure portal settings > Directories + subscriptions, make sure that you've selected the subscription where your sensors were onboarded to Defender for IoT.
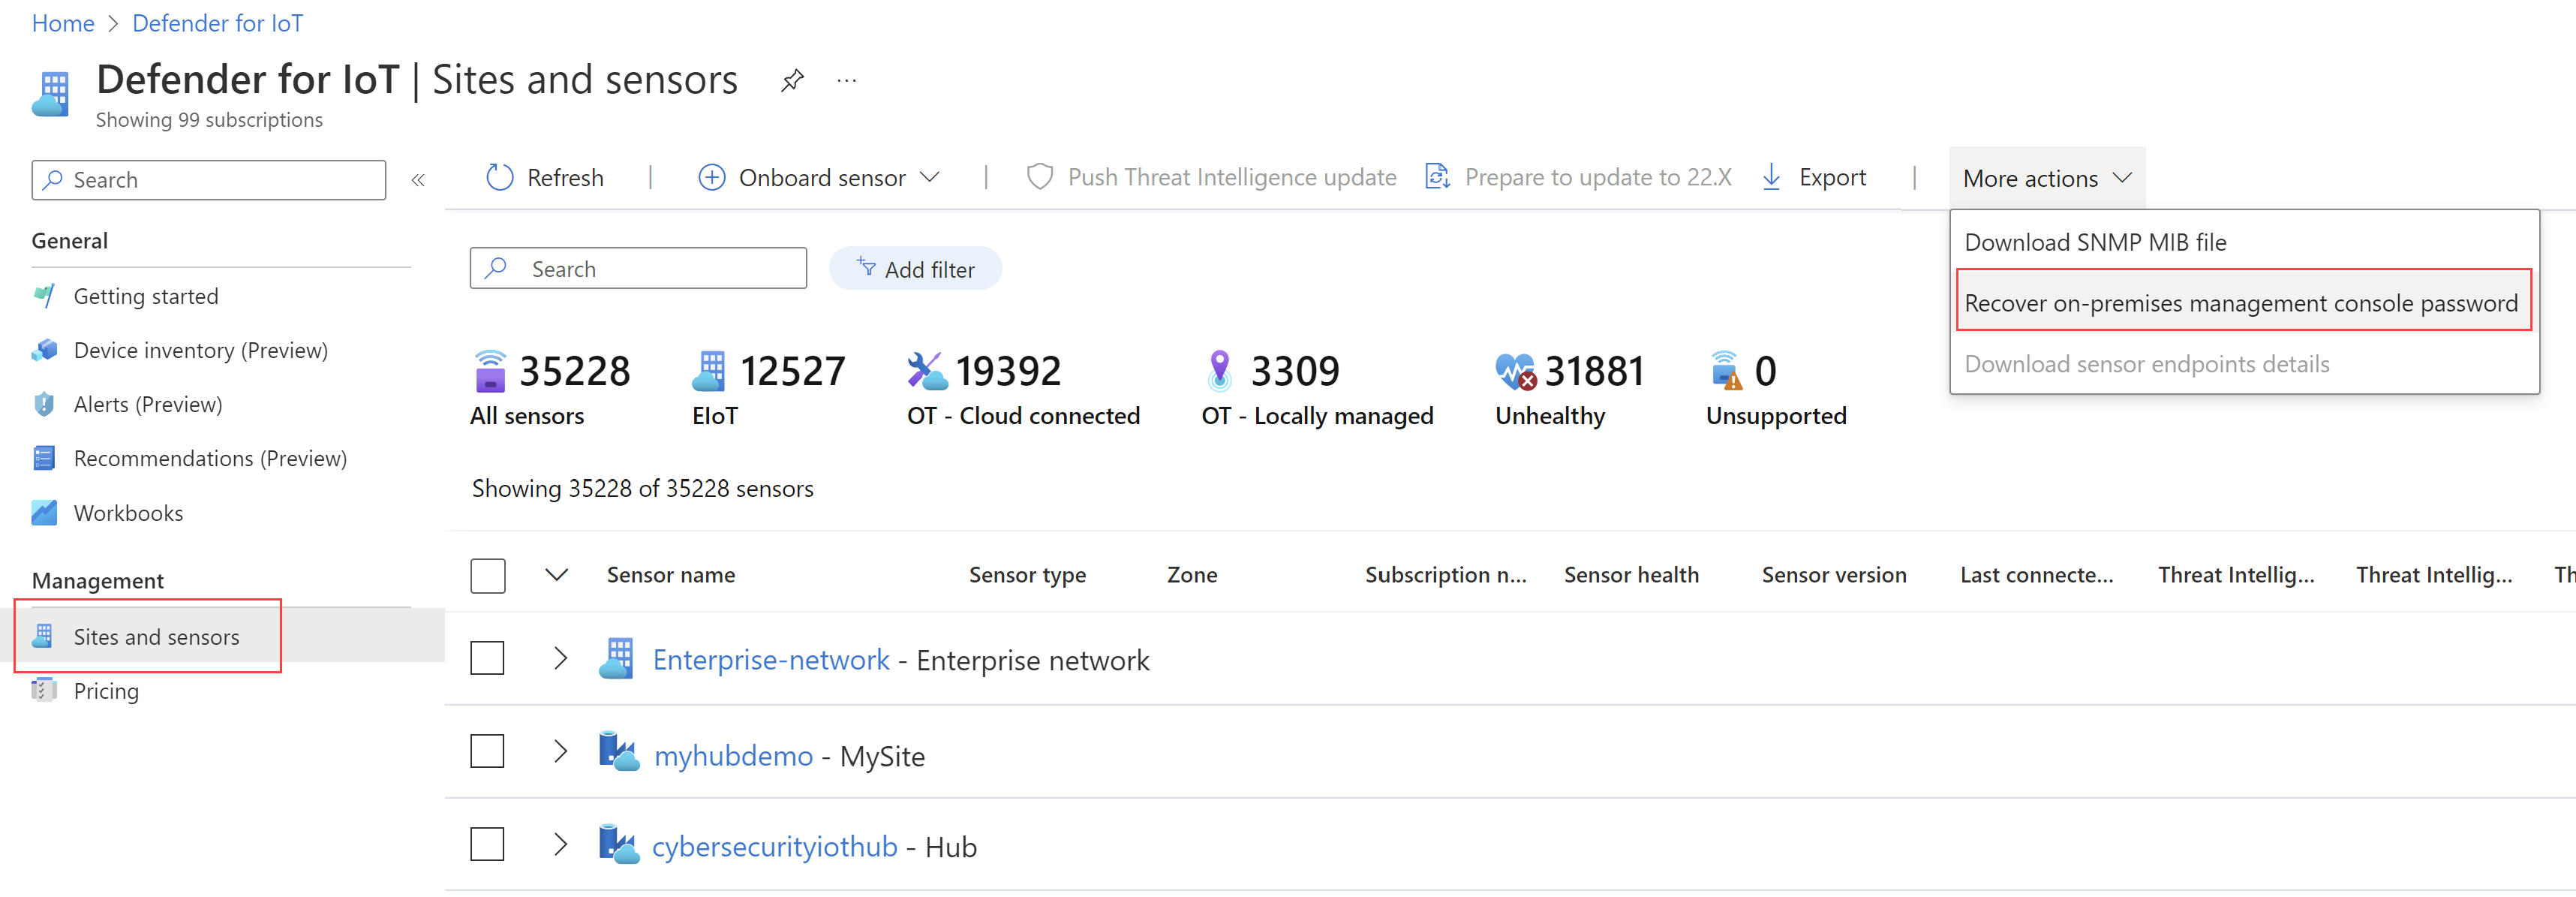
In the Sites and sensors page, select the More Actions drop down menu > Recover on-premises management console password.

In the Recover dialog that opens, enter the unique identifier that you've copied to the clipboard from your on-premises management console and select Recover. A password_recovery.zip file is automatically downloaded.
All files downloaded from the Azure portal are signed by root of trust so that your machines use signed assets only.
Back on the on-premises management console tab, on the Password recovery dialog, select Upload. Browse to an upload the password_recovery.zip file you downloaded from the Azure portal.
Note
If an error message appears, indicating that the file is invalid, you may have had an incorrect subscription selected in your Azure portal settings.
Return to Azure, and select the settings icon in the top toolbar. On the Directories + subscriptions page, make sure that you've selected the subscription where your sensors were onboarded to Defender for IoT. Then repeat the steps in Azure to download the password_recovery.zip file and upload it on the on-premises management console again.
Select Next. A system-generated password for your on-premises management console appears for you to use for the selected user. Make sure to write down the password as it won't be shown again.
Select Next again to sign into your on-premises management console.
Integrate users with Active Directory
Configure an integration between your on-premises management console and Active Directory to:
- Allow Active Directory users to sign in to your on-premises management console
- Use Active Directory groups, with collective permissions assigned to all users in the group
For example, use Active Directory when you have a large number of users that you want to assign Read Only access to, and you want to manage those permissions at the group level.
For more information, see Microsoft Entra ID support on sensors and on-premises management consoles.
Prerequisites: This procedure is available for the support and cyberx users only, or any user with an Admin role.
To integrate with Active Directory:
Sign in to your on-premises management console and select System Settings.
Scroll down to the Management console integrations area on the right, and then select Active Directory.
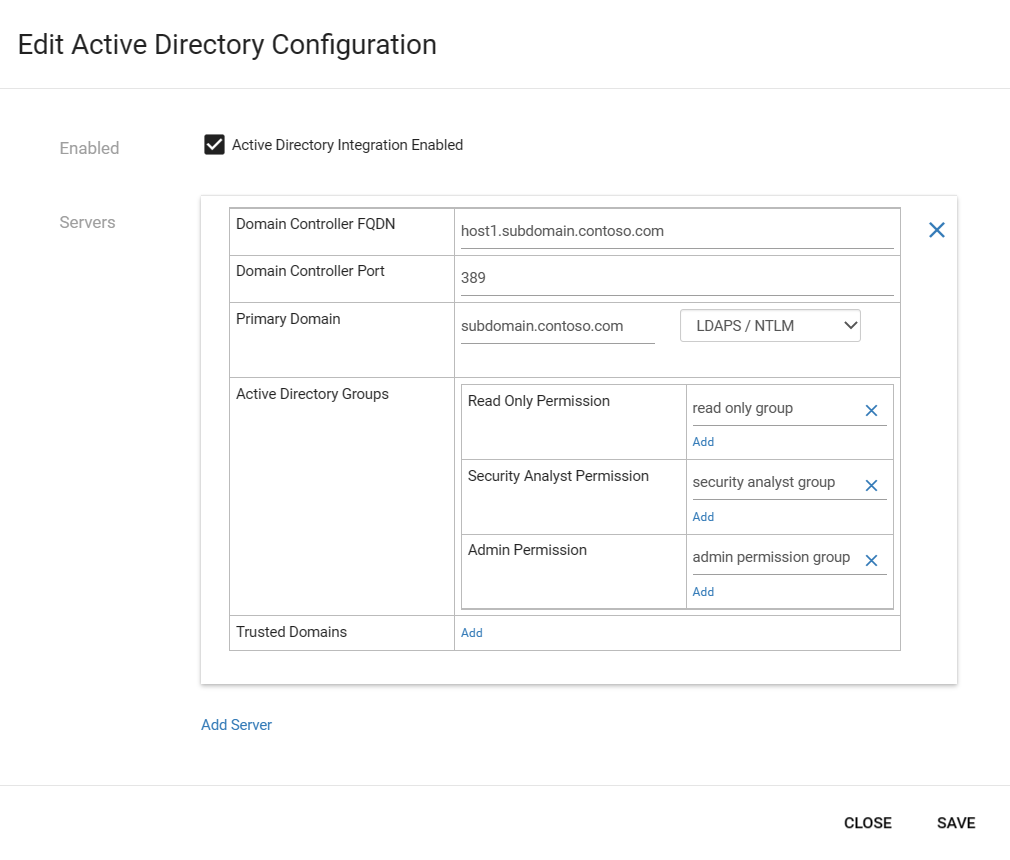
Select the Active Directory Integration Enabled option and enter the following values for an Active Directory server:
Field Description Domain Controller FQDN The fully qualified domain name (FQDN), exactly as it appears on your LDAP server. For example, enter host1.subdomain.contoso.com.
If you encounter an issue with the integration using the FQDN, check your DNS configuration. You can also enter the explicit IP of the LDAP server instead of the FQDN when setting up the integration.Domain Controller Port The port on which your LDAP is configured. Primary Domain The domain name, such as subdomain.contoso.com, and then select the connection type for your LDAP configuration.
Supported connection types include: LDAPS/NTLMv3 (recommended), LDAP/NTLMv3, or LDAP/SASL-MD5Active Directory Groups Select + Add to add an Active Directory group to each permission level listed, as needed.
When you enter a group name, make sure that you enter the group name as it's defined in your Active Directory configuration on the LDAP server. Then, make sure to use these groups when creating new sensor users from Active Directory.
Supported permission levels include Read-only, Security Analyst, Admin, and Trusted Domains.
Add groups as Trusted endpoints in a separate row from the other Active Directory groups. To add a trusted domain, add the domain name and the connection type of a trusted domain. You can configure trusted endpoints only for users who were defined under users.Select + Add Server to add another server and enter its values as needed, and Save when you're done.
Important
When entering LDAP parameters:
- Define values exactly as they appear in Active directory, except for the case.
- User lowercase only, even if the configuration in Active Directory uses uppercase.
- LDAP and LDAPS can't be configured for the same domain. However, you can configure each in different domains and then use them at the same time.
For example:

Create access group rules for on-premises management console users.
If you configure Active Directory groups for on-premises management console users, you must also create an access group rule for each Active Directory group. Active Directory credentials won't work for on-premises management console users without a corresponding access group rule.
For more information, see Define global access permission for on-premises users.
Define global access permission for on-premises users
Large organizations often have a complex user permissions model based on global organizational structures. To manage your on-premises Defender for IoT users, we recommend that you use a global business topology that's based on business units, regions, and sites, and then define user access permissions around those entities.
Create user access groups to establish global access control across Defender for IoT on-premises resources. Each access group includes rules about the users that can access specific entities in your business topology, including business units, regions, and sites.
For more information, see On-premises global access groups.
Prerequisites:
This procedure is available for the support and cyberx users, and any user with the Admin role.
Before you create access groups, we also recommend that you:
Plan which users are associated with the access groups that you create. Two options are available for assigning users to access groups:
Assign groups of Active Directory groups: Verify that you set up an Active Directory instance to integrate with the on-premises management console.
Assign local users: Verify that you've created local users.
Users with Admin roles have access to all business topology entities by default, and can't be assigned to access groups.
Carefully set up your business topology. For a rule to be successfully applied, you must assign sensors to zones in the Site Management window. For more information, see Create OT sites and zones on an on-premises management console.
To create access groups:
Sign in to the on-premises management console as user with an Admin role.
Select Access Groups from the left navigation menu, and then select Add
 .
.In the Add Access Group dialog box, enter a meaningful name for the access group, with a maximum of 64 characters.
Select ADD RULE, and then select the business topology options that you want to include in the access group. The options that appear in the Add Rule dialog are the entities that you'd created in the Enterprise View and Site Management pages. For example:
If they don't otherwise exist yet, default global business units and regions are created for the first group you create. If you don't select any business units or regions, users in the access group will have access to all business topology entities.
Each rule can include only one element per type. For example, you can assign one business unit, one region, and one site for each rule. If you want the same users to have access to multiple business units, in different regions, create more rules for the group. When an access group contains several rules, the rule logic aggregates all rules using an AND logic.
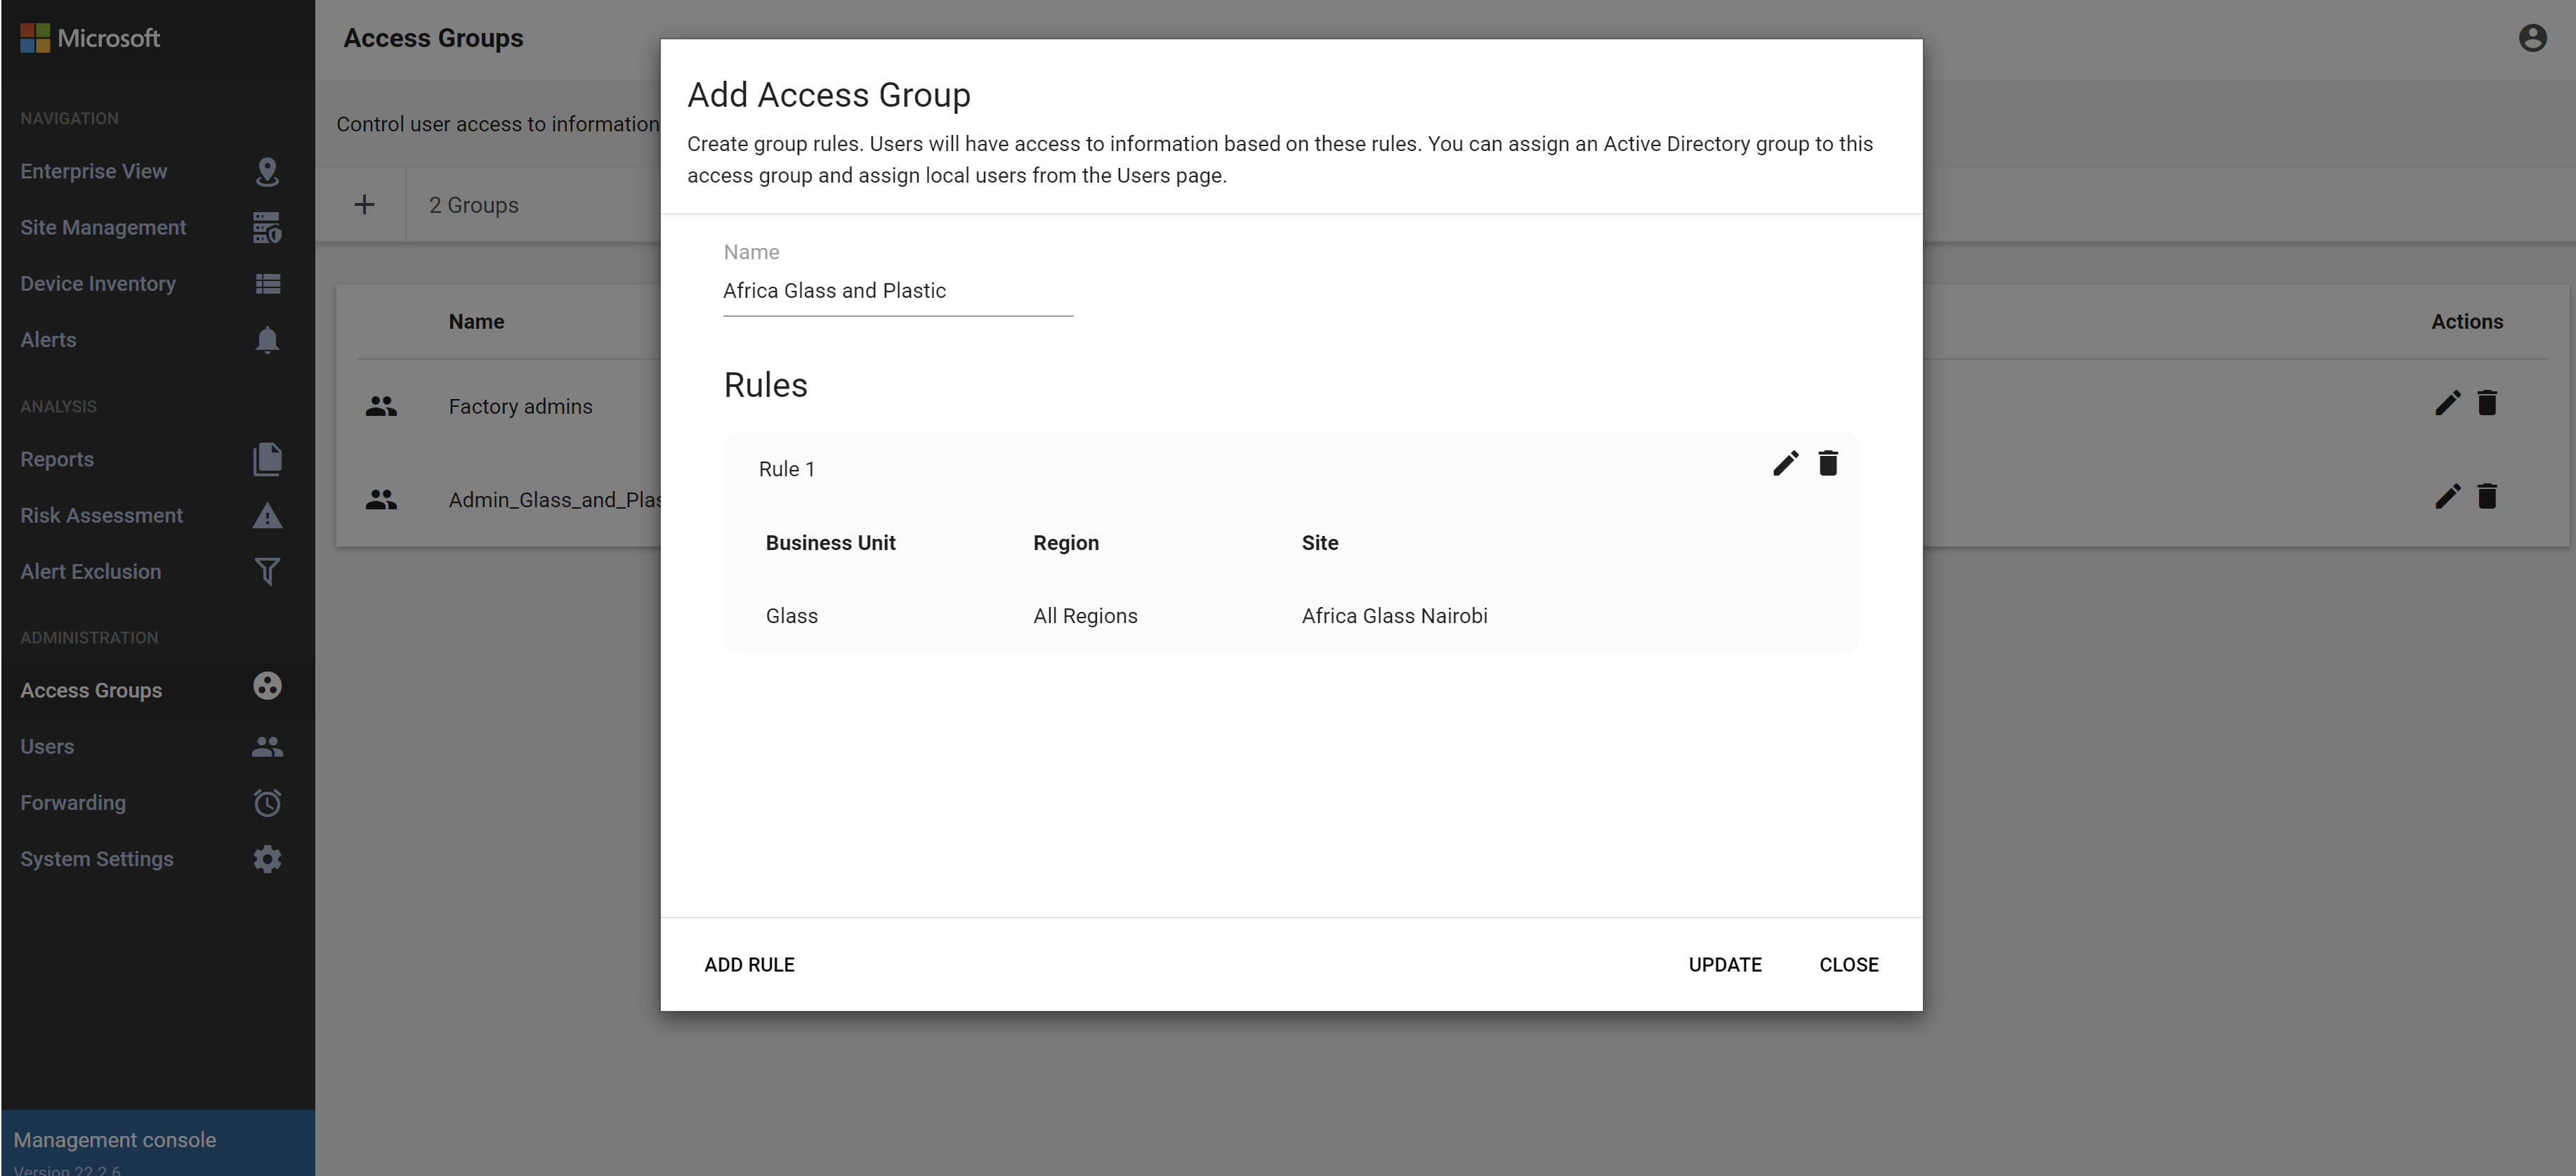
Any rules you create are listed in the Add Access Group dialog box, where you can edit them further or delete them as needed. For example:
Add users with one or both of the following methods:
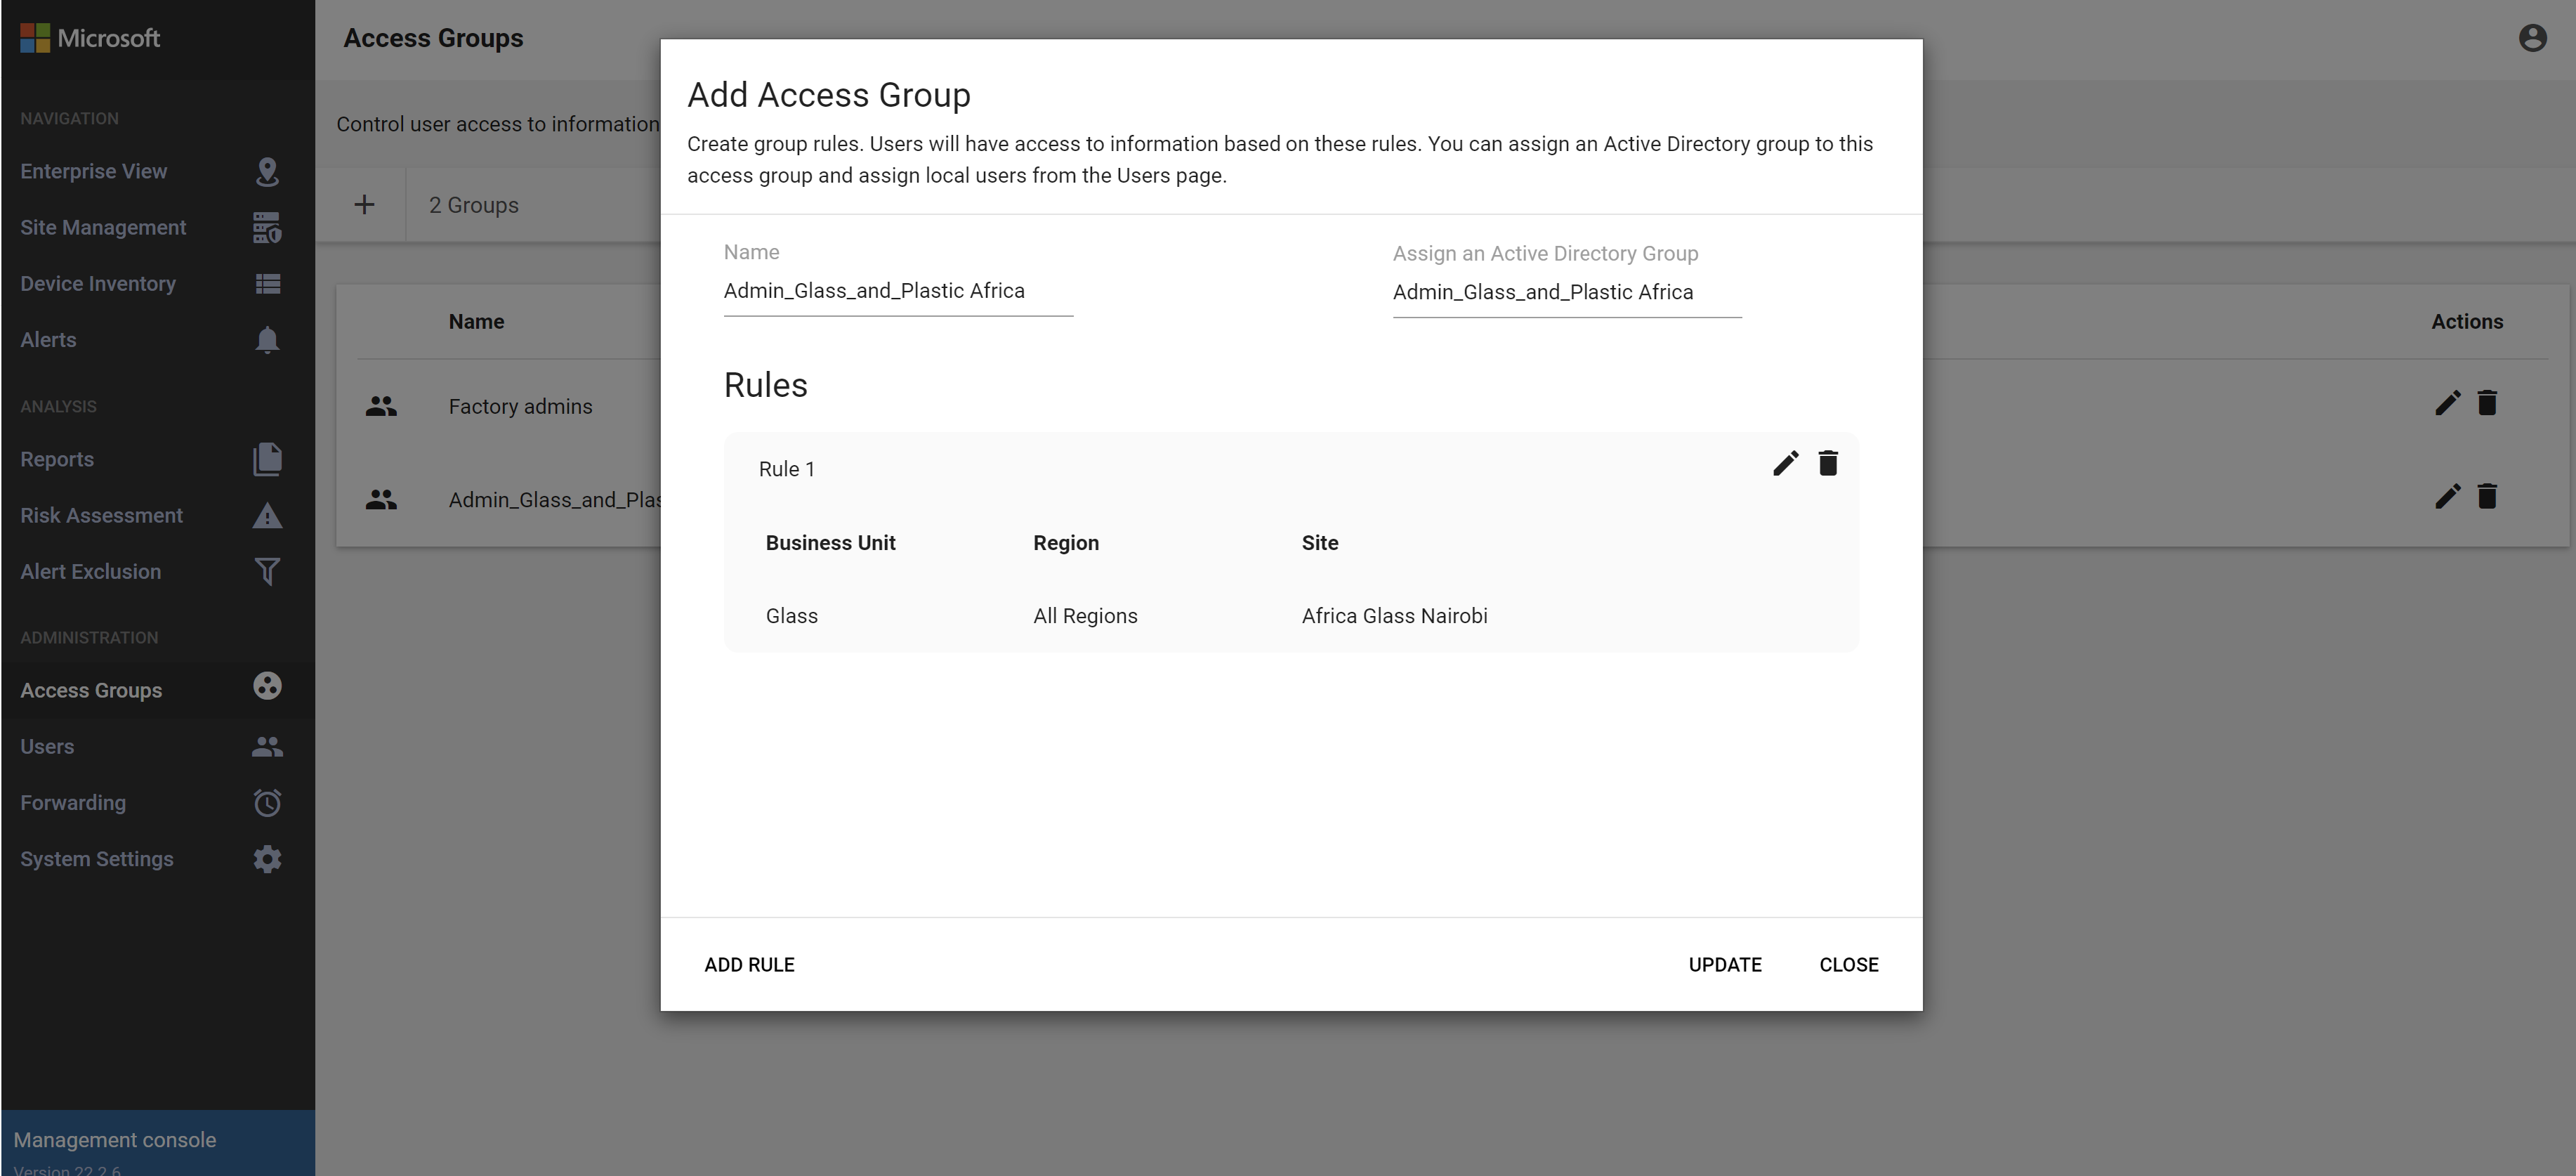
If the Assign an Active Directory Group option appears, assign an Active Directory group of users to this access group as needed. For example:
If the option doesn't appear, and you want to include Active Directory groups in access groups, make sure that you've included your Active Directory group in your Active Directory integration. For more information, see Integrate on-premises users with Active Directory.
Add local users to your groups by editing existing users from the Users page. On the Users page, select the Edit button for the user you want to assign to the group, and then update the Remote Sites Access Group value for the selected user. For more information, see Add new on-premises management console users.
Changes to topology entities
If you later modify a topology entity and the change affects the rule logic, the rule is automatically deleted.
If modifications to topology entities affect rule logic so that all rules are deleted, the access group remains but users won't be able to sign in to the on-premises management console. Instead, users are notified to contact their on-premises management console administrator for help with signing in. Update the settings for these users so that they're no longer part of the legacy access group.
Control user session timeouts
By default, on-premises users are signed out of their sessions after 30 minutes of inactivity. Admin users can use the local CLI to either turn this feature on or off, or to adjust the inactivity thresholds. For more information, see Work with Defender for IoT CLI commands.
Note
Any changes made to user session timeouts are reset to defaults when you update the OT monitoring software.
Prerequisites: This procedure is available for the support and cyberx users only.
To control sensor user session timeouts:
Sign in to your sensor via a terminal and run:
sudo nano /var/cyberx/properties/authentication.propertiesThe following output appears:
infinity_session_expiration = true
session_expiration_default_seconds = 0
# half an hour in seconds
session_expiration_admin_seconds = 1800
session_expiration_security_analyst_seconds = 1800
session_expiration_read_only_users_seconds = 1800
certificate_validation = true
CRL_timeout_seconds = 3
CRL_retries = 1
Do one of the following:
To turn off user session timeouts entirely, change
infinity_session_expiration = truetoinfinity_session_expiration = false. Change it back to turn it back on again.To adjust an inactivity timeout period, adjust one of the following values to the required time, in seconds:
session_expiration_default_secondsfor all userssession_expiration_admin_secondsfor Admin users onlysession_expiration_security_analyst_secondsfor Security Analyst users onlysession_expiration_read_only_users_secondsfor Read Only users only
Next steps
For more information, see:


