CI/CD for pipelines in Data Factory in Microsoft Fabric
In Fabric Data Factory, continuous integration and continuous development (CI/CD) automates the integration, testing, and deployment of code changes to ensure efficient and reliable development.
In Fabric, there are two features we currently support in collaboration with the Application Lifecycle Management (ALM) team: Git Integration and deployment pipelines. These features allow users to import/export workspace resources with individual updates.
The Fabric Data Factory CI/CD solution deviates from the Azure Data Factory model where whole factory updates using ARM template export methodology is preferred. This change in methodology allows customers to selectively choose which pipelines to update without pausing the whole factory. Both Git integration (bring-your-own Git) and deployment pipelines (built-in CI/CD) use the concept of associated a single workspace with a single environment. You need to map out different workspaces to your different environments such as development, test, and production.
Why developers use CI/CD
CI/CD is a practice that automates software delivery, and it resolves a few prominent pain points:
- Manual integration issues: without CI/CD, integrating code changes manually can lead to conflicts and errors, slowing down development.
- Development delays: manual deployments are time-consuming and prone to errors, leading to delays in delivering new features and updates.
- Inconsistent environments: different environments (development, testing, and production) can have inconsistencies, causing issues that are hard to debug.
- Lack of visibility: without CI/CD, tracking changes and understanding the state of the codebase can be challenging.
Understanding CI/CD, Git, and deployment pipelines
CI/CD consists of continuous integration, and continuous deployment.
Continuous integration (CI)
Developers frequently commit to a Git-managed main branch, triggering automated tests and builds for integration. Git tracks changes to enable automatic fetching and testing of new commits.
Continuous deployment (CD)
Focuses on deploying verified changes to production developments through structured deployment stages within deployment pipelines.
Git integration with Data Factory pipelines
Git is a version control system that allows developers to track changes in their codebase (or JSON code definitions, in the case of pipelines) and collaborate with others. It provides a centralized repository where code changes are stored and managed. Currently, Git is supported in Fabric via GitHub or Azure DevOps. There are a few key workflow essentials to understand when working with Git.
- Main branch: The main branch, sometimes named the master branch, holds production ready code.
- Feature branches: These branches are separate from the main branch and allow for isolated development without changing the main branch.
- Pull requests (PRs): PRs allow users to propose, review, and discuss changes before integration.
- Merging: This occurs when changes are approved. Git integrates these changes, continuously updating the project.
Deployment pipelines for Git
Deployment pipelines are tightly integrated with Git. When a developer pushes code changes to the Git repository, it triggers the CI/CD pipeline. This integration ensures that the latest code changes are always tested and deployed automatically.
Stages and jobs
Deployment pipelines consist of multiple stages and jobs within each stage. Typically, these stages are separated into three environments: development (compiling code), testing (running tests), and production (deploying the application). The pipeline progresses through these stages, ensuring that the code is thoroughly tested and deployed in a controlled manner.
Automated workflows
Deployment pipelines automate the entire process of building, testing, and deploying code. This automation reduces the risk of human error, speeds up the development process, and ensures code changes are consistently and reliably delivered to production.
Get started with Git integration for Data Factory pipelines
Take the following steps to set up Git integration for your pipelines in Data Factory:
Prerequisites for Git integration
To access Git with your Microsoft Fabric workspace, ensure the following prerequisites for both Fabric and Git.
- Either a Power BI Premium license or Fabric capacity.
- Enabled the following tenant switches from the admin portal:
- Either an Azure DevOps or GitHub account.
- For an Azure DevOps account:
- An active Azure account registered to the same user that is using the Fabric workspace. Create a free account.
- Access to an existing repository
- For a GitHub account:
- An active GitHub account. Create a free account.
- Either a fine grained token with read and write permissions for Contents, under repository permissions, or a GitHub classic token with repo scopes enabled.
- For an Azure DevOps account:
Step 1: Connect to a Git repository
To use Git integration with Data Factory pipelines in Fabric, you first need to connect to a Git repository, as described here.
Sign into Fabric and navigate to the workspace you want to connect to Git.
Select Workspace settings.

Select Git integration.
Select your Git provider. Currently, Fabric only supports Azure DevOps or GitHub. If you use GitHub, you need to select Add account to connect your GitHub account. After you sign in, select Connect to allow Fabric to access your GitHub account.

Step 2: Connect to a workspace
Once you connect to a Git repository, you need to connect to a workspace, as described here.
From the dropdown menu, specify the following details about the branch you want to connect to:
For Azure DevOps branch connections, specify the following details:
- Organization: The Azure DevOps organization name.
- Project: The Azure DevOps project name.
- Repository: The Azure DevOps repository name.
- Branch: The Azure DevOps branch name.
- Folder: The Azure DevOps folder name.
For GitHub branch connections, specify the following details:
- Repository URL: The GitHub repository URL.
- Branch: The GitHub branch name.
- Folder: The GitHub folder name.
Select Connect and sync.
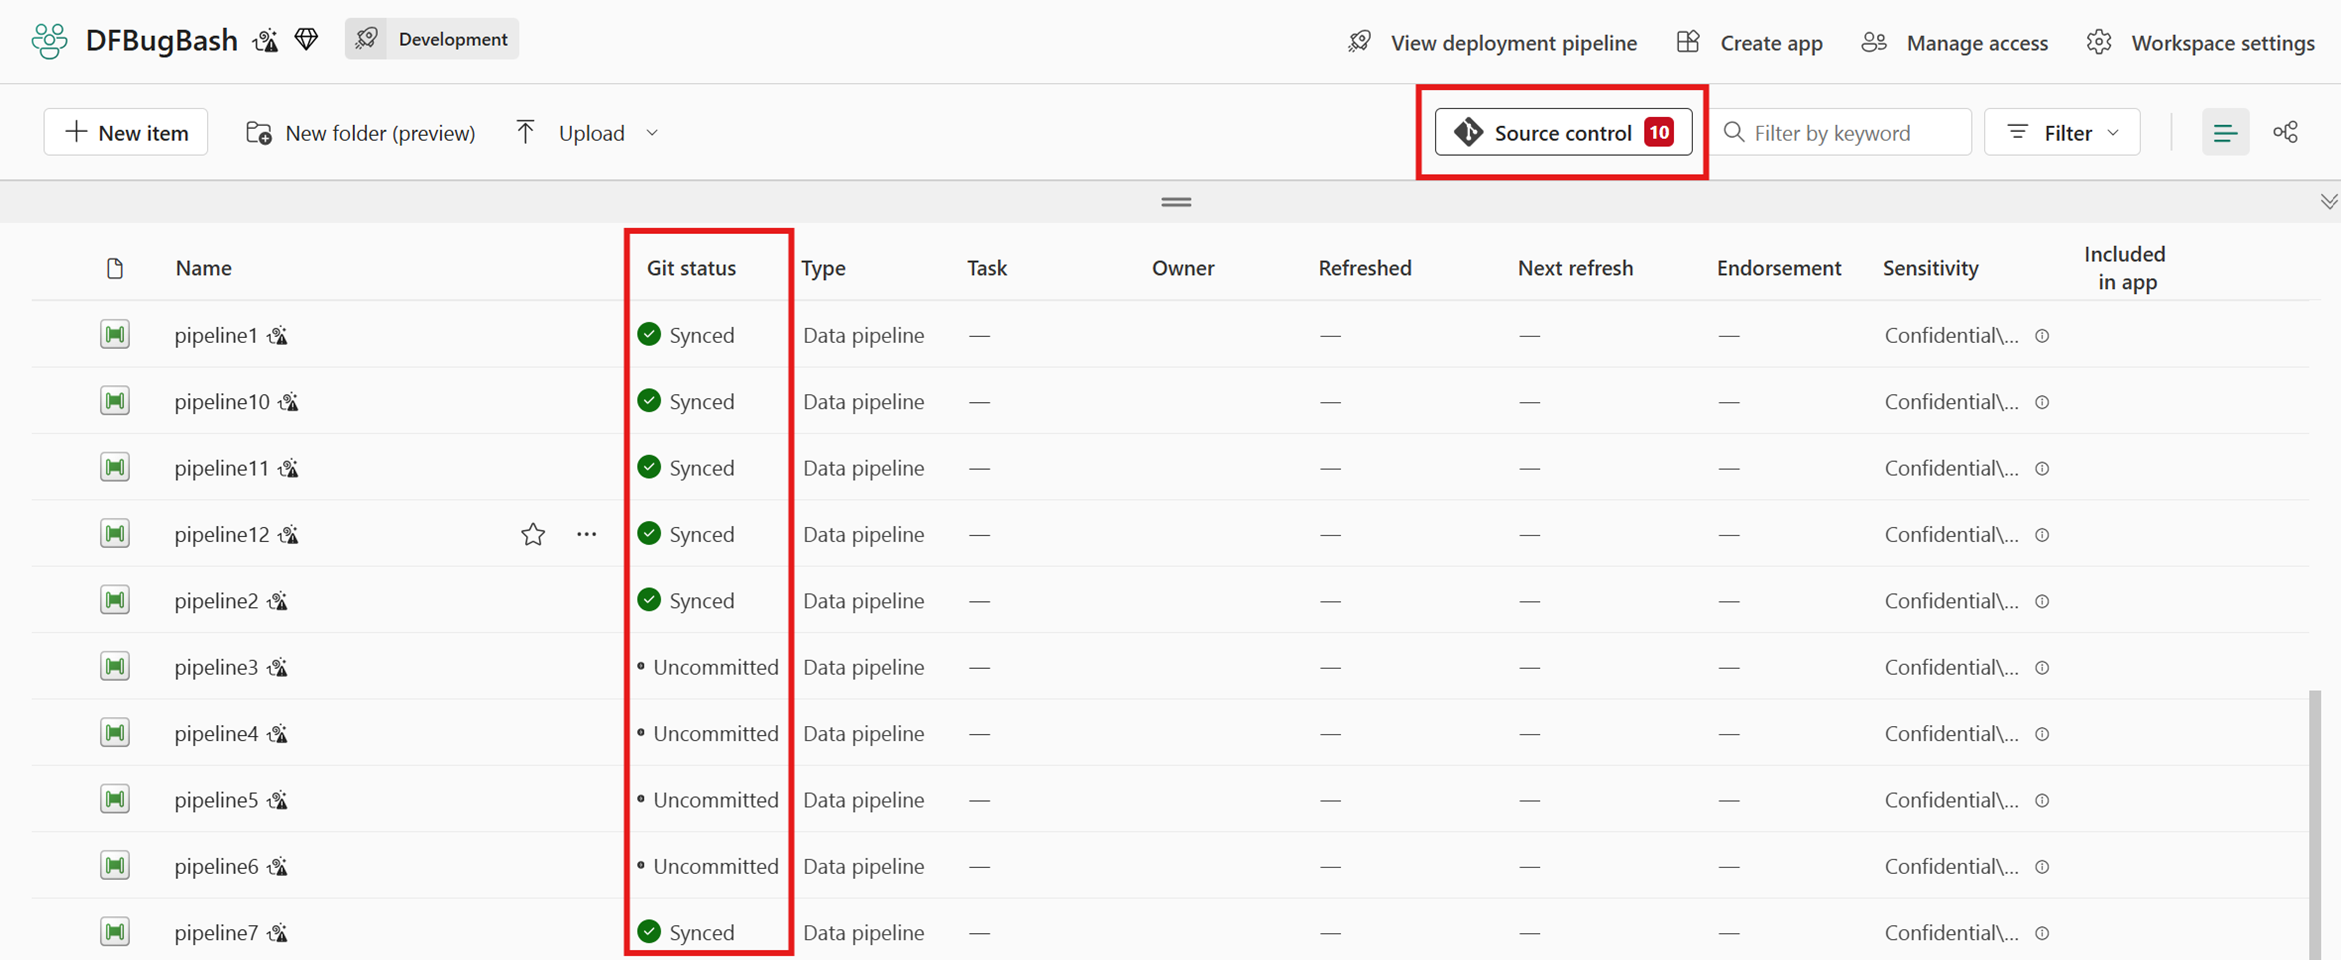
After you connect, the Workspace displays information about source control that allows users to view the connected branch, the status of each item in the branch, and the time of the last sync.

Step 3: Commit changes to Git
After you connect to a Git repository and workspace, you can commit changes to Git, as described here.
Go to the workspace.
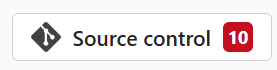
Select the Source control icon. This icon shows the number of uncommitted changes.
Select the Changes tab from the Source control panel. A list appears with all the items you changed, and an icon indicating the status: New
 , Modified
  , Conflict
  , or Deleted
  .
.Select the items you want to commit. To select all items, check the top box.
(Optional) Add a commit comment in the box.
Select Commit.
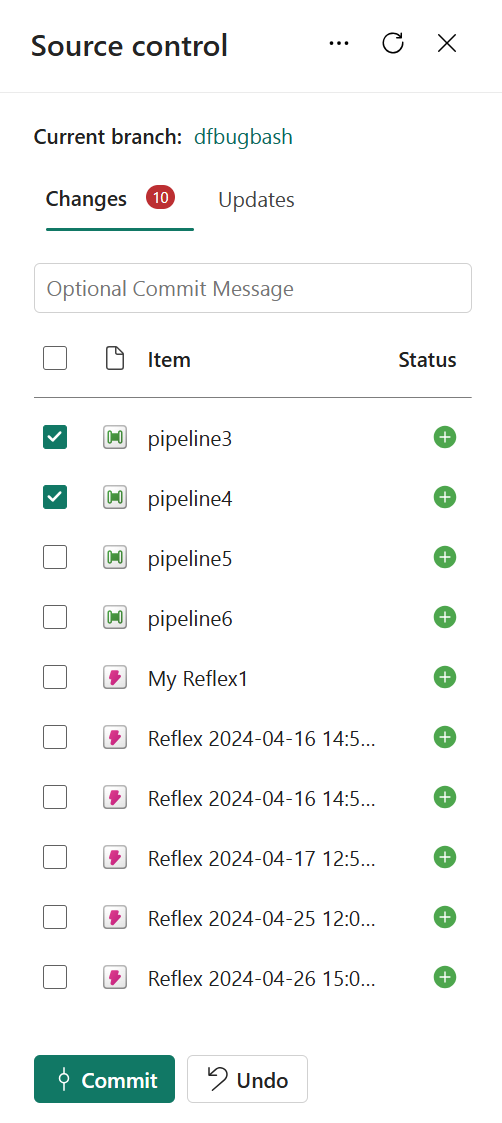
After the changes are committed, the items that were committed are removed from the list, and the workspace will point to the new commit that it synced to.
Step 4: (Optional) Update the workspace from Git
Go to the workspace.
Select the Source control icon.
Select Updates from the Source control panel. A list appears with all the items that were changed in the branch from your Git connection source since the last update.
Select Update all.
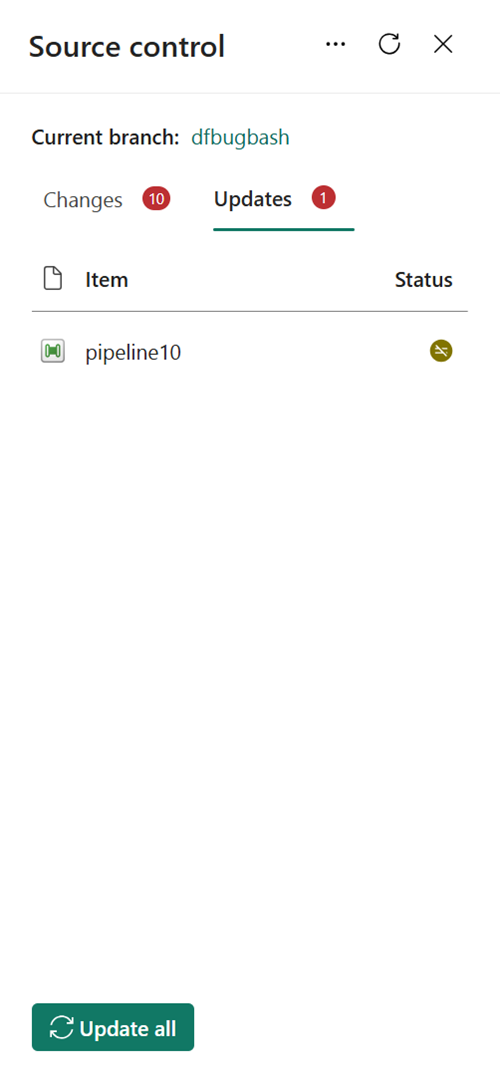
After it updates successfully, the list of items is removed, and the workspace will point to the new commit to which it's synced.
Get started with deployment pipelines for Git
Take the following steps to use Git deployment pipelines with your Fabric workspace.
Prerequisites for deployment pipelines
Before you get started, be sure to set up the following prerequisites:
- An active Microsoft Fabric subscription.
- Admin access of a Fabric workspace.
Step 1: Create a deployment pipeline
From the Workspaces flyout, select Deployment pipelines.
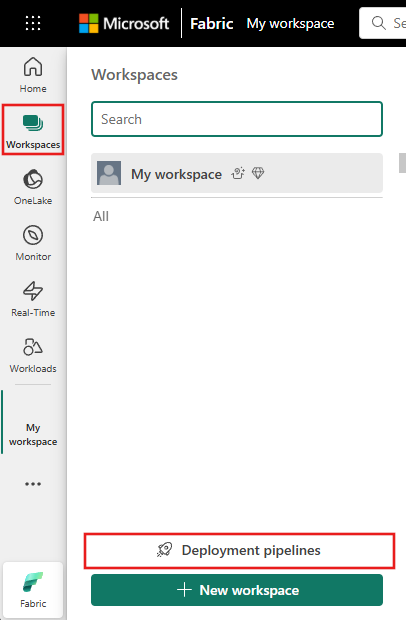
Select Create pipeline or + New pipeline.
Step 2: Name the pipeline and assign stages
In the Create deployment pipeline dialog box, enter a name and description for the pipeline, and select Next.
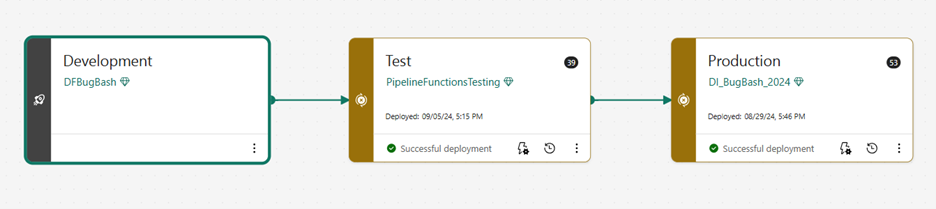
Set your deployment pipeline’s structure by defining the required stages for your deployment pipeline. By default, the pipeline has three stages: Development, Test, and Production.

You can add another stage, delete stages, or rename them by typing a new name in the box. Select Create (or Create and continue) when you’re done.
Step 3: Assign a workspace to the deployment pipeline
After creating a pipeline, you need to add content you want to manage to the pipeline. Adding content to the pipeline is done by assigning a workspace to the pipeline stage. You can assign a workspace to any stage. Follow the instructions to Assign a workspace to a pipeline.
Step 4: Deploy to an empty stage
When you finish working with content in one pipeline stage, you can deploy it to the next stage. Deployment pipelines offer three options for deploying your content:
- Full deployment: Deploy all your content to the target stage.
- Selective deployment: Select which content to deploy to the target stage.
- Backward deployment: Deploy content from a later stage to an earlier stage in the pipeline. Currently, backward deployment is only possible when the target stage is empty (has no workspace assigned to it).
After you choose how to deploy your content, you can review your deployment and leave a note.
Step 5: Deploy content from one stage to another
- Once you have content in a pipeline stage, you can deploy it to the next stage, even if the next stage workspace has content. Paired items are overwritten. You can learn more about this process, in the Deploy content to an existing workspace section.
- You can review the deployment history to see the last time content was deployed to each stage. To examine the differences between the two pipelines before you deploy, see Compare content in different deployment stages.
Known limitations
The following known limitations apply to CI/CD for pipelines in Data Factory in Microsoft Fabric:
- Workspace variables: CI/CD doesn't currently support workspace variables.
- Git Integration limited support: Currently, Fabric only supports Git integration with Azure DevOps and GitHub. Azure DevOps Git integration is recommended as GitHub Git integration has more limitations.
- Pipeline activities with OAuth connectors: For MS Teams and Outlook connectors, when deploying to a higher environment, users must manually open each pipeline and sign into each activity, which is a limitation currently.
- Pipelines invoking dataflows: When a pipeline that invokes a dataflow is promoted, it will still reference the dataflow in the previous workspace, which is incorrect. This behavior occurs because dataflows are not currently supported in deployment pipelines.
Related content
- Introduction to the CI/CD process as part of the ALM cycle in Microsoft Fabric
- Get started with Git integration, the Fabric Application Lifecycle Management (ALM) tool
- Get started using deployment pipelines, the Fabric Application Lifecycle Management (ALM) tool
- Blog: Exploring CI/CD Capabilities in Microsoft Fabric: A Focus on pipelines