Use SAP Deployment Automation Framework from Azure DevOps Services
Azure DevOps streamlines the deployment process by providing pipelines that you can run to perform the infrastructure deployment and the configuration and SAP installation activities.
You can use Azure Repos to store your configuration files and use Azure Pipelines to deploy and configure the infrastructure and the SAP application.
Sign up for Azure DevOps Services
To use Azure DevOps Services, you need an Azure DevOps organization. An organization is used to connect groups of related projects. Use your work or school account to automatically connect your organization to your Microsoft Entra ID. To create an account, open Azure DevOps and either sign in or create a new account.
Configure Azure DevOps Services for SAP Deployment Automation Framework
You can use the following script to do a basic installation of Azure DevOps Services for SAP Deployment Automation Framework.
Open PowerShell ISE and copy the following script and update the parameters to match your environment.
    $Env:SDAF_ADO_ORGANIZATION = "https://dev.azure.com/ORGANIZATIONNAME"
    $Env:SDAF_ADO_PROJECT = "SAP Deployment Automation Framework"
    $Env:SDAF_CONTROL_PLANE_CODE = "MGMT"
    $Env:SDAF_ControlPlaneSubscriptionID = "xxxxxxxx-xxxx-xxxx-xxxx-xxxxxxxxxxxx"
    $Env:ARM_TENANT_ID="zzzzzzzz-zzzz-zzzz-zzzz-zzzzzzzzzzzz"

    $Env:MSI_OBJECT_ID = $null

    $branchName = "main"

    $UniqueIdentifier = "SDAF" + $ShortCode

    if ($Env:ARM_TENANT_ID.Length -eq 0) {
      az login --output none --only-show-errors --scope https://graph.microsoft.com//.default
    }
    else {
      az login --output none --tenant $Env:ARM_TENANT_ID --only-show-errors --scope https://graph.microsoft.com//.default
    }

    az config set extension.use_dynamic_install=yes_without_prompt --only-show-errors

    az extension add --name azure-devops --only-show-errors

    $differentTenant = Read-Host "Is your Azure DevOps organization hosted in a different tenant than the one you are currently logged in to? y/n"
    if ($differentTenant -eq 'y') {
        $env:AZURE_DEVOPS_EXT_PAT = Read-Host "Please enter your Personal Access Token (PAT) with permissions to add new projects, manage agent pools to the Azure DevOps organization $Env:ADO_Organization"
        try {
            az devops project list
        }
        catch {
            $_
        }
    }

    $confirmationWebAppDeployment = Read-Host "Do you want to use the Web Application for editing the configuration files (recommended) y/n?"
    if ($confirmationWebAppDeployment -eq 'y') {
        $Env:SDAF_WEBAPP = "true"
        $confirmation = Read-Host "Do you want to create a new Application registration (needed for the Web Application) y/n?"
        if ($confirmation -eq 'y') {
            $Env:SDAF_APP_NAME = "SDAF " + $UniqueIdentifier + " SDAF Control Plane"
        }
        else {
            $Env:SDAF_APP_NAME = Read-Host "Please provide the Application registration name"
        }
    }
    else {
        $Env:SDAF_WEBAPP = "false"
    }

    $Env:SDAF_AuthenticationMethod = 'Managed Identity'

    $confirmationDeployment = Read-Host "Do you want to use Managed Identities for the deployment (recommended) y/n?"

    if ($confirmationDeployment -eq 'n') {
        $Env:SDAF_AuthenticationMethod = 'Service Principal'

        $confirmation = Read-Host "Do you want to create a new Service Principal for the Control plane y/n?"
        if ($confirmation -eq 'y') {
            $Env:SDAF_MGMT_SPN_NAME = "SDAF " + $UniqueIdentifier + $Env:SDAF_CONTROL_PLANE_CODE + " SPN"
        }
        else {
            $Env:SDAF_MGMT_SPN_NAME = Read-Host "Please provide the Control Plane Service Principal Name"
        }

    }

    if ( $PSVersionTable.Platform -eq "Unix") {
        if ( Test-Path "SDAF") {
        }
        else {
            $sdaf_path = New-Item -Path "SDAF" -Type Directory
        }
    }
    else {
        $sdaf_path = Join-Path -Path $Env:HOMEDRIVE -ChildPath "SDAF"
        if ( Test-Path $sdaf_path) {
        }
        else {
            New-Item -Path $sdaf_path -Type Directory
        }
    }

    Set-Location -Path $sdaf_path

    if ( Test-Path "New-SDAFDevopsProject.ps1") {
        if ( $PSVersionTable.Platform -eq "Unix") {
            Remove-Item "New-SDAFDevopsProject.ps1"
        }
        else {
            Remove-Item ".\New-SDAFDevopsProject.ps1"
        }
    }

    Invoke-WebRequest -Uri https://raw.githubusercontent.com/Azure/sap-automation/$branchName/deploy/scripts/New-SDAFDevopsProject.ps1 -OutFile New-SDAFDevopsProject.ps1


    if ( $PSVersionTable.Platform -eq "Unix") {
        Unblock-File ./New-SDAFDevopsProject.ps1
        ./New-SDAFDevopsProject.ps1
    }
    else {
        Unblock-File .\New-SDAFDevopsProject.ps1
        .\New-SDAFDevopsProject.ps1
    }
Run the script and follow the instructions. The script opens browser windows for authentication and for performing tasks in the Azure DevOps project.
You can choose to either run the code directly from GitHub or you can import a copy of the code into your Azure DevOps project.
To confirm that the project was created, go to the Azure DevOps portal and select the project. Ensure that the repo was populated and that the pipelines were created.
Important
Run the following steps on your local workstation. Also ensure that you have the latest Azure CLI installed by running the az upgrade command.
Configure Azure DevOps Services artifacts for a new workload zone
Use the following script to deploy the artifacts that are needed to support a new workload zone. This process creates the variable group and the service connection in Azure DevOps and, optionally, the deployment service principal.
Open PowerShell ISE and copy the following script and update the parameters to match your environment.
    $Env:SDAF_ADO_ORGANIZATION = "https://dev.azure.com/ORGANIZATIONNAME"
    $Env:SDAF_ADO_PROJECT = "SAP Deployment Automation Framework"
    $Env:SDAF_WorkloadZoneSubscriptionID = "yyyyyyyy-yyyy-yyyy-yyyy-yyyyyyyyyyyy"
    $Env:ARM_TENANT_ID="zzzzzzzz-zzzz-zzzz-zzzz-zzzzzzzzzzzz"

    if ( $PSVersionTable.Platform -eq "Unix") {
        if ( Test-Path "SDAF") {
        }
        else {
            $sdaf_path = New-Item -Path "SDAF" -Type Directory
        }
    }
    else {
        $sdaf_path = Join-Path -Path $Env:HOMEDRIVE -ChildPath "SDAF"
        if ( Test-Path $sdaf_path) {
        }
        else {
            New-Item -Path $sdaf_path -Type Directory
        }
    }

    $branchName = "main"

    Set-Location -Path $sdaf_path

    if ( Test-Path "New-SDAFDevopsWorkloadZone.ps1") {
        remove-item .\New-SDAFDevopsWorkloadZone.ps1
    }

    Invoke-WebRequest -Uri https://raw.githubusercontent.com/Azure/sap-automation/$branchName/deploy/scripts/New-SDAFDevopsWorkloadZone.ps1 -OutFile .\New-SDAFDevopsWorkloadZone.ps1 ; .\New-SDAFDevopsWorkloadZone.ps1
Create a sample control plane configuration
You can run the Create Sample Deployer Configuration pipeline to create a sample configuration for the control plane. When it's running, choose the appropriate Azure region. You can also control if you want to deploy Azure Firewall and Azure Bastion.
Manual configuration of Azure DevOps Services for SAP Deployment Automation Framework
You can manually configure Azure DevOps Services for SAP Deployment Automation Framework.
Create a new project
You can use Azure Repos to store the code from the sap-automation GitHub repository and the environment configuration files.
Open Azure DevOps and create a new project by selecting New Project and entering the project details. The project contains the Azure Repos source control repository and Azure Pipelines for performing deployment activities.
If you don't see New Project, ensure that you have permissions to create new projects in the organization.
Record the URL of the project.
Import the repository
Start by importing the SAP Deployment Automation Framework Bootstrap GitHub repository into Azure Repos.
Go to the Repositories section and select Import a repository. Import the https://github.com/Azure/sap-automation-bootstrap.git repository into Azure DevOps. For more information, see Import a repository.
If you're unable to import a repository, you can create the repository manually. Then you can import the content from the SAP Deployment Automation Framework GitHub Bootstrap repository to it.
Create the repository for manual import
Only do this step if you're unable to import the repository directly.
To create the workspaces repository, in the Repos section, under Project settings, select Create.
Choose the repository, enter Git, and provide a name for the repository. For example, use SAP Configuration Repository.
Clone the repository
To provide a more comprehensive editing capability of the content, you can clone the repository to a local folder and edit the contents locally.
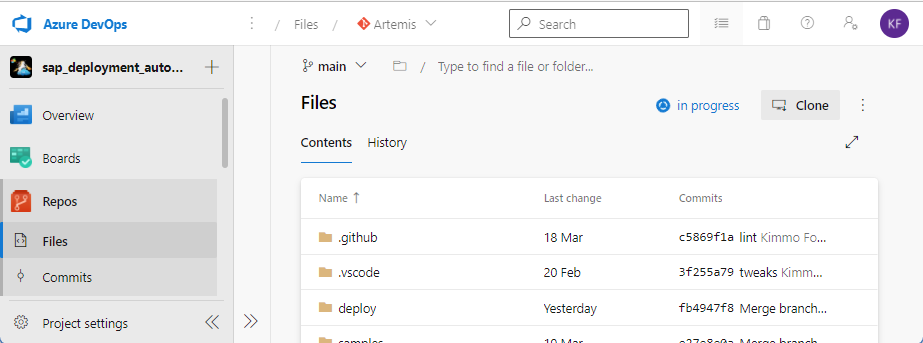
To clone the repository to a local folder, on the Repos section of the portal, under Files, select Clone. For more information, see Clone a repository.
Manually import the repository content by using a local clone
You can also manually download the content from the SAP Deployment Automation Framework repository and add it to your local clone of the Azure DevOps repository.
Go to the https://github.com/Azure/SAP-automation-samples repository and download the repository content as a .zip file. Select Code and choose Download ZIP.
Copy the content from the .zip file to the root folder of your local clone.
Open the local folder in Visual Studio Code. You should see that changes need to be synchronized by the indicator by the source control icon shown here.
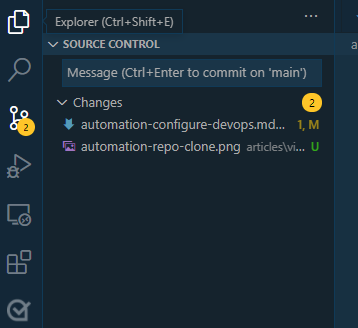
Select the source control icon and provide a message about the change. For example, enter Import from GitHub and select Ctrl+Enter to commit the changes. Next, select Sync Changes to synchronize the changes back to the repository.
Choose the source for the Terraform and Ansible code
You can either run the SAP Deployment Automation Framework code directly from GitHub or you can import it locally.
Run the code from a local repository
If you want to run the SAP Deployment Automation Framework code from the local Azure DevOps project, you need to create a separate code repository and a configuration repository in the Azure DevOps project:
- Name of configuration repository:
Same as the DevOps Project name. Source ishttps://github.com/Azure/sap-automation-bootstrap.git. - Name of code repository:
sap-automation. Source ishttps://github.com/Azure/sap-automation.git. - Name of sample and template repository:
sap-samples. Source ishttps://github.com/Azure/sap-automation-samples.git.
Run the code directly from GitHub
If you want to run the code directly from GitHub, you need to provide credentials for Azure DevOps to be able to pull the content from GitHub.
Create the GitHub service connection
To pull the code from GitHub, you need a GitHub service connection. For more information, see Manage service connections.
To create the service connection, go to Project Settings and under the Pipelines section, go to Service connections.
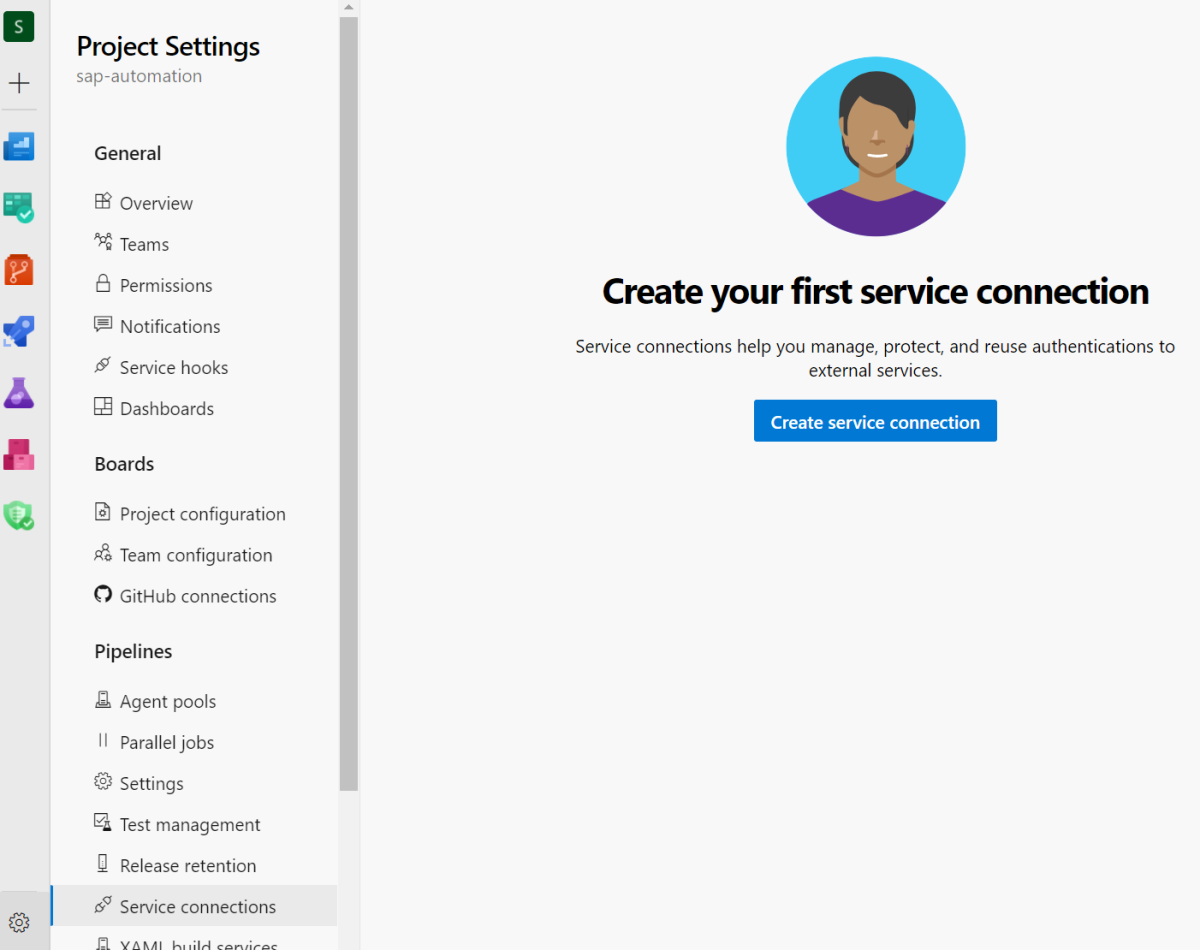
Select GitHub as the service connection type. Select Azure Pipelines in the OAuth Configuration dropdown.
Select Authorize to sign in to GitHub.
Enter a service connection name, for instance, SDAF Connection to GitHub. Ensure that the Grant access permission to all pipelines checkbox is selected. Select Save to save the service connection.
Set up the web app
The automation framework optionally provisions a web app as a part of the control plane to assist with the SAP workload zone and system configuration files. If you want to use the web app, you must first create an app registration for authentication purposes. Open Azure Cloud Shell and run the following commands.
Replace MGMT with your environment, as necessary.
echo '[{"resourceAppId":"00000003-0000-0000-c000-000000000000","resourceAccess":[{"id":"e1fe6dd8-ba31-4d61-89e7-88639da4683d","type":"Scope"}]}]' >> manifest.json

TF_VAR_app_registration_app_id=$(az ad app create --display-name MGMT-webapp-registration --enable-id-token-issuance true --sign-in-audience AzureADMyOrg --required-resource-access @manifest.json --query "appId" | tr -d '"')

echo $TF_VAR_app_registration_app_id

az ad app credential reset --id $TF_VAR_app_registration_app_id --append --query "password"

rm manifest.json
Save the app registration ID and password values for later use.
Create Azure Pipelines
Azure Pipelines are implemented as YAML files. They're stored in the deploy/pipelines folder in the repository.
Control plane deployment pipeline
Create the control plane deployment pipeline. Under the Pipelines section, select New Pipeline. Select Azure Repos Git as the source for your code. Configure your pipeline to use an existing Azure Pipelines YAML file. Specify the pipeline with the following settings:
| Setting | Value |
|---|---|
| Repo | "Root repo" (same as project name) |
| Branch | main |
| Path | pipelines/01-deploy-control-plane.yml |
| Name | Control plane deployment |
Save the pipeline. To see Save, select the chevron next to Run. Go to the Pipelines section and select the pipeline. Choose Rename/Move from the ellipsis menu on the right and rename the pipeline as Control plane deployment.
SAP workload zone deployment pipeline
Create the SAP workload zone pipeline. Under the Pipelines section, select New Pipeline. Select Azure Repos Git as the source for your code. Configure your pipeline to use an existing Azure Pipelines YAML file. Specify the pipeline with the following settings:
| Setting | Value |
|---|---|
| Repo | "Root repo" (same as project name) |
| Branch | main |
| Path | pipelines/02-sap-workload-zone.yml |
| Name | SAP workload zone deployment |
Save the pipeline. To see Save, select the chevron next to Run. Go to the Pipelines section and select the pipeline. Choose Rename/Move from the ellipsis menu on the right and rename the pipeline as SAP workload zone deployment.
SAP system deployment pipeline
Create the SAP system deployment pipeline. Under the Pipelines section, select New Pipeline. Select Azure Repos Git as the source for your code. Configure your pipeline to use an existing Azure Pipelines YAML file. Specify the pipeline with the following settings:
| Setting | Value |
|---|---|
| Repo | "Root repo" (same as project name) |
| Branch | main |
| Path | pipelines/03-sap-system-deployment.yml |
| Name | SAP system deployment (infrastructure) |
Save the pipeline. To see Save, select the chevron next to Run. Go to the Pipelines section and select the pipeline. Choose Rename/Move from the ellipsis menu on the right and rename the pipeline as SAP system deployment (infrastructure).
SAP software acquisition pipeline
Create the SAP software acquisition pipeline. Under the Pipelines section, select New Pipeline. Select Azure Repos Git as the source for your code. Configure your pipeline to use an existing Azure Pipelines YAML file. Specify the pipeline with the following settings:
| Setting | Value |
|---|---|
| Repo | "Root repo" (same as project name) |
| Branch | main |
| Path | deploy/pipelines/04-sap-software-download.yml |
| Name | SAP software acquisition |
Save the pipeline. To see Save, select the chevron next to Run. Go to the Pipelines section and select the pipeline. Choose Rename/Move from the ellipsis menu on the right and rename the pipeline as SAP software acquisition.
SAP configuration and software installation pipeline
Create the SAP configuration and software installation pipeline. Under the Pipelines section, select New Pipeline. Select Azure Repos Git as the source for your code. Configure your pipeline to use an existing Azure Pipelines YAML file. Specify the pipeline with the following settings:
| Setting | Value |
|---|---|
| Repo | "Root repo" (same as project name) |
| Branch | main |
| Path | pipelines/05-DB-and-SAP-installation.yml |
| Name | Configuration and SAP installation |
Save the pipeline. To see Save, select the chevron next to Run. Go to the Pipelines section and select the pipeline. Choose Rename/Move from the ellipsis menu on the right and rename the pipeline as SAP configuration and software installation.
Deployment removal pipeline
Create the deployment removal pipeline. Under the Pipelines section, select New Pipeline. Select Azure Repos Git as the source for your code. Configure your pipeline to use an existing Azure Pipelines YAML file. Specify the pipeline with the following settings:
| Setting | Value |
|---|---|
| Repo | "Root repo" (same as project name) |
| Branch | main |
| Path | pipelines/10-remover-terraform.yml |
| Name | Deployment removal |
Save the pipeline. To see Save, select the chevron next to Run. Go to the Pipelines section and select the pipeline. Choose Rename/Move from the ellipsis menu on the right and rename the pipeline as Deployment removal.
Control plane removal pipeline
Create the control plane deployment removal pipeline. Under the Pipelines section, select New Pipeline. Select Azure Repos Git as the source for your code. Configure your pipeline to use an existing Azure Pipelines YAML file. Specify the pipeline with the following settings:
| Setting | Value |
|---|---|
| Repo | "Root repo" (same as project name) |
| Branch | main |
| Path | pipelines/12-remove-control-plane.yml |
| Name | Control plane removal |
Save the pipeline. To see Save, select the chevron next to Run. Go to the Pipelines section and select the pipeline. Choose Rename/Move from the ellipsis menu on the right and rename the pipeline as Control plane removal.
Deployment removal pipeline by using Azure Resource Manager
Create the deployment removal Azure Resource Manager pipeline. Under the Pipelines section, select New Pipeline. Select Azure Repos Git as the source for your code. Configure your pipeline to use an existing Azure Pipelines YAML file. Specify the pipeline with the following settings:
| Setting | Value |
|---|---|
| Repo | "Root repo" (same as project name) |
| Branch | main |
| Path | pipelines/11-remover-arm-fallback.yml |
| Name | Deployment removal using Azure Resource Manager |
Save the pipeline. To see Save, select the chevron next to Run. Go to the Pipelines section and select the pipeline. Choose Rename/Move from the ellipsis menu on the right and rename the pipeline as Deployment removal using ARM processor.
Note
Only use this pipeline as a last resort. Removing just the resource groups leaves remnants that might complicate redeployments.
Repository updater pipeline
Create the repository updater pipeline. Under the Pipelines section, select New Pipeline. Select Azure Repos Git as the source for your code. Configure your pipeline to use an existing Azure Pipelines YAML file. Specify the pipeline with the following settings:
| Setting | Value |
|---|---|
| Repo | "Root repo" (same as project name) |
| Branch | main |
| Path | pipelines/20-update-ado-repository.yml |
| Name | Repository updater |
Save the pipeline. To see Save, select the chevron next to Run. Go to the Pipelines section and select the pipeline. Choose Rename/Move from the ellipsis menu on the right and rename the pipeline as Repository updater.
This pipeline should be used when there's an update in the sap-automation repository that you want to use.
Import the cleanup task from Visual Studio Marketplace
The pipelines use a custom task to perform cleanup activities post deployment. You can install the custom task from Post Build Cleanup. Install it to your Azure DevOps organization before you run the pipelines.
Preparations for a self-hosted agent
Create an agent pool by going to Organizational Settings. Under the Pipelines section, select Agent Pools > Add Pool. Select Self-hosted as the pool type. Name the pool to align with the control plane environment. For example, use
MGMT-WEEU-POOL. Ensure that Grant access permission to all pipelines is selected and select Create to create the pool.Sign in with the user account you plan to use in your Azure DevOps organization.
From your home page, open your user settings and select Personal access tokens.
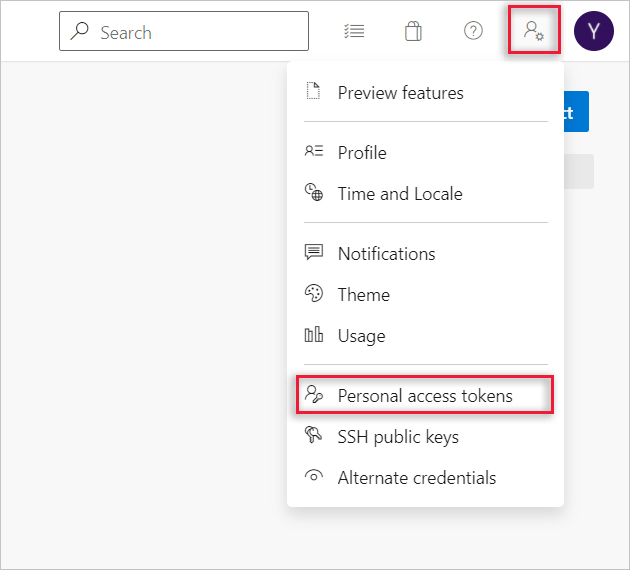
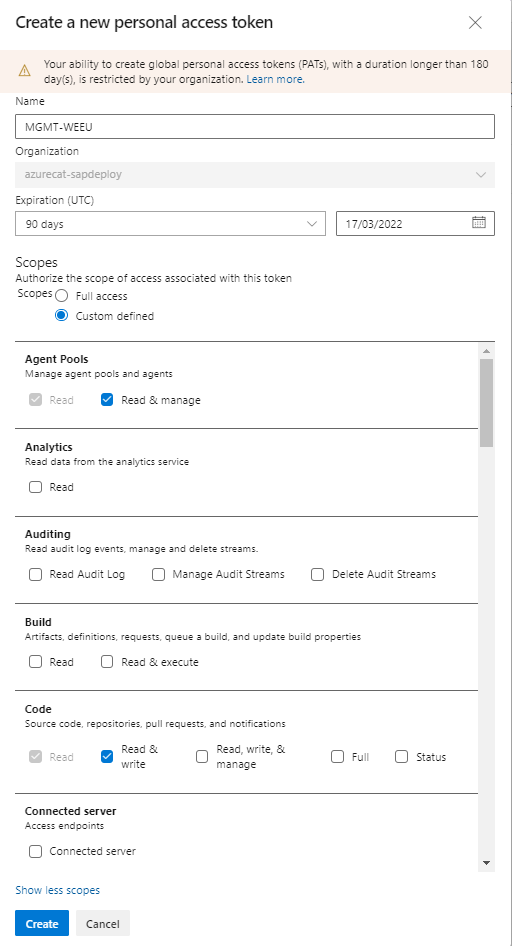
Create a personal access token with these settings:
Agent Pools: Select Read & manage.
Build: Select Read & execute.
Code: Select Read & write.
Variable Groups: Select Read, create, & manage.
Write down the created token value.
Variable definitions
The deployment pipelines are configured to use a set of predefined parameter values defined by using variable groups.
Common variables
Common variables are used by all the deployment pipelines. They're stored in a variable group called SDAF-General.
Create a new variable group named SDAF-General by using the Library page in the Pipelines section. Add the following variables:
| Variable | Value | Notes |
|---|---|---|
| Deployment_Configuration_Path | WORKSPACES | For testing the sample configuration, use samples/WORKSPACES instead of WORKSPACES. |
| Branch | main | |
| S-Username | <SAP Support user account name> |
|
| S-Password | <SAP Support user password> |
Change the variable type to secret by selecting the lock icon. |
tf_version |
1.6.0 | The Terraform version to use. See Terraform download. |
Save the variables.
Alternatively, you can use the Azure DevOps CLI to set up the groups.
s-user="<SAP Support user account name>"
s-password="<SAP Support user password>"

az devops login

az pipelines variable-group create --name SDAF-General --variables ANSIBLE_HOST_KEY_CHECKING=false Deployment_Configuration_Path=WORKSPACES Branch=main S-Username=$s-user S-Password=$s-password tf_version=1.3.0 --output yaml
Remember to assign permissions for all pipelines by using Pipeline permissions.
Environment-specific variables
Because each environment might have different deployment credentials, you need to create a variable group per environment. For example, use SDAF-MGMT,SDAF-DEV, and SDAF-QA.
Create a new variable group named SDAF-MGMT for the control plane environment by using the Library page in the Pipelines section. Add the following variables:
| Variable | Value | Notes |
|---|---|---|
| Agent | Azure Pipelines or the name of the agent pool |
This pool is created in a later step. |
| CP_ARM_CLIENT_ID | Service principal application ID |
|
| CP_ARM_OBJECT_ID | Service principal object ID |
|
| CP_ARM_CLIENT_SECRET | Service principal password |
Change the variable type to secret by selecting the lock icon. |
| CP_ARM_SUBSCRIPTION_ID | Target subscription ID |
|
| CP_ARM_TENANT_ID | Tenant ID for the service principal |
|
| AZURE_CONNECTION_NAME | Previously created connection name | |
| sap_fqdn | SAP fully qualified domain name, for example, sap.contoso.net |
Only needed if Private DNS isn't used. |
| FENCING_SPN_ID | Service principal application ID for the fencing agent |
Required for highly available deployments that use a service principal for the fencing agent. |
| FENCING_SPN_PWD | Service principal password for the fencing agent |
Required for highly available deployments that use a service principal for the fencing agent. |
| FENCING_SPN_TENANT | Service principal tenant ID for the fencing agent |
Required for highly available deployments that use a service principal for the fencing agent. |
| PAT | <Personal Access Token> |
Use the personal token defined in the previous step. |
| POOL | <Agent Pool name> |
The agent pool to use for this environment. |
| APP_REGISTRATION_APP_ID | App registration application ID |
Required if deploying the web app. |
| WEB_APP_CLIENT_SECRET | App registration password |
Required if deploying the web app. |
| SDAF_GENERAL_GROUP_ID | The group ID for the SDAF-General group | The ID can be retrieved from the URL parameter variableGroupId when accessing the variable group by using a browser. For example: variableGroupId=8. |
| WORKLOADZONE_PIPELINE_ID | The ID for the SAP workload zone deployment pipeline |
The ID can be retrieved from the URL parameter definitionId from the pipeline page in Azure DevOps. For example: definitionId=31. |
| SYSTEM_PIPELINE_ID | The ID for the SAP system deployment (infrastructure) pipeline |
The ID can be retrieved from the URL parameter definitionId from the pipeline page in Azure DevOps. For example: definitionId=32. |
Save the variables.
Remember to assign permissions for all pipelines by using Pipeline permissions.
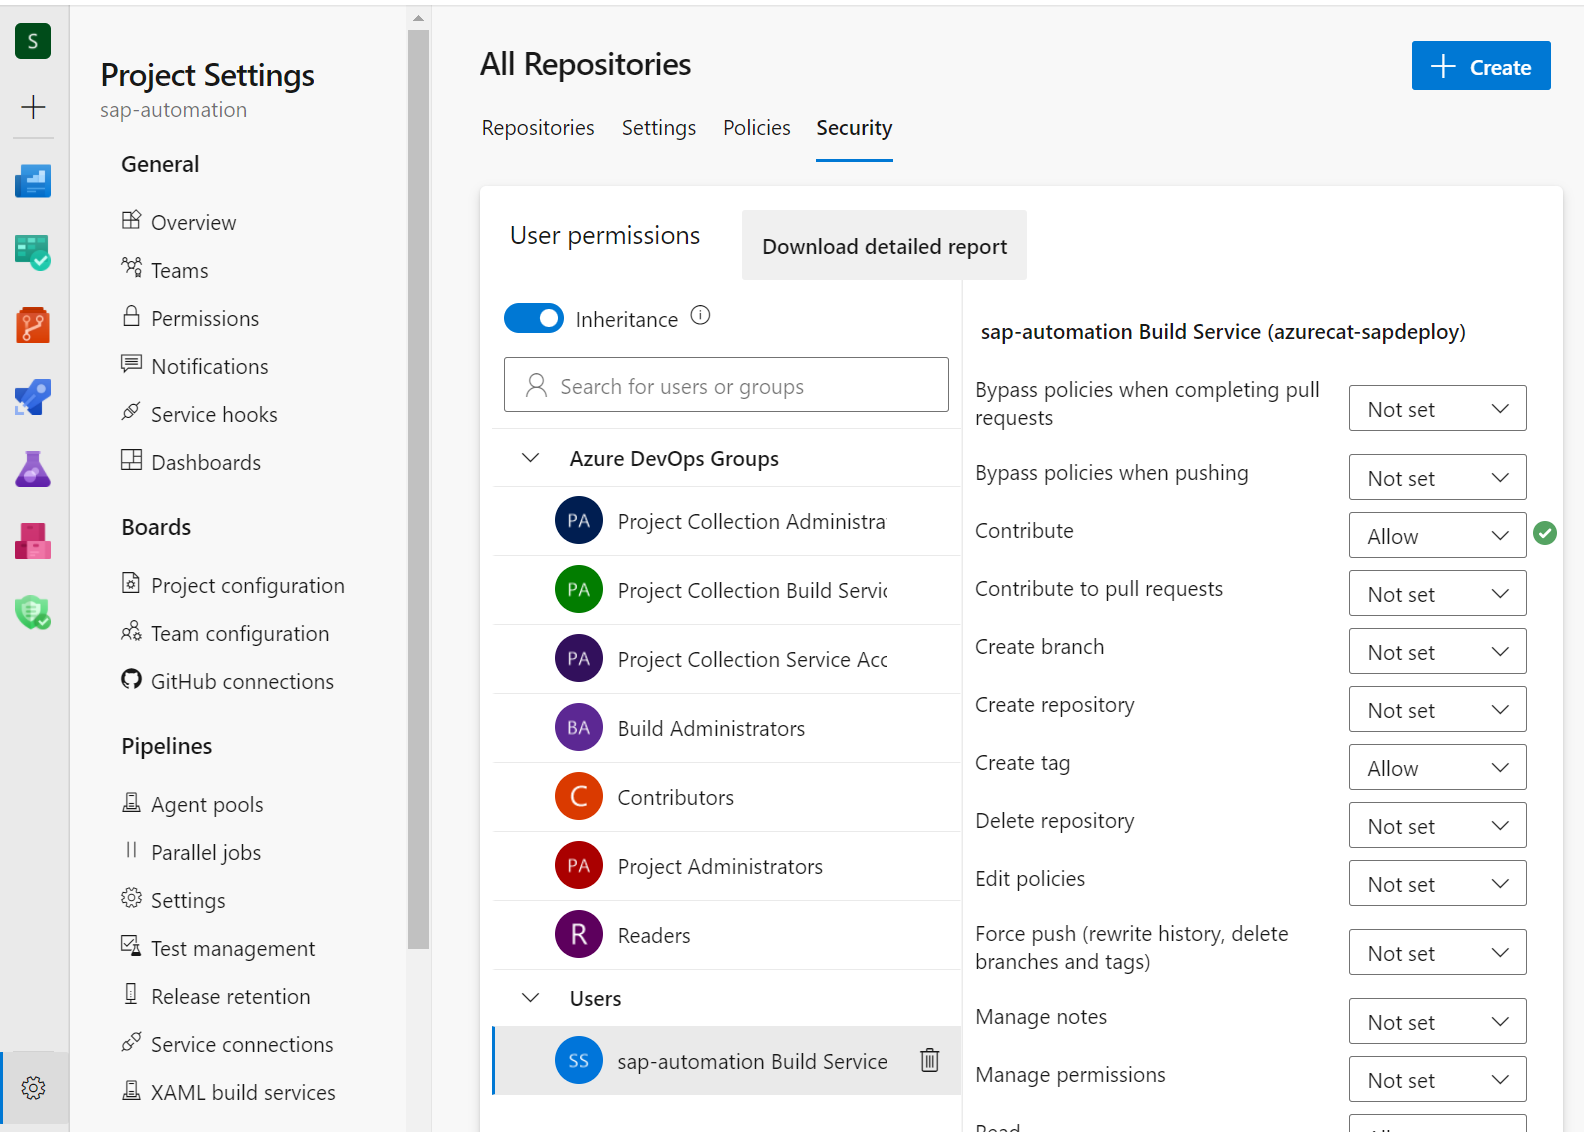
When you use the web app, ensure that the Build Service has at least Contribute permissions.
You can use the clone functionality to create the next environment variable group. APP_REGISTRATION_APP_ID, WEB_APP_CLIENT_SECRET, SDAF_GENERAL_GROUP_ID, WORKLOADZONE_PIPELINE_ID and SYSTEM_PIPELINE_ID are only needed for the SDAF-MGMT group.
Create a service connection
To remove the Azure resources, you need an Azure Resource Manager service connection. For more information, see Manage service connections.
To create the service connection, go to Project Settings. Under the Pipelines section, select Service connections.

Select Azure Resource Manager as the service connection type and Service principal (manual) as the authentication method. Enter the target subscription, which is typically the control plane subscription. Enter the service principal details. Select Verify to validate the credentials. For more information on how to create a service principal, see Create a service principal.
Enter a Service connection name, for instance, use Connection to MGMT subscription. Ensure that the Grant access permission to all pipelines checkbox is selected. Select Verify and save to save the service connection.
Permissions
Most of the pipelines add files to the Azure Repos and therefore require pull permissions. On Project Settings, under the Repositories section, select the Security tab of the source code repository and assign Contribute permissions to the Build Service.
Deploy the control plane
Newly created pipelines might not be visible in the default view. Select the Recent tab and go back to All tabs to view the new pipelines.
Select the Control plane deployment pipeline and enter the configuration names for the deployer and the SAP library. Select Run to deploy the control plane. Make sure to select the Deploy the configuration web application checkbox if you want to set up the configuration web app.
Configure the Azure DevOps Services self-hosted agent manually
Manual configuration is only needed if the Azure DevOps Services agent isn't automatically configured. Check that the agent pool is empty before you proceed.
To connect to the deployer:
Sign in to the Azure portal.
Go to the resource group that contains the deployer virtual machine.
Connect to the virtual machine by using Azure Bastion.
The default username is azureadm.
Select SSH Private Key from Azure Key Vault.
Select the subscription that contains the control plane.
Select the deployer key vault.
From the list of secrets, select the secret that ends with -sshkey.
Connect to the virtual machine.
Run the following script to configure the deployer:
mkdir -p ~/Azure_SAP_Automated_Deployment

cd ~/Azure_SAP_Automated_Deployment

git clone https://github.com/Azure/sap-automation.git

cd sap-automation/deploy/scripts

./configure_deployer.sh
Reboot the deployer, reconnect, and run the following script to set up the Azure DevOps agent:
cd ~/Azure_SAP_Automated_Deployment/

$DEPLOYMENT_REPO_PATH/deploy/scripts/setup_ado.sh
Accept the license and, when you're prompted for the server URL, enter the URL you captured when you created the Azure DevOps project. For authentication, select PAT and enter the token value from the previous step.
When prompted, enter the application pool name that you created in the previous step. Accept the default agent name and the default work folder name. The agent is now configured and starts.
Deploy the control plane web application
Selecting the deploy the web app infrastructure parameter when you run the control plane deployment pipeline provisions the infrastructure necessary for hosting the web app. The Deploy web app pipeline publishes the application's software to that infrastructure.
Wait for the deployment to finish. Select the Extensions tab and follow the instructions to finalize the configuration. Update the reply-url values for the app registration.
As a result of running the control plane pipeline, part of the web app URL that is needed is stored in a variable named WEBAPP_URL_BASE in your environment-specific variable group. At any time, you can update the URLs of the registered application web app by using the following command.
webapp_url_base=<WEBAPP_URL_BASE>
az ad app update --id $TF_VAR_app_registration_app_id --web-home-page-url https://${webapp_url_base}.azurewebsites.net --web-redirect-uris https://${webapp_url_base}.azurewebsites.net/ https://${webapp_url_base}.azurewebsites.net/.auth/login/aad/callback
You also need to grant reader permissions to the app service system-assigned managed identity. Go to the app service resource. On the left side, select Identity. On the System assigned tab, select Azure role assignments > Add role assignment. Select Subscription as the scope and Reader as the role. Then select Save. Without this step, the web app dropdown functionality will not work.
You should now be able to visit the web app and use it to deploy SAP workload zones and SAP system infrastructure.