Use Azure RBAC on Azure Arc-enabled Kubernetes clusters
You can use Microsoft Entra ID and Azure role-based access control (Azure RBAC) to control authorization checks on your Azure Arc-enabled Kubernetes cluster. Azure role assignments let you granularly control which users can read, write, and delete Kubernetes objects such as deployment, pod, and service. Kubernetes ClusterRoleBinding and RoleBinding object types help to define authorization in Kubernetes natively.
For a conceptual overview of this feature, see Azure RBAC on Azure Arc-enabled Kubernetes.
Prerequisites
Install or upgrade the Azure CLI to the latest version.
Install the latest version of the
connectedk8sAzure CLI extension:az extension add --name connectedk8sIf the
connectedk8sextension is already installed, you can update it to the latest version by using the following command:az extension update --name connectedk8sConnect an existing Azure Arc-enabled Kubernetes cluster:
- If you haven't connected a cluster yet, use our quickstart.
- Upgrade your agents to the latest version.
Note
Azure RBAC isn't supported for Red Hat OpenShift or managed Kubernetes offerings where user access to the API server is restricted (such as Amazon Elastic Kubernetes Service (EKS) or Google Kubernetes Engine (GKE)).
Azure RBAC doesn't currently support Kubernetes clusters operating on Arm64 architecture. For these clusters, use Kubernetes RBAC to manage access control.
For Azure Kubernetes Service (AKS) clusters, this feature is available natively and doesn't require the AKS cluster to be connected to Azure Arc.
For Azure Kubernetes Service (AKS) clusters enabled by Azure Arc on Azure Local, version 23H2, Azure RBAC is currently supported only if enabled when the clusters are created. To create an AKS cluster enabled by Azure Arc with Azure RBAC enabled, see Use Azure RBAC for Kubernetes authorization. Azure RBAC isn't supported for Azure Local, version 22H2.
Enable Azure RBAC on the cluster
Get the cluster MSI identity by running the following command:
az connectedk8s show -g <resource-group> -n <connected-cluster-name>Get the ID (
identity.principalId) from the output and run the following command to assign the Connected Cluster Managed Identity CheckAccess Reader role to the cluster MSI:az role assignment create --role "Connected Cluster Managed Identity CheckAccess Reader" --assignee "<Cluster MSI ID>" --scope <cluster ARM ID>Enable Azure role-based access control (RBAC) on your Azure Arc-enabled Kubernetes cluster by running the following command:
az connectedk8s enable-features -n <clusterName> -g <resourceGroupName> --features azure-rbacNote
Before you run the
enable-featurescommand, ensure that thekubeconfigfile on the machine points to the cluster on which you want to enable Azure RBAC.Use
--skip-azure-rbac-listwith this command for a comma-separated list of usernames, emails, and OpenID connections undergoing authorization checks by using Kubernetes nativeClusterRoleBindingandRoleBindingobjects instead of Azure RBAC.
Next, follow the steps in the appropriate section, depending on whether you're using a generic cluster where no reconciler is running on the apiserver specification, or a cluster created by using Cluster API.
Generic cluster where no reconciler is running on the apiserver specification
SSH into every master node of the cluster, then complete the following steps:
If your
kube-apiserveris a static pod:The
azure-arc-guard-manifestssecret in thekube-systemnamespace contains two files:guard-authn-webhook.yamlandguard-authz-webhook.yaml. Copy these files to the/etc/guarddirectory of the node.sudo mkdir -p /etc/guard kubectl get secrets azure-arc-guard-manifests -n kube-system -o json | jq -r '.data."guard-authn-webhook.yaml"' | base64 -d > /etc/guard/guard-authn-webhook.yaml kubectl get secrets azure-arc-guard-manifests -n kube-system -o json | jq -r '.data."guard-authz-webhook.yaml"' | base64 -d > /etc/guard/guard-authz-webhook.yamlOpen the
apiservermanifest in edit mode:sudo vi /etc/kubernetes/manifests/kube-apiserver.yamlAdd the following specification under
volumes:- hostPath path: /etc/guard type: Directory name: azure-rbacAdd the following specification under
volumeMounts:- mountPath: /etc/guard name: azure-rbac readOnly: true
If your
kube-apiserverisn't a static pod:Open the
apiservermanifest in edit mode:sudo vi /etc/kubernetes/manifests/kube-apiserver.yamlAdd the following specification under
volumes:- name: azure-rbac secret: secretName: azure-arc-guard-manifestsAdd the following specification under
volumeMounts:- mountPath: /etc/guard name: azure-rbac readOnly: true
Add the following
apiserverarguments:- --authentication-token-webhook-config-file=/etc/guard/guard-authn-webhook.yaml - --authentication-token-webhook-cache-ttl=5m0s - --authorization-webhook-cache-authorized-ttl=5m0s - --authorization-webhook-config-file=/etc/guard/guard-authz-webhook.yaml - --authorization-webhook-version=v1 - --authorization-mode=Node,RBAC,WebhookSet the following
apiserverargument:- --authentication-token-webhook-version=v1Save and close the editor to update the
apiserverpod.
Cluster created by using Cluster API
Copy the guard secret that contains authentication and authorization webhook configuration files from the workload cluster onto your machine:
kubectl get secret azure-arc-guard-manifests -n kube-system -o yaml > azure-arc-guard-manifests.yamlChange the
namespacefield in the azure-arc-guard-manifests.yaml file to the namespace within the management cluster where you're applying the custom resources for creation of workload clusters.Apply this manifest:
kubectl apply -f azure-arc-guard-manifests.yamlEdit the
KubeadmControlPlaneobject by runningkubectl edit kcp <clustername>-control-plane:Add the following specification under
files:- contentFrom: secret: key: guard-authn-webhook.yaml name: azure-arc-guard-manifests owner: root:root path: /etc/kubernetes/guard-authn-webhook.yaml permissions: "0644" - contentFrom: secret: key: guard-authz-webhook.yaml name: azure-arc-guard-manifests owner: root:root path: /etc/kubernetes/guard-authz-webhook.yaml permissions: "0644"Add the following specification under
apiServer>extraVolumes:- hostPath: /etc/kubernetes/guard-authn-webhook.yaml mountPath: /etc/guard/guard-authn-webhook.yaml name: guard-authn readOnly: true - hostPath: /etc/kubernetes/guard-authz-webhook.yaml mountPath: /etc/guard/guard-authz-webhook.yaml name: guard-authz readOnly: trueAdd the following specification under
apiServer>extraArgs:authentication-token-webhook-cache-ttl: 5m0s authentication-token-webhook-config-file: /etc/guard/guard-authn-webhook.yaml authentication-token-webhook-version: v1 authorization-mode: Node,RBAC,Webhook authorization-webhook-cache-authorized-ttl: 5m0s authorization-webhook-config-file: /etc/guard/guard-authz-webhook.yaml authorization-webhook-version: v1Save and close to update the
KubeadmControlPlaneobject. Wait for these changes to appear on the workload cluster.
Create role assignments for users to access the cluster
Owners of the Azure Arc-enabled Kubernetes resource can use either built-in roles or custom roles to grant other users access to the Kubernetes cluster.
Built-in roles
The following built-in roles provide access to perform common tasks on Kubernetes clusters. These roles can be granted to Microsoft Entra ID users, groups, or service principals.
| Role | Description |
|---|---|
| Azure Arc Kubernetes Viewer | Allows read-only access to see most objects in a namespace. This role doesn't allow viewing secrets, because read permission on secrets would enable access to ServiceAccount credentials in the namespace. These credentials would in turn allow API access through that ServiceAccount value (a form of privilege escalation). |
| Azure Arc Kubernetes Writer | Allows read/write access to most objects in a namespace. This role doesn't allow viewing or modifying roles or role bindings. However, this role allows accessing secrets and running pods as any ServiceAccount value in the namespace, so it can be used to gain the API access levels of any ServiceAccount value in the namespace. |
| Azure Arc Kubernetes Admin | Allows admin access. This role is often granted within a namespace through the RoleBinding object. If you use it in RoleBinding, it allows read/write access to most resources in a namespace, including the ability to create roles and role bindings within the namespace. However, this role doesn't allow write access to resource quota or to the namespace itself. |
| Azure Arc Kubernetes Cluster Admin | Allows the ability to execute any action on any resource within the granted scope. When you use it in ClusterRoleBinding, it allows full control over every resource in the cluster and in all namespaces. When you use it in RoleBinding, it allows full control over every resource in the role binding's namespace, including the namespace itself. |
You can create built-in role assignments scoped to the cluster by using either the Azure portal or the Azure CLI. However, only Azure CLI can be used to create role assignments scoped to namespaces.
To create role assignments scoped to the Azure Arc-enabled Kubernetes cluster in the Azure portal, navigate to the cluster and then select Access Control (IAM) from the service menu.
To create role assignments by using Azure CLI, use the following command:
az role assignment create --role "Azure Arc Kubernetes Cluster Admin" --assignee <AZURE-AD-ENTITY-ID> --scope $ARM_ID
AZURE-AD-ENTITY-ID can be a username (for example, testuser@mytenant.onmicrosoft.com) or the appId value of a service principal.
To create a role assignment scoped to a specific namespace within the cluster, modify the scope:
az role assignment create --role "Azure Arc Kubernetes Viewer" --assignee <AZURE-AD-ENTITY-ID> --scope $ARM_ID/namespaces/<namespace-name>
Custom roles
You can choose to create your own role definition for use in role assignments. For more information, see the full list of data actions that you can use to construct a role definition.
The following example shows a custom role definition that allows a user to read deployments, but provides no other access. The custom role uses one of the data actions and lets you view all deployments in the scope (cluster or namespace) where the role assignment is created.
{
    "Name": "Arc Deployment Viewer",
    "Description": "Lets you view all deployments in cluster/namespace.",
    "Actions": [],
    "NotActions": [],
    "DataActions": [
        "Microsoft.Kubernetes/connectedClusters/apps/deployments/read"
    ],
    "NotDataActions": [],
    "assignableScopes": [
        "/subscriptions/<subscription-id>"
    ]
}
To use this role definition, copy the following JSON object into a file called custom-role.json. Replace the <subscription-id> placeholder with the actual subscription ID. Then, complete these steps:
Create the role definition by running the following command from the folder where you saved custom-role.json:
az role definition create --role-definition @custom-role.jsonCreate a role assignment to assign this custom role definition:
az role assignment create --role "Arc Deployment Viewer" --assignee <AZURE-AD-ENTITY-ID> --scope $ARM_ID/namespaces/<namespace-name>
Configure kubectl with user credentials
There are two ways to get the kubeconfig file that you need to access the cluster:
- Use the cluster connect feature (
az connectedk8s proxy) of the Azure Arc-enabled Kubernetes cluster. - The cluster admin can share the kubeconfig file with every user.
Use cluster connect
Run the following command to start the proxy process:
az connectedk8s proxy -n <clusterName> -g <resourceGroupName>
After the proxy process is running, you can open another tab in your console to start sending your requests to the cluster.
Use a shared kubeconfig file
Run the following command to set the credentials for the user. Specify
serverApplicationIdas6256c85f-0aad-4d50-b960-e6e9b21efe35andclientApplicationIdas3f4439ff-e698-4d6d-84fe-09c9d574f06b:kubectl config set-credentials <testuser>@<mytenant.onmicrosoft.com> \ --auth-provider=azure \ --auth-provider-arg=environment=AzurePublicCloud \ --auth-provider-arg=client-id=<clientApplicationId> \ --auth-provider-arg=tenant-id=<tenantId> \ --auth-provider-arg=apiserver-id=<serverApplicationId>Open the kubeconfig file that you created earlier. Under
contexts, verify that the context associated with the cluster points to the user credentials that you created in the previous step. To set the current context to these user credentials, run the following command:kubectl config set-context --current=true --user=<testuser>@<mytenant.onmicrosoft.com>Add the config-mode setting under
user>config:name: testuser@mytenant.onmicrosoft.com user: auth-provider: config: apiserver-id: $SERVER_APP_ID client-id: $CLIENT_APP_ID environment: AzurePublicCloud tenant-id: $TENANT_ID config-mode: "1" name: azureExec plugin is a Kubernetes authentication strategy that allows
kubectlto execute an external command to receive user credentials to send toapiserver. Starting with Kubernetes version 1.26, in order to use the exec plugin to receive user credentials, you must use Azure kubelogin, aclient-gocredential (exec) plugin that implements Azure authentication. To install Azure kubelogin:For Windows or Mac, follow the Azure kubelogin installation instructions.
For Linux or Ubuntu, download the latest version of kubelogin, then run the following commands:
curl -LO https://github.com/Azure/kubelogin/releases/download/"$KUBELOGIN_VERSION"/kubelogin-linux-amd64.zip

unzip kubelogin-linux-amd64.zip

sudo mv bin/linux_amd64/kubelogin /usr/local/bin/

sudo chmod +x /usr/local/bin/kubelogin
Kubelogin can be used to authenticate with Azure Arc-enabled clusters by requesting a proof-of-possession (PoP) token. Convert the kubeconfig using kubelogin to use the appropriate login mode. For example, for device code login with a Microsoft Entra user, the commands would be as follows:
export KUBECONFIG=/path/to/kubeconfig

kubelogin convert-kubeconfig --pop-enabled --pop-claims 'u=<ARM ID of cluster>"
Send requests to the cluster
Run any
kubectlcommand. For example:kubectl get nodeskubectl get pods
After you're prompted for browser-based authentication, copy the device login URL (
https://microsoft.com/devicelogin) and open it in your web browser.Enter the code printed on your console. Copy and paste the code on your terminal into the prompt for device authentication input.
Enter the username (
testuser@mytenant.onmicrosoft.com) and the associated password.If you see an error message that says the users doesn't have access to the resource in Azure, it means you're unauthorized to access the requested resource. In this case, an administrator in your Azure tenant needs to create a new role assignment that authorizes this user to have access on the resource.
Use Conditional Access with Microsoft Entra ID
When you're integrating Microsoft Entra ID with your Azure Arc-enabled Kubernetes cluster, you can also use Conditional Access to control access to your cluster.
Note
Microsoft Entra Conditional Access is a Microsoft Entra ID P2 capability. For more information about Microsoft Entra ID SKUs, see the pricing guide.
To create an example Conditional Access policy to use with the cluster:
- At the top of the Azure portal, search for and select Microsoft Entra ID.
- In the service menu, under Manage, select Enterprise applications.
- In the service menu, under Security, select Conditional Access.
- In the service menu, select Policies. Then select Create new policy.
- Enter a name for the policy, such as
arc-k8s-policy. - Under Assignments, select the current value under Users or workload identities. Then, under What does this policy apply to?, verify that Users and groups is selected.
- Under Include, choose Select users and groups. Then choose the users and groups where you want to apply the policy. For this example, choose the same Microsoft Entra group that has administrative access to your cluster.
- Select the current value under Cloud apps or actions. Then, under Select what this policy applies to, verify that Cloud apps is selected.
- Under Include, choose Select resources. Then search for and select the server application that you created earlier.
- Under Access controls, select the current value under Grant. Then, select Grant access.
- Check the box for Require device to be marked as compliant, then select Select.
- Under Enable policy, select On.
- To apply the Conditional Access policy, select Create.
Access the cluster again. For example, run the kubectl get nodes command to view nodes in the cluster:
kubectl get nodes
To confirm that the policy is applied correctly, follow the instructions to sign in again. An error message states that you're successfully logged in, but your admin requires the device that's requesting access to be managed by Microsoft Entra ID in order to access the resource. Follow these steps to view more details:
- In the Azure portal, go to Microsoft Entra ID.
- In the service menu, under Manage, select Enterprise applications.
- In the service menu, under Activity, select Sign-in logs.
- Select the entry at the top that shows Failed for Status and Success for Conditional Access. Then, under Details, select Conditional Access. You'll see the Conditional Access policy that you created, requiring that your device must be compliant.
Configure just-in-time cluster access with Microsoft Entra ID
Another option for cluster access control is Privileged Identity Management (PIM), which enables a higher level of access for users for just-in-time requests.
Note
Microsoft Entra PIM is a Microsoft Entra ID P2 capability. For more information about Microsoft Entra ID SKUs, see the pricing guide.
To configure just-in-time access requests for a group of users, complete the following steps:
At the top of the Azure portal, search for and select Microsoft Entra ID.
In the service menu, under Manage, select Groups. Then select New group.
For Group type, verify that Security is selected. Enter a group name, such as
myJITGroup. Make any additional selections, then select Create.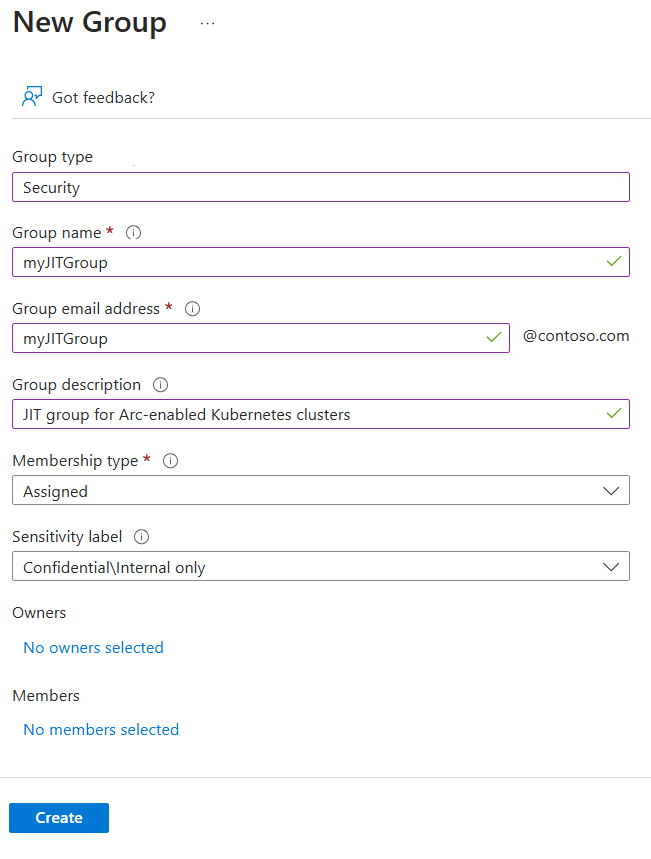
You're brought back to the Groups page. Search for and select your newly created group.
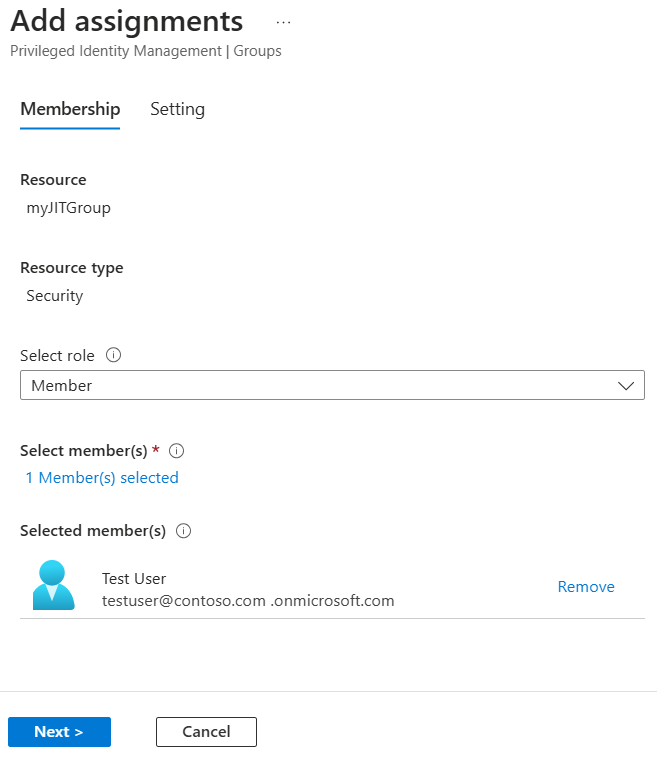
In the service menu, under Activity, select Privileged Identity Management. Then select Enable PIM for this group.
Select Add assignments to begin granting access.
Under Select role, choose Member. Then select the users and groups to whom you want to grant cluster access. A group admin can modify these assignments at any time. When you're ready to move on, select Next.
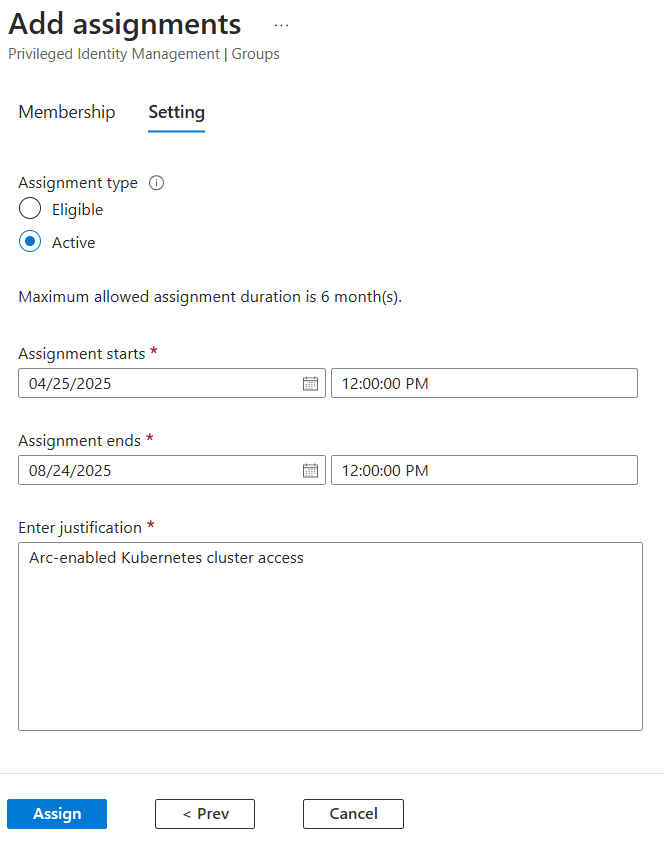
Choose an assignment type of Active, choose the desired duration, and provide a justification. When you're ready to proceed, select Assign.
For more information about these steps and options, see Assign eligibility for a group in Privileged Identity Management.
After you've made the assignments, verify that just-in-time access is working by accessing the cluster. For example, use the kubectl get nodes command to view nodes in the cluster:
kubectl get nodes
Note the authentication requirement and follow the steps to authenticate. If authentication is successful, you should see output similar to this:
To sign in, use a web browser to open the page https://microsoft.com/devicelogin and enter the code AAAAAAAAA to authenticate.

NAME      STATUS   ROLES    AGE      VERSION
node-1    Ready    agent    6m36s    v1.18.14
node-2    Ready    agent    6m42s    v1.18.14
node-3    Ready    agent    6m33s    v1.18.14
Next steps
- Read about the architecture of Azure RBAC on Arc-enabled Kubernetes.
- Securely connect to an Arc-enabled Kubernetes cluster by using cluster connect.