Set up Azure App Service access restrictions
Note
Starting June 1, 2024, newly created App Service apps can generate a unique default host name that uses the naming convention <app-name>-<random-hash>.<region>.azurewebsites.net. For example: myapp-ds27dh7271aah175.westus-01.azurewebsites.net. Existing app names remain unchanged.
For more information, see the blog post about creating a web app with a unique default host name.
When you set up access restrictions, you can define a priority-ordered allow/deny list that controls network access to your app. The list can include IP addresses or Azure Virtual Network subnets. When there are one or more entries, an implicit deny all exists at the end of the list. For more information, see Azure App Service access restrictions.
The access restriction capability works with all Azure App Service-hosted workloads. The workloads can include web apps, API apps, Linux apps, Linux custom containers, and Azure Functions apps.
When someone makes a request to your app, the FROM address is evaluated against the rules in your access restriction list. If the FROM address is in a subnet configured with service endpoints to Microsoft.Web, the source subnet is compared against the virtual network rules in your access restriction list. If the address isn't allowed access based on the rules in the list, the service replies with an HTTP 403 status code.
The access restriction capability is implemented in the App Service front-end roles, which are upstream of the worker hosts where your code runs. Therefore, access restrictions are effectively network access-control lists.
The ability to restrict access to your web app from an Azure virtual network uses service endpoints. With service endpoints, you can restrict access to a multitenant service from selected subnets. It doesn't work to restrict traffic to apps that are hosted in an App Service Environment. If you're in an App Service Environment, you can control access to your app by applying IP address rules.
Note
The service endpoints must be enabled both on the networking side and for the Azure service with which they're being enabled. For a list of Azure services that support service endpoints, see Virtual Network service endpoints.

Manage access restriction rules in the portal
To add an access restriction rule to your app:
Sign in to the Azure portal.
Select the app that you want to add access restrictions to.
On the left menu, select Settings > Networking.
On the Networking pane, under Inbound traffic configuration, select the Public network access setting.
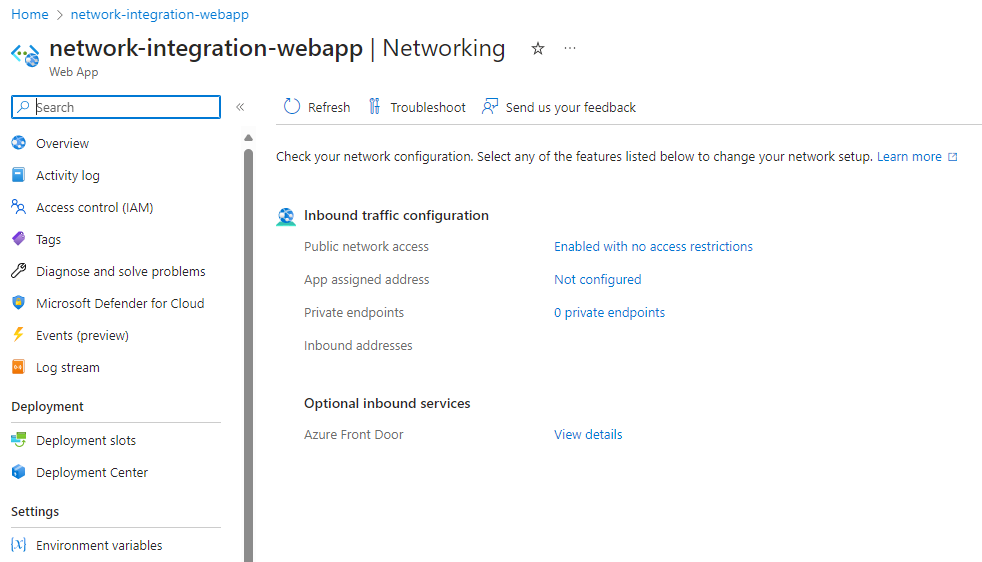
On the Access Restrictions pane, review the list of access restriction rules that are defined for your app.
The list displays the restrictions that are currently applied to the app. If you have a virtual network restriction on your app, the table shows whether the service endpoints are enabled for
Microsoft.Web. If no restrictions are defined on your app and your unmatched rule isn't set to Deny, the app is accessible from anywhere.
Permissions
You must have the following role-based access control permissions on the subnet or at a higher level to configure access restrictions through Azure portal, CLI, or when you set the site config properties directly:
| Action | Description |
|---|---|
Microsoft.Web/sites/config/read |
Gets web app configuration settings. |
Microsoft.Web/sites/config/write |
Updates web app's configuration settings. |
Microsoft.Network/virtualNetworks/subnets/joinViaServiceEndpoint/action* |
Joins resource such as storage account or SQL database to a subnet. |
Microsoft.Web/sites/write** |
Updates web app settings. |
*Only required when adding a virtual network (service endpoint) rule
**Only required if you're updating access restrictions through the Azure portal
If you add a service endpoint-based rule and the virtual network is in a different subscription than the app, ensure that the subscription with the virtual network is registered for the Microsoft.Web resource provider. You can explicitly register the provider, but it's also automatically registered when you create the first web app in a subscription. For more information, see Register resource provider.
Add an access restriction rule
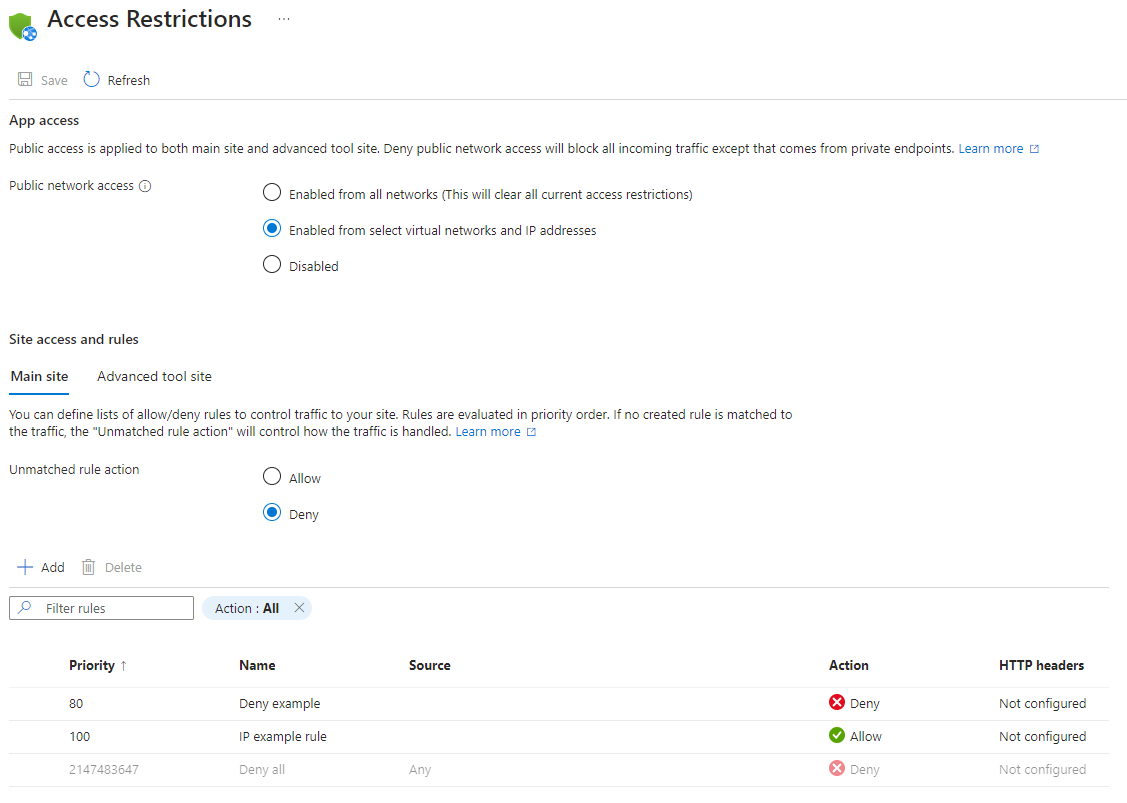
To add an access restriction rule to your app, on the Access Restrictions pane, select Add. The rule is effective only after you save it.
Rules are enforced in priority order, from the lowest number in the Priority column. If you don't configure unmatched rule, an implicit deny all is in effect when you add one rule.
On the Add Access Restriction pane, when you create a rule, do the following:
- Under Action, select either Allow or Deny.
- Enter a name and description of the rule (optional).
- In the Priority box, enter a priority value.
- In the Type dropdown list, select the type of rule. The different types of rules are described in the following sections.
- Type in the rule-specific input. Select Add rule to add the rule to the list.
- Select Save on the Access Restrictions pane.
Note
There's a limit of 512 access restriction rules. If you require more than 512 access restriction rules, we suggest that you consider a standalone security product. Consider Azure Front Door, Azure Application Gateway, or a different web application firewall (WAF).
Set an IP address-based rule
Follow the procedure as outlined in the preceding section, but with the following addition:
- For step 4, in the Type dropdown list, select IPv4 or IPv6.
Specify IP Address Block in the Classless Inter-Domain Routing (CIDR) notation for both the IPv4 and IPv6 addresses. To specify an address, you can use something like 1.2.3.4/32, where the first four octets represent your IP address and /32 is the mask. The IPv4 CIDR notation for all addresses is 0.0.0.0/0.
Note
IP-based access restriction rules only handle virtual network address ranges when your app is in an App Service Environment. If your app is in the multitenant service, you need to use service endpoints to restrict traffic to select subnets in your virtual network.
Set a service endpoint-based rule
For step 4, in the Type dropdown list, select Virtual Network.

Specify the Subscription, Virtual Network, and Subnet dropdown lists, matching what you want to restrict access to.
By using service endpoints, you can restrict access to selected Azure virtual network subnets. If service endpoints aren't already enabled with Microsoft.Web for the subnet that you select, they're automatically enabled unless you select Ignore missing Microsoft.Web service endpoints. Whether you might want to enable service endpoints on the app but not the subnet depends on if you have the permissions to enable them on the subnet.
If you need someone else to enable service endpoints on the subnet, select Ignore missing Microsoft.Web service endpoints. Your app is configured for service endpoints. They can later be enabled on the subnet.
You can't use service endpoints to restrict access to apps that run in an App Service Environment. When your app is in an App Service Environment, you can control access to it by applying IP access rules.
With service endpoints, you can configure your app by using application gateways or other web application firewall (WAF) devices. You can also configure multi-tier applications with secure back ends. For more information, see App Service networking features and Application Gateway integration.
Note
Service endpoints aren't supported for web apps that use IP-based TLS/SSL bindings with a virtual IP.
Set a service tag-based rule
For step 4, in the Type dropdown list, select Service Tag.

All publicly available service tags are supported in access restriction rules. Each service tag represents a list of IP ranges from Azure services. A list of these services and links to the specific ranges can be found in the service tag documentation. Use Azure Resource Manager templates or scripting to configure more advanced rules like regional scoped rules.
Note
When you create service tag-based rules through Azure portal or the Azure CLI, you need read access at the subscription level to get the full list of service tags for selection/validation. In addition, the Microsoft.Network resource provider needs to be registered on the subscription.
Edit a rule
To edit an existing access restriction rule, go to the Access Restrictions pane and select the rule you want to edit.
On the Edit Access Restriction pane, make your changes, and then select Update rule.
Select Save to save the changes.
Note
When you edit a rule, you can't switch between rule types.
Delete a rule
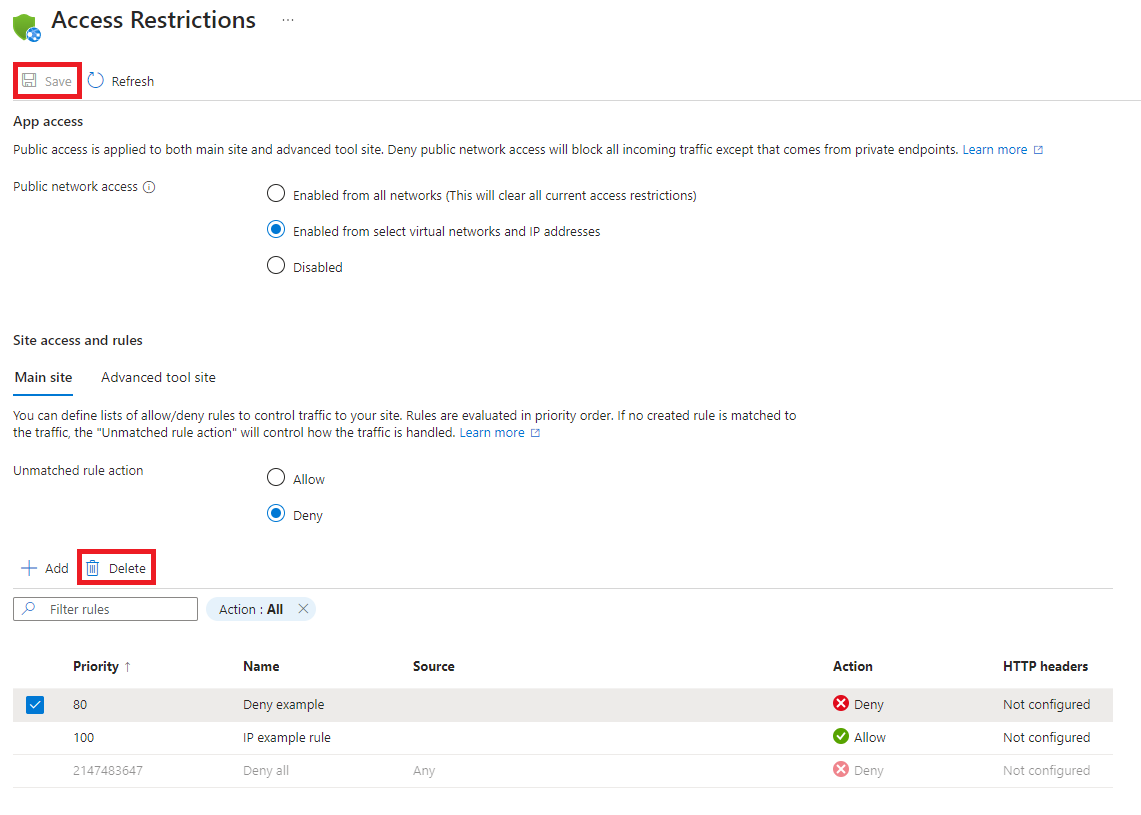
To delete a rule, on the Access Restrictions pane, select the rule or rules that you want to delete, and then select Delete.
Select Save to save the changes.
Access restriction advanced scenarios
The following sections describe using access restrictions in advanced scenarios.
Filter by HTTP header
You can add HTTP header filters to any rule. The following HTTP header names are supported:
X-Forwarded-ForX-Forwarded-HostX-Azure-FDIDX-FD-HealthProbe
For each header name, you can add up to eight values separated by commas. The HTTP header filters are evaluated after the rule itself and both conditions must be true for the rule to apply.
Multi-source rules
Multi-source rules allow you to combine up to eight IP ranges or eight service tags in a single rule. Use multi-source rules if you have more than 512 IP ranges or if you want to create logical rules. For example: a logical rule could include multiple IP ranges combined with a single HTTP header filter.
Multi-source rules are defined the same way as single-source rules, but each range is separated with a comma.
PowerShell example:
Add-AzWebAppAccessRestrictionRule -ResourceGroupName "ResourceGroup" -WebAppName "AppName" `
  -Name "Multi-source rule" -IpAddress "192.168.1.0/24,192.168.10.0/24,192.168.100.0/24" `
  -Priority 100 -Action Allow
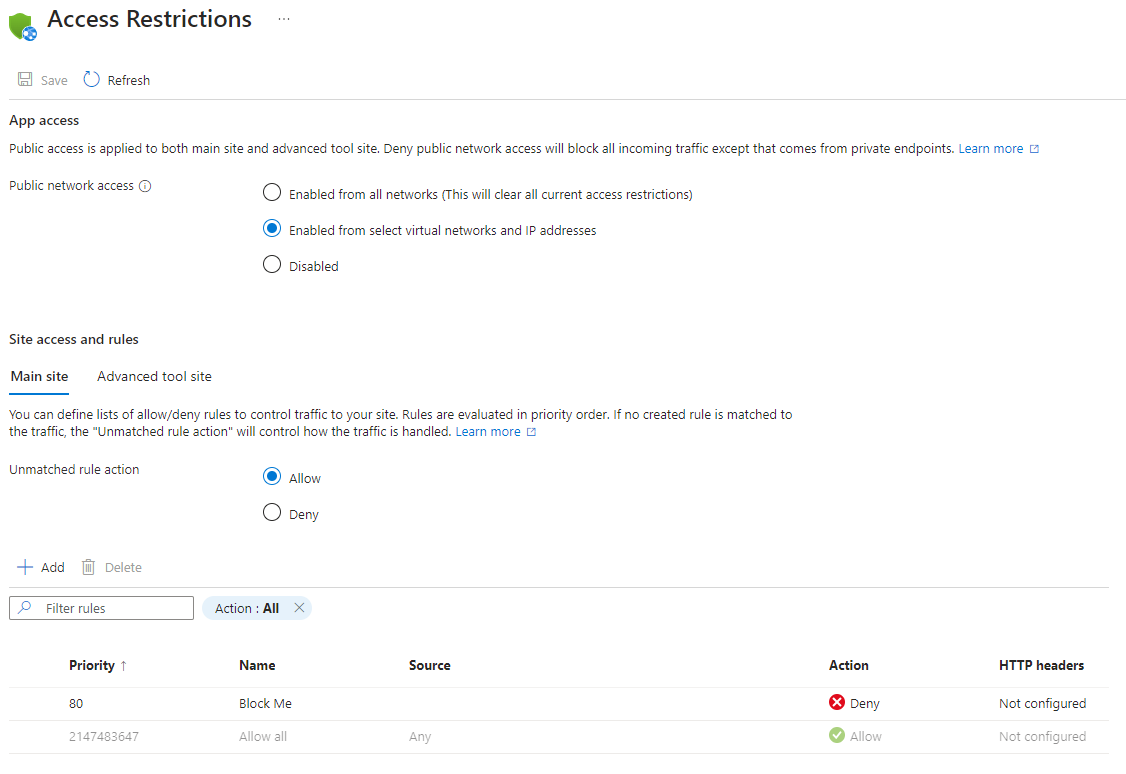
Block a single IP address
If you want to explicitly block a single IP address or a block of IP addresses, but allow access to everything else, you can add a Deny rule for the specific IP address. Then configure the unmatched rule action to Allow.
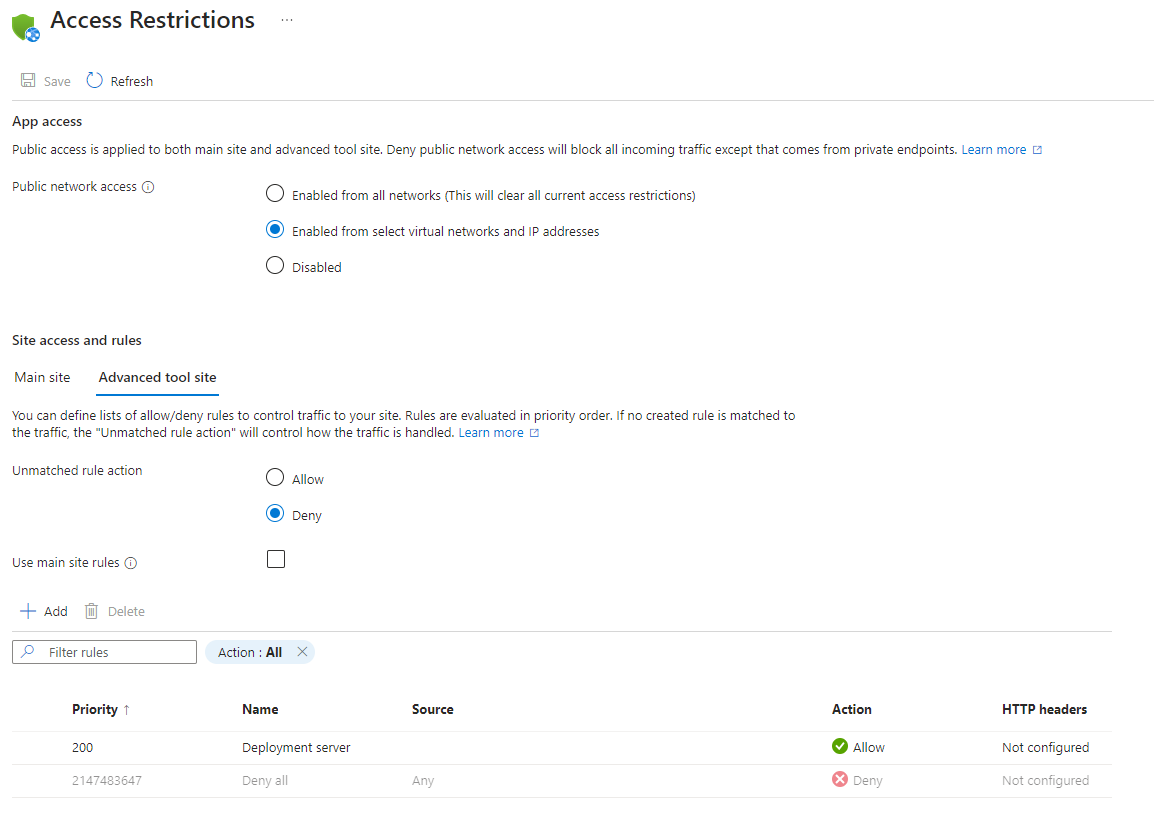
Restrict access to an SCM site
In addition to being able to control access to your app, you can restrict access to the source control management (SCM) advanced tool site used by your app. The SCM site is both the web deploy endpoint and the Kudu console. You can assign access restrictions to the SCM site from the app separately or use the same set of restrictions for both the app and the SCM site. When you select Use main site rules, the rules list is hidden. The SCM site uses the rules from the main site. If you unselect the checkbox, your SCM site settings appear again.
Restrict access to a specific Azure Front Door instance
Traffic from Azure Front Door to your application originates from a well known set of IP ranges defined in the AzureFrontDoor.Backend service tag. By using a service tag restriction rule, you can restrict traffic to only originate from Azure Front Door. To ensure traffic only originates from your specific instance, you need to further filter the incoming requests based on the unique HTTP header that Azure Front Door sends.

PowerShell example:
$afd = Get-AzFrontDoor -Name "MyFrontDoorInstanceName"
Add-AzWebAppAccessRestrictionRule -ResourceGroupName "ResourceGroup" -WebAppName "AppName" `
  -Name "Front Door example rule" -Priority 100 -Action Allow -ServiceTag AzureFrontDoor.Backend `
  -HttpHeader @{'x-azure-fdid' = $afd.FrontDoorId}
Manage access restriction programmatically
You can also manage access restriction programmatically. The following examples show how to add rules to access restrictions and how to change Unmatched rule action for both Main site and Advanced tool site.
Add access restrictions rules for main site
You can add access restrictions rules for Main site programmatically by choosing one of the following options:
You can run the following command in Azure Cloud Shell. For more information about the command, see az webapp config access-restriction.
az webapp config access-restriction add --resource-group ResourceGroup --name AppName \
  --rule-name 'IP example rule' --action Allow --ip-address 122.133.144.0/24 --priority 100

az webapp config access-restriction add --resource-group ResourceGroup --name AppName \
  --rule-name "Azure Front Door example" --action Allow --priority 200 --service-tag AzureFrontDoor.Backend \
  --http-header x-azure-fdid=xxxxxxxx-xxxx-xxxx-xxxx-xxxxxxxxxxxx
Add access restrictions rules for advanced tool site
You can add access restrictions rules for Advanced tool site programmatically. Choose one of the following options:
You can run the following command in Cloud Shell. For more information about the command, see az webapp config access-restriction.
az webapp config access-restriction add --resource-group ResourceGroup --name AppName \
  --rule-name 'IP example rule' --action Allow --ip-address 122.133.144.0/24 --priority 100 --scm-site true
Change unmatched rule action for main site
You can change Unmatched rule action for Main site programmatically by choosing one of the following options:
You can run the following command in Cloud Shell. For more information about the command, see az resource. Accepted values for ipSecurityRestrictionsDefaultAction are Allow or Deny.
az resource update --resource-group ResourceGroup --name AppName --resource-type "Microsoft.Web/sites" \
  --set properties.siteConfig.ipSecurityRestrictionsDefaultAction=Allow
Change unmatched rule action for advanced tool site
You can change Unmatched rule action for Advanced tool site programmatically by choosing one of the following options:
You can run the following command in Cloud Shell. For more information about the command, see az resource. Accepted values for scmIpSecurityRestrictionsDefaultAction are Allow or Deny.
az resource update --resource-group ResourceGroup --name AppName --resource-type "Microsoft.Web/sites" \
  --set properties.siteConfig.scmIpSecurityRestrictionsDefaultAction=Allow
Set up Azure Functions access restrictions
Access restrictions are also available for function apps with the same functionality as App Service plans. When you enable access restrictions, you also disable the Azure portal code editor for any disallowed IPs.