Once you are satisfied with how your model performs, it's ready to be deployed, and query it for predictions from utterances. Deploying a model makes it available for use through the prediction API.
Prerequisites
See project development lifecycle for more information.
Deploy model
After you have reviewed the model's performance and decide it's fit to be used in your environment, you need to assign it to a deployment to be able to query it. Assigning the model to a deployment makes it available for use through the prediction API. It is recommended to create a deployment named production to which you assign the best model you have built so far and use it in your system. You can create another deployment called staging to which you can assign the model you're currently working on to be able to test it. You can have a maximum on 10 deployments in your project.
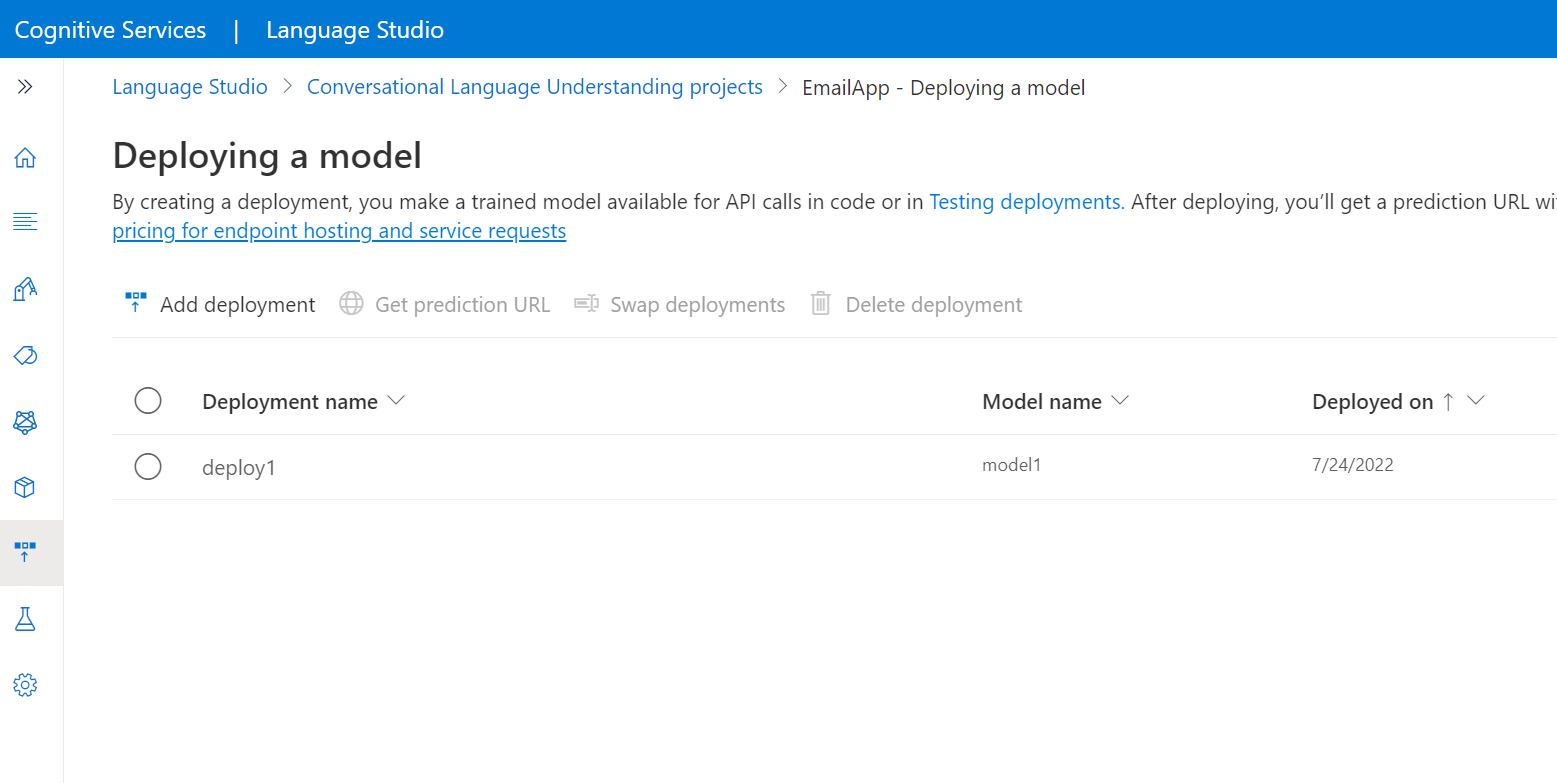
To deploy your model from within the Language Studio:
Select Deploying a model from the left side menu.
Select Add deployment to start the Add deployment wizard.
Select Create a new deployment name to create a new deployment and assign a trained model from the dropdown below. You can otherwise select Overwrite an existing deployment name to effectively replace the model that's used by an existing deployment.
Note
Overwriting an existing deployment doesn't require changes to your Prediction API call but the results you get will be based on the newly assigned model.
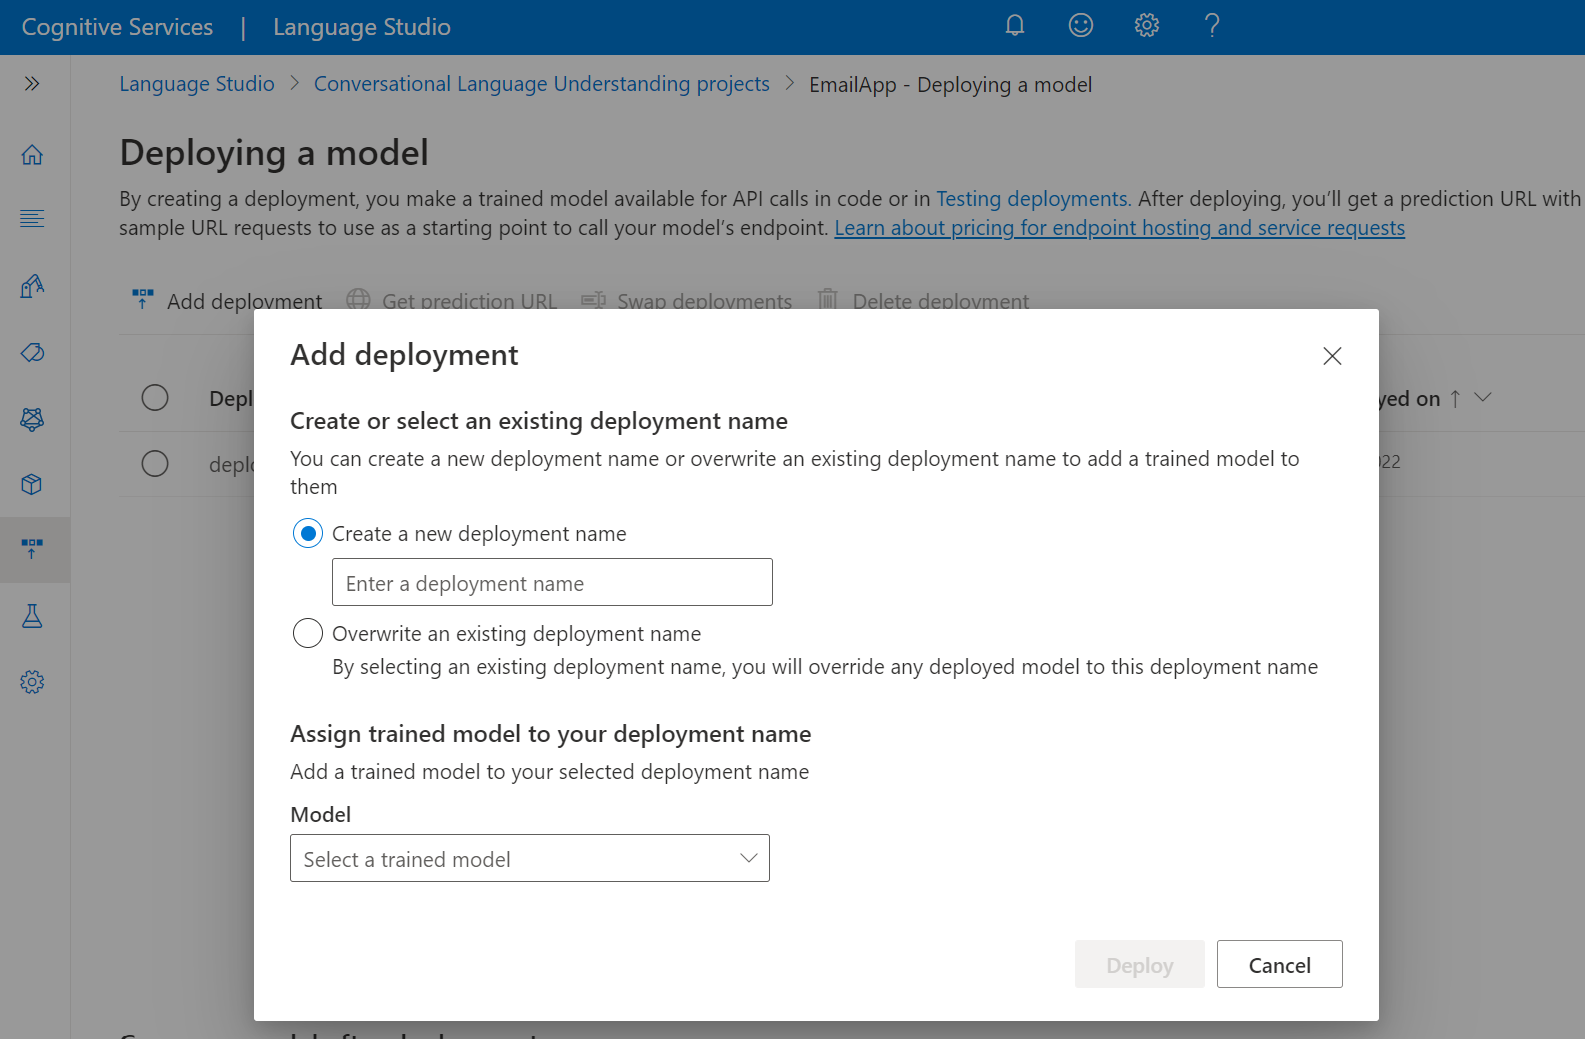
Select a trained model from the Model dropdown.
Select Deploy to start the deployment job.
After deployment is successful, an expiration date will appear next to it. Deployment expiration is when your deployed model will be unavailable to be used for prediction, which typically happens twelve months after a training configuration expires.
Submit deployment job
Create a PUT request using the following URL, headers, and JSON body to start deploying a conversational language understanding model.
Request URL
{ENDPOINT}/language/authoring/analyze-conversations/projects/{PROJECT-NAME}/deployments/{DEPLOYMENT-NAME}?api-version={API-VERSION}
| Placeholder |
Value |
Example |
{ENDPOINT} |
The endpoint for authenticating your API request. |
https://<your-custom-subdomain>.cognitiveservices.azure.com |
{PROJECT-NAME} |
The name for your project. This value is case-sensitive. |
myProject |
{DEPLOYMENT-NAME} |
The name for your deployment. This value is case-sensitive. |
staging |
{API-VERSION} |
The version of the API you are calling. |
2023-04-01 |
Use the following header to authenticate your request.
| Key |
Value |
Ocp-Apim-Subscription-Key |
The key to your resource. Used for authenticating your API requests. |
Request Body
{
  "trainedModelLabel": "{MODEL-NAME}",
}
| Key |
Placeholder |
Value |
Example |
| trainedModelLabel |
{MODEL-NAME} |
The model name that will be assigned to your deployment. You can only assign successfully trained models. This value is case-sensitive. |
myModel |
Once you send your API request, you will receive a 202 response indicating success. In the response headers, extract the operation-location value. It will be formatted like this:
{ENDPOINT}/language/authoring/analyze-conversations/projects/{PROJECT-NAME}/deployments/{DEPLOYMENT-NAME}/jobs/{JOB-ID}?api-version={API-VERSION}
You can use this URL to get the deployment job status.
Get deployment job status
When you send a successful deployment request, the full request URL for checking the job's status (including your endpoint, project name, and job ID) is contained in the response's operation-location header.
Use the following GET request to get the status of your deployment job. Replace the placeholder values with your own values.
Request URL
{ENDPOINT}/language/authoring/analyze-conversations/projects/{PROJECT-NAME}/deployments/{DEPLOYMENT-NAME}/jobs/{JOB-ID}?api-version={API-VERSION}
| Placeholder |
Value |
Example |
{ENDPOINT} |
The endpoint for authenticating your API request. |
https://<your-custom-subdomain>.cognitiveservices.azure.com |
{PROJECT-NAME} |
The name for your project. This value is case-sensitive. |
myProject |
{DEPLOYMENT-NAME} |
The name for your deployment. This value is case-sensitive. |
staging |
{JOB-ID} |
The ID for locating your model's training status. |
xxxxxxxx-xxxx-xxxx-xxxx-xxxxxxxxxxxxx |
{API-VERSION} |
The version of the API you are calling. |
2023-04-01 |
Use the following header to authenticate your request.
| Key |
Value |
Ocp-Apim-Subscription-Key |
The key to your resource. Used for authenticating your API requests. |
Response Body
Once you send the request, you'll get the following response. Keep polling this endpoint until the status parameter changes to "succeeded".
{
    "jobId":"{JOB-ID}",
    "createdDateTime":"{CREATED-TIME}",
    "lastUpdatedDateTime":"{UPDATED-TIME}",
    "expirationDateTime":"{EXPIRATION-TIME}",
    "status":"running"
}
Swap deployments
After you are done testing a model assigned to one deployment, you might want to assign it to another deployment. Swapping deployments involves:
- Taking the model assigned to the first deployment, and assigning it to the second deployment.
- taking the model assigned to second deployment and assign it to the first deployment.
This can be used to swap your production and staging deployments when you want to take the model assigned to staging and assign it to production.
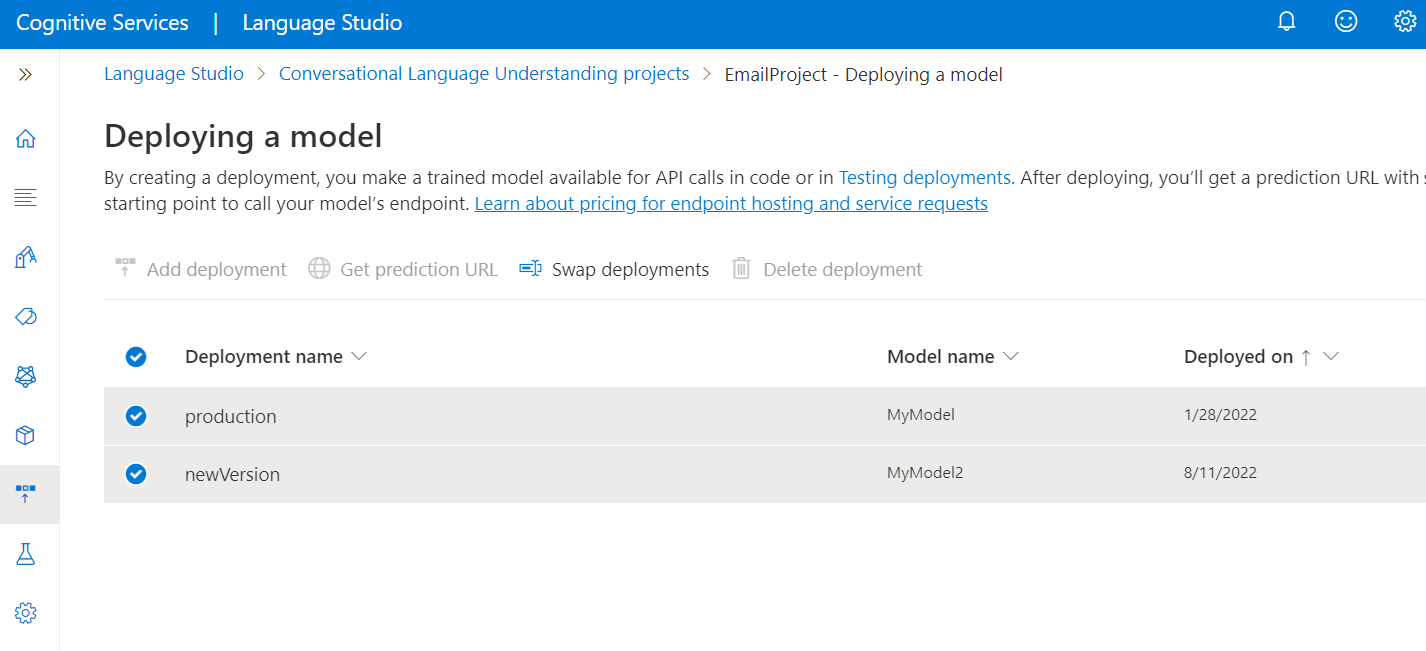
To swap deployments from within Language Studio
In the Deploy model page, select the two deployments you want to swap and select Swap deployments from the top menu.
From the window that appears, select the names of the deployments you want to swap.
Create a POST request using the following URL, headers, and JSON body to start a swap deployments job.
Request URL
{ENDPOINT}/language/authoring/analyze-conversations/projects/{PROJECT-NAME}/deployments/:swap?api-version={API-VERSION}
| Placeholder |
Value |
Example |
{ENDPOINT} |
The endpoint for authenticating your API request. |
https://<your-custom-subdomain>.cognitiveservices.azure.com |
{PROJECT-NAME} |
The name for your project. This value is case-sensitive. |
myProject |
{API-VERSION} |
The version of the API you are calling. |
2023-04-01 |
Use the following header to authenticate your request.
| Key |
Value |
Ocp-Apim-Subscription-Key |
The key to your resource. Used for authenticating your API requests. |
Request Body
{
  "firstDeploymentName": "{FIRST-DEPLOYMENT-NAME}",
  "secondDeploymentName": "{SECOND-DEPLOYMENT-NAME}"
}
| Key |
Placeholder |
Value |
Example |
| firstDeploymentName |
{FIRST-DEPLOYMENT-NAME} |
The name for your first deployment. This value is case-sensitive. |
production |
| secondDeploymentName |
{SECOND-DEPLOYMENT-NAME} |
The name for your second deployment. This value is case-sensitive. |
staging |
Once you send your API request, you will receive a 202 response indicating success.
Delete deployment
To delete a deployment from within Language Studio, select the Deploy model page. Then select the deployment you want to delete, and select Delete deployment from the top menu.
Create a DELETE request using the following URL, headers, and JSON body to delete a conversational language understanding deployment.
Request URL
{ENDPOINT}/language/authoring/analyze-conversations/projects/{projectName}/deployments/{deploymentName}?api-version={API-VERSION}
| Placeholder |
Value |
Example |
{ENDPOINT} |
The endpoint for authenticating your API request. |
https://<your-custom-subdomain>.cognitiveservices.azure.com |
{PROJECT-NAME} |
The name for your project. This value is case-sensitive. |
myProject |
{DEPLOYMENT-NAME} |
The name for your deployment name. This value is case-sensitive. |
staging |
{API-VERSION} |
The version of the API you are calling. |
2023-04-01 |
Use the following header to authenticate your request.
| Key |
Value |
Ocp-Apim-Subscription-Key |
The key to your resource. Used for authenticating your API requests. |
Once you send your API request, you will receive a 202 response indicating success, which means your deployment has been deleted.
Assign deployment resources
You can deploy your project to multiple regions by assigning different Language resources that exist in different regions.
To assign deployment resources in other regions in Language Studio:
- Make sure you've assigned yourself as a Cognitive Services Language Owner to the resource you used to create the project.
- Go to the Deploying a model page in Language Studio.
- Select the Regions tab.
- Select Add deployment resource.
- Select a Language resource in another region.
You are now ready to deploy your project to the regions where you have assigned resources.
Assigning deployment resources programmatically requires Microsoft Entra authentication**. Microsoft Entra ID is used to confirm you have access to the resources you are interested in assigning to your project for multi-region deployment. To programmatically use Microsoft Entra authentication when making REST API calls, see the Azure AI services authentication documentation.
Assign resource
Submit a POST request using the following URL, headers, and JSON body to assign deployment resources.
Request URL
Use the following URL when creating your API request. Replace the placeholder values below with your own values.
{ENDPOINT}/language/authoring/analyze-conversations/projects/{PROJECT-NAME}/resources/:assign?api-version={API-VERSION}
| Placeholder |
Value |
Example |
{ENDPOINT} |
The endpoint for authenticating your API request. |
https://<your-custom-subdomain>.cognitiveservices.azure.com |
{PROJECT-NAME} |
The name for your project. This value is case-sensitive. |
myProject |
{API-VERSION} |
The version of the API you're calling. |
2022-10-01-preview |
Use Microsoft Entra authentication to authenticate this API.
Body
Use the following sample JSON as your body.
{
  "resourcesMetadata": [
    {
      "azureResourceId": "{AZURE-RESOURCE-ID}",
      "customDomain": "{CUSTOM-DOMAIN}",
      "region": "{REGION-CODE}"
    }
  ]
}
| Key |
Placeholder |
Value |
Example |
azureResourceId |
{AZURE-RESOURCE-ID} |
The full resource ID path you want to assign. Found in the Azure portal under the Properties tab for the resource, within the Resource ID field. |
/subscriptions/aaaa0a0a-bb1b-cc2c-dd3d-eeeeee4e4e4e/resourceGroups/ContosoResourceGroup/providers/Microsoft.CognitiveServices/accounts/ContosoResource |
customDomain |
{CUSTOM-DOMAIN} |
The custom subdomain of the resource you want to assign. Found in the Azure portal under the Keys and Endpoint tab for the resource, part of the Endpoint field in the URL https://<your-custom-subdomain>.cognitiveservices.azure.com/ |
contosoresource |
region |
{REGION-CODE} |
A region code specifying the region of the resource you want to assign. Found in the Azure portal under the Keys and Endpoint tab for the resource, as part of the Location/Region field. |
eastus |
Get assign resource status
Use the following GET request to get the status of your assign deployment resource job. Replace the placeholder values below with your own values.
Request URL
{ENDPOINT}/language/authoring/analyze-conversations/projects/{PROJECT-NAME}/resources/assign/jobs/{JOB-ID}?api-version={API-VERSION}
| Placeholder |
Value |
Example |
{ENDPOINT} |
The endpoint for authenticating your API request. |
https://<your-custom-subdomain>.cognitiveservices.azure.com |
{PROJECT-NAME} |
The name for your project. This value is case-sensitive. |
myProject |
{JOB-ID} |
The job ID for getting your assign deployment status. This is in the operation-location header value you received from the API in response to your assign deployment resource request. |
xxxxxxxx-xxxx-xxxx-xxxx-xxxxxxxxxxxxx |
{API-VERSION} |
The version of the API you're calling. |
2022-10-01-preview |
Use the following header to authenticate your request.
| Key |
Value |
Ocp-Apim-Subscription-Key |
The key to your resource. Used for authenticating your API requests. |
Response Body
Once you send the request, you will get the following response. Keep polling this endpoint until the status parameter changes to "succeeded".
{
    "jobId":"{JOB-ID}",
    "createdDateTime":"{CREATED-TIME}",
    "lastUpdatedDateTime":"{UPDATED-TIME}",
    "expirationDateTime":"{EXPIRATION-TIME}",
    "status":"running"
}
Unassign deployment resources
When unassigning or removing a deployment resource from a project, you will also delete all the deployments that have been deployed to that resource's region.
To unassign or remove deployment resources in other regions using Language Studio:
- Go to the Regions tab in the Deploy a model page.
- Select the resource you'd like to unassign.
- Select the Remove assignment button.
- In the window that appears, type the name of the resource you want to remove.
Unassign resource
Submit a POST request using the following URL, headers, and JSON body to unassign or remove deployment resources from your project.
Request URL
Use the following URL when creating your API request. Replace the placeholder values below with your own values.
{ENDPOINT}/language/authoring/analyze-conversations/projects/{PROJECT-NAME}/resources/:unassign?api-version={API-VERSION}
| Placeholder |
Value |
Example |
{ENDPOINT} |
The endpoint for authenticating your API request. |
https://<your-custom-subdomain>.cognitiveservices.azure.com |
{PROJECT-NAME} |
The name for your project. This value is case-sensitive. |
myProject |
{API-VERSION} |
The version of the API you're calling. |
2022-10-01-preview |
Use the following header to authenticate your request.
| Key |
Value |
Ocp-Apim-Subscription-Key |
The key to your resource. Used for authenticating your API requests. |
Body
Use the following sample JSON as your body.
{
  "assignedResourceIds": [
    "{AZURE-RESOURCE-ID}"
  ]
}
| Key |
Placeholder |
Value |
Example |
assignedResourceIds |
{AZURE-RESOURCE-ID} |
The full resource ID path you want to unassign. Found in the Azure portal under the Properties tab for the resource as the Resource ID field. |
/subscriptions/aaaa0a0a-bb1b-cc2c-dd3d-eeeeee4e4e4e/resourceGroups/ContosoResourceGroup/providers/Microsoft.CognitiveServices/accounts/ContosoResource |
Get unassign resource status
Use the following GET request to get the status of your unassign deployment resources job. Replace the placeholder values below with your own values.
Request URL
{ENDPOINT}/language/authoring/analyze-conversations/projects/{PROJECT-NAME}/resources/unassign/jobs/{JOB-ID}?api-version={API-VERSION}
| Placeholder |
Value |
Example |
{ENDPOINT} |
The endpoint for authenticating your API request. |
https://<your-custom-subdomain>.cognitiveservices.azure.com |
{PROJECT-NAME} |
The name for your project. This value is case-sensitive. |
myProject |
{JOB-ID} |
The job ID for getting your assign deployment status. This is in the operation-location header value you received from the API in response to your unassign deployment resource request. |
xxxxxxxx-xxxx-xxxx-xxxx-xxxxxxxxxxxxx |
{API-VERSION} |
The version of the API you're calling. |
2022-10-01-preview |
Use the following header to authenticate your request.
| Key |
Value |
Ocp-Apim-Subscription-Key |
The key to your resource. Used for authenticating your API requests. |
Response Body
Once you send the request, you will get the following response. Keep polling this endpoint until the status parameter changes to "succeeded".
{
    "jobId":"{JOB-ID}",
    "createdDateTime":"{CREATED-TIME}",
    "lastUpdatedDateTime":"{UPDATED-TIME}",
    "expirationDateTime":"{EXPIRATION-TIME}",
    "status":"running"
}
Next steps


