Visual Studio 2010 UML Design Pattern Toolbox Items Extension
I presented at the Black Marble Architecture Forum in the North event in December and one of the things I showed was how to create a toolbox item extension to add a UML design pattern into Visual Studio’s UML toolbox. Having done this I checked and couldn’t find any extensions that covered the Gang of Four design patterns, so I thought I’d create an extension to do just that. Let’s start at the end with where to download them and what they give you…
What do you get?
The toolbox items extension gives you some extra toolbox items that cover the majority of the core Gang of Four design patterns. Once installed, if you open a UML class diagram you should see the following additions under Structural, Creational and Behavioural (yes, British spelling) Patterns:
Select one of the toolbox items and this will place a ready to go representation of that design pattern on the class diagram, in this example it’s the Abstract Factory:
Underlying the visible Toolbox extension is a UML profile that contains a number of UML stereotypes to mark classes and interfaces with roles in the relevant pattern. So in the example above there is an IFactory interface stereotype and an Abstract Factory class stereotype.
Where do I get it?
If that looks interesting then depending on what you want you can get hold of this in two places:
Visual Studio Gallery
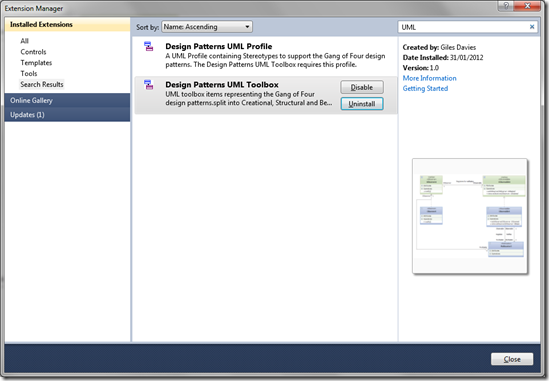
I’ve published the .vsix extension to the Visual Studio Gallery here. All you need to do is download the .vsix, install it and restart Visual Studio. To check it installed successfully then go to Tools | Extension Manager and you should find these extensions have been added (I’ve filtered on UML to simplify it):
Then open or create a UML modelling project and once you have a class diagram you should see the new toolbox items.
Codeplex
I’ve added the Visual Studio solutions that I created this extension from to Codeplex here. You can download the solutions, take a look at the projects and update/improve/extend/adapt the toolbox items to suit your needs.
How do you build this?
Take a look at the Codeplex project if you want to download the full solutions but as an overview this is essentially simple. It breaks down into 4 key aspects:
UML Profile
I wanted to create a UML profile in order to define the stereotypes that I would use in the design patterns. As an example I wanted to have <<Singleton>> stereotype so that any class that you wanted to implement the Singleton pattern could be identified as such without having to rely on naming conventions, and the name can be independent of the stereotype. A secondary reason is that if I wanted to generate code from the design patterns this would allow the T4 templates to generate the appropriate code for the specified stereotype. I haven’t got round to this part but using a profile means that this will be possible in the future.
The documentation on creating a custom profile is here. This is what I followed but a summary is:
- Create an XML file with the extension.profile. In my case GoFDesignPatterns.profile
- Add in the profile element of the XML
  1: <profile dslVersion="1.0.0.0"
  2:        name="GoFDesignPatterns" displayName="GoF Design Patterns"
  3:        xmlns="https://schemas.microsoft.com/UML2.1.2/ProfileDefinition">
  4:
  5: </profile>
- For each stereotype add an appropriate element inside the profile. Note that you need to reference the appropriate metaclass. I only wanted steretypes for classes and interfaces so these were the only metaclasses that I needed, as in this example for the Visitor pattern:
  1: <!--Visitor-->
  2: <stereotype name="IVisitor" displayName="IVisitor" >
  3:   <metaclasses>
  4:     <metaclassMoniker name="/GoFDesignPatterns/Microsoft.VisualStudio.Uml.Classes.IInterface" />
  5:   </metaclasses>
  6: </stereotype>
  7: <stereotype name="ConcreteVisitor" displayName="ConcreteVisitor" >
  8:   <metaclasses>
  9:     <metaclassMoniker name="/GoFDesignPatterns/Microsoft.VisualStudio.Uml.Classes.IClass" />
  10:   </metaclasses>
  11: </stereotype>
  12: <stereotype name="Element" displayName="Element" >
  13:   <metaclasses>
  14:     <metaclassMoniker name="/GoFDesignPatterns/Microsoft.VisualStudio.Uml.Classes.IClass" />
  15:   </metaclasses>
  16: </stereotype>
  17: <stereotype name="ConcreteElement" displayName="ConcreteElement" >
  18:   <metaclasses>
  19:     <metaclassMoniker name="/GoFDesignPatterns/Microsoft.VisualStudio.Uml.Classes.IClass" />
  20:   </metaclasses>
  21: </stereotype>
- For each UML metaclass referenced in the stereotype elements add a metaclass element:
  1: <metaclasses>
  2:   <!-- List of metaclasses (that is, classes in the UML spec) that are mentioned in the stereotype definitions. -->
  3:   <metaclass name="Microsoft.VisualStudio.Uml.Classes.IClass"/>
  4:   <metaclass name="Microsoft.VisualStudio.Uml.Classes.IInterface"/>
  5: </metaclasses>
UML Profile Extension
Having created the profile itself (actually I did this iteratively and not in one go), then you need to package this as a Visual studio extension, a .vsix file. This is actually fairly straightforward and there are good instructions here. The key points I would highlight are:
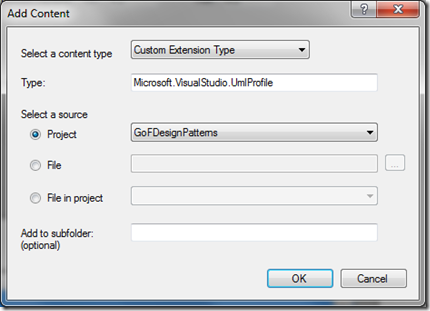
- There’s a bit of configuration in the source.extension.vsixmanifest to tell it what kind of an extension this will be. In the Content section of the editor select the Add Content button, and then add the following:
- Fill in the meta-data – very simple, here’s a screenshot of what how I completed it:
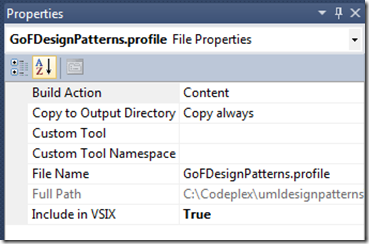
- Number one gotcha – make sure that for any files to be included in the .vsix you change these properties:
- Build Action: Content
- Copy to Output Directory: Copy always
- Include in VSIX: True
- Now just build the project, and in the bin folder of the project you should find the .vsix file. Run the file to install it in Visual Studio (although you will need to restart Visual Studio to pick up the changes).
UML Toolbox Items
I followed the documentation here and it was pretty easy. My points to note:
- I had a separate project for my UML diagrams and the Visual Studio extension as each requires a different type of project. There might be a better way of arranging this but I quite liked the separation. It did mean that I needs to add the class diagrams to the .vsix project, but see the point below on this.
- For each pattern I created a new class diagram, added the relevant elements and set the stereotypes (from the profile above) as appropriate. You therefore need the UML profile complete enough and installed in order to reference the required stereotypes. I ended up doing little batches of 2 or 3 design pattern stereotypes, install new .vsix, then create the class diagrams
- Once a class diagram representing a pattern was created in the modelling project it needs to be added to the extension project. I did this by simply adding an existing item, and selecting the .classdiagram and .classdiagram.layout files for each class diagram I wanted to add. I linked to the modelling project rather than copy the files in so that if I edited the classdiagram I didn’t need to repeat this step:
- Don’t forget to set the properties for those file to include them in the .vsix file… (see above for this gotcha).
- In the .tbxinfo XML file add an entry for the pattern you’ve just added. This metadata provides the name, tooltip and icon for the toolbox item. Two critical entries are:
- fileName. This is the file name of the classdiagram that represents the pattern.
- tabName: the tab in the toolbox that the item will appear under. You don’t need to create this separately, it will be added automatically. Equally, make sure you spell the tab name the same for all those items that you want to appear together.
  1: <!--AbstractFactory-->
  2: <customToolboxItem fileName="AbstractFactory.classdiagram">
  3:   <displayName>
  4:     <value>AbstractFactory</value>
  5:   </displayName>
  6:   <tabName>
  7:     <value>Creational Patterns</value>
  8:   </tabName>
  9:   <image>
  10:     <bmp fileName="DesignPatternIcon.bmp"/>
  11:   </image>
  12:   <f1Keyword>
  13:     <value>AbstractFactoryHelp</value>
  14:   </f1Keyword>
  15:   <tooltip>
  16:     <value>Groups object factories that have a common theme.</value>
  17:   </tooltip>
  18: </customToolboxItem>
UML Toolbox Items Extension
Exactly the same as the extension project for the profile with the following exceptions:
- Content configuration:
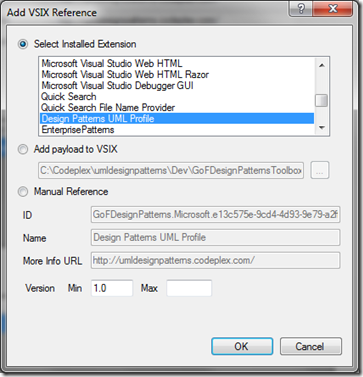
- Referencing the UML Profile extension dependency so that it’s a single install rather than 2 installations. This can be set in the References section of the source.extension.vsixmanifest editor. Make sure you reference the UML profile that you need, in my case the Design Patterns UML Profile:
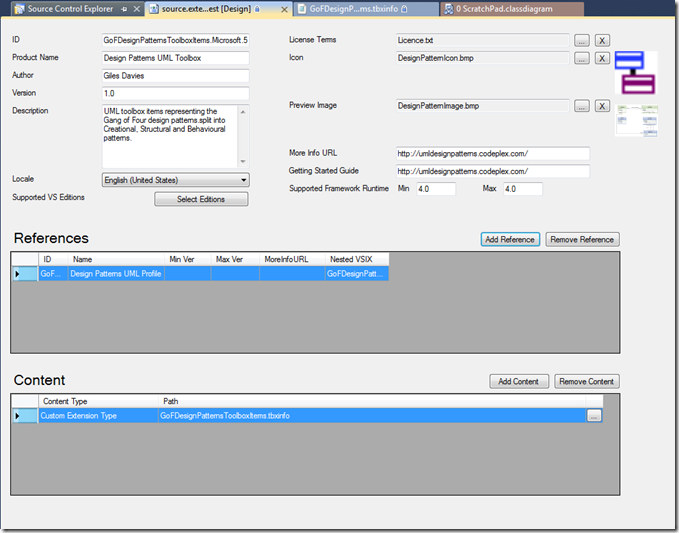
- And again here’s my complete manifest data:
I hope that either the toolbox items themselves or the explanation on how to create them are useful or interesting, and I’d encourage you to think of opportunities to extend and customise your Visual Studio environment to help you work more effectively. And if you don’t like my implementation of the patterns then please improve them via the Codeplex project.
Comments
Anonymous
January 31, 2012
Great Work - Thanks :-)Anonymous
February 02, 2012
looks very interesting! anyway, when i try to run the installer package, i get message saying "This extension is not installable on any currently installed product" despite i have of course VS2010 installed... any idea?Anonymous
February 02, 2012
Hi Lubos, yes this is deliberate :-) I specified in the installer that this should only be installed in Visual Studio 2010 Ultimate or Premium as these are the only editions that support UML, and Ultimate is the only edition that supports creation of UML diagrams. So - assuming you don't have Ultimate or Premium then this is expected behaviour. If not, then let me know and I'll see if there is another issue.Anonymous
February 02, 2012
hi gdavi. yes - it's correct. i got it wrong, my expectation was that this will extend class diagram functionality in professional as well...Anonymous
February 12, 2012
i love your blog, i have it in my rss reader and always like new things coming up from it.Anonymous
February 27, 2012
Is there any way that this is useable in the Premium edition? There doesn't seem to be any modelling projects - so how can you use you toolbox editions?Anonymous
February 28, 2012
Hi Allan, This is limited to the Ultimate edition as that's the edition that allows you to create UML models and diagrams. A model that's created in Ultimate can be viewed in Premium but it's a read-only experience. GilesAnonymous
May 15, 2012
Hi! I try to use but show this message: The system cannot find the file specified. (Exception from HRESULT: 0x80070002) ....Anonymous
December 15, 2012
Giles, Since the October, 2012 refresh, which indicates it supports VS2012, myself and a number of others are getting error messages when trying to install into VS2012 Professional. Please see the messages on the Gallery page at visualstudiogallery.msdn.microsoft.com/dc41bd3a-85f6-4015-aa39-c57bfa332b20 Please advise. Thanks. -- MichaelAnonymous
June 24, 2013
Hey man, great work. I wanted to give it a try but it says "This extension is not installable on any currently installed product" despite I have VS2010 Ultimate. Any Ideas?


