Data Warehousing in the Cloud

 By Chris Testa-O’Neill, Features Engineer at Microsoft.
For a few months now we've had a SQL Server edition in the cloud, known as Azure SQL Data Warehouse. This version enables you to provision a data warehouse instance in just 3 to 5 minutes. Its main benefit is that it allows you to scale your compute in seconds, allowing you to keep up with your organisation's data demands. So, if you are performing heavy data loads, you can maximise the amount of compute for the duration of a data load, only to scale the compute back down once the load is complete. Furthermore, if you don’t require access to your data, you can pause the compute so that you can keep control of your costs, while still retaining the data.
These are some of the business benefits of Azure SQL Data Warehouse, but how does it work?
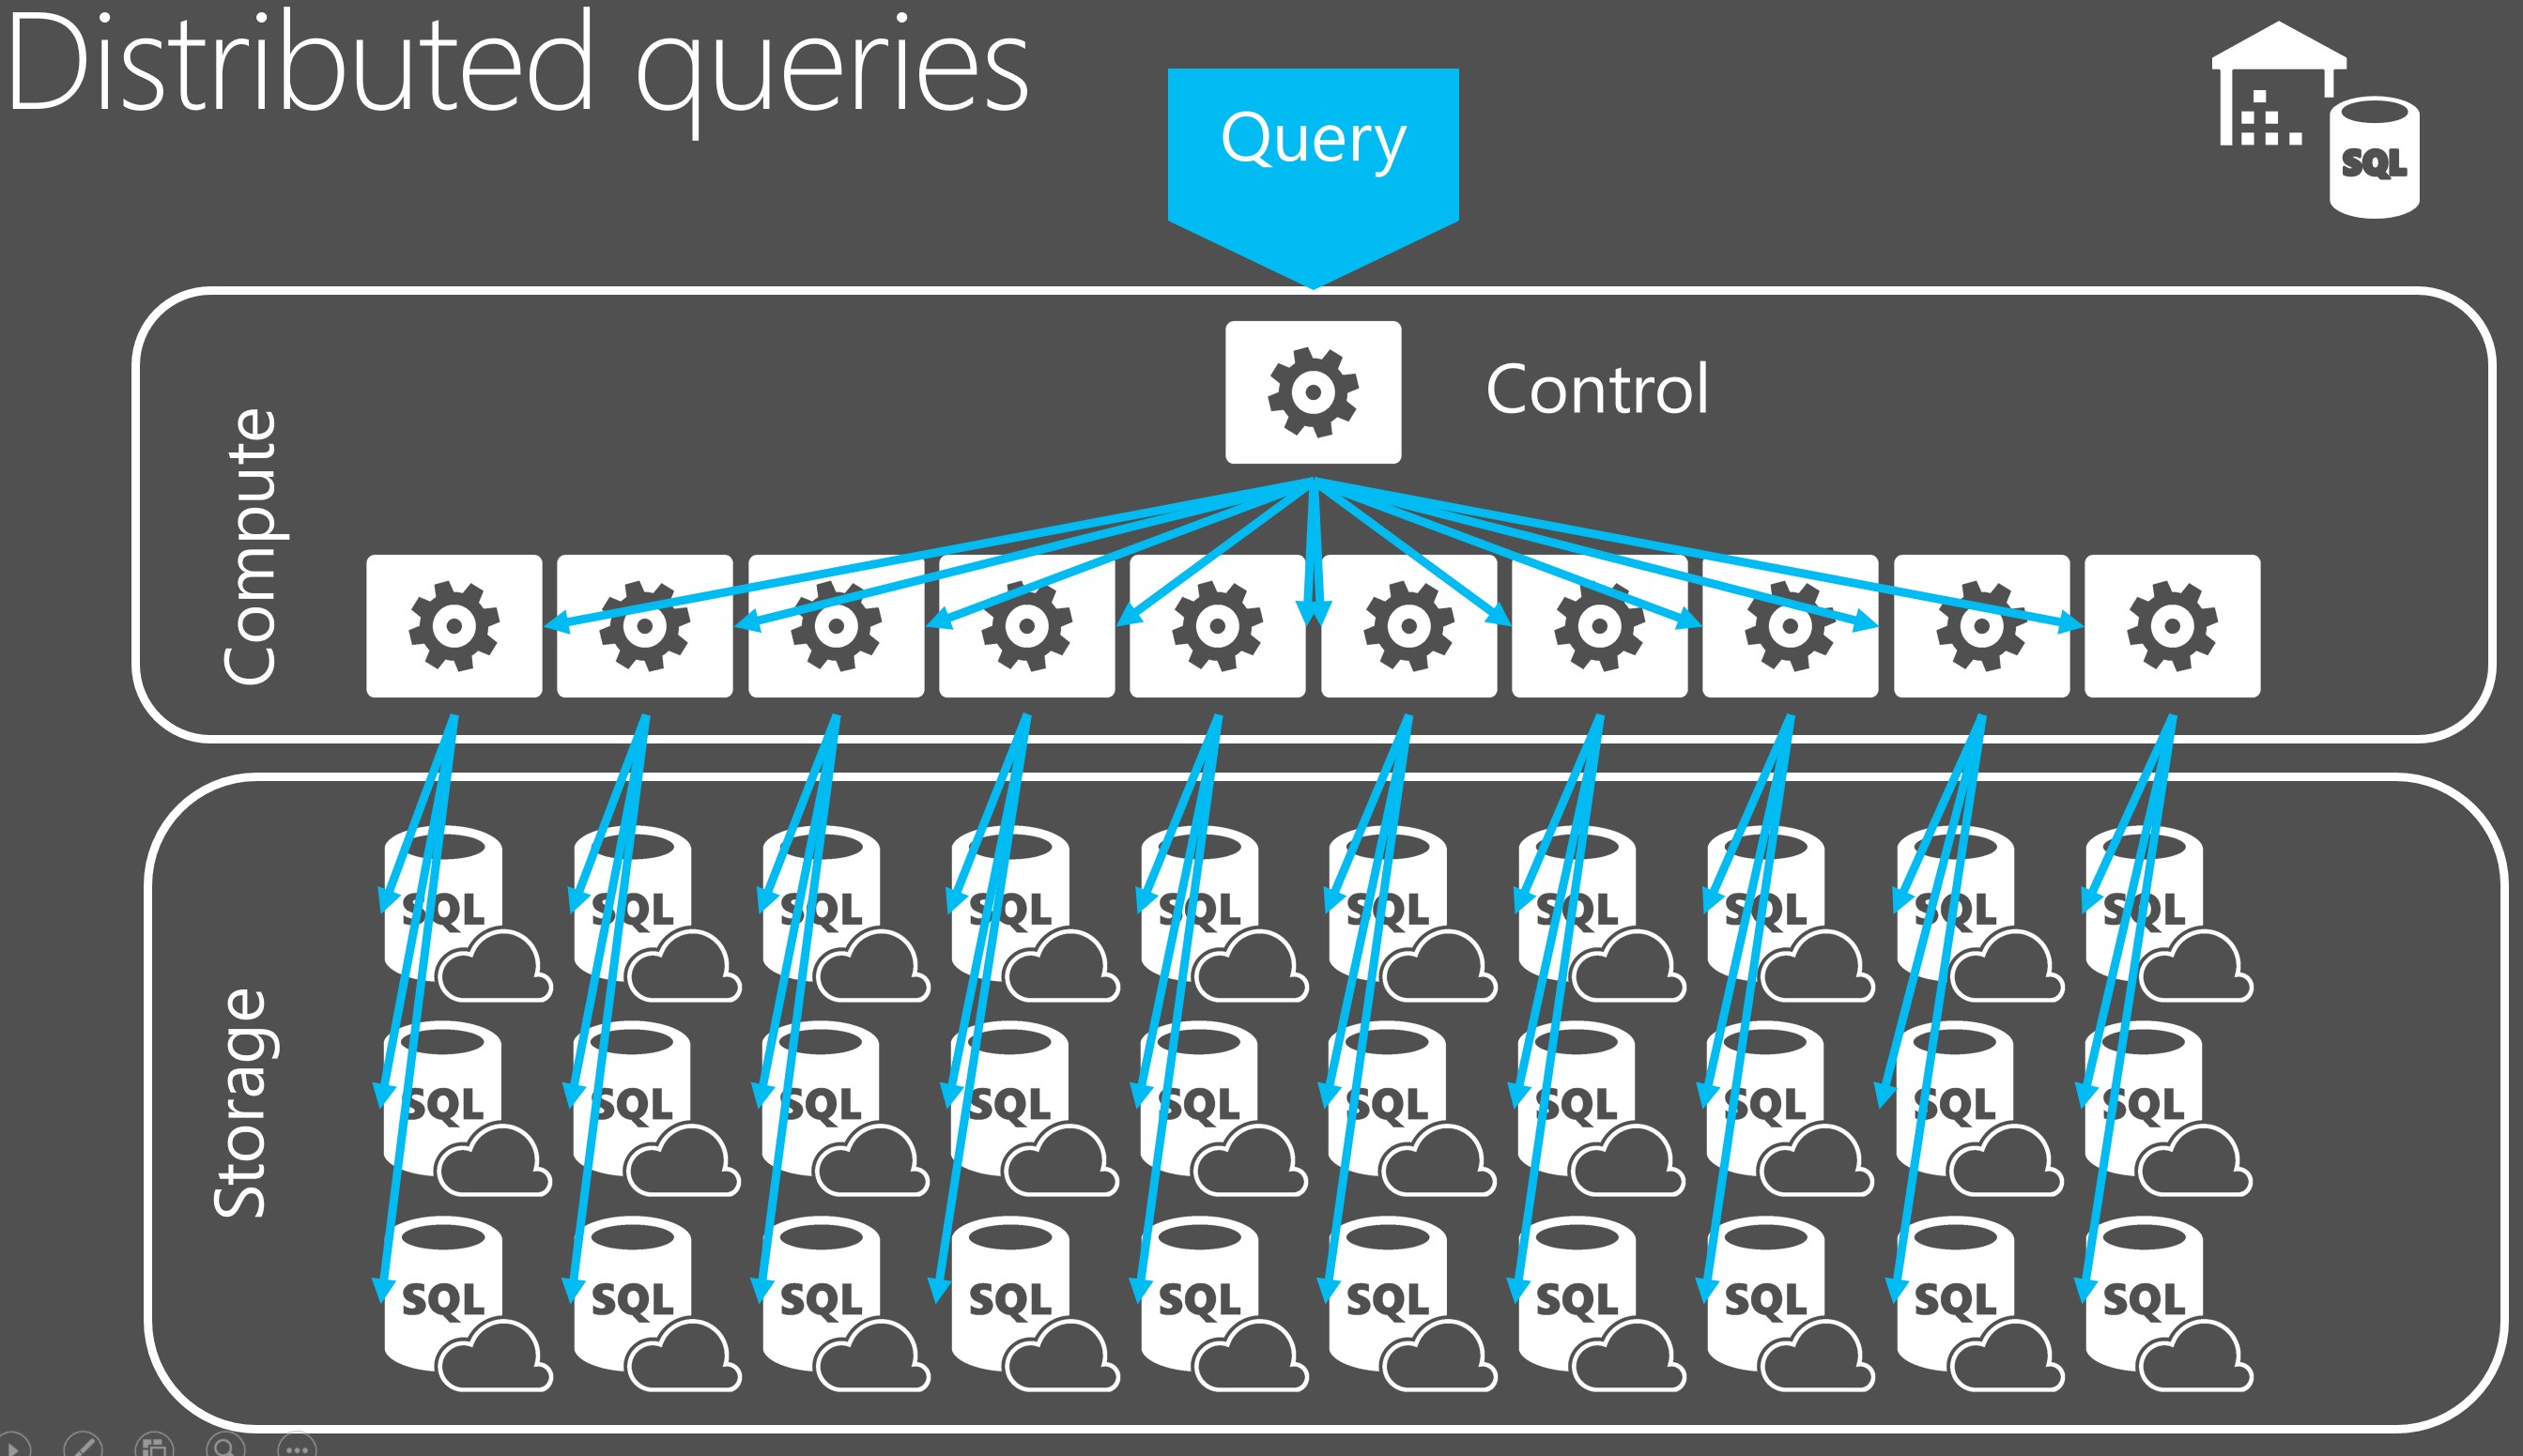
SQL Data Warehouse is a massively parallel processing (MPP) distributed database system. Behind the scenes, SQL Data Warehouse spreads your data across many shared-nothing storage and processing units. The data is stored in a premium locally redundant storage layer, on top of which dynamically linked compute nodes execute distributed queries. SQL Data Warehouse takes a "divide and conquer" approach to running loads and complex queries. Requests are received by a control node, optimised for distribution, and then passed to compute nodes to do their work in parallel as shown in the following graphic:

Azure Data Warehouse is ideal for analytical workloads whether it is a small workload of GBs, to a large workload of PBs. It can also interface with unstructured data stored in an Azure Blob Store. If transactional consistency and high concurrency is your requirement, then Azure SQL Data Warehouse is not the service to use; SQL Database would be a more appropriate choice.
It only takes minutes to get this up and running, and you can do this within the Azure Portal. Or, alternatively, you can use PowerShell.
At this point you have a choice: you can either watch the following 10 minute video that demonstrates how to set up an instance of Azure SQL Data Warehouse, or alternatively you can continue to read. If you're hardcore, why not do both! But I understand your time is precious.
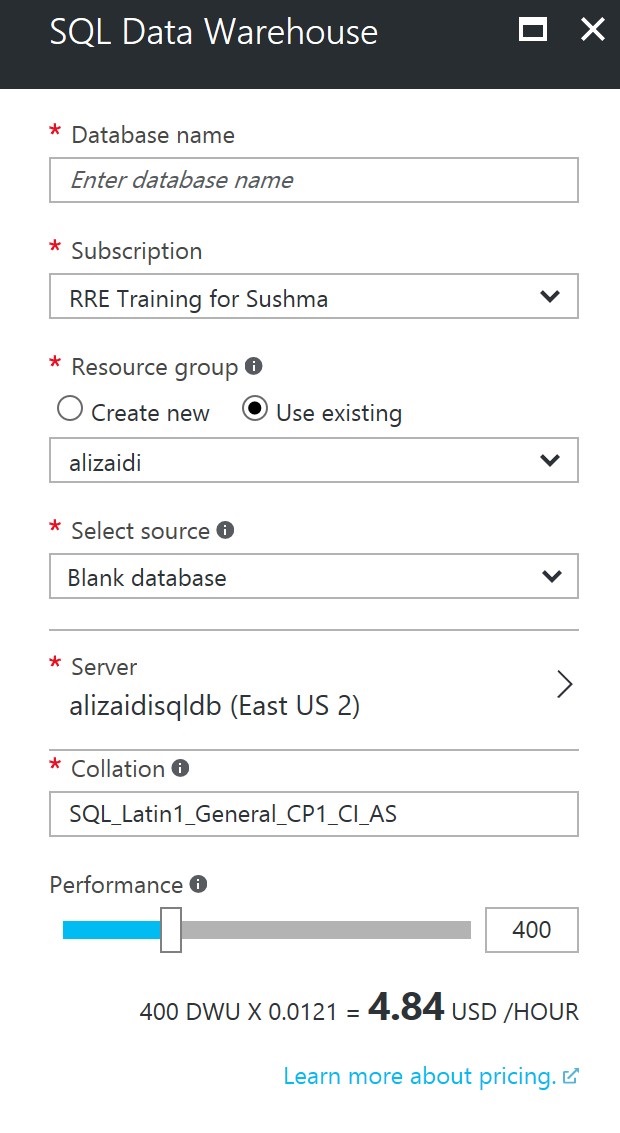
 There is some information that you need to have to hand before creating an Azure SQL Data Warehouse:
- Database name: The name of the new database. This name must be unique on the SQL server.
- Subscription: A Windows Azure subscription grants you access to Windows Azure services and to the Windows Azure Platform Management Portal. In this section you select the subscription to which the Azure SQL Data Warehouse is assigned.
- Resource Group: A resource group is a container that holds related resources for an Azure solution. In this area you can select an existing resource group, or create a new resource group to host the SQL DW Instance.
- Select Source: Select Blank Database to create a blank database. Backup to restore a database. Select Sample to choose the sample database AdventureworksDW.
- Server: In this area you can either create a new SQL Server instance to host the database, or make use of an existing server.
- Collation: Defines the rules that sorts and compares data. The collation cannot be changed once the database is created.
- Performance: Is a slider that defines the Data Warehouse Units (DWU). The higher the value, the more compute.
Armed with this information, you can then go ahead and create the SQL Data Warehouse Instance.
Alternatively, you can use the same information to create a PowerShell script to sign into an Azure Subscription, create a resource group and then create a SQL Server instance, and optionally a database. The following PowerShell code creates a resource group named cto_ads_prep_rg located in North Europe using the New-AzureRmResourceGroup cmdlet. The script then creates a SQL Server instance named ctomsftadssqlsrv with an admin account named ctesta-oneill using the New-AzureRmSqlServer cmdlet.
 ######################################################################
##                PART I: Creating the Azure SQL Server             ##
######################################################################


# Sign in to Azure and set the WINDOWS AZURE subscription to work with
$SubscriptionId = "XXXXXXXX-xxXX-XXxx-XXXX-xxxxxxxxxxxx"

Add-AzureRmAccount
Set-AzureRmContext -SubscriptionId $SubscriptionId

# CREATE A RESOURCE GROUP
$resourceGroupName = "cto_ads_prep_rg"
$rglocation = "North Europe"

New-AzureRmResourceGroup -Name $resourceGroupName -Location $rglocation

# CREATE A SERVER
$serverName = "ctomsftadssqlsrv"
$serverVersion = "12.0"
$serverLocation = "North Europe"

$serverAdmin = "ctesta-oneill"
$serverPassword = "P@ssw0rd"
$securePassword = ConvertTo-SecureString –String $serverPassword –AsPlainText -Force
$serverCreds = New-Object –TypeName System.Management.Automation.PSCredential –ArgumentList $serverAdmin, $securePassword

$sqlDbServer = New-AzureRmSqlServer -ResourceGroupName $resourceGroupName -ServerName $serverName -Location $serverLocation -ServerVersion $serverVersion -SqlAdministratorCredentials $serverCreds
You can also use PowerShell to configure firewall settings on the SQL Server instance using the New-AzureRmSqlServerFirewallRule cmdlet. This can be performed in the Azure Portal as well.
 # CREATE A SERVER FIREWALL RULE
$ip = (Test-Connection -ComputerName $env:COMPUTERNAME -Count 1 -Verbose).IPV4Address.IPAddressToString
$firewallRuleName = 'Client IP address'
$firewallStartIp = $ip
$firewallEndIp = $ip

$fireWallRule = New-AzureRmSqlServerFirewallRule -ResourceGroupName $resourceGroupName -ServerName $serverName -FirewallRuleName $firewallRuleName -StartIpAddress $firewallStartIp -EndIpAddress $firewallEndIp
With the firewall rules defined, you will then be able to access Azure SQL Server using tools such as Visual Studio and SQL Server Management Studio, where you could run T-SQL scripts to create and manage the database. This can be done in PowerShell using the New-AzureRmSqlDatabase cmdlets as well. The following code creates a data warehouse named ContosoRetailDW:
 # CREATE A SQL DATABASE
$databaseName = "ContosoRetailDW"
$databaseEdition = "DataWarehouse"
$RequestedServiceObjectiveName = "DW400"

$sqlDatabase = New-AzureRmSqlDatabase -ResourceGroupName $resourceGroupName -RequestedServiceObjectiveName $RequestedServiceObjectiveName -ServerName $serverName -DatabaseName $databaseName -Edition $databaseEdition
Once a database has been created, you can then understand how to scale and pause a database in Azure SQL Data Warehouse, but that will be covered in the next blog.