Azure Mobile Services in Project Siena
In this post, I will show you to incorporate your Azure Mobile Service data into your Project Siena App. If you don't know what Project Siena is, you can check one of my previous posts, Microsoft Project Siena, to get up to date. Very quickly, it is a Windows 8 store app that allows you to build Windows 8 store apps without writing any code. Trust me, it’s cool! Also for this blog post, I am expecting you to already have an Azure Mobile Service set up with a corresponding database and “highscore” table. You can see my previous blog post Azure Mobile Services on how to accomplish that!
Alright, so we have our AMS (Azure Mobile Service) setup with our highscore table. Anyways, to be able to read from our highscore table we need to tell Project Siena which tables it has access to read. Here is their documentation on how to accomplish that.
Note that in the current release, we support a simplified and lightweight interface for accessing AMS data. As part of the AMS setup, your IT administrator will also need to create a table named "zz_config" in your AMS instance for Siena to be able to interact with it. This table should contain the following columns:
- Key: This should be set to “table”.
- Value: String value that stores the table name.
The zz_config table should contain one row per table that you want to expose to Siena. For example, if you want to allow Siena to access Employee and Sales tables, your zz_config table will have the following entries:
Key
Value"table"
"Employee""table"
"Sales"
The idea is pretty straight forward, but let me reword. We need to create a table that keeps a list of the tables in our AMS that Project Siena will have access to. So in our example we will need to add the following record to the zz_config table, key-“table” value-“highscore”, to tell Project Siena that it can access our highscore table. If you have named your table something different then obviously you will use that name instead of highscore. Sounds simple enough right? Well, let’s go ahead and do that part!
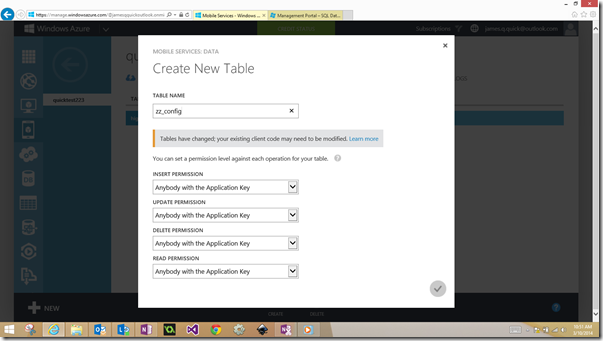
So you should remember how to create a table from the first AMS post, but if not here’s a reminder. On the left hand side in the Azure Portal, click on Azure Mobile Services, then click on the one we created, then click on the heading near the top that says Data. On the bottom of that screen, you should see the “Create” button. Go ahead and click on that. Enter your name “zz_config” exactly like that, and we can leave the permissions alone here. Should look like below. Then click the check mark.
After that, we want to go in and edit the columns for this table to add the “key” and “value” fields. So click on the Columns header after your table is created. Go ahead and delete the bottom two columns that are created for us, and then add two columns of string type called “key” and “value” respectively. Should look like this once you have done that.
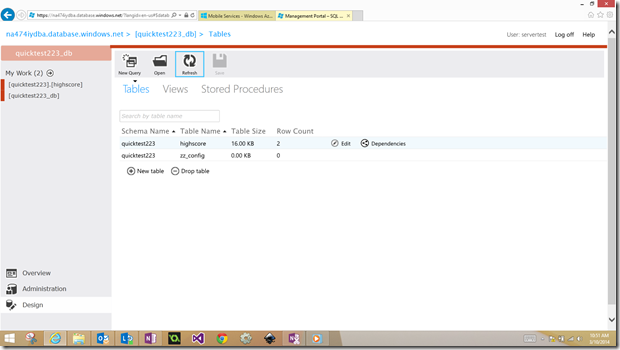
Now we need to go in and insert a row in this table with the key “table” and the value “highscore” to show that Project Siena will have access to my highscore table. Again, if you named your table something different, obviously use the correct name. To do this, click on the database symbol on the far left, and then click manage at the bottom. Again something that we covered in the previous post so you can refer to that if you are having issues. Once you login there, go ahead and click design, and you should now see two tables listed there like below.
Go ahead and click to edit the zz_config table, then click on the “Data” header. Now, add a row using “table” as the key and the name of your other table that you want to access as the value. Again, the table I am using is highscore. After that, go ahead and click save.
Now we can move into Project Siena! If you haven’t already go ahead and download Project Siena from the Windows 8 Store, and then open it. When it is open it should look like this.
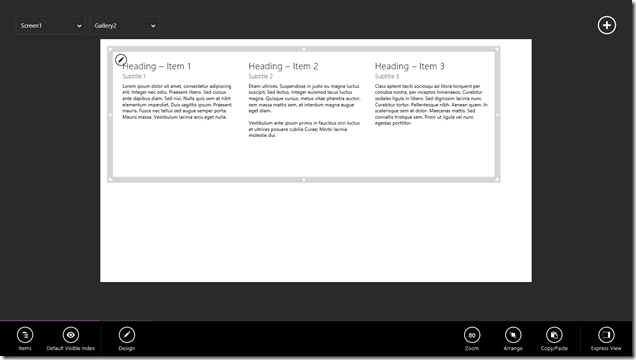
Let’s add a visual that will be able to hold the data that we pull down from our table. Click on “Add A Visual” in the middle, then on the right select “Gallery”, and then “Text Gallery”. Resize it so that it looks somewhat like this.
Now, in the bottom left, click on “Data”, and then “Items” then “Add Data Source”.
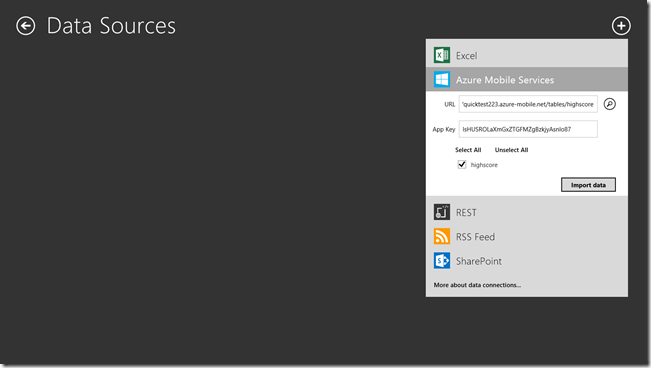
Now click the plus arrow in the top right and choose Azure Mobile Services. Here we need two things, our AMS url, and our application key. I mentioned in the previous post how to find both of those things, but if you don't remember you can find them in the dashboard for your AMS in the Azure Portal. However, we do need to alter the URL slightly to specify which table to look at. So for instance, the base url for my AMS is https://quicktest223.azure-mobile.net/. Since I want to tell Project Siena to look at my highscore table specifically, I need to append “tables/highscore/ to my url, so that in the end it looks like this “https://quicktest223.azure-mobile.net/tables/highscore”.
Let’s go ahead and add that url along with our application key in project siena under the Azure Mobile Service data source. Once you have input both of those things, you click on the search icon. Give it a second and it should then load your highscore table. Checkmark that table. Should look like this. If it looks right, go ahead and click import data.
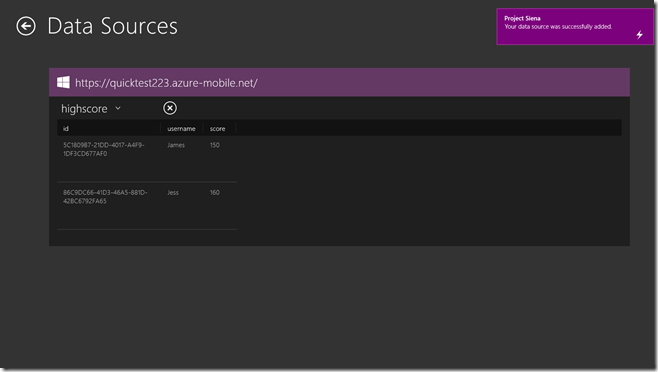
After you click “Import Data” you should see your data showing up like below. You can see that my two high scores have been successfully pulled down from Azure.
Go ahead and click the back arrow, and then select your Text Gallery control. After you have selected it, click on “Items”, and then select your data source. Mine is called “highscore”. Once you do this, the fields in your Text Gallery will be populated with data from your AMS table. However, you might want to change which field is displayed where, so you can select the individual text boxes and choose which data field to display in each one. I chose to set it up like below.
So, there you have it! You have successfully incorporated Azure Mobile Services into your Project Siena App!! Obviously, I didn't spend any time on making it pretty, but what can I say? Design isn't necessarily my thing. You can use your own creativity there, but for now you now know how to connect to your AMS tables in Project Siena! Stay tuned for more posts with Azure Mobile Services!
Comments
Anonymous
April 29, 2014
very nice, James!Anonymous
May 12, 2014
Awesome - u saved my day! How I can Excel data via Siena back to AMS? :)Anonymous
May 15, 2014
Are you asking how to send data back to AMS in Siena? If so, I haven't come across that directly within Project Siena. However, there is always the option of downloading the source code and making changes and additions in Visual Studio! Thanks for the comment!Anonymous
May 21, 2014
@James - thank you for your feedback. It would be great, if this would work directly out of Siena without Visual Studio and coding requirments. I am a business based app-developer, but hope to be included in one of the next releases...Anonymous
May 26, 2014
It is very simple and straight forward :)Anonymous
May 26, 2014
Thank you!
