MSDN Style Choose a Language Extender
Download Sample and Source Code :
Sample Application :
Source Code :
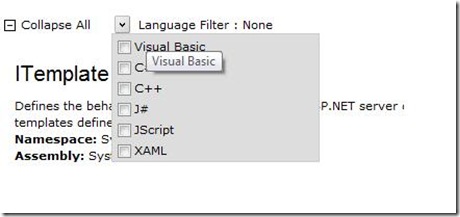
Quite recently , someone asked me if there was a control that mimicked MSDN's "Choose a Language" Button.
It looks like this:
I would have explained that one could achieve this using a combination of the DropDownExtender and some hacky javascript to prevent the popup from closing when one clicks on the options in the CheckBoxList.
But , this sounded to be a stupid way to solve the problem .And also , I was teaching a couple of guys how to write Ajax Control Extenders.
Since this looked like a good example to illustrate and also a pretty fun problem to solve , I went ahead and wrote a control Extender that does exactly this .
So , the behavior would be :
a) We have a CheckBoxList inside a block Element such as a asp:Panel , which is initially hidden
b) We have a button upon clicking on which the chechboxList is shown.
c) User can select multiple elements from the CheckBoxList.
c.1) If One option is selected, the " Language Filter : " value would show the Option
c.2) If more than one option is selected, it would show "Multiple Options"
So , my extender looks like this .
Looks very much like the MSDN widget , doesn't it ?
So , how would one go about writing this extender ?
The design would be dependent on the Behavior that you want to achieve.
a) Are there any existing behaviors that you want to create that already exist ?
You would want the Options to POPUP , so we need the PopupExtender.
b) What kind of Properties would the Extender exhibit ?
| Property Name | Description |
| TargetPanelID | The Id of the asp:Panel that would contain the checkBoxList |
| PopupPosition | The Position relative to the TargetControl where the Options would popup |
| FilterText |
c) What kind of Events would the Extender raise ?
| Event Name | Description | EventArgs |
| itemSelected | Raised when an item in the CheckBoxList is Selected | The Checkbox , the text of the Checkbox , a value indicating if the checkbox is checked. |
So , my design/spec is now ready .
I follow these steps to setup the initial infrastructure for my Extender : Creating a new extender
Being Thoroughly incompetent at finding the right name , I use the term "OptionPickerBehavior" to describe my extender and get 3 files ,
- OptionPickerBehavior.js
- OptionPickerBehaviorDesigner.cs
- OptionPickerBehaviorExtender.cs
In the OptionPickerBehaviorExtender.cs
Since we decided that I need the PopupExtender , I will need to add that as the RequiredScript for my extender.
[RequiredScript(typeof(PopupExtender))]
 Defining the Properties
We add the Necessary Properties
         [RequiredProperty]
        [ExtenderControlProperty]
        [ClientPropertyName("targetPanelID")]
        [IDReferenceProperty(typeof(Panel))]
        public string TargetPanelID
        {
            get { return GetPropertyValue("targetPanelID", ""); }
            set { SetPropertyValue("targetPanelID", value); }
        }
We also define the other properties , PopupPosition and FilterText similarly .
Defining the Event
         [ExtenderControlEvent]
        [ClientPropertyName("itemSelected")]
        public string OnClientItemSelected
        {
            get { return GetPropertyValue("itemSelected", ""); }
            set { SetPropertyValue("itemSelected", value); }
        }
In the OptionPickerBehavior.js
The behavior of the control is defined in the accompanying OptionPickerBehavior.js file.
Now , here is where the real meat of the control lies , since its too tedious to describe the whole thing in One Blog Post ,
I have put up the control Extender and a Sample application for download , its available for you guys to download and try out .
I will blog about how we use JavaScript to Achieve the UI effect that you see.
How do I use this control ?
a) Reference the SampleExtenders Dll in your web project .
b) Add a tagMapping in your web.config for the SampleExtenders Controls .
 <pages>
   <controls>
      <add tagPrefix ="Raj" namespace="SampleExtenders" assembly="SampleExtenders"/>
    </controls>
</pages>
c) Add an ImageButton to act as the Trigger Control .
<asp:ImageButton runat="server" ID="btnToggleOptions" ImageUrl="~/images/Arrow-off.gif" />
d) The TargetPanel which contains the CheckBoxList.
 <!-- Target Panel Begins-->
<asp:Panel runat="server" ID="OptionsList" Style="display: none; width: 150px" CssClass="grey">
              <asp:CheckBoxList runat="server" ID="chklOptions">
                         <asp:ListItem Text="Visual Basic" Value="Visual Basic"></asp:ListItem>
                         <asp:ListItem Text="C#" Value="CSharp"></asp:ListItem>
                         <asp:ListItem Text="C++" Value="Visual Basic"></asp:ListItem>
                         <asp:ListItem Text="J#" Value="Visual Basic"></asp:ListItem>
                         <asp:ListItem Text="JScript" Value="Visual Basic"></asp:ListItem>
                         <asp:ListItem Text="XAML" Value="Visual Basic"></asp:ListItem>
              </asp:CheckBoxList>
</asp:Panel>
<!-- Target Panel Ends-->
e) Markup for the OptionPickerExtender
  <Raj:OptionPickerBehavior runat="server" ID="optionList"
            TargetControlID="btnToggleOptions"
            TargetPanelID="OptionsList"
            FilterText="Select Languages"
            PopupPosition="BottomRight"
            OnClientItemSelected="itemSelected">
</Raj:OptionPickerBehavior>
 f) The itemSelected function is wired up to handle the click on the CheckBoxes in the CheckBoxList.
g) Thats it !! you are done !!
Happy Coding .
In case you have any questions , feel free to leave a comment on this post
Comments
- Anonymous
October 08, 2007
PingBack from http://msdnrss.thecoderblogs.com/2007/10/08/msdn-style-quotchoose-a-languagequot-extender/

