Publishing apps for Office and SharePoint to Windows Azure Websites
Windows Azure Websites are a great hosting platform for a variety of applications – and your app can be one of them. Azure Websites are easy to create and offer advanced management, scalability, and load-balancing features – and of course, great integration with Visual Studio. With our new streamlined experience for publishing apps for Office and SharePoint, publishing to Azure Websites is designed to be easier than ever before.
This post will focus on provider-hosted apps for SharePoint and apps for Office. Provider-hosted (as opposed to SharePoint-hosted or Autohosted) means that the developer is responsible for hosting the web content – which is precisely where Azure Websites can help. At the end of the post, I will also look at advanced topics, including options for publishing to a non-Azure environment (like an on-premise server).
Direct web publishing to Azure
Creating a profile
Suppose you have an app for SharePoint or an app for Office that you’re ready to publish for the first time. To begin publishing your app, choose the app for SharePoint or app for Office project, and choose “Publish”.

Figure 1. Publish menu in Solution Explorer
A guided publishing experience will appear, as shown below.

Figure 2. Guided publishing experience
For a new project, there is no current publishing profile. You can create one by selecting <New…> from the profile dropdown, which will open the following dialog box.

Figure 3. Creating a new publishing profile
If you’re publishing to Azure, choose the “download your publishing profile” link, and you’ll be redirected to the Azure portal. There, if you have not already, you can create a new website by choosing the +NEW at bottom-left corner of the portal. The bottom portion of the screen will expand, allowing you to create a new website via the Quick Create or Custom Create menu items.

Figure 4. Creating new website on Azure portal
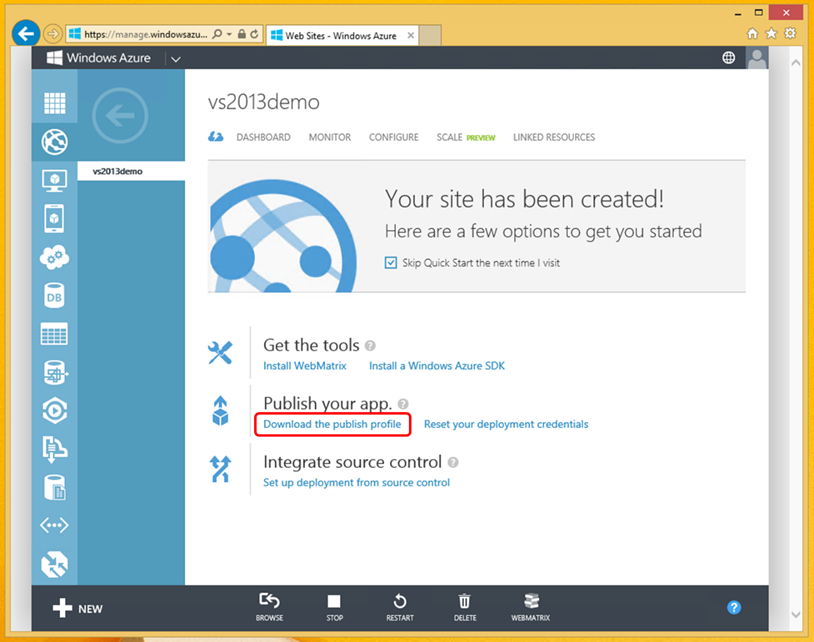
Once the website entity is created, choose it from the list of websites to reveal the website details. Then choose Download the publish profile and save the profile to your computer. The profile contains all the information necessary to deploy your web content, including any auxiliary information like linked database connections.

Figure 5. Downloading the publish profile from the Azure portal
Back in the Visual Studio dialog box, and with the import publishing profile option still selected, choose the “browse” button and browse to the newly-downloaded file. Depending on the type of app:
- For apps for Office, the profile is now complete.
- For apps for SharePoint, you can now configure the Client ID and Client Secret on the second page of the wizard. These values uniquely identify your app to SharePoint, and allows the app to access SharePoint data. Client IDs and Secrets are generated and registered automatically when you debug your app, but they must be registered in a more permanent fashion when publishing the app. To do so:
- If you will be publishing your app on the Office Store, or using the app on more than one tenant, use the Seller Dashboard to register your app.
- If you will be publishing your app to a single SharePoint tenant only, register your app using appregnew.aspx.
At the completion of either registration process, you will be granted a Client ID and Client Secret. Transfer those values into the Profile-creation dialog, and then choose Finish.
Deploying and packaging
Once the profile is set, the publishing buttons will activate. You now have a choice of deploying the web project and/or packaging the app. When publishing for the first time, you will need to do both – but it generally makes sense to start with deploying the web project first.
Deploy your web project
Deploying your web project is exactly what it sounds like: it will publish the entire contents of your web project (but not the SharePoint app or Office manifest) to the web. To do this, choose deploy your web project and you will see the familiar web publishing experience – complete with Preview, deployment settings, and more. The Connection tab has been pre-filled with information from your publish profile, and you can go to Settings to customize the publish configuration and options like Remove additional files at destination. Note that if your project requires a database, you can set it on the Settings page of the Wizard – and that, if your publish profile came from Azure, you can simply choose the database from the dropdown list.

Figure 6. Deploying a web project to Azure
The Preview functionality is helpful to ensure you’re publishing the right set of files. By choosing a file in the Preview list, you can see the impending changes that you’re about to commit to your live site.

Figure 7. Preview functionality in Visual Studio
Packaging your app
Once the web project is deployed, packaging the app is designed to be simple, and most fields should be pre-populated. If you used a publishing profile, the URL will already be pre-populated, though you’ll need to change the URL from “http” to “https”. Note that with Azure Websites, https hosting is automatically included for any website hosted on *.azurewebsites.net (for custom domains or other hosting providers, you may need to follow additional steps).
For apps for Office, that’s all you need: Just choose Finish, and a manifest file that points to your live web content will get generated for you. For apps that you wish to sell on the Office Store, see the next section. Otherwise, if it’s just an in-house app, you can upload the app to a file share or to a corporate catalog.
For apps for SharePoint, you will need to provide or confirm the Client ID, which you may have already entered during the profile-creation step. After that, click “finish” – and an app package will get created for you. Again, see the next section for apps headed for the Office Store. Otherwise, if you only intend to distribute the app to users of your SharePoint site, follow the documentation for uploading the app to a SharePoint corporate catalog.
Publishing to the Office Store
After your app package (apps for SharePoint) or manifest file (apps for Office) is created, you can use the Visit the Seller Dashboard button to get started with publishing to the Office Store.
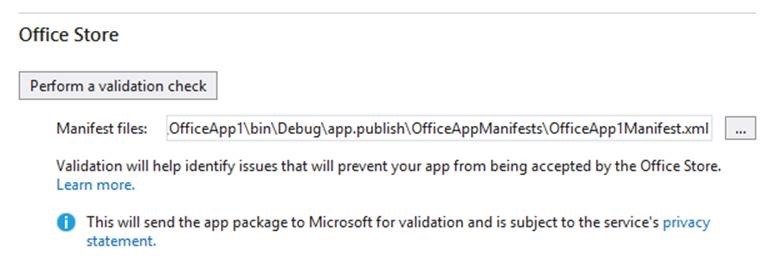
For apps for Office, you can also run your app through a validation utility, which will catch common mistakes (like not specifying required information in the manifest). This will save you time and hassle when submitting the app to the Store.

Figure 8. Validation utility for apps for Office
Upgrading an app
When it comes time to upgrade an existing app that you have already published, what steps do you need to take?
For both apps for Office and apps for SharePoint, if all that you’ve updated is just in the web project, you can just re-publish the web content via the Deploy your web project button. These changes will go live immediately, and you’re fully in control of deploying these whenever you’d like.
If you made changes to the app manifest (apps for Office and apps for SharePoint) or if you have modified any SharePoint artifacts (lists, event receivers, or anything outside the web project), you need to re-publish those artifacts instead via the Package the app button. If your app is listed on the Office Store, you will then need to re-submit to the produced app package or app manifest to the Store, so it may take a few days before those changes go live – and remember that applying an update is at the discretion of the user.
In general, remember to be considerate of the upgrade impact when modifying anything outside of the web project. Especially for apps for SharePoint, which have a more involved upgrade process, see the Apps for SharePoint update process article for an in-depth upgrade discussion and for guidance on how to avoid breaking older app packages when deploying new web artifacts.
Advanced topics
Specifying multiple publish environments
One common request we heard is to publish an app to different environments. For example, one might want to publish to a “staging” environment first, ensure that the app works properly, and only then publish to “production”.
With the new Publish experience, switching between multiple environments is only a dropdown away. Each publish profile remembers its own URL, Client ID, and Secret, so publishing to a different profile is as easy as changing the profile dropdown and choosing the appropriate “Deploy your web project” and “Package the app” buttons.

Figure 9. Publishing to multiple environments
Configuring Client Secret (or other environmental variables) in the Azure Portal
Sometimes, the “Client Secret” for the production app might be a closely-guarded secret. As a developer, you might have the ability to publish to the website, but you might not have access to the Client Secret itself. The same thing might be true for any other such variables.
One way to solve this scenario is to have your Azure account Admin manage these environmental variables through the Azure Portal. For each Azure Website, it is possible to have the Client Secret – or any other variables – be set via “app settings” section of the Configure tab. The “app settings” values take precedence over values in Web.config, so you get the best of both worlds – your local F5 scenario continues to work as before, yet your published app can make of a Client Secret that you might not even have access to.

Figure 10. Configuring a Client Secret in the Azure portal
Deploying outside of Azure (or to a local IIS server)
If you need to deploy to a non-Azure hosting provider – particularly if you are publishing to an on-premises machine – you can still use the many improvements to the app-publishing experience.
During profile-creation, choose the Create new profile radio button.
Then, once you are ready to deploy your web content, enter the Connection credentials in the “Publish Web” wizard.
The rest of the flow should be the same. Remember to ensure that your hosting server supports the HTTPS protocol.
Creating a Web Deploy Package
An alternate, but similar, case for publishing to a local IIS server is when only an IT admin has the ability to publish a website. To simplify deployment, you can provide the IT admin with a Web Deploy Package – a .zip file that contains all web artifacts.
To do this, create a new profile rather than importing one from Azure. In the case of an app for SharePoint, you will also need to fill in some dummy Client ID and Secret values.
Now go to Deploy your web project – but be sure to choose Web Deploy Package as the publish method in the “Connection” tab.

Figure 11. Creating a web deploy package
Choose a package location (any new folder will do) and proceed with the wizard. At the end, a set of deploy scripts and a .zip file with your web content will be generated.

Figure 12. Web deploy package files
Your IT Admin should be able to take things from here (registering the app with SharePoint and providing the Client ID and Secret into the deployment scripts). Once the web content is deployed, ask your admin to provide you with the Client ID (the secret is not needed) and proceed with the “Package the app” step. You can then send the app package – now containing the SharePoint artifacts, and pointing at the live web content – back to the IT admin to deploy to SharePoint.
===================================================================
I hope you enjoy the new Publish experience. If you have any suggestions or questions, please don’t hesitate to send them our way.
~ Michael Zlatkovsky | Program Manager, Visual Studio