Rename A Published App
Windows store presents an app to users with the help of logo, name, description and screenshots. But what uniquely identifies an app on the store and makes users remember it is the app's name!
There's a variety of reasons for which you might have to rename and re-brand your application. The reason could be for making the app more discover-able on the store, or making it standout among competing apps, or it could be for a major business transformation. Let's see the steps to achieve this.
For this blog I will use our published app named "How much to tip?" as an example. It calculates tips to be paid at restaurants. Adding a keyword "Restaurant" would probably make the name more relevant and make the app easier to find for our users. We decide to rename the app "Restaurant Tip Calculator" to better reflect the purpose of the app. In the course of the steps, I will use the screenshots and reference of this app
In the course of renaming an app, we need to make changes to the app at two places
1. Windows Developer Dashboard
2. In the app package.
Though these two steps are independent of each other and can be performed in parallel, it's best to first reserve an app name. You do not want to make change to the app package, and later realize the name you used there is not available!
Step 1: Reserve a new name
Visit the Windows Developer Dashboard and login with the credentials you used for publishing the app.
Under the Overview page, click on the name of the app you want to rename.
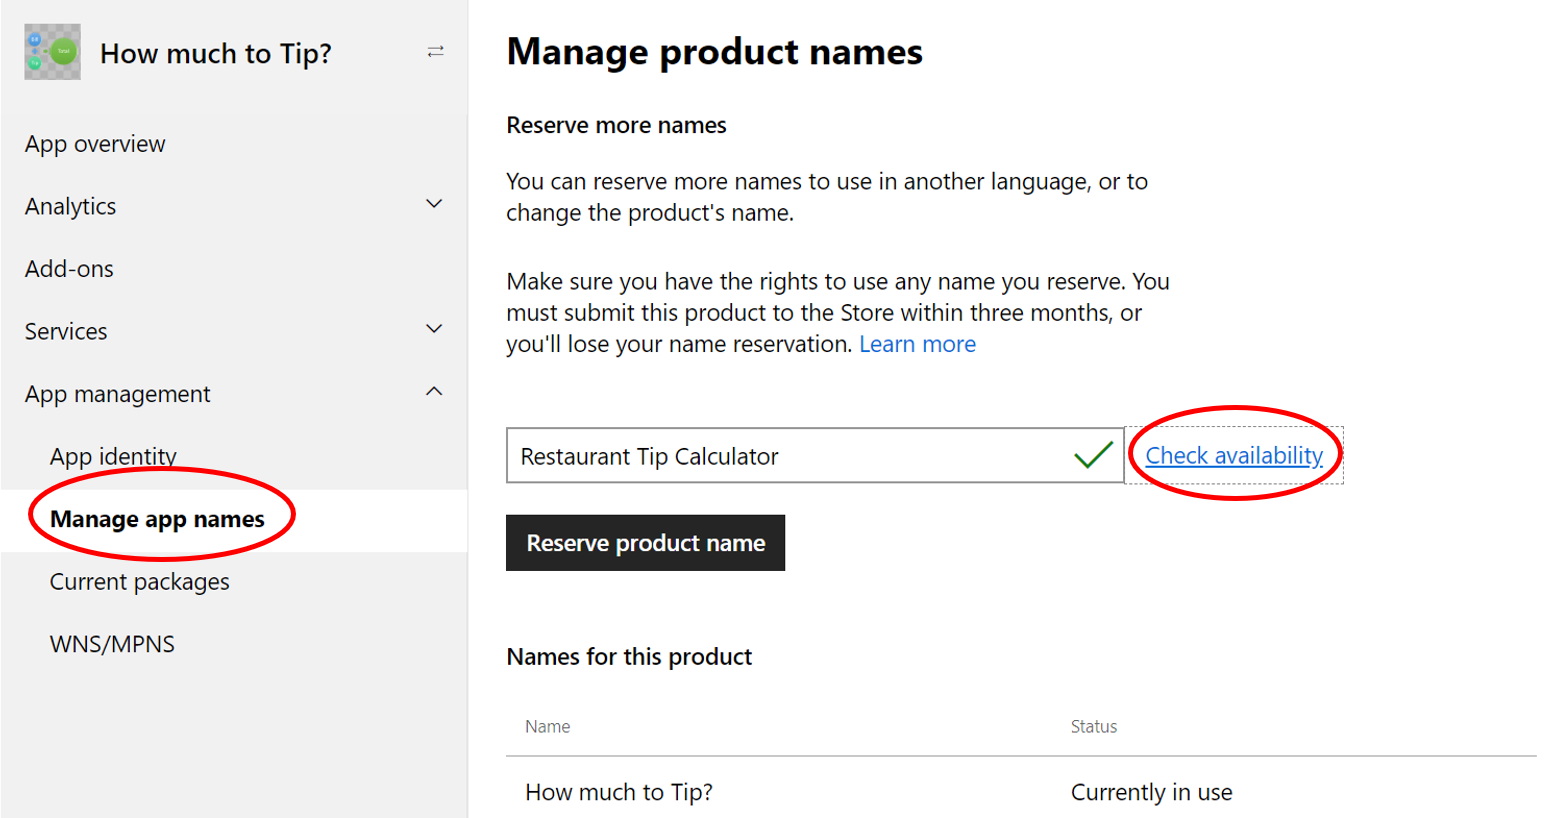
Go to App Management > Manage App Names.
Under Manage Product Names > Go to “Reserve more names”.
Add the new name you want to reserve for the existing app in the textbox
Click on Check Availability.
If the name is available(if there is a green tick in the text box), click on "Reserve Product Name" .
You can see in the screenshot, I am trying to reserve "Restaurant Tip Calculator" name and it seems available.
Step 2: Update your App Package
a) Make relevant changes to the icons, logos
Each app has an icon that is shown at the title bar of your app window, the app list in the start menu, the taskbar and task manager, your app's tiles, your app's splash screen, in the Microsoft Store. These images corresponding to the tiles, logos and splashes are a part of the branding and you may want them to reflect the new app name.
Make the desired changes and keep them ready to be consumed in the package.
b) Updating the appxmanifest:
When the app is meant to be published on the store, the Application's manifest needs to have information as per the dashboard. Since you are going to change the name of the app, it has to reflect in the manifest file as well. When we want to change the application name, we have to make sure the appxmanifest file reflects the new name, else we may run into errors like “Invalid Package Identity name/family name” during app submission to the store.
You can follow the following steps to change the Appxmanifest. If you do not have a project for the app and only have the appx, you can go for the Option 2 listed below.
Option 1: You have a Visual Studio Project:
If you have a UWP/PWA project or a packaging project for a Desktop Bridge app, you can:
Open the project in Visual Studio
Open the Package.appxmanifest file
Under the Application tab, change the Display Name to the new app name
Under the Packaging tab, change the Package Display Name to the new app name.
Under the Packaging tab, increment the Version Number.
When choosing a UWP package from your published submission, the Microsoft Store will always use the highest-versioned package that is applicable to the customer’s Windows 10 device. Since this package will be a new submission, it is important this package's version number is greater than the one you submitted earlier.Refer this article for more details.
Editing manifest file in designer(packaging tab):
Application Tab:

Packaging Tab: 
Editing manifest file as code(F7):
 .................
<Properties>
  <DisplayName>NewName</DisplayName>
  <PublisherDisplayName>XXXXX</PublisherDisplayName>
  <Logo>Images\StoreLogo.png</Logo>
</Properties>
.................
<uap:VisualElements DisplayName="NewName" .................
.................
Associating a Visual Studio project to store is an easy alternative to make the manifest reflect the app details from store. This is something you might have used during your app's first submission. But since it is a rename scenario, you would not find the new app name in the store association list yet. So we will have to go with the manual changes to the manifest.
- Repackaing the app: You can package the appx by :
right clicking on the project > Store > Create App Packages
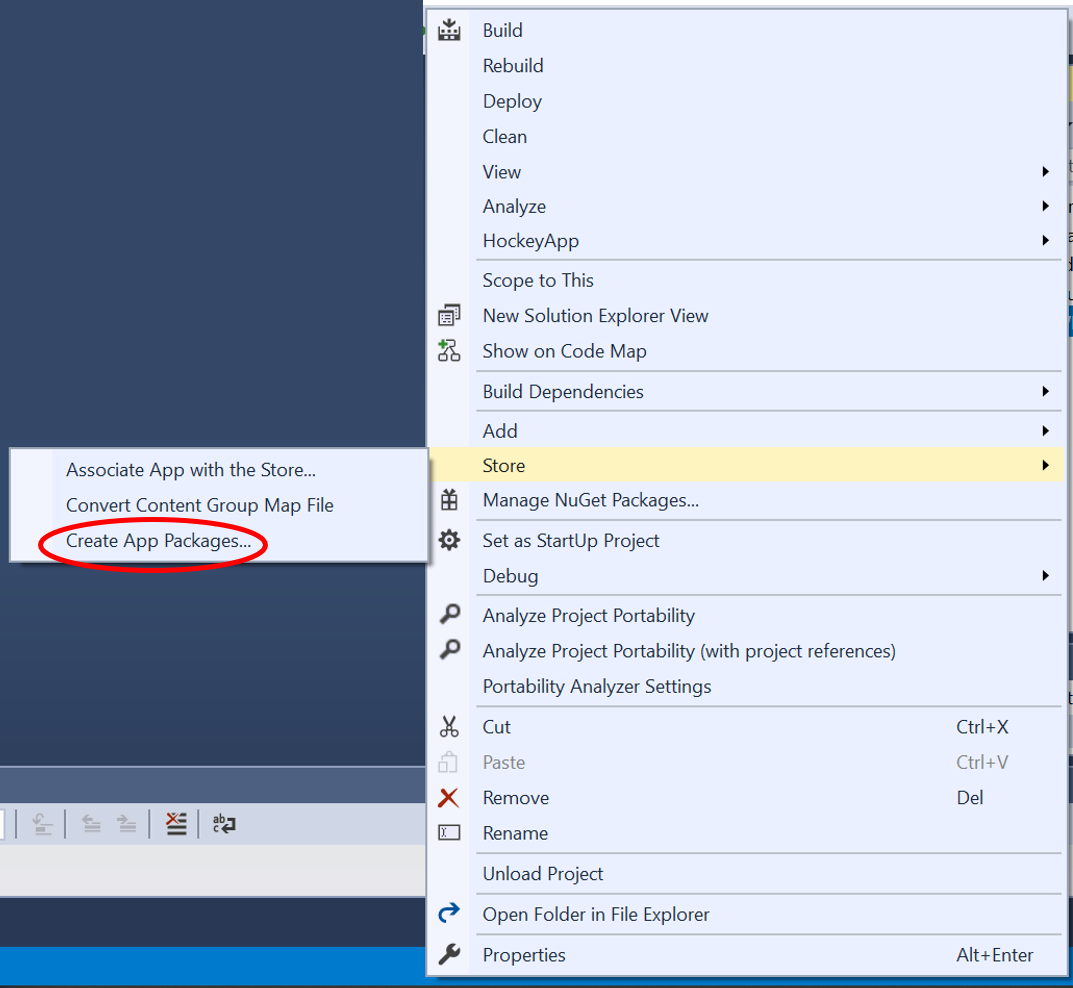
Select the first option.
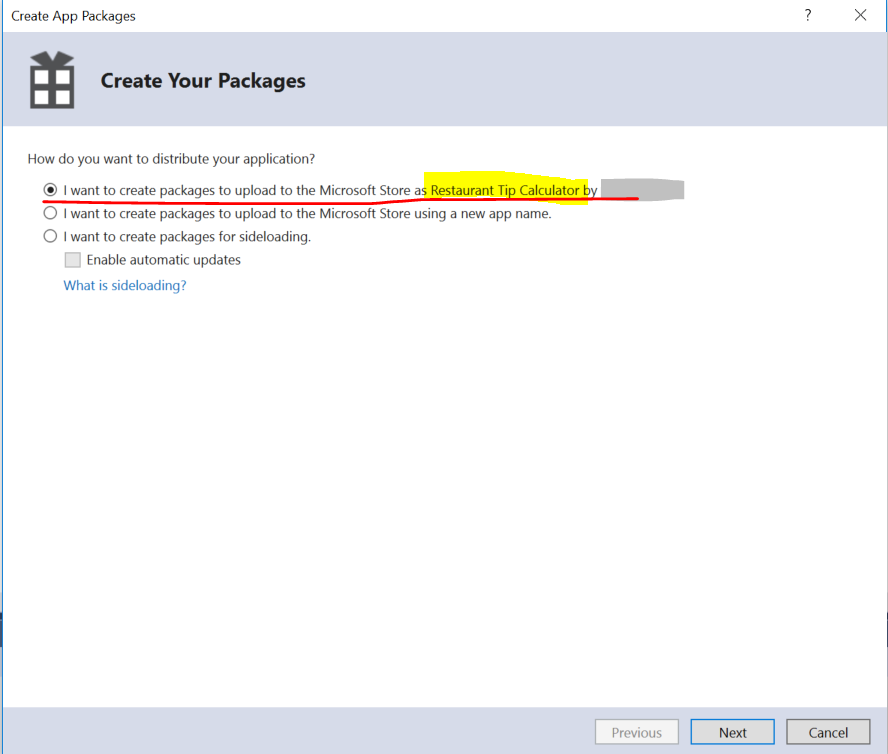
Select the old app name and click on Next.
Option 2:
If you do not have a Visual Studio project but only the appx file, you need to
Rename the appx file to, say, "appname.zip"
Unzip the file.
Open the manifest file from the folder
Make changes to assets : You may want to change the assets to reflect your brand and new name as suggested in Step 2.a.
To create an appx from an appx's folder, you can use makeappx command:
makeappx pack -d "FOLDER_NAME_WITH_LOCATION" -p "APPX_NAME_WITH_LOCATION"
Step 3: Create a new submission
You would have guessed by now that for changing the app name, you will have to change the package, which in turn means you have to create a new submission on dashboard.
To create a new submission for a published app:
Go to App Overview
Click on Update next to the most recent submission shown on the App overview page(the submission whose status shows "In the Store"). Note in the screenshot, the current submission is Submission 2 for this app.

You will see this takes you to a new submission. Note in the screenshot below, it now shows Submission 3 as the current submission.

Step 4: Upload the new package.
- Go to packages and upload the new package you created in step 2
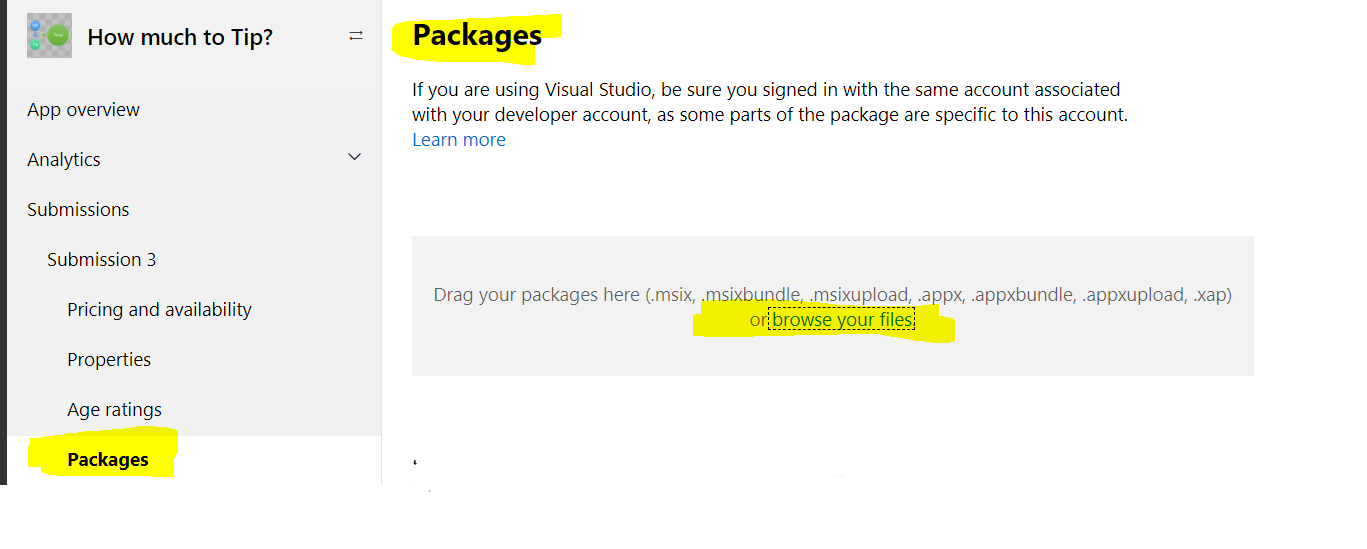
Make sure you select check-boxes against the required device families.
Click on the Save button to retain the changes to this submission.
Step 5: Delete old packages
Go to the Packages of the new submission.
Delete all old packages from the previous submission.
Save.
Step 6: Update Store listing page
Go to the Store listing page, repeat these steps for each store listing.
Under Default description, in the Product Name drop-down, select the newly chosen name.
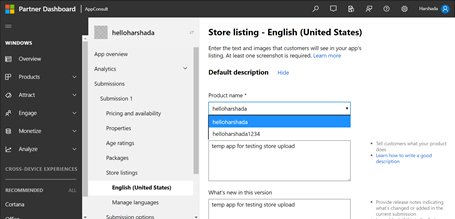
You will continue to see the old app name in the left side panel. This will remain till we delete the older name from reserved names. Do not worry about it now, we will perform this action in step 8.
(Optional) Make changes to the other details like Description, App features.
Add new screenshots.
Adding new screenshots may seem like an optional step but it is important we take new screenshots, especially if the older ones have the app's title bar shown. This means the older screenshots would depict the older name of the app, making the old screenshots inappropriate for use with the new name.
Step 7: Submit to the store:
You can modify other fields from the submission if required and submit it to the store.
Step 8: Delete the older name
You might have observed, in spite of the new submission, the app still reflects the older name.
Deleting the older name will rectify this for us. Make sure you no more need this name, because once deleted, it becomes available for allocation publicly.
Go to App Management > Manage App Names. You can delete the older name here.
Once the older name is deleted, you can see the new name reflected on the dashboard.
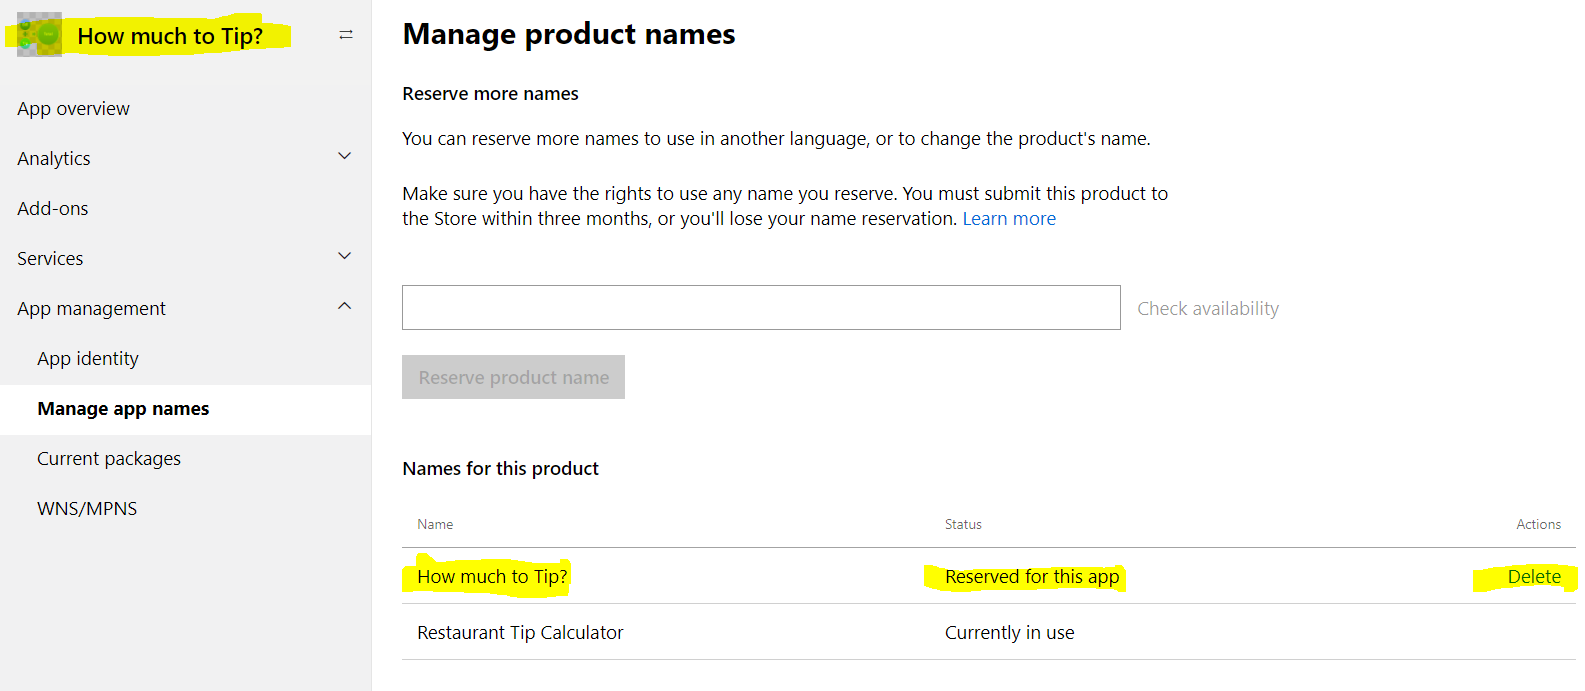
Since the new submission was using the new name "Restaurant Tip Calculator" and the older name "How much to tip?" is no more being used in any active submission, you will be able to delete it now. This option was not available till there was an active submission using the older name.
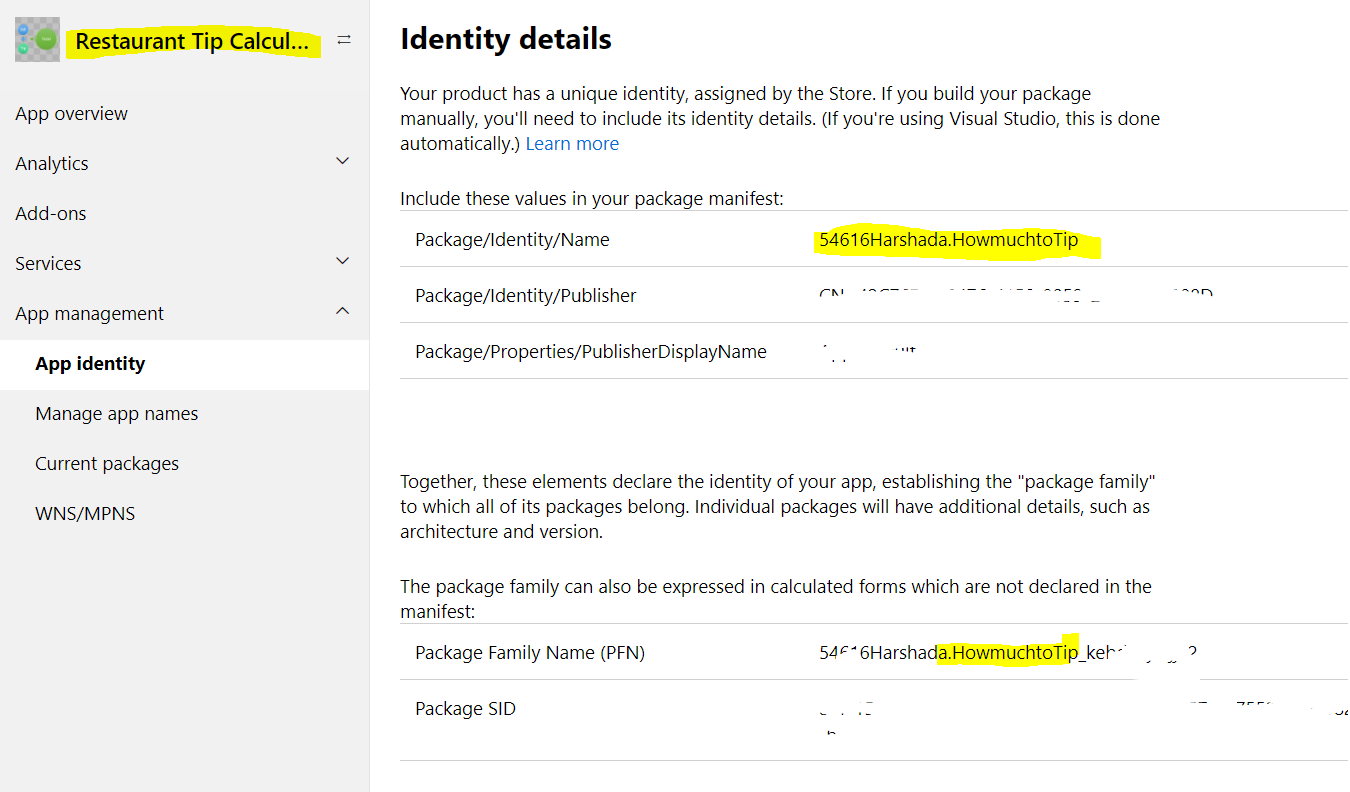
Please note - the app identity name will continue to show the first name reserved.
Also, you may have to refresh the dashboard page to make the new name reflect in the left side menu.
Here’s some extra information that might be helpful:
Once a name is reserved, you have three months to publish with that name before the reservation expires. I don’t believe that you will immediately lose the name once it expires, but the name will instead become available for another developer to claim it, which may or may not happen immediately. So it’s best to try to use the name soon. Once you have published your first submission, you’d no longer need to worry about losing the name(of course with the exception of name infringement).
The name that you first reserve for your app when it’s created will be used in some of your app's identity details, such as the Package Family Name (PFN). These values may be visible to some users, and cannot be changed, so keep this in mind when you first set up your app.
And finally, if you try to reserve a name, sometimes it is already taken by a company or an individual. If you hold the trademark or some other legal right to the name, you can report the issue here.