Choose how to authorize access to queue data in the Azure portal
When you access queue data using the Azure portal, the portal makes requests to Azure Storage under the covers. A request to Azure Storage can be authorized using either your Microsoft Entra account or the storage account access key. The portal indicates which method you're using, and enables you to switch between the two if you have the appropriate permissions.
Permissions needed to access queue data
Depending on how you want to authorize access to queue data in the Azure portal, you need specific permissions. In most cases, these permissions are provided via Azure role-based access control (Azure RBAC). For more information about Azure RBAC, see What is Azure role-based access control (Azure RBAC)?.
Use the account access key
To access queue data with the account access key, you must have an Azure role assigned to you that includes the Azure RBAC action Microsoft.Storage/storageAccounts/listkeys/action. This Azure role can be a built-in or a custom role.
The following built-in roles, listed from least to greatest permissions, support Microsoft.Storage/storageAccounts/listkeys/action:
- Reader and Data Access
- Storage Account Contributor
- Azure Resource Manager Contributor
- Azure Resource Manager Owner
When you attempt to access queue data in the Azure portal, the portal first checks whether you have been assigned a role with Microsoft.Storage/storageAccounts/listkeys/action. If you have been assigned a role with this action, then the portal uses the account key for accessing queue data. If you haven't been assigned a role with this action, then the portal attempts to access data using your Microsoft Entra account.
Important
When a storage account is locked with an Azure Resource Manager ReadOnly lock, the List Keys operation isn't permitted for that storage account. List Keys is a POST operation, and all POST operations are prevented when a ReadOnly lock is configured for the account. For this reason, when the account is locked with a ReadOnly lock, users must use Microsoft Entra credentials to access queue data in the portal. For information about accessing queue data in the portal with Microsoft Entra ID, see Use your Microsoft Entra account.
Note
The classic subscription administrator roles Service Administrator and Co-Administrator include the equivalent of the Azure Resource Manager Owner role. The Owner role includes all actions, including the Microsoft.Storage/storageAccounts/listkeys/action, so a user with one of these administrative roles can also access queue data with the account key. For more information, see Azure roles, Microsoft Entra roles, and classic subscription administrator roles.
Use your Microsoft Entra account
To access queue data from the Azure portal using your Microsoft Entra account, both of the following statements must be true for you:
- You have been assigned either a built-in or custom role that provides access to queue data.
- You have been assigned the Azure Resource Manager Reader role, at a minimum, scoped to the level of the storage account or higher. The Reader role grants the most restricted permissions, but another Azure Resource Manager role that grants access to storage account management resources is also acceptable.
The Azure Resource Manager Reader role permits users to view storage account resources, but not modify them. It doesn't provide read permissions to data in Azure Storage, but only to account management resources. The Reader role is necessary so that users can navigate to queues in the Azure portal.
For information about the built-in roles that support access to queue data, see Authorize access to queues using Microsoft Entra ID.
Custom roles can support different combinations of the same permissions provided by the built-in roles. For more information about creating Azure custom roles, see Azure custom roles and Understand role definitions for Azure resources.
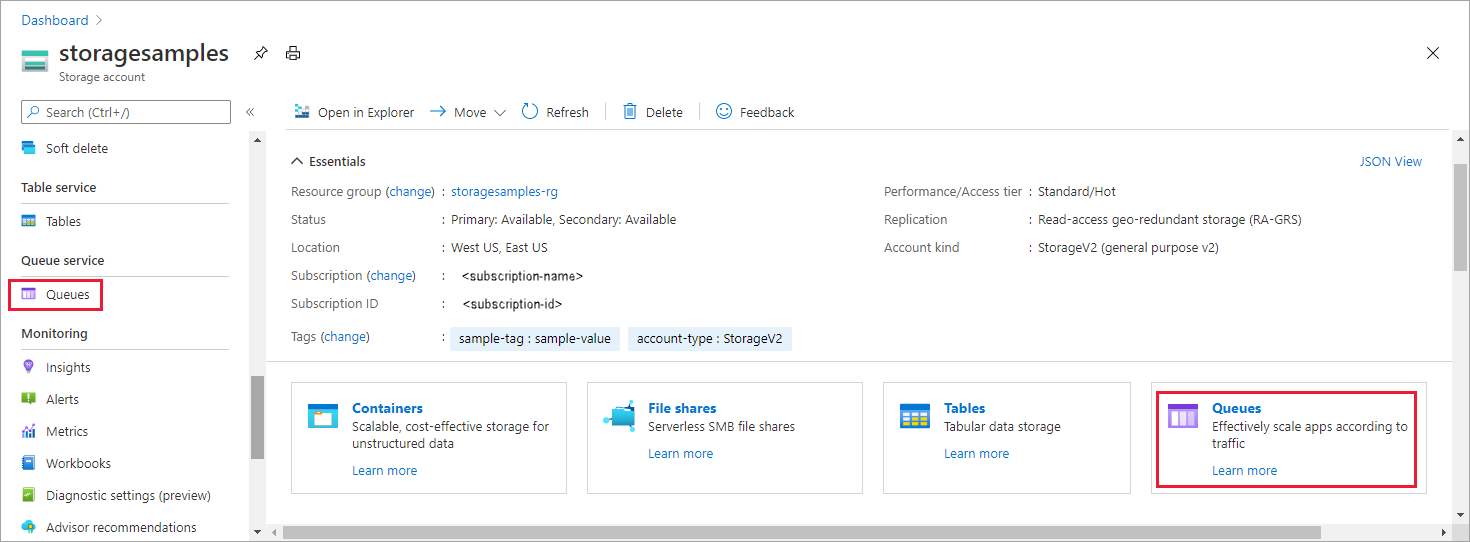
Navigate to queues in the Azure portal
To view queue data in the portal, navigate to the Overview for your storage account, and select on the links for Queues. Alternatively you can navigate to the Queue service section in the menu.
Determine the current authentication method
When you navigate to a queue, the Azure portal indicates whether you're currently using the account access key or your Microsoft Entra account to authenticate.
Authenticate with the account access key
If you're authenticating using the account access key, you see Access Key specified as the authentication method in the portal:
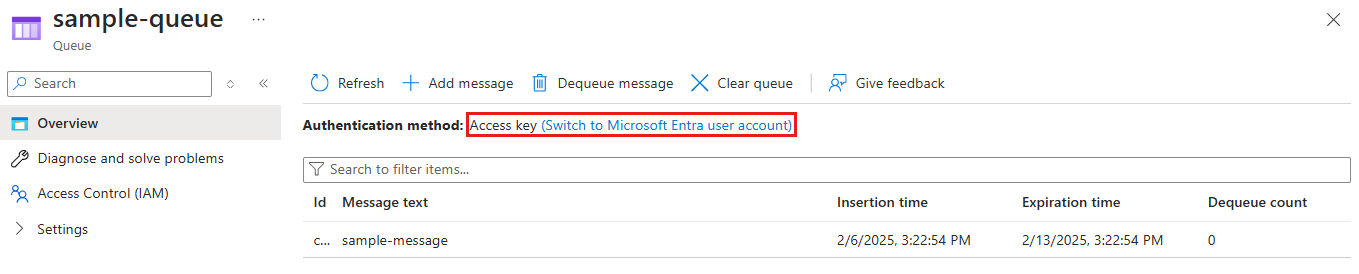
If you want to switch to use the Microsoft Entra account, select the link highlighted in the image. If you have the appropriate permissions via the Azure roles that are assigned to you, you're able to proceed. If you don't have the right permissions, you see an error message and no blobs appear in the list.
Select the Switch to access key link to use the access key for authentication again.
Authenticate with your Microsoft Entra account
If you're authenticating using your Microsoft Entra account, you see Microsoft Entra user Account specified as the authentication method in the portal:
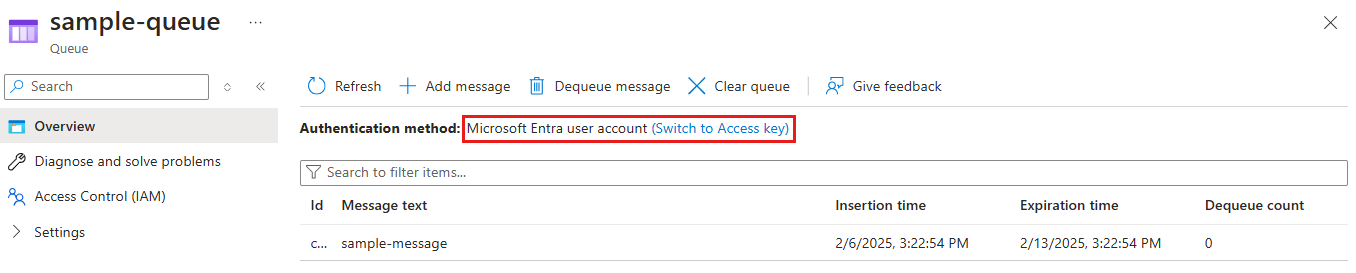
If you want to switch to use the account access key, select the link highlighted in the image. If you have access to the account key, then you're able to proceed. If you don't have access to the account key, you see an error message and no blobs appear in the list.
Select the Switch to Microsoft Entra user account link to use your Microsoft Entra account for authentication again.
Default to Microsoft Entra authorization in the Azure portal
When you create a new storage account, you can specify that the Azure portal defaults to authorization with Microsoft Entra ID when a user navigates to queue data. You can also configure this setting for an existing storage account. This setting specifies the default authorization method only, so keep in mind that a user can override this setting and choose to authorize data access with the account key.
To specify that the portal uses Microsoft Entra authorization by default for data access when you create a storage account, follow these steps:
Create a new storage account, following the instructions in Create a storage account.
On the Advanced tab, in the Security section, check the box next to Default to Microsoft Entra authorization in the Azure portal.
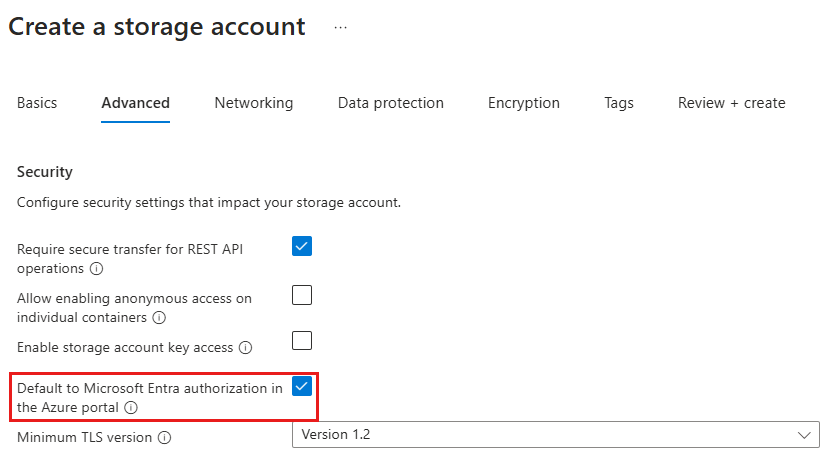
Select the Review + create button to run validation and create the account.
To update this setting for an existing storage account, follow these steps:
Navigate to the account overview in the Azure portal.
Under Settings, select Configuration.
Set Default to Microsoft Entra authorization in the Azure portal to Enabled.
