Export, configure, and view audit log records
After you search the audit log and download the search results to a CSV file, the file contains a column named AuditData, which contains additional information about each event. The data in this column is formatted as a JSON object, which contains multiple properties that are configured as property:value pairs separated by commas. You can use the JSON transform feature in the Power Query Editor in Excel to split each property in the JSON object in the AuditData column into multiple columns so that each property has its own column. This lets you sort and filter on one or more of these properties, which can help you quickly locate the specific auditing data you're looking for.
Tip
If you're not an E5 customer, use the 90-day Microsoft Purview solutions trial to explore how additional Purview capabilities can help your organization manage data security and compliance needs. Start now at the Microsoft Purview trials hub. Learn details about signing up and trial terms.
Step 1: Export audit log search results
The first step is to search the audit log and then export the results in a comma-separated value (CSV) file to your local computer.
Run an audit log search and revise the search criteria if necessary until you have the desired results.
On the search results page, select Export.
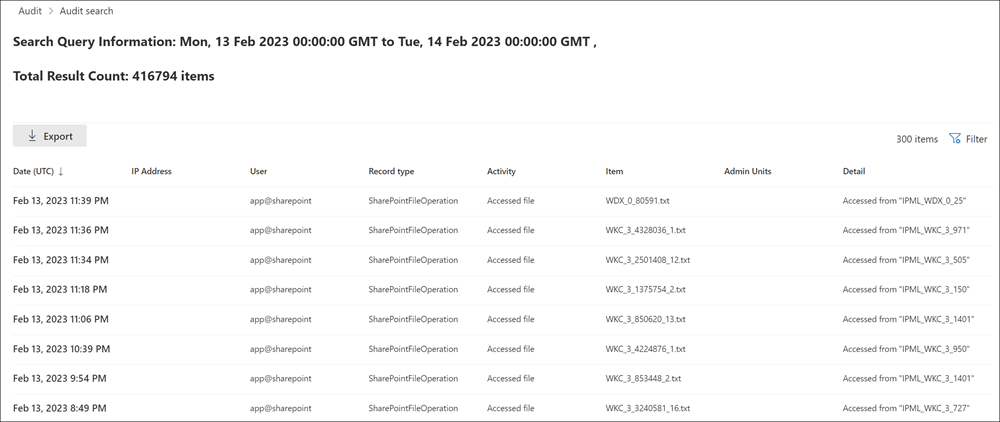
This option exports all the audit records from the audit log search you ran in step 1, and adds the raw data from the audit log to a CSV file. It takes a while to prepare the download file for a large search. Large files result when searching for all activities or using a wide date range.
After the export process is complete, a message is displayed at the top of the window that prompts you to open the CSV file and save it to your local computer. You can also access the CSV file in the Downloads folder.
Note
You can download a maximum of 50,000 entries to a CSV file from a single audit log search. If 50,000 entries are downloaded to the CSV file, you can probably assume there are more than 50,000 events that met the search criteria. To export more than this limit, try using a narrower date range to reduce the number of audit log records. You might have to run multiple searches with smaller date ranges to export more than 50,000 entries.
Step 2: Format the exported audit log using the Power Query Editor
The next step is to use the JSON transform feature in the Power Query Editor in Excel to split each property in the JSON object in the AuditData column into its own column. Then you filter columns to view records based on the values of specific properties. This can help you quickly locate the specific auditing data you're looking for.
Open a blank workbook in Excel for Office 365, Excel 2019, or Excel 2016.
On the Data tab, in the Get & Transform Data ribbon group, select From Text/CSV.
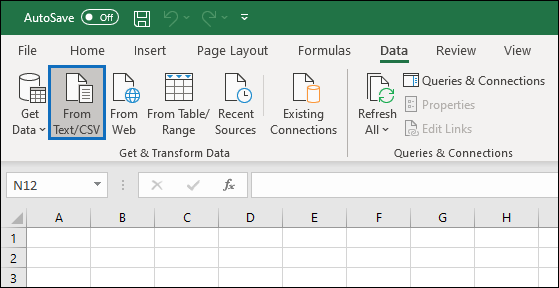
Open the CSV file that you downloaded in Step 1.
In the window that's displayed, select Transform Data.
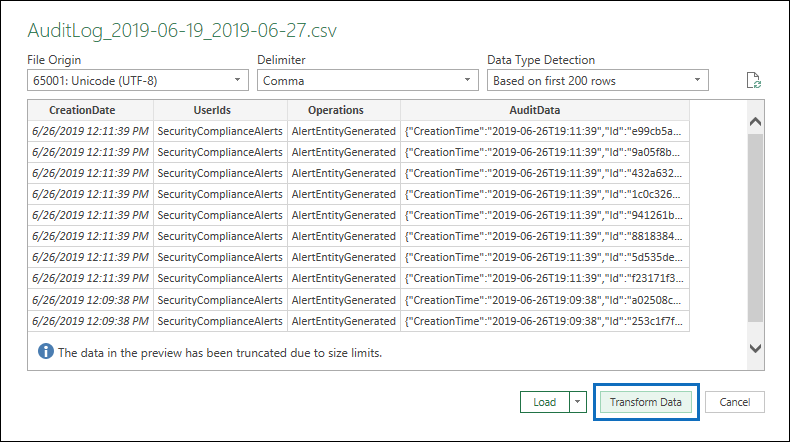
The CSV file is opened in the Query Editor. There are four columns: CreationDate, UserIds, Operations, and AuditData. The AuditData column is a JSON object that contains multiple properties. The next step is to create a column for each property in the JSON object.
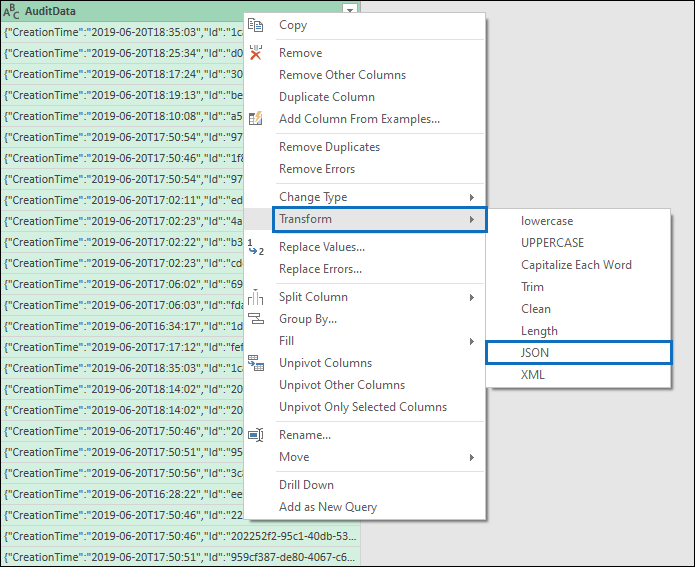
Right-click the title in the AuditData column, select Transform, and then select JSON.
In the upper-right corner of the AuditData column, select the expand icon.
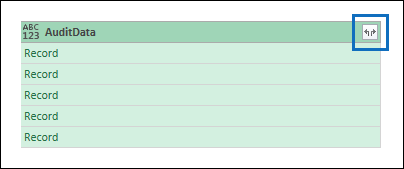
A partial list of the properties in the JSON objects in the AuditData column is displayed.
Select Load more to display all properties in the JSON objects in the AuditData column.
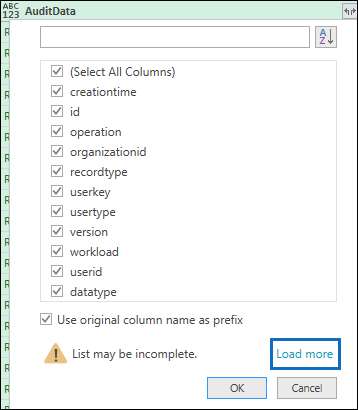
You can unselect the checkbox next to any property that you don't want to include. Eliminating columns that aren't useful for your investigation is a good way to reduce the amount of data displayed in the audit log.
Note
The JSON properties displayed in the previous screenshot (after you select Load more) are based on the properties found in the AuditData column from the first 1,000 rows in the CSV file. If there are different JSON properties in records after the first 1,000 rows, these properties (and a corresponding column) won't be included when the AuditData column is split into multiple columns. To help prevent this, consider rerunning the audit log search and narrow the search criteria so that fewer records are returned. Another workaround is to filter items in the Operations column to reduce the number of rows (before you perform step 5) before transforming the JSON object in the AuditData column.
Tip
To view an attribute within a list such as AuditData.AffectedItems, select the Expand icon in the upper right corner of the column you want to pull an attribute from, and then select Expand to New Row. From there it's a record and you can select the Expand icon in the upper right corner of the column, view the attributes, and select the one you want to view or extract.
Do one of the following things to format the title of the columns that are added for each JSON property that's selected.
- Unselect the Use original column name as prefix checkbox to use the name of the JSON property as the column names; for example, RecordType or SourceFileName.
- Leave the Use original column name as prefix checkbox selected to add the AuditData prefix to the column names; for example, AuditData.RecordType or AuditData.SourceFileName.
Select OK.
The AuditData column is split into multiple columns. Each new column corresponds to a property in the AuditData JSON object. Each row in the column contains the value for the property. If the property doesn't contain a value, the null value is displayed. In Excel, cells with null values are empty.
On the Home tab, select Close & Load to close the Power Query Editor and open the transformed CSV file in an Excel workbook.
Use PowerShell to search and export audit log records
Instead of using the audit log search tool in the Microsoft Purview portal or the Microsoft Purview compliance portal, you can use the Search-UnifiedAuditLog cmdlet in Exchange Online PowerShell to export the results of an audit log search to a CSV file. Then you can follow the same procedure described in Step 2 to format the audit log using the Power Query editor. One advantage of using the PowerShell cmdlet is that you can search for events from a specific service by using the RecordType parameter. Here are few examples of using PowerShell to export audit records to a CSV file so you can use the Power Query editor to transform the JSON object in the AuditData column as described in Step 2.
In this example, run the following commands to return all records related to SharePoint sharing operations.
$auditlog = Search-UnifiedAuditLog -StartDate 06/01/2019 -EndDate 06/30/2019 -RecordType SharePointSharingOperation
$auditlog | Select-Object -Property CreationDate,UserIds,RecordType,AuditData | Export-Csv -Path c:\AuditLogs\PowerShellAuditlog.csv -NoTypeInformation
The search results are exported to a CSV file named PowerShellAuditlog that contains four columns: CreationDate, UserIds, RecordType, AuditData).
You can also use the name or enum value for the record type as the value for the RecordType parameter. For a list of record type names and their corresponding enum values, see the AuditLogRecordType table in Office 365 Management Activity API schema.
You can only include a single value for the RecordType parameter. To search for audit records for other record types, you have to run the two previous commands again to specify a different record type and append those results to the original CSV file. For example, you would run the following two commands to add SharePoint file activities from the same date range to the PowerShellAuditlog.csv file.
$auditlog = Search-UnifiedAuditLog -StartDate 06/01/2019 -EndDate 06/30/2019 -RecordType SharePointFileOperation
$auditlog | Select-Object -Property CreationDate,UserIds,RecordType,AuditData | Export-Csv -Append -Path c:\AuditLogs\PowerShellAuditlog.csv -NoTypeInformation
Tips for exporting and viewing the audit log
Here are some tips and examples of exporting and viewing the audit log before and after you use the JSON transform feature to split the AuditData column into multiple columns.
- Filter the RecordType column to display only the records from a specific service or functional area. For example, to show events related to SharePoint sharing, you would select 14 (the enum value for records triggered by SharePoint sharing activities). For a list of the services that correspond to the enum values displayed in the RecordType column, see Detailed properties in the audit log.
- Filter the Operations column to display the records for specific activities. For a list of most operations that correspond to a searchable activity in the audit log search tool in the Microsoft Purview portal or the compliance portal, see the "Audited activities" section in Search the audit log.