Configure server settings for P2S VPN Gateway certificate authentication
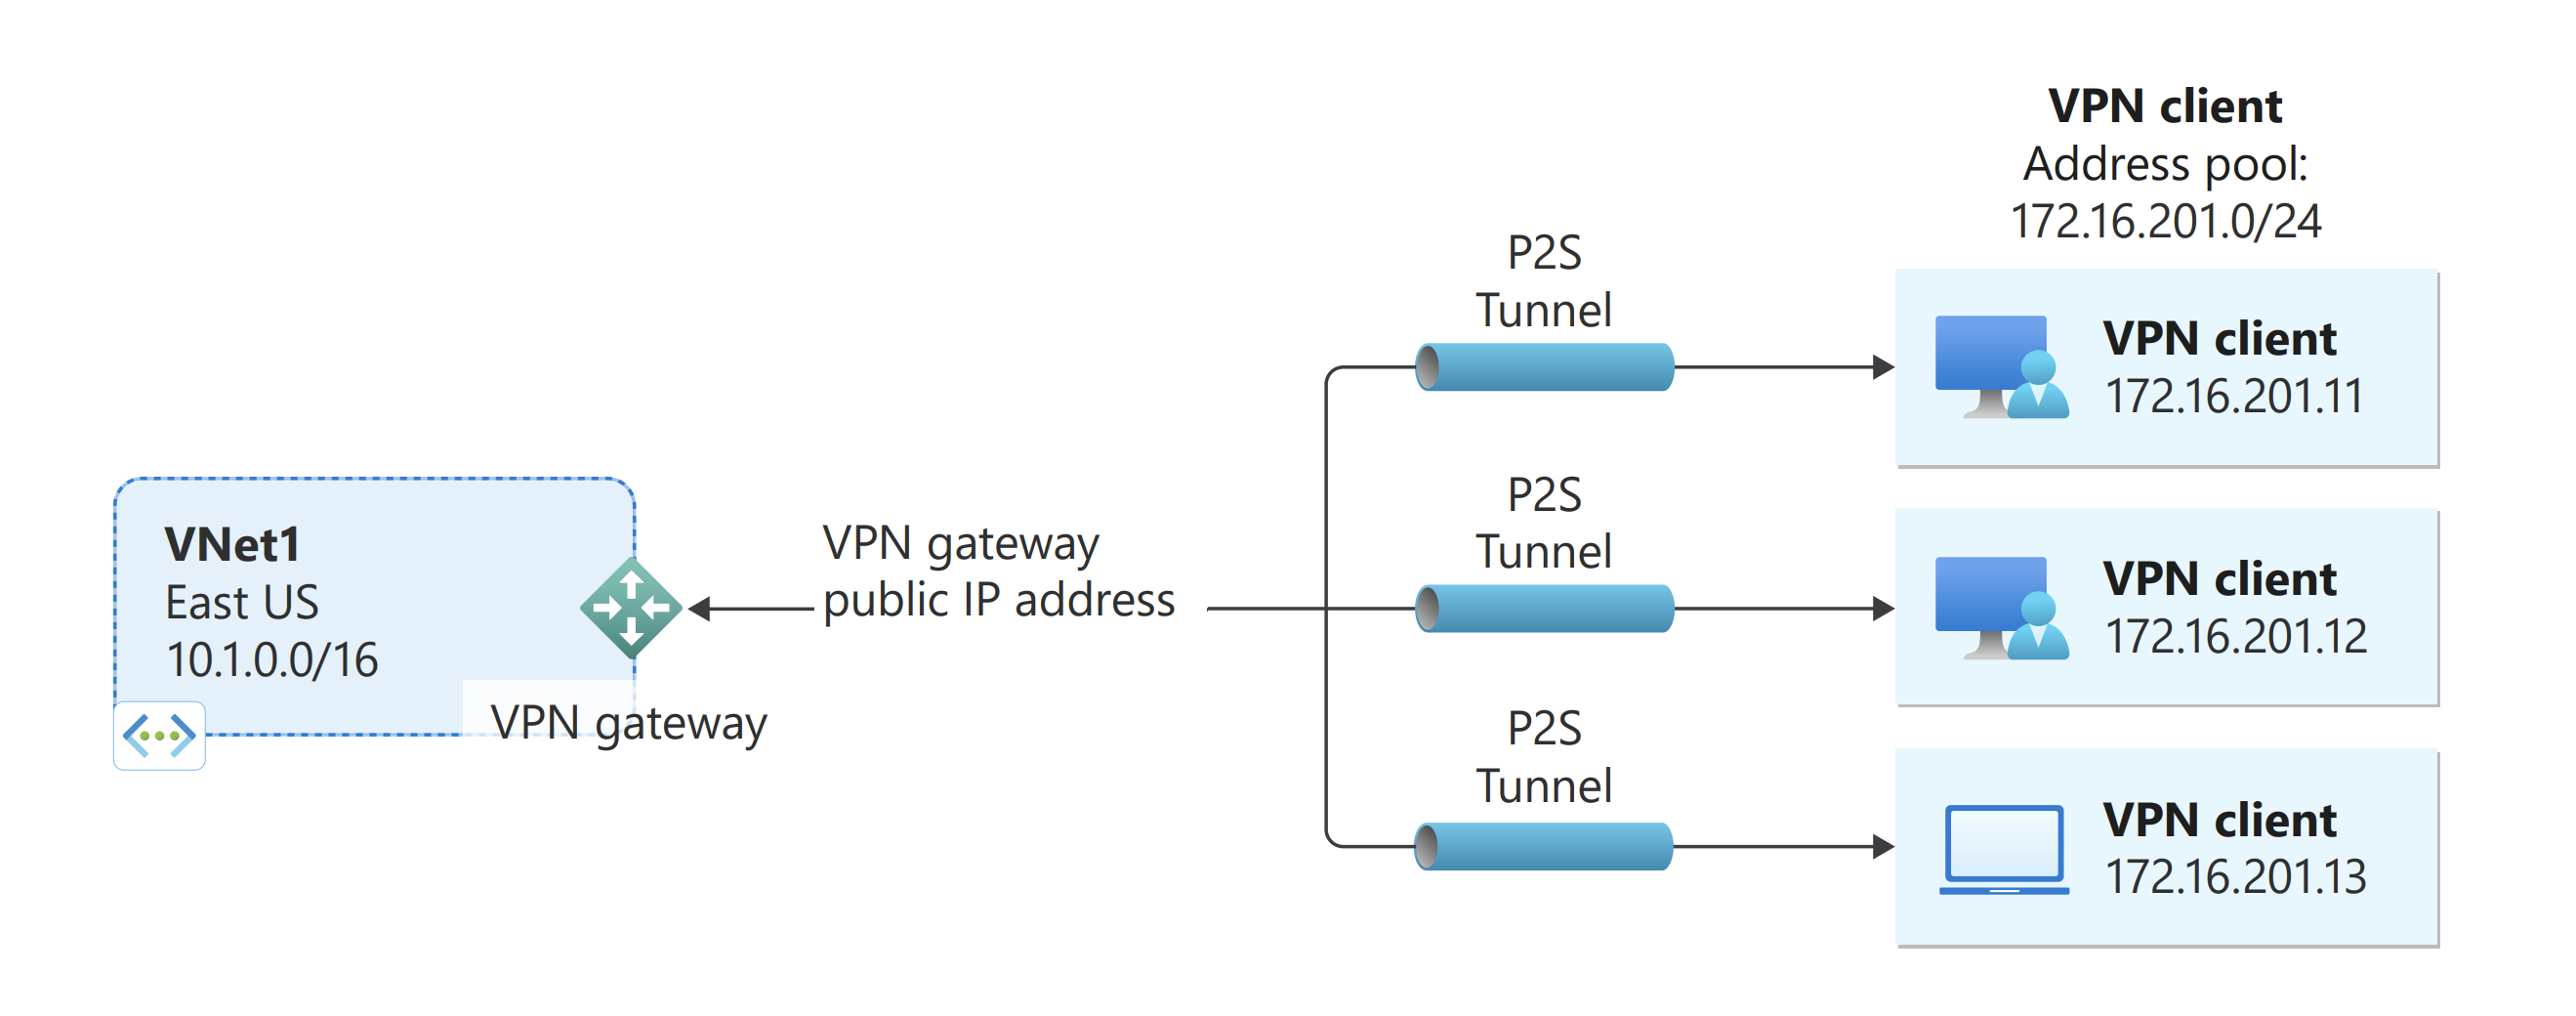
This article helps you configure the necessary VPN Gateway point-to-site (P2S) server settings to let you securely connect individual clients running Windows, Linux, or macOS to an Azure virtual network (VNet). P2S VPN connections are useful when you want to connect to your virtual network from a remote location, such as when you're telecommuting from home or a conference. You can also use P2S instead of a site-to-site (S2S) VPN when you have only a few clients that need to connect to a virtual network.
P2S connections don't require a VPN device or a public-facing IP address. There are various different configuration options available for P2S. For more information about point-to-site VPN, see About point-to-site VPN.
The steps in this article use the Azure portal to configure your Azure VPN gateway for point-to-site certificate authentication.
P2S Azure certificate authentication connections use the following items:
- A route-based VPN gateway (not policy-based). For more information about VPN type, see VPN Gateway settings.
- The public key (.cer file) for a root certificate, which is uploaded to Azure. Once the certificate is uploaded, it's considered a trusted certificate and is used for authentication.
- A client certificate that is generated from the root certificate. The client certificate installed on each client computer that will connect to the VNet. This certificate is used for client authentication.
- VPN client configuration files. The VPN client is configured using VPN client configuration files. These files contain the necessary information for the client to connect to the VNet. Each client that connects must be configured using the settings in the configuration files.
Prerequisites
This article assumes the following prerequisites:
- An Azure virtual network.
- A route-based VPN gateway that's compatible with the P2S configuration that you want to create and the connecting VPN clients. To help determine the P2S configuration that you need, see the VPN client table. If your gateway uses the Basic SKU, understand that the Basic SKU has P2S limitations and doesn't support IKEv2 or RADIUS authentication. For more information, see About gateway SKUs.
If you don't yet have a functioning VPN gateway that's compatible with the P2S configuration that you want to create, see Create and manage a VPN gateway. Create a compatible VPN gateway, then return to this article to configure P2S settings.
Generate certificates
Certificates are used by Azure to authenticate clients connecting to a virtual network over a point-to-site VPN connection. Once you obtain a root certificate, you upload the public key information to Azure. The root certificate is then considered 'trusted' by Azure for connection over P2S to the virtual network.
You also generate client certificates from the trusted root certificate, and then install them on each client computer. The client certificate is used to authenticate the client when it initiates a connection to the virtual network.
The root certificate must be generated and extracted before you configure the point-to-site gateway settings.
Generate a root certificate
Obtain the .cer file for the root certificate. You can use either a root certificate that was generated with an enterprise solution (recommended), or generate a self-signed certificate. After you create the root certificate, export the public certificate data (not the private key) as a Base64 encoded X.509 .cer file. You upload this file later to Azure.
Enterprise certificate: If you're using an enterprise solution, you can use your existing certificate chain. Acquire the .cer file for the root certificate that you want to use.
Self-signed root certificate: If you aren't using an enterprise certificate solution, create a self-signed root certificate. Otherwise, the certificates you create won't be compatible with your P2S connections and clients receive a connection error when they try to connect. You can use Azure PowerShell, MakeCert, or OpenSSL. The steps in the following articles describe how to generate a compatible self-signed root certificate:
- PowerShell instructions for Windows 10 or later: These instructions require PowerShell on a computer running Windows 10 or later. Client certificates that are generated from the root certificate can be installed on any supported P2S client.
- MakeCert instructions: Use MakeCert to generate certificates if you don't have access to a computer running Windows 10 or later. Although MakeCert is deprecated, you can still use it to generate certificates. Client certificates that you generate from the root certificate can be installed on any supported P2S client.
- Linux - OpenSSL instructions
- Linux - strongSwan instructions
Generate client certificates
Each client computer that you connect to a VNet with a point-to-site connection must have a client certificate installed. You generate it from the root certificate and install it on each client computer. If you don't install a valid client certificate, authentication will fail when the client tries to connect to the VNet.
You can either generate a unique certificate for each client, or you can use the same certificate for multiple clients. The advantage to generating unique client certificates is the ability to revoke a single certificate. Otherwise, if multiple clients use the same client certificate to authenticate and you revoke it, you'll need to generate and install new certificates for every client that uses that certificate.
You can generate client certificates by using the following methods:
Enterprise certificate:
If you're using an enterprise certificate solution, generate a client certificate with the common name value format name@yourdomain.com. Use this format instead of the domain name\username format.
Make sure the client certificate is based on a user certificate template that has Client Authentication listed as the first item in the user list. Check the certificate by double-clicking it and viewing Enhanced Key Usage in the Details tab.
Self-signed root certificate: Follow the steps in one of the following P2S certificate articles so that the client certificates you create will be compatible with your P2S connections.
When you generate a client certificate from a self-signed root certificate, it's automatically installed on the computer that you used to generate it. If you want to install a client certificate on another client computer, export it as a .pfx file, along with the entire certificate chain. Doing so will create a .pfx file that contains the root certificate information required for the client to authenticate.
The steps in these articles generate a compatible client certificate, which you can then export and distribute.
Windows 10 or later PowerShell instructions: These instructions require Windows 10 or later, and PowerShell to generate certificates. The generated certificates can be installed on any supported P2S client.
MakeCert instructions: Use MakeCert if you don't have access to a Windows 10 or later computer for generating certificates. Although MakeCert is deprecated, you can still use it to generate certificates. You can install the generated certificates on any supported P2S client.
Linux: See strongSwan or OpenSSL instructions.
Add the VPN client address pool
The client address pool is a range of private IP addresses that you specify. The clients that connect over a point-to-site VPN dynamically receive an IP address from this range. Use a private IP address range that doesn't overlap with the on-premises location that you connect from, or the VNet that you want to connect to. If you configure multiple protocols and SSTP is one of the protocols, then the configured address pool is split between the configured protocols equally.
In the Azure portal, go to your VPN gateway.
On the page for your gateway, in the left pane, select Point-to-site configuration.
Click Configure now to open the configuration page.
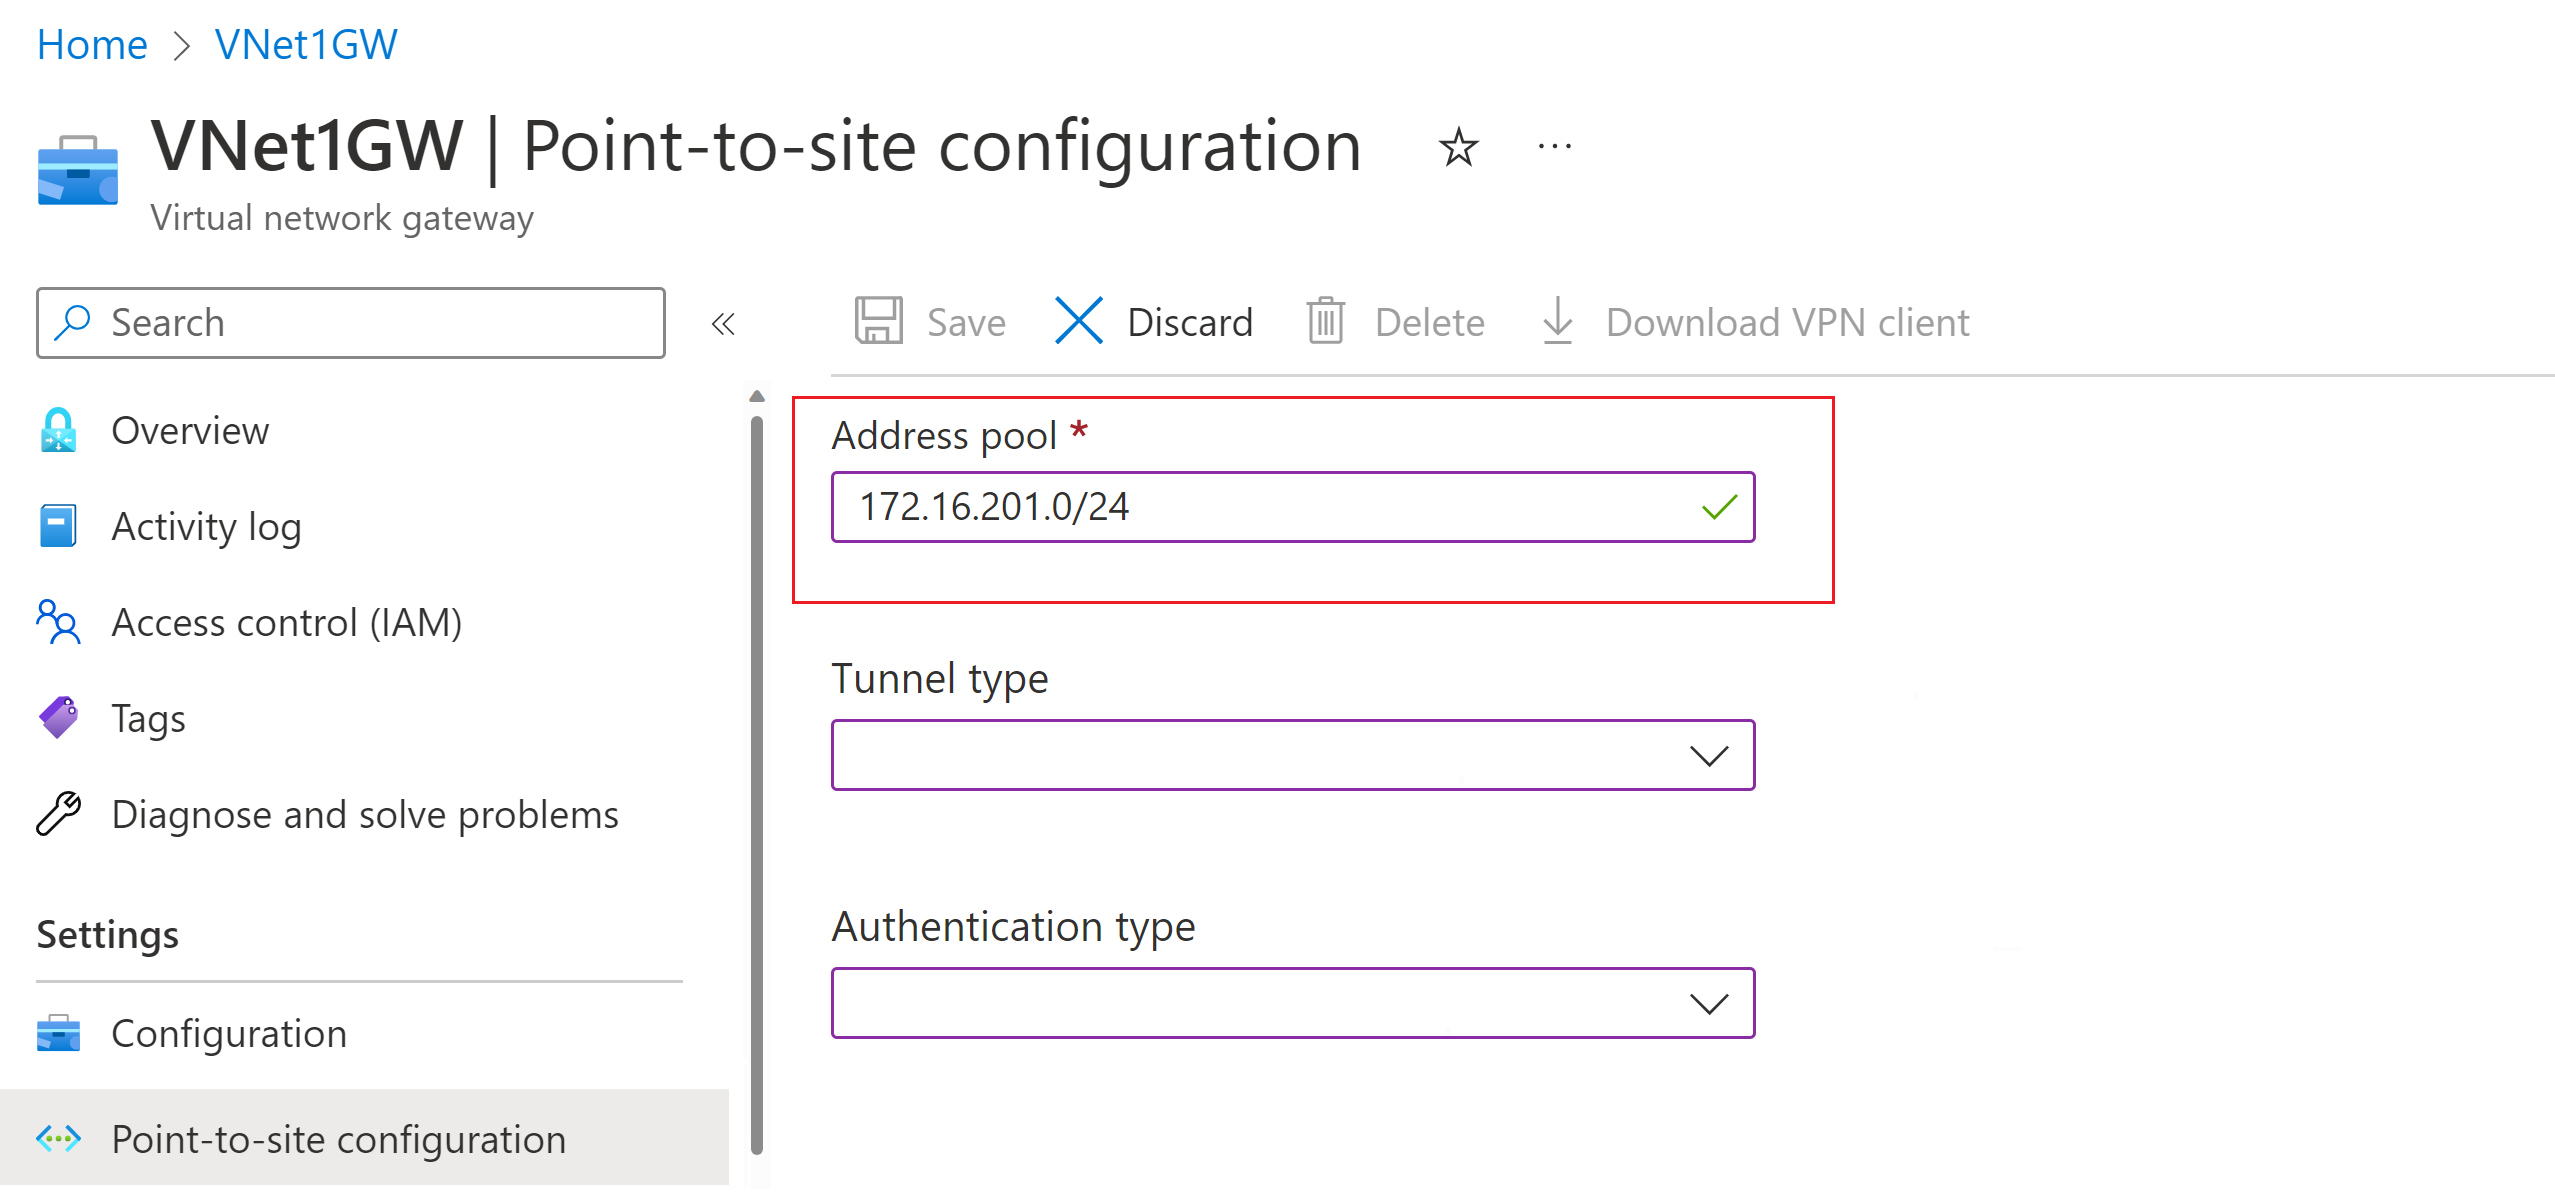
On the Point-to-site configuration page, in the Address pool box, add the private IP address range that you want to use. VPN clients dynamically receive an IP address from the range that you specify. The minimum subnet mask is 29 bit for active/passive and 28 bit for active/active configuration.
Continue to the next section to configure more settings.
Specify the tunnel and authentication type
In this section, you specify the tunnel type and the authentication type. These settings can become complex. You can select options that contain multiple tunnel types from the dropdown, such as IKEv2 and OpenVPN(SSL) or IKEv2 and SSTP (SSL). Only certain combinations of tunnel types and authentication types are available.
The tunnel type and the authentication type must correspond to the VPN client software you want use to connect to Azure. When you have various VPN clients connecting from different operating systems, planning the tunnel type and authentication type is important. The following table shows available tunnel types and authentication types as they relate to VPN client software.
VPN client table
| Authentication method | Tunnel type | Client OS | VPN client |
|---|---|---|---|
| Certificate | |||
| IKEv2, SSTP | Windows | Native VPN client | |
| IKEv2 | macOS | Native VPN client | |
| IKEv2 | Linux | strongSwan | |
| OpenVPN | Windows | Azure VPN client OpenVPN client version 2.x OpenVPN client version 3.x |
|
| OpenVPN | macOS | OpenVPN client | |
| OpenVPN | iOS | OpenVPN client | |
| OpenVPN | Linux | Azure VPN Client OpenVPN client |
|
| Microsoft Entra ID | |||
| OpenVPN | Windows | Azure VPN client | |
| OpenVPN | macOS | Azure VPN Client | |
| OpenVPN | Linux | Azure VPN Client |
Note
If you don't see tunnel type or authentication type on the Point-to-site configuration page, your gateway is using the Basic SKU. The Basic SKU doesn't support IKEv2 or RADIUS authentication. If you want to use these settings, you need to delete and re-create the gateway using a different gateway SKU.
For Tunnel type, select the tunnel type that you want to use. For this exercise, from the dropdown, select IKEv2 and OpenVPN(SSL).
For Authentication type, from the dropdown, select Azure certificate.
Add another public IP address
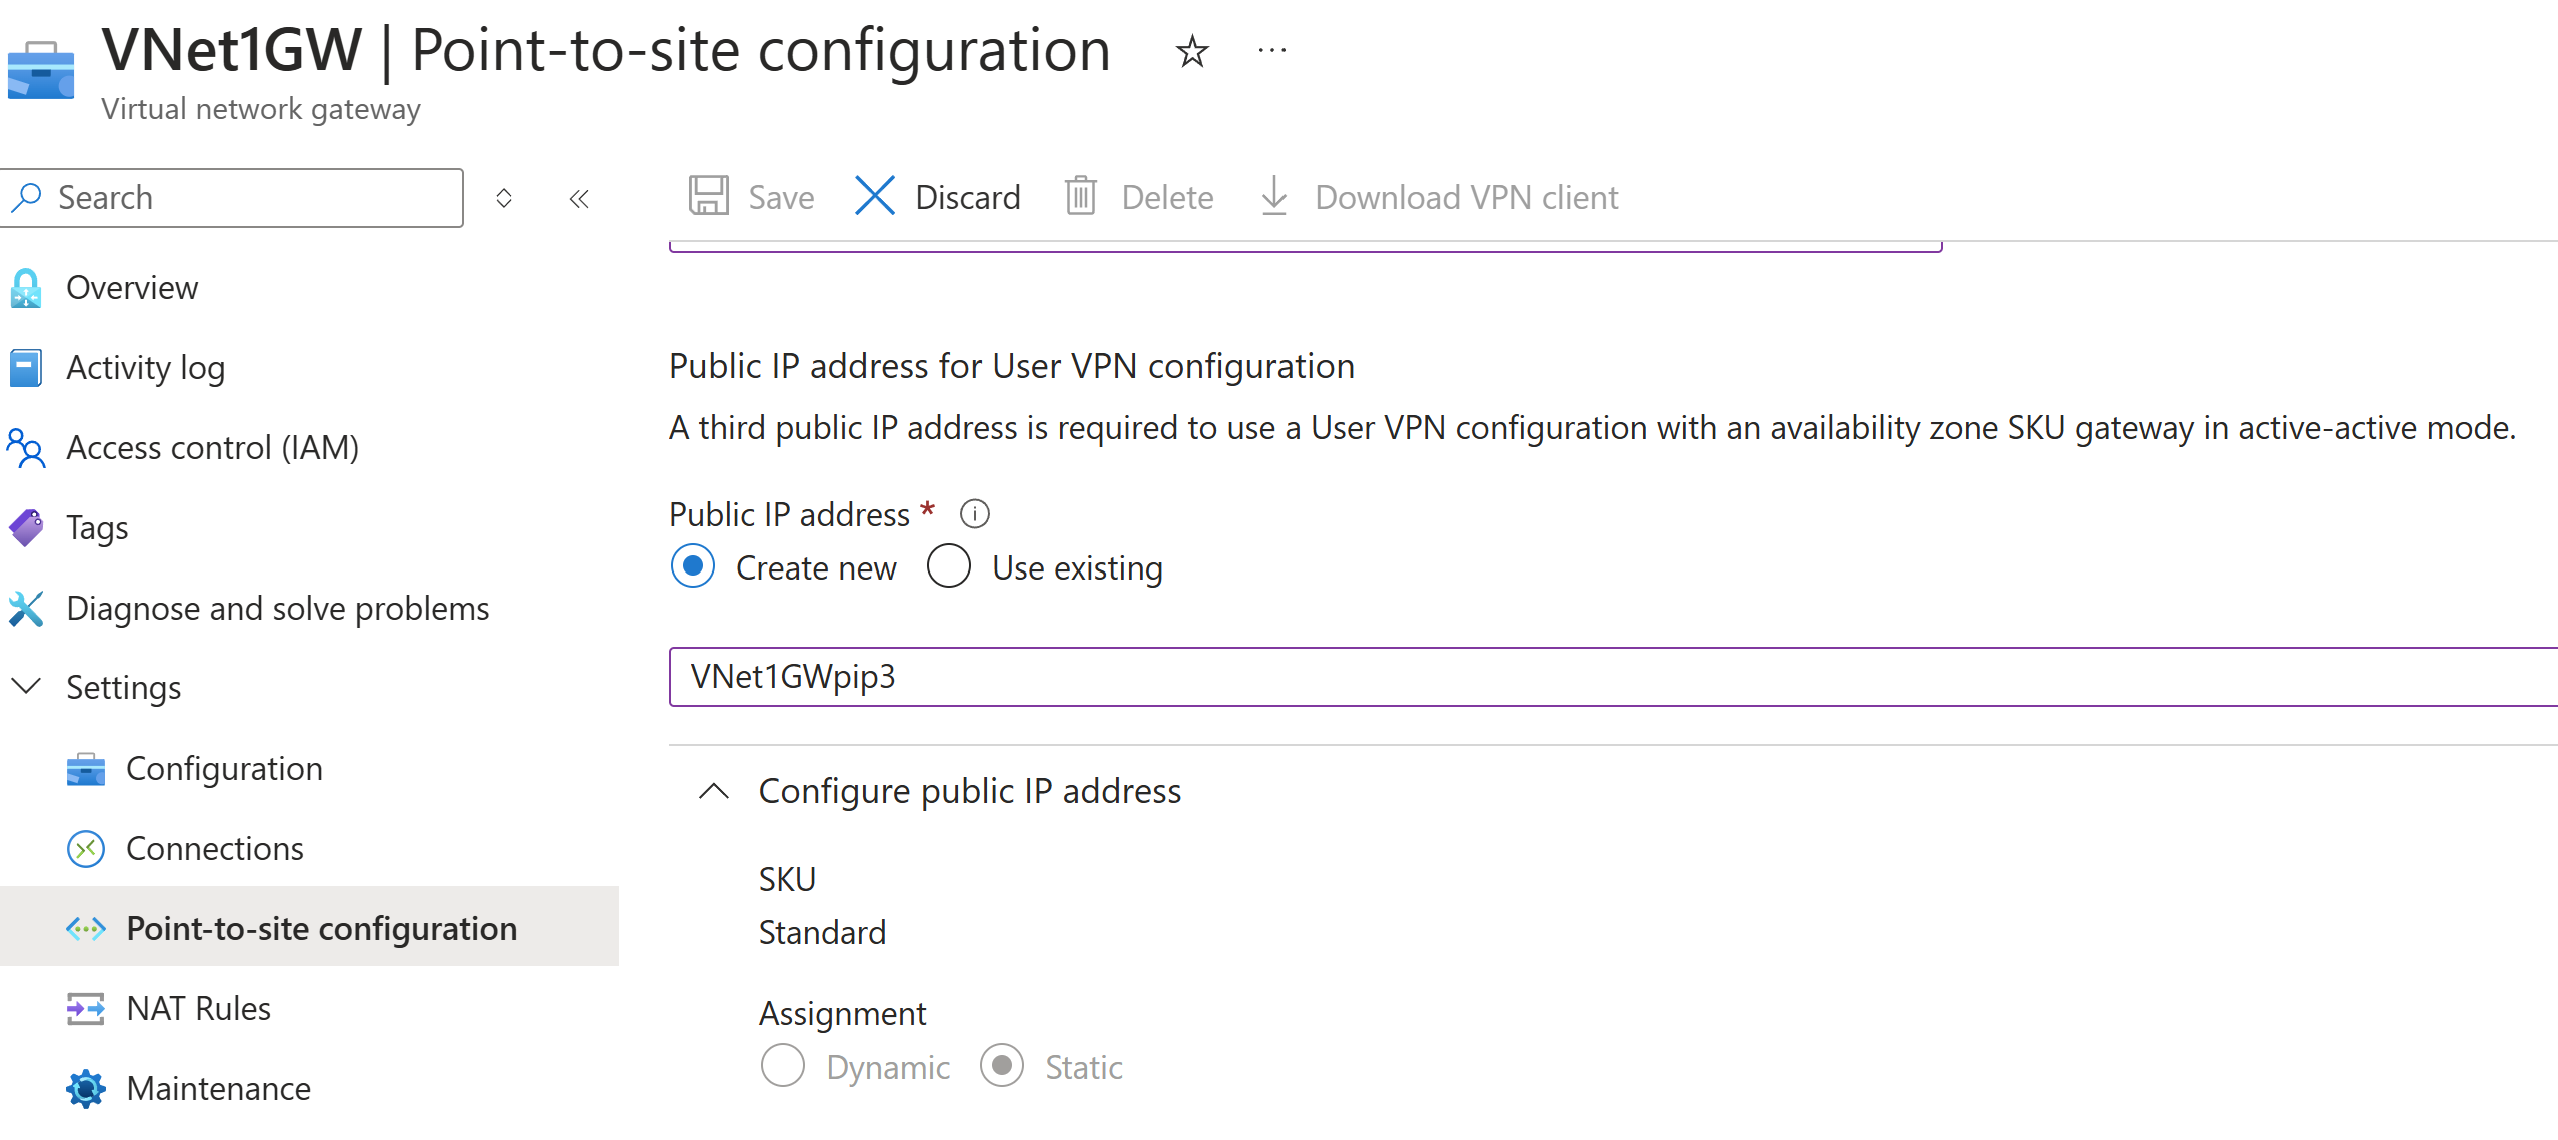
If you have an active-active mode gateway, you need to specify a third public IP address to configure point-to-site. In the example, we create the third public IP address using the example value VNet1GWpip3. If your gateway isn't in active-active mode, you don't need to add another public IP address.
Upload root certificate public key information
In this section, you upload public root certificate data to Azure. Once the public certificate data is uploaded, Azure uses it to authenticate connecting clients. The connecting clients have an installed client certificate generated from the trusted root certificate.
Make sure that you exported the root certificate as a Base-64 encoded X.509 (.CER) file in the previous steps. You need to export the certificate in this format so you can open the certificate with text editor. You don't need to export the private key.
Open the certificate with a text editor, such as Notepad. When copying the certificate data, make sure that you copy the text as one continuous line:
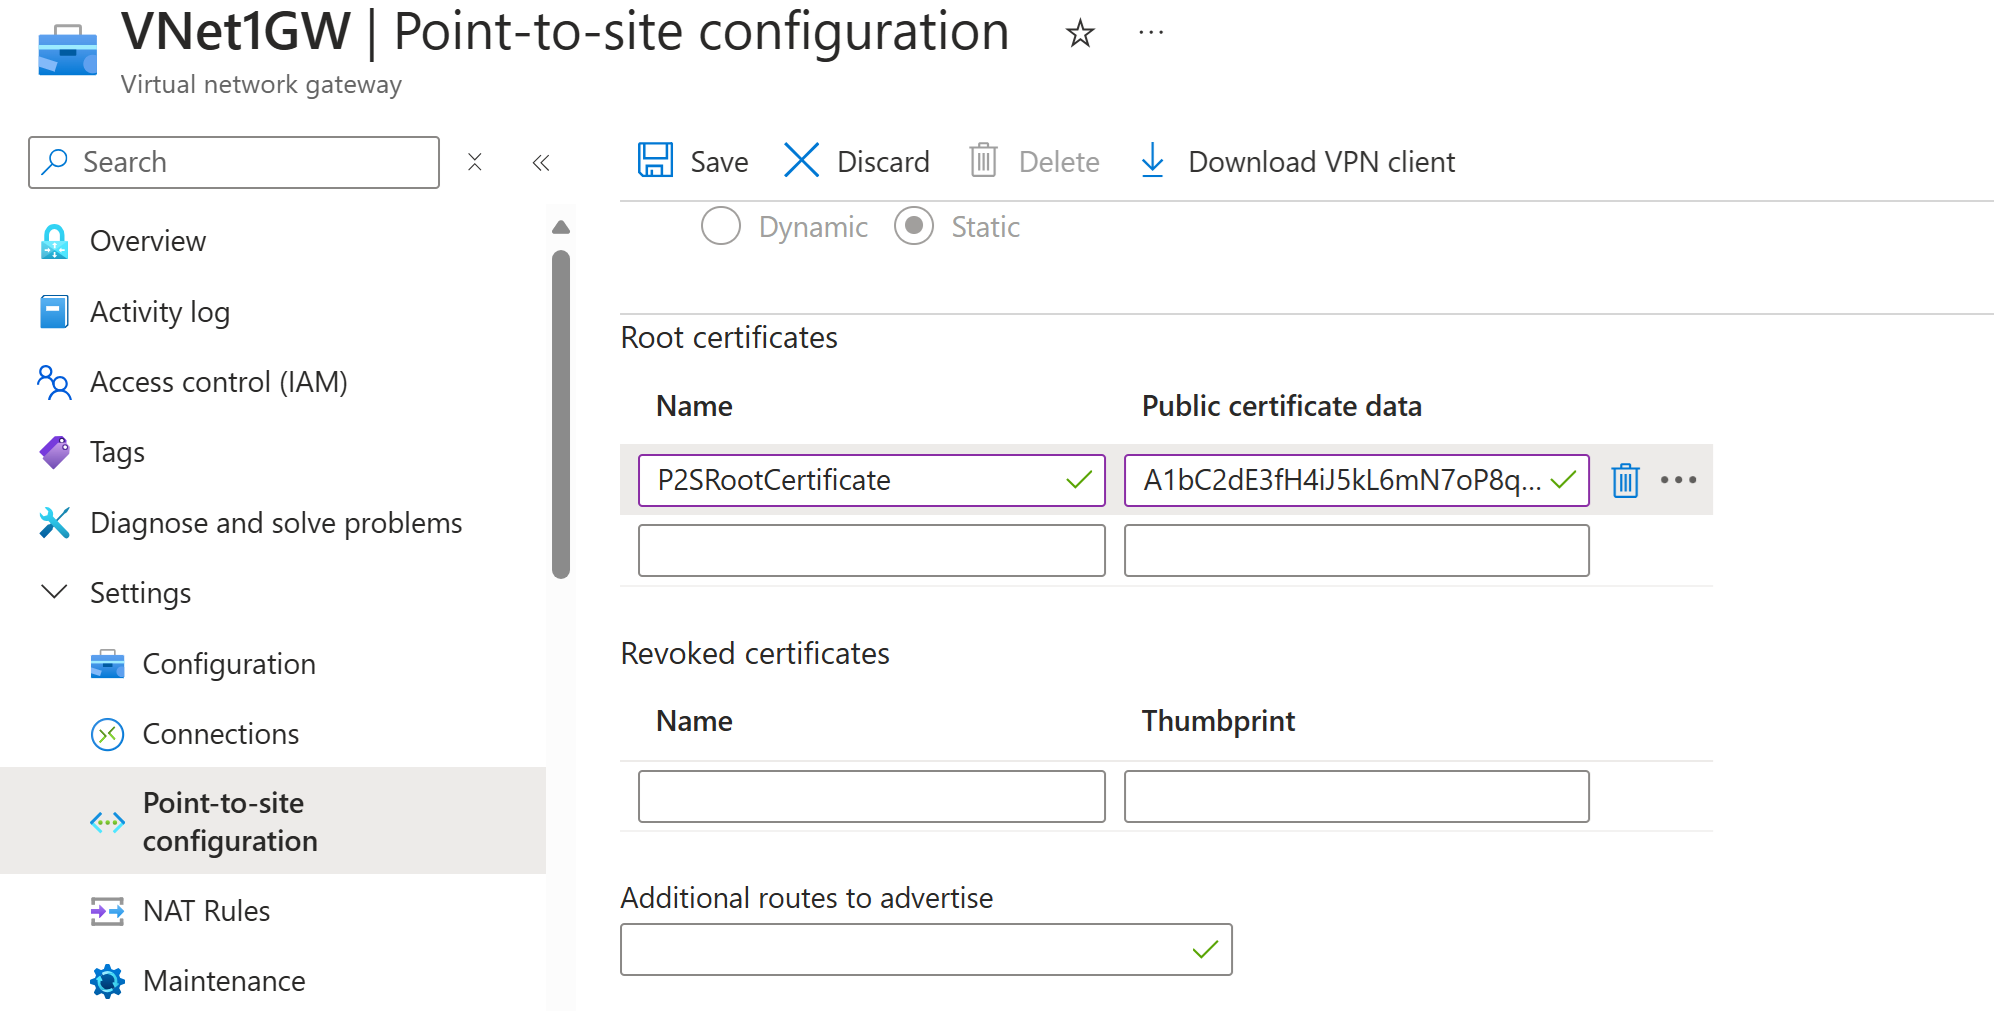
Go to your Virtual network gateway -> Point-to-site configuration page in the Root certificate section. This section is only visible if you have selected Azure certificate for the authentication type.
In the Root certificate section, you can add up to 20 trusted root certificates.
- Paste the certificate data into the Public certificate data field.
- Name the certificate.
Additional routes aren't necessary for this exercise. For more information about the custom routing feature, see Advertise custom routes.
Select Save at the top of the page to save all of the configuration settings.
Generate VPN client profile configuration files
All the necessary configuration settings for the VPN clients are contained in a VPN client profile configuration zip file. VPN client profile configuration files are specific to the P2S VPN gateway configuration for the virtual network. If there are any changes to the P2S VPN configuration after you generate the files, such as changes to the VPN protocol type or authentication type, you need to generate new VPN client profile configuration files and apply the new configuration to all of the VPN clients that you want to connect. For more information about P2S connections, see About point-to-site VPN.
You can generate client profile configuration files using PowerShell, or by using the Azure portal. The following examples show both methods. Either method returns the same zip file.
Azure portal
In the Azure portal, go to the virtual network gateway for the virtual network to which you want to connect.
On the virtual network gateway page, select Point-to-site configuration to open the Point-to-site configuration page.
At the top of the Point-to-site configuration page, select Download VPN client. This doesn't download VPN client software, it generates the configuration package used to configure VPN clients. It takes a few minutes for the client configuration package to generate. During this time, you might not see any indications until the packet generates.
Once the configuration package is generated, your browser indicates that a client configuration zip file is available. It's named the same name as your gateway.
Unzip the file to view the folders. You'll use some, or all, of these files to configure your VPN client. The files that are generated correspond to the authentication and tunnel type settings that you configured on the P2S server.
Configure VPN clients and connect to Azure
For steps to configure your VPN clients and connect to Azure, see the VPN client table in the Specify tunnel and authentication type section. The table contains links to articles that provide detailed steps to configure the VPN client software.
Add or remove trusted root certificates
You can add and remove trusted root certificates from Azure. When you remove a root certificate, clients that have a certificate generated from that root won't be able to authenticate, and as a result, can't connect. If you want a client to authenticate and connect, you need to install a new client certificate generated from a root certificate that is trusted (uploaded) to Azure.
You can add up to 20 trusted root certificate .cer files to Azure. For instructions, see the section Upload a trusted root certificate.
To remove a trusted root certificate:
- Navigate to the Point-to-site configuration page for your virtual network gateway.
- In the Root certificate section of the page, locate the certificate that you want to remove.
- Select the ellipsis next to the certificate, and then select Remove.
Revoke a client certificate
You can revoke client certificates. The certificate revocation list allows you to selectively deny P2S connectivity based on individual client certificates. This is different than removing a trusted root certificate. If you remove a trusted root certificate .cer from Azure, it revokes the access for all client certificates generated/signed by the revoked root certificate. When you revoke a client certificate, rather than the root certificate, it allows the other certificates that were generated from the root certificate to continue to be used for authentication.
The common practice is to use the root certificate to manage access at team or organization levels, while using revoked client certificates for fine-grained access control on individual users.
You can revoke a client certificate by adding the thumbprint to the revocation list.
- Retrieve the client certificate thumbprint. For more information, see How to retrieve the Thumbprint of a Certificate.
- Copy the information to a text editor and remove all spaces so that it's a continuous string.
- Navigate to the virtual network gateway Point-to-site-configuration page. This is the same page that you used to upload a trusted root certificate.
- In the Revoked certificates section, input a friendly name for the certificate (it doesn't have to be the certificate CN).
- Copy and paste the thumbprint string to the Thumbprint field.
- The thumbprint validates and is automatically added to the revocation list. A message appears on the screen that the list is updating.
- After updating has completed, the certificate can no longer be used to connect. Clients that try to connect using this certificate receive a message saying that the certificate is no longer valid.
Point-to-site FAQ
For frequently asked questions, see the FAQ.
Next steps
Once your connection is complete, you can add virtual machines to your virtual networks. For more information, see Virtual Machines. To understand more about networking and virtual machines, see Azure and Linux VM network overview.
For P2S troubleshooting information, Troubleshooting Azure point-to-site connections.


