Audit and track changes to incident tasks in Microsoft Sentinel in the Azure portal
Incident tasks ensure comprehensive and uniform treatment of incidents across all SOC personnel. Task lists are typically defined according to determinations made by senior analysts or SOC managers, and put into practice using automation rules or playbooks.
Your analysts can see the list of tasks they need to perform for a particular incident on the incident details page, and mark them complete as they go. Analysts can also create their own tasks on the spot, manually, right from within the incident.
This article explains how you, as a SOC manager, can audit the history of Microsoft Sentinel incident tasks, and track the changes made to them throughout their life cycle, in order to gauge the efficacy of your task assignments and their contribution to your SOC's efficiency and proper functioning.
Structure of Tasks array in the SecurityIncident table
The SecurityIncident table is an audit table—it stores not the incidents themselves, but rather records of the life of an incident: its creation and any changes made to it. Any time an incident is created or a change is made to an incident, a record is generated in this table showing the now-current state of the incident.
The addition of tasks details to the schema of this table allows you to audit tasks in greater depth.
The detailed information added to the Tasks field consists of key-value pairs taking the following structure:
| Key | Value description |
|---|---|
| createdBy | The identity that created the task: - email: email address of identity - name: name of the identity - objectId: GUID of the identity - userPrincipalName: UPN of the identity |
| createdTimeUtc | Time the task was created, in UTC. |
| lastCompletedTimeUtc | Time the task was marked complete, in UTC. |
| lastModifiedBy | The identity that last modified the task: - email: email address of identity - name: name of the identity - objectId: GUID of the identity - userPrincipalName: UPN of the identity |
| lastModifiedTimeUtc | Time the task was last modified, in UTC. |
| status | Current status of the task: New, Completed, Deleted. |
| taskId | Resource ID of the task. |
| title | Friendly name given to the task by its creator. |
View incident tasks in the SecurityIncident table
Apart from the Incident tasks workbook, you can audit task activity by querying the SecurityIncident table in Logs. The rest of this article shows you how to do this, as well as how to read and understand the query results to get task activity information.
In the Logs page, enter the following query in the query window and run it. This query will return all the incidents that have any tasks assigned.
SecurityIncident
| where array_length( Tasks) > 0
You can add any number of statements to the query to filter and narrow down the results. To demonstrate how to view and understand the results, we're going to add statements to filter the results so that we only see the tasks for a single incident, and we'll also add a
projectstatement so that we see only those fields that will be useful for our purposes, without a lot of clutter.For more information, see Kusto Query Language overview.
SecurityIncident
| where array_length( Tasks) > 0
| where IncidentNumber == "405211"
| sort by LastModifiedTime desc
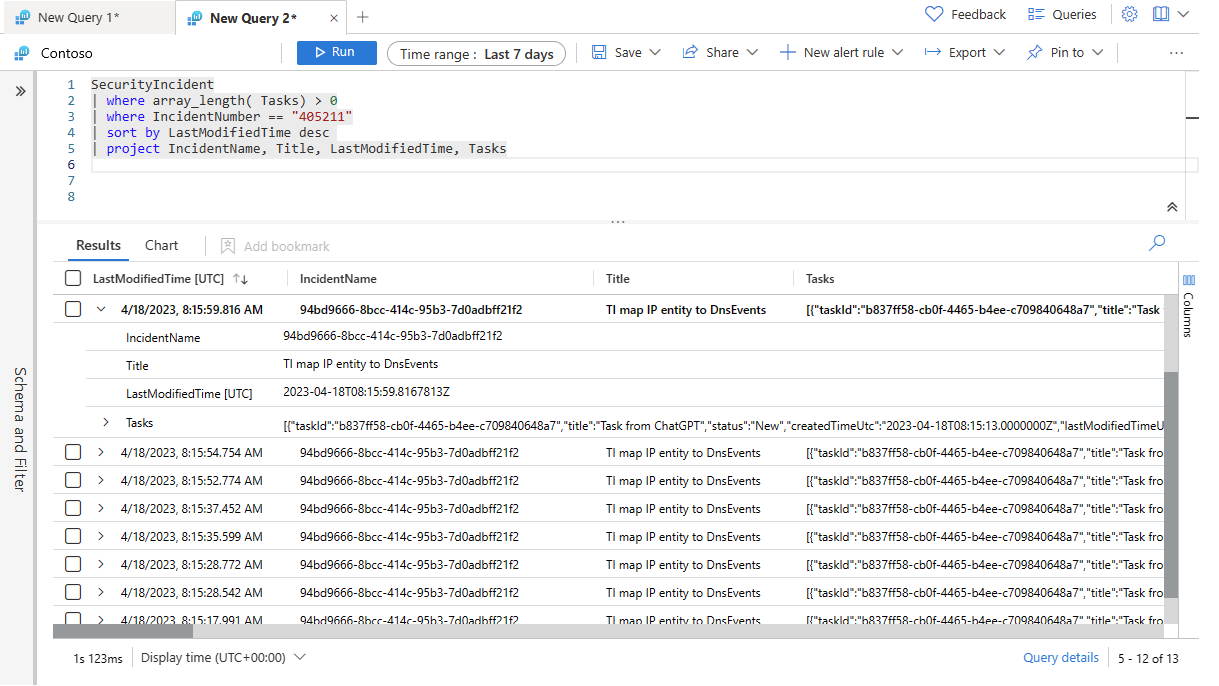
| project IncidentName, Title, LastModifiedTime, Tasks
Let's look at the most recent record for this incident, and find the list of tasks associated with it.
Select the expander next to the top row in the query results (which have been sorted in descending order of recency).
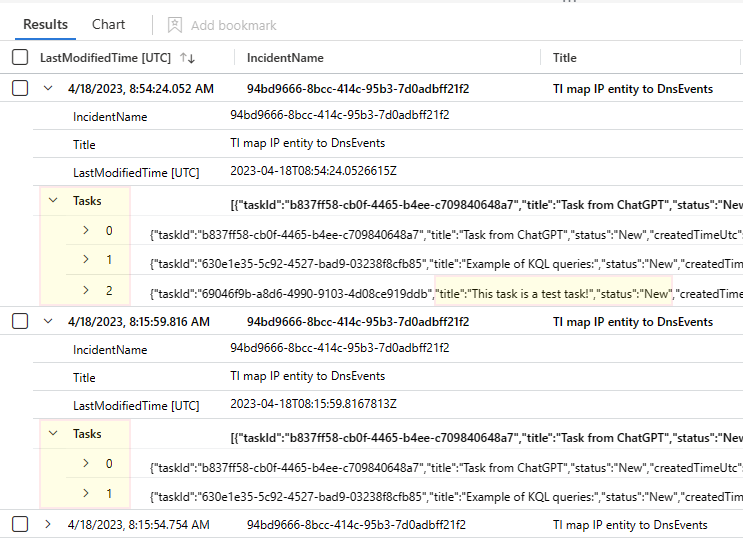
The Tasks field is an array of the current state of all the tasks in this incident. Select the expander to view each item in the array in its own row.
Now you see that there are two tasks in this incident. Each one is represented in turn by an expandable array. Select a single task's expander to view its information.
Here you see the details for the first task in the array ("0" being the index position of the task in the array). The title field shows the name of the task as displayed in the incident.
View tasks added to the list
Let's add a task to the incident, and then we'll come back here, run the query again, and see the changes in the results.
On the Incidents page, enter the incident ID number in the Search bar.
Open the incident details page and select Tasks from the toolbar.
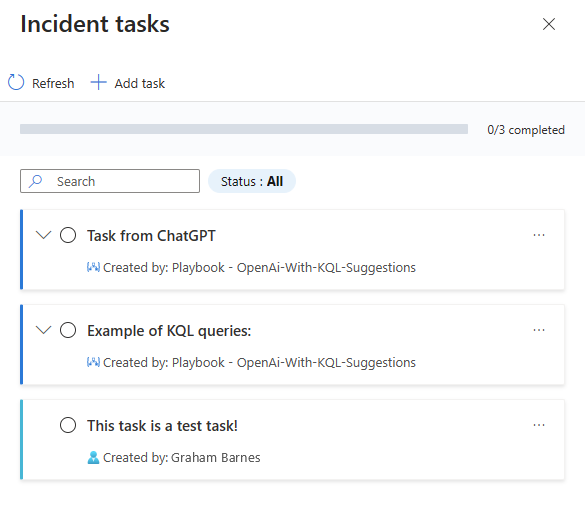
Add a new task, give it the name "This task is a test task!", then select Save. The last task shown below is what you should end up with:

Now let's return to the Logs page and run our query again.
In the results you'll see that there's a new record in the table for this same incident (note the timestamps). Expand the record and you'll see that while the record we saw before had two tasks in its Tasks array, the new one has three. The newest task is the one we just added, as you can see by its title.
View status changes to tasks
Now, if we go back to that new task in the incident details page and mark it as complete, and then come back to Logs and rerun the query again, we'll see yet another new record for the same incident, this time showing our task's new status as Completed.
View deletion of tasks
Let's go back to the task list in the incident details page and delete the task we added earlier.
When we come back to Logs and run the query yet again, we'll see another new record, only this time the status for our task—the one titled "This task is a test task!"—will be Deleted.
However— once the task has appeared one such time in the array (with a Deleted status), it will no longer appear in the Tasks array in new records for that incident in the SecurityIncident table. The existing records, like those we saw above, will continue to preserve the evidence that this task once existed.
View active tasks belonging to a closed incident
The following query allows you to see if an incident was closed but not all its assigned tasks were completed. This knowledge can help you verify that any remaining loose ends in your investigation were brought to a conclusion—all relevant parties were notified, all comments were entered, all responses were verified, and so on.
SecurityIncident
| summarize arg_max(TimeGenerated, *) by IncidentNumber
| where Status == 'Closed'
| mv-expand Tasks
| evaluate bag_unpack(Tasks)
| summarize arg_max(lastModifiedTimeUtc, *) by taskId
| where status !in ('Completed', 'Deleted')
| project TaskTitle = ['title'], TaskStatus = ['status'], createdTimeUtc, lastModifiedTimeUtc = column_ifexists("lastModifiedTimeUtc", datetime(null)), TaskCreator = ['createdBy'].name, lastModifiedBy, IncidentNumber, IncidentOwner = Owner.userPrincipalName
| sort by lastModifiedTimeUtc desc
See more information on the following items used in the preceding examples, in the Kusto documentation:
For more information on KQL, see Kusto Query Language (KQL) overview.
Other resources:
Next steps
- Learn more about incident tasks.
- Learn how to investigate incidents.
- Learn how to add tasks to groups of incidents automatically using automation rules or playbooks, and when to use which.
- Learn more about automation rules and how to create them.
- Learn more about playbooks and how to create them.


