Set up and manage an exchange peering
In this article, you learn how to set up and manage an exchange peering in Azure Peering Service.
Create an exchange peering
To provision an exchange peering:
- Review the Microsoft peering policy to understand the requirements for exchange peering.
- Find a Microsoft peering location and peering facility ID on PeeringDB.
- Request exchange peering for a peering location by using the instructions in Create and modify an exchange peering.
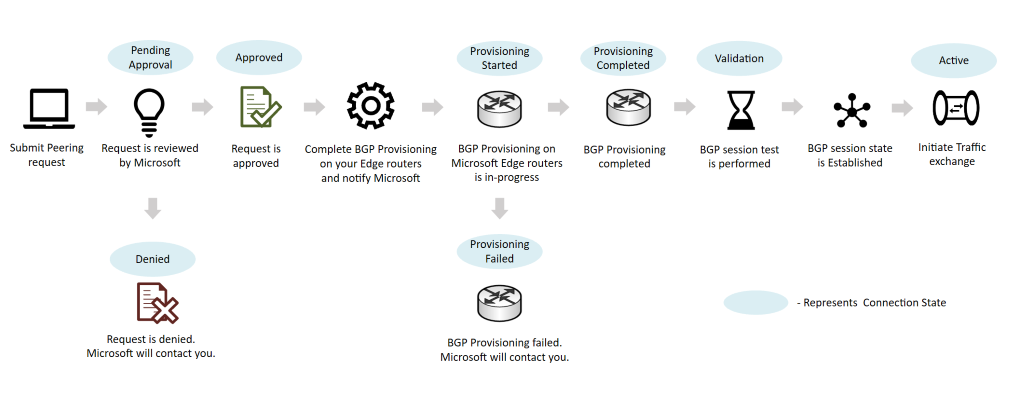
- After you submit a peering request, Microsoft reviews the request and contacts you if necessary.
- When the peering request is approved, the connection state changes to Approved.
- Configure a Border Gateway Protocol (BGP) on your end and notify Microsoft.
- Microsoft provisions the BGP session with a DENY ALL policy and completes an end-to-end session validation.
- If validation is successful, you receive a notification that the peering connection state is Active.
Traffic is then allowed through the new peering.
Note
Connection states are different from standard BGP session states.
Convert a legacy exchange peering to Azure resource
To convert a legacy exchange peering to an Azure resource:
- Complete the steps in Convert a legacy exchange peering to Azure resource.
- After you submit the conversion request, Microsoft reviews the request and contacts you if necessary.
- When the conversion is approved, you see your exchange peering with a connection state of Active.
Deprovision an exchange peering
To deprovision an exchange peering, contact the Microsoft peering team.
When an exchange peering is set for deprovision, the connection state changes to PendingRemove.
Important
If you run PowerShell cmdlet to delete the exchange peering when the connection state is ProvisioningStarted or ProvisioningCompleted, the operation fails.
Related content
- Learn about the prerequisites to set up peering with Microsoft.
- Learn about peering policy.
