Tutorial: Create an alias record to refer to a zone resource record
Alias records can reference other record sets of the same type. For example, you can have a DNS CNAME record set be an alias to another CNAME record set of the same type. This capability is useful if you want to have some record sets as aliases and some as non-aliases in terms of behavior.
In this tutorial, you learn how to:
- Create a resource record in the zone.
- Create an alias record for the resource record.
- Test the alias record.
If you don’t have an Azure subscription, create a free account before you begin.
Prerequisites
- An Azure account with an active subscription.
- A domain name hosted in Azure DNS. If you don't have an Azure DNS zone, you can create a DNS zone, then delegate your domain to Azure DNS.
Note
In this tutorial, contoso.com is used as an example domain name. Replace contoso.com with your own domain name.
Sign in to Azure
Sign in to the Azure portal.
Create an alias record
Create an alias record that points to a resource record in the zone.
Create the target resource record
In the Azure portal, enter contoso.com in the search box at the top of the portal, and then select contoso.com DNS zone from the search results.
In the Overview page, select the + Record set button.
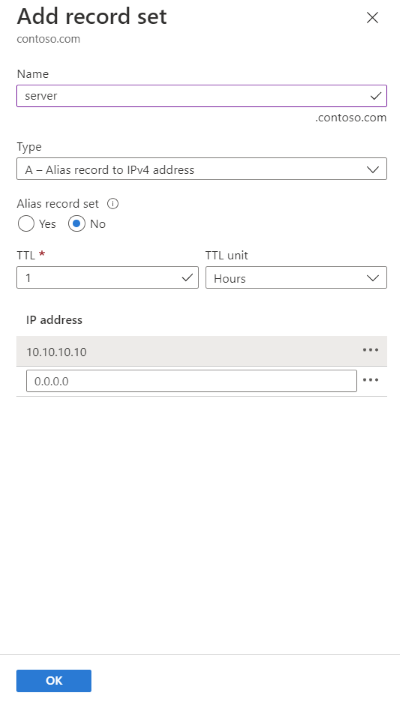
In the Add record set, enter server in the Name.
Select A for the Type.
Enter 10.10.10.10 in the IP address.
Select OK.
Create the alias record
In the Overview page of contoso.com DNS zone, select the + Record set button.
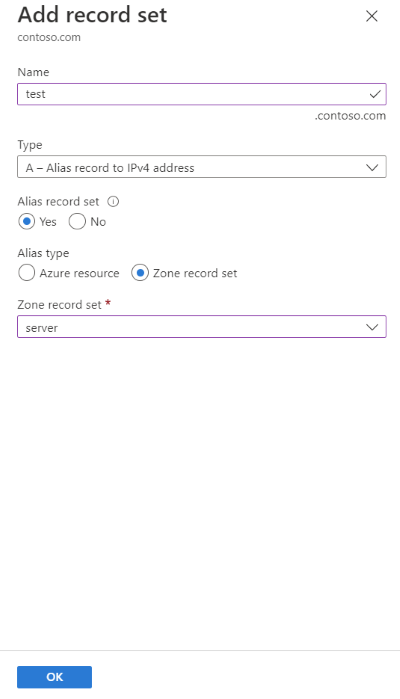
In the Add record set, enter test in the Name.
Select A for the Type.
Select Yes for the Alias record set, and then select the Zone record set for the Alias type.
Select the server record for the Zone record set.
Select OK.
Test the alias record
After adding the alias record, you can verify that it's working by using a tool such as nslookup to query the test A record.
Tip
You may need to wait at least 10 minutes after you add a record to successfully verify that it's working. It can take a while for changes to propagate through the DNS system.
From a command prompt, enter the
nslookupcommand:nslookup test.contoso.comVerify that the response looks similar to the following output:
Server:  UnKnown
Address:  203.0.113.10

Name:    test.contoso.com
Address:  10.10.10.10
In the Overview page of contoso.com DNS zone, select the server record, and then enter 10.11.11.11 in the IP address.
Select Save.
Wait a few minutes, and then use the
nslookupcommand again. Verify the response changed to reflect the new IP address:Server: UnKnown Address: 203.0.113.10 Name: test.contoso.com Address: 10.11.11.11
Clean up resources
When no longer needed, you can delete all records created in this tutorial by following these steps:
- On the Azure portal menu, select All resources.
- Select contoso.com DNS zone.
- On the Overview page, select the server record.
- Select Delete and then Yes.
- Repeat last two steps with test record.
Next steps
In this tutorial, you learned the basic steps to create an alias record to refer to a resource record within the Azure DNS zone. To learn how to create an alias record that references an Azure public IP address resource, continue with the next tutorial:

