Scale Azure OpenAI for JavaScript chat using RAG with Azure Container Apps
Learn how to add load balancing to your application to extend the chat app beyond the Azure OpenAI token and model quota limits. This approach uses Azure Container Apps to create three Azure OpenAI endpoints, as well as a primary container to direct incoming traffic to one of the three endpoints.
This article requires you to deploy two separate samples:
Chat app
If you haven't deployed the chat app yet, wait until after the load balancer sample is deployed.
If you have already deployed the chat app once, you'll change the environment variable to support a custom endpoint for the load balancer and redeploy it again.
Chat app available in these languages:
Load balancer app
Note
This article uses one or more AI app templates as the basis for the examples and guidance in the article. AI app templates provide you with well-maintained, easy to deploy reference implementations that help to ensure a high-quality starting point for your AI apps.
Architecture for load balancing Azure OpenAI with Azure Container Apps
Because the Azure OpenAI resource has specific token and model quota limits, a chat app using a single Azure OpenAI resource is prone to have conversation failures due to those limits.
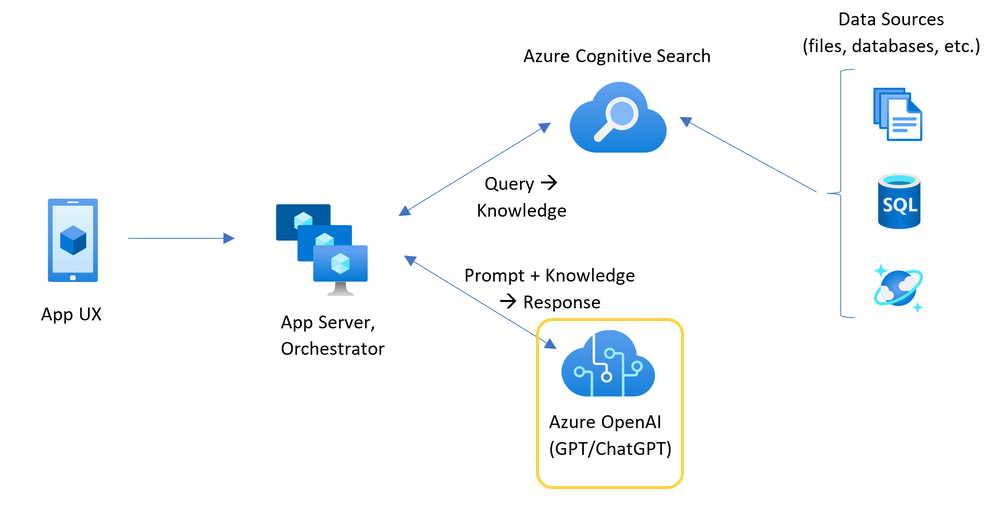
To use the chat app without hitting those limits, use a load balanced solution with Azure Container Apps. This solution seamlessly exposes a single endpoint from Azure Container Apps to your chat app server.
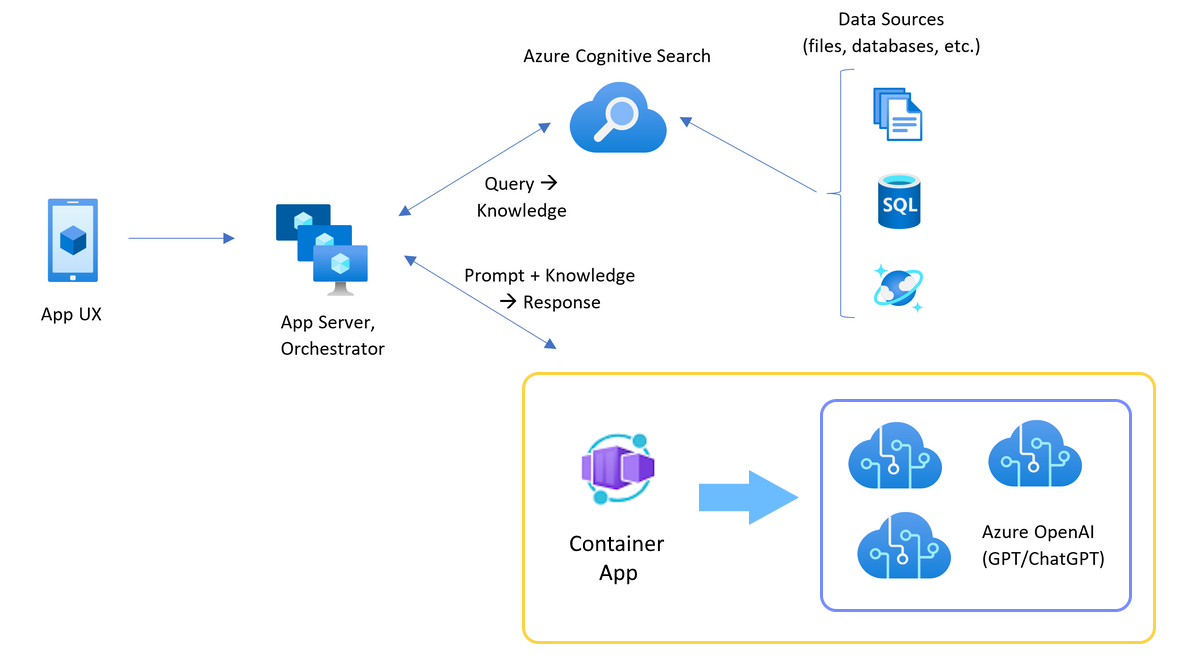
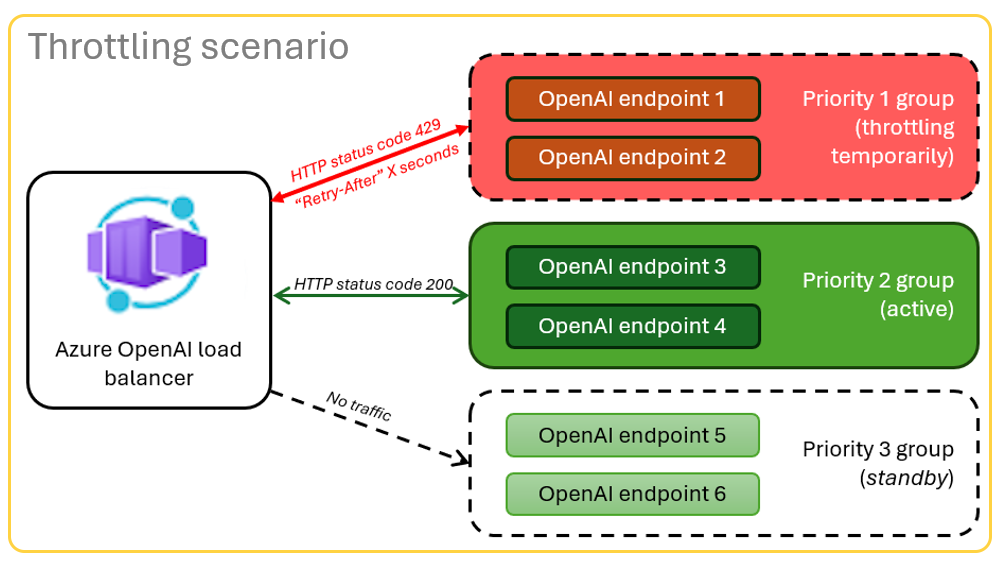
The Azure Container app sits in front of a set of Azure OpenAI resources. The Container app solves two scenarios: normal and throttled. During a normal scenario where token and model quota is available, the Azure OpenAI resource returns a 200 back through the Container App and App Server.
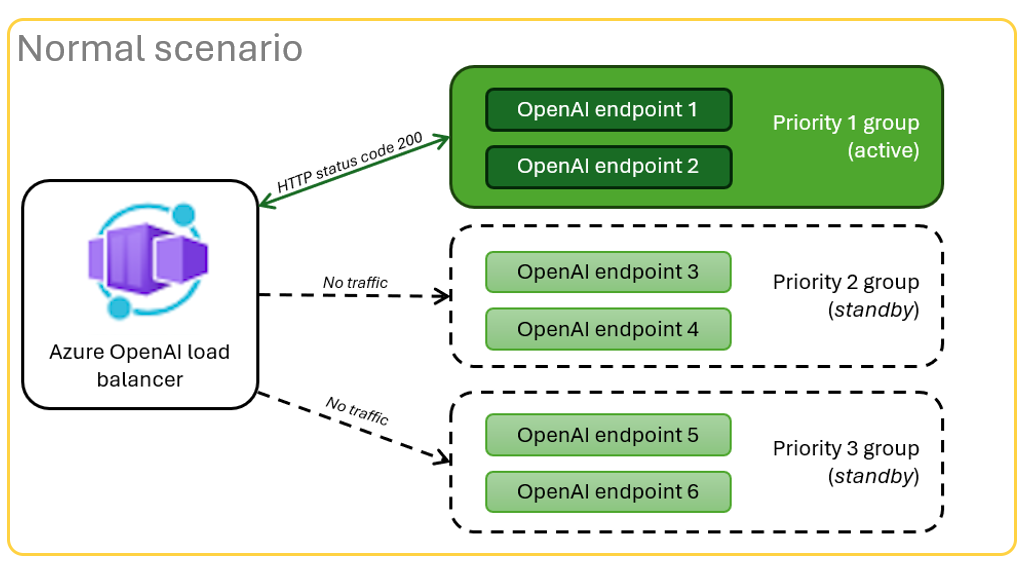
When a resource is in a throttled scenario such as due to quota limits, the Azure Container app can retry a different Azure OpenAI resource immediately to fulfill the original chat app request.
Prerequisites
Azure subscription. Create one for free
Access granted to Azure OpenAI in the desired Azure subscription.
Currently, access to this service is granted only by application. You can apply for access to Azure OpenAI by completing the form at https://aka.ms/oai/access.
Dev containers are available for both samples, with all dependencies required to complete this article. You can run the dev containers in GitHub Codespaces (in a browser) or locally using Visual Studio Code.
- GitHub account
Open Container apps local balancer sample app
GitHub Codespaces runs a development container managed by GitHub with Visual Studio Code for the Web as the user interface. For the most straightforward development environment, use GitHub Codespaces so that you have the correct developer tools and dependencies preinstalled to complete this article.
Important
All GitHub accounts can use Codespaces for up to 60 hours free each month with 2 core instances. For more information, see GitHub Codespaces monthly included storage and core hours.
Deploy Azure Container Apps load balancer
Sign in to the Azure Developer CLI to provide authentication to the provisioning and deployment steps.
azd auth login --use-device-codeSet an environment variable to use Azure CLI authentication to the post provision step.
azd config set auth.useAzCliAuth "true"Deploy the load balancer app.
azd upYou'll need to select a subscription and region for the deployment. These don't have to be the same subscription and region as the chat app.
Wait for the deployment to complete before continuing.
Get the deployment endpoint
Use the following command to display the deployed endpoint for the Azure Container app.
azd env get-valuesCopy the
CONTAINER_APP_URLvalue. You will use it in the next section.
Redeploy Chat app with load balancer endpoint
These are completed on the chat app sample.
Open the chat app sample's dev container using one of the following choices.
Language Codespaces Visual Studio Code .NET JavaScript Python Sign in to Azure Developer CLI (AZD).
azd auth loginFinish the sign in instructions.
Create an AZD environment with a name such as
chat-app.azd env new <name>Add the following environment variable, which tells the Chat app's backend to use a custom URL for the OpenAI requests.
azd env set OPENAI_HOST azure_customAdd the following environment variable, substituting
<CONTAINER_APP_URL>for the URL from the previous section. This action tells the Chat app's backend what the value is of the custom URL for the OpenAI request.azd env set AZURE_OPENAI_CUSTOM_URL <CONTAINER_APP_URL>Deploy the chat app.
azd up
You can now use the chat app with the confidence that it's built to scale across many users without running out of quota.
Stream logs to see the load balancer results
In the Azure portal, search your resource group.
From the list of resources in the group, select the Container App resource.
Select Monitoring -> Log stream to view the log.
Use the chat app to generate traffic in the log.
Look for the logs, which reference the Azure OpenAI resources. Each of the three resources has its numeric identity in the log comment beginning with
Proxying to https://openai3, where3indicates the third Azure OpenAI resource.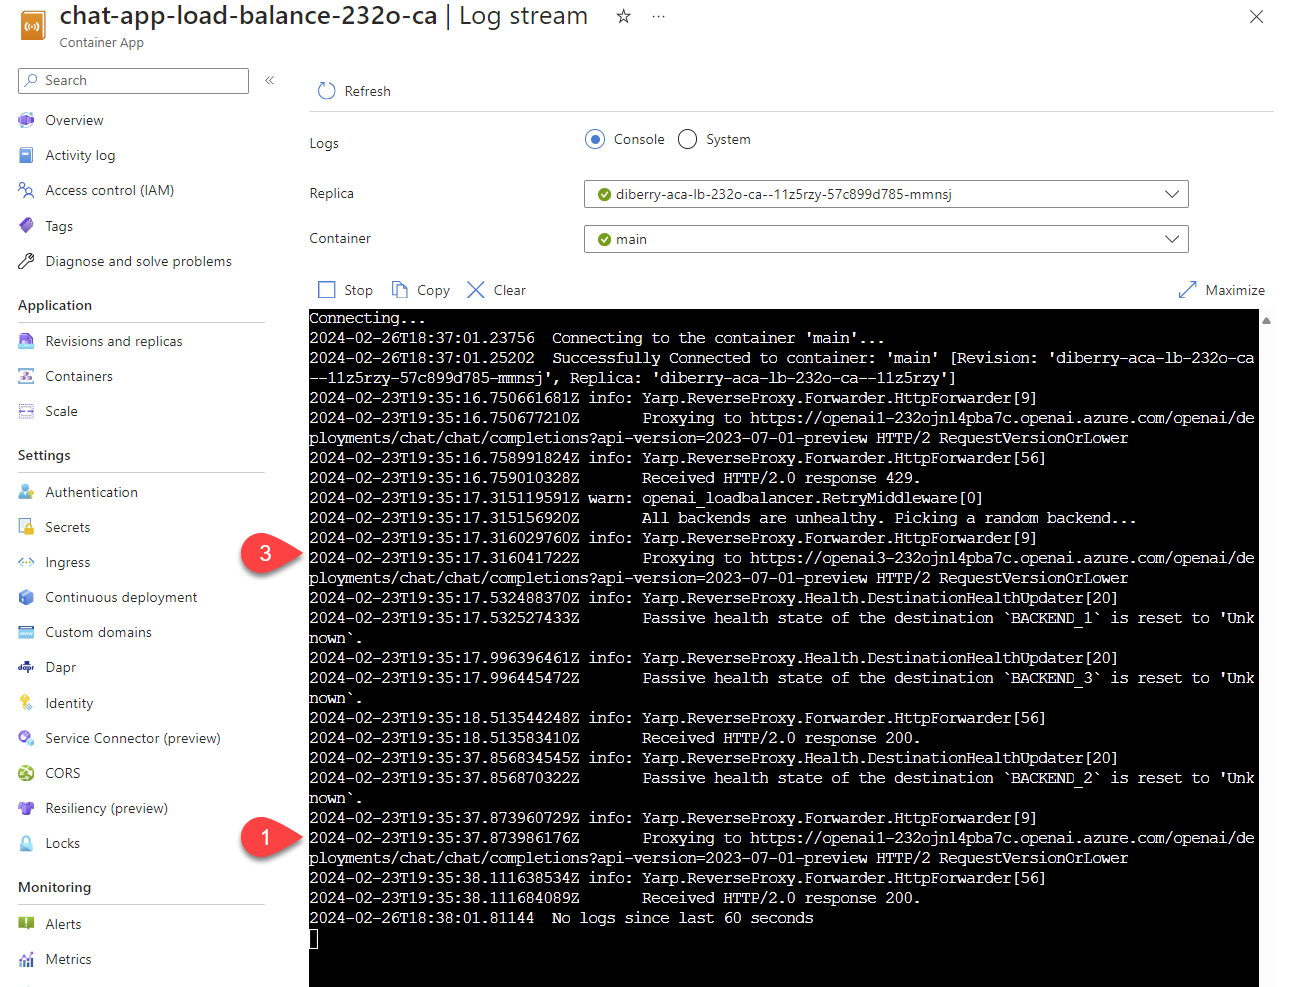
As you use the chat app, when the load balancer receives status that the request has exceeded quota, the load balancer automatically rotates to another resource.
Configure the TPM quota
By default, each of the Azure OpenAI instances in the load balancer is deployed with a capacity of 30,000 tokens per minute (TPM). You can use the chat app with the confidence that it's built to scale across many users without running out of quota. Change this value when:
- You get deployment capacity errors: Lower the value.
- You need higher capacity: Raise the value.
Use the following command to change the value:
azd env set OPENAI_CAPACITY 50Redeploy the load balancer:
azd up
Clean up resources
When you're done with both the chat app and the load balancer, clean up the resources. The Azure resources created in this article are billed to your Azure subscription. If you don't expect to need these resources in the future, delete them to avoid incurring more charges.
Clean up chat app resources
Return to the chat app article to clean up those resources.
Clean upload balancer resources
Run the following Azure Developer CLI command to delete the Azure resources and remove the source code:
azd down --purge --force
The switches provide:
purge: Deleted resources are immediately purged. This allows you to reuse the Azure OpenAI TPM.force: The deletion happens silently, without requiring user consent.
Clean up GitHub Codespaces
Deleting the GitHub Codespaces environment ensures that you can maximize the amount of free per-core hours entitlement you get for your account.
Important
For more information about your GitHub account's entitlements, see GitHub Codespaces monthly included storage and core hours.
Sign into the GitHub Codespaces dashboard (https://github.com/codespaces).
Locate your currently running Codespaces sourced from the
azure-samples/openai-aca-lbGitHub repository.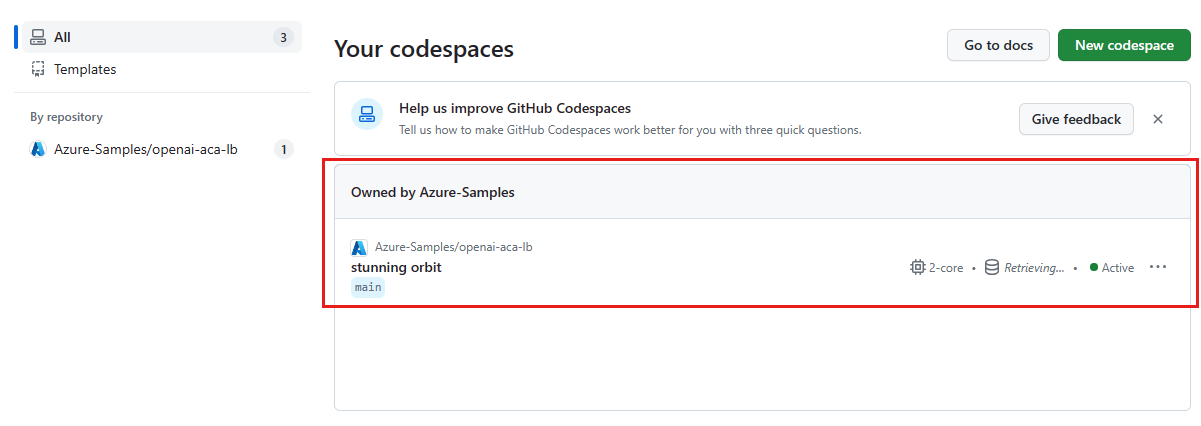
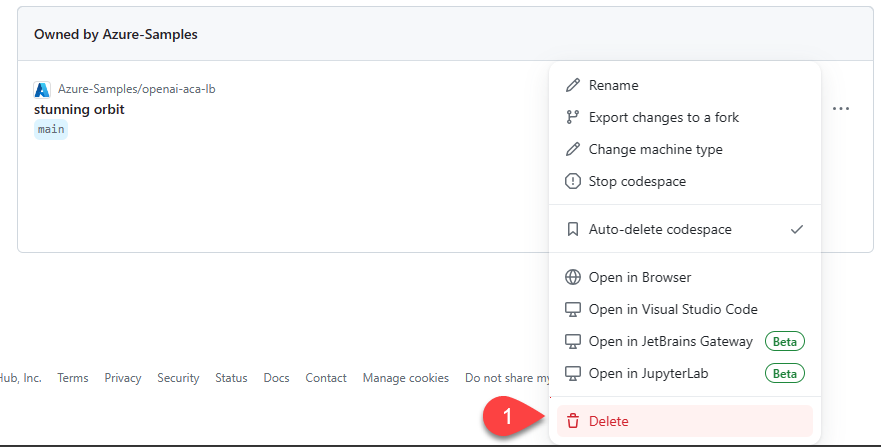
Open the context menu for the codespace and then select Delete.
Get help
If you have trouble deploying the Azure API Management load balancer, log your issue to the repository's Issues.
Sample code
Samples used in this article include:
Next step
- Use Azure Load Testing to load test your chat app with

