Configure passwordless database connections for Java apps on Oracle WebLogic Server
This article shows you how to configure passwordless database connections for Java apps on Oracle WebLogic Server offers with the Azure portal.
In this guide, you accomplish the following tasks:
- Provision database resources using Azure CLI.
- Enable the Microsoft Entra administrator in the database.
- Provision a user-assigned managed identity and create a database user for it.
- Configure a passwordless database connection in Oracle WebLogic offers with the Azure portal.
- Validate the database connection.
The offers support passwordless connections for PostgreSQL, MySQL, and Azure SQL databases.
Prerequisites
An Azure subscription. If you don't have an Azure subscription, create a free account before you begin.
Use Azure Cloud Shell using the Bash environment. Make sure the Azure CLI version is 2.43.0 or higher.
If you prefer, install the Azure CLI 2.43.0 or higher to run Azure CLI commands.
- If you're using a local install, sign in with Azure CLI by using the
az logincommand. To finish the authentication process, follow the steps displayed in your terminal. See Sign in with Azure CLI for other sign-in options. - When you're prompted, install Azure CLI extensions on first use. For more information about extensions, see Use extensions with Azure CLI.
- Run
az versionto find the version and dependent libraries that are installed. To upgrade to the latest version, runaz upgrade.
- If you're using a local install, sign in with Azure CLI by using the
Ensure the Azure identity you use to sign in and complete this article has either the Owner role in the current subscription or the Contributor and User Access Administrator roles in the current subscription. For an overview of Azure roles, see What is Azure role-based access control (Azure RBAC)? For details on the specific roles required by Oracle WebLogic marketplace offer, see Azure built-in roles.
Create a resource group
Create a resource group with az group create. Because resource groups must be unique within a subscription, pick a unique name. An easy way to have unique names is to use a combination of your initials, today's date, and some identifier - for example, abc1228rg. This example creates a resource group named abc1228rg in the eastus location:
export RESOURCE_GROUP_NAME="abc1228rg"
az group create \
    --name ${RESOURCE_GROUP_NAME} \
    --location eastus
Create a database server and a database
Create a flexible server with the az mysql flexible-server create command. This example creates a flexible server named mysql20221201 with admin user azureuser and admin password Secret123456. Replace the password with yours. For more information, see Create an Azure Database for MySQL Flexible Server using Azure CLI.
export MYSQL_NAME="mysql20221201"
export MYSQL_ADMIN_USER="azureuser"
export MYSQL_ADMIN_PASSWORD="Secret123456"

az mysql flexible-server create \
    --resource-group $RESOURCE_GROUP_NAME \
    --name $MYSQL_NAME \
    --location eastus \
    --admin-user $MYSQL_ADMIN_USER \
    --admin-password $MYSQL_ADMIN_PASSWORD \
    --public-access 0.0.0.0 \
    --tier Burstable \
    --sku-name Standard_B1ms
Create a database with az mysql flexible-server db create.
export DATABASE_NAME="contoso"

# create mysql database
az mysql flexible-server db create \
    --resource-group $RESOURCE_GROUP_NAME \
    --server-name $MYSQL_NAME \
    --database-name $DATABASE_NAME
When the command completes, you should see output similar to the following example:
Creating database with utf8 charset and utf8_general_ci collation
{
  "charset": "utf8",
  "collation": "utf8_general_ci",
  "id": "/subscriptions/contoso-hashcode/resourceGroups/abc1228rg/providers/Microsoft.DBforMySQL/flexibleServers/mysql20221201/databases/contoso",
  "name": "contoso",
  "resourceGroup": "abc1228rg",
  "systemData": null,
  "type": "Microsoft.DBforMySQL/flexibleServers/databases"
}
Configure a Microsoft Entra administrator for your database
Now that you created the database, you need to make it ready to support passwordless connections. A passwordless connection requires a combination of managed identities for Azure resources and Microsoft Entra authentication. For an overview of managed identities for Azure resources, see What are managed identities for Azure resources?
For information on how MySQL Flexible Server interacts with managed identities, see the Azure Database for MySQL documentation.
The following example configures the current Azure CLI user as a Microsoft Entra administrator account. To enable Azure authentication, it's necessary to assign an identity to MySQL Flexible Server.
First, create a managed identity with az identity create and assign the identity to MySQL server with az mysql flexible-server identity assign.
export MYSQL_UMI_NAME="id-mysql-aad-20221205"

# create a User Assigned Managed Identity for MySQL to be used for AAD authentication
az identity create \
    --resource-group $RESOURCE_GROUP_NAME \
    --name $MYSQL_UMI_NAME

## assign the identity to the MySQL server
az mysql flexible-server identity assign \
    --resource-group $RESOURCE_GROUP_NAME \
    --server-name $MYSQL_NAME \
    --identity $MYSQL_UMI_NAME
Then, set the current Azure CLI user as the Microsoft Entra administrator account with az mysql flexible-server ad-admin create.
export CURRENT_USER=$(az account show --query user.name --output tsv)
export CURRENT_USER_OBJECTID=$(az ad signed-in-user show --query id --output tsv)

az mysql flexible-server ad-admin create \
    --resource-group $RESOURCE_GROUP_NAME \
    --server-name $MYSQL_NAME \
    --object-id $CURRENT_USER_OBJECTID \
    --display-name $CURRENT_USER \
    --identity $MYSQL_UMI_NAME
Create a user-assigned managed identity
Next, in Azure CLI, create an identity in your subscription by using the az identity create command. You use this managed identity to connect to your database.
az identity create \
    --resource-group ${RESOURCE_GROUP_NAME} \
    --name myManagedIdentity
To configure the identity in the following steps, use the az identity show command to store the identity's client ID in a shell variable.
# Get client ID of the user-assigned identity
export CLIENT_ID=$(az identity show \
    --resource-group ${RESOURCE_GROUP_NAME} \
    --name myManagedIdentity \
    --query clientId \
    --output tsv)
Create a database user for your managed identity
First, you're required to create a firewall rule to access the database server from your CLI client. Run the following commands to get your current IP address:
export MY_IP=$(curl http://whatismyip.akamai.com)
If you're working on Windows Subsystem for Linux (WSL) with VPN enabled, the following command might return an incorrect IPv4 address. One way to get your IPv4 address is by visiting whatismyipaddress.com. Set the environment variable MY_IP as the IPv4 address from which you want to connect to the database. You configure the database firewall with this IP address later.
Connect as the Microsoft Entra administrator user to your MySQL database, and create a MySQL user for your managed identity.
Create a temporary firewall rule with az mysql flexible-server firewall-rule create.
az mysql flexible-server firewall-rule create \
    --resource-group $RESOURCE_GROUP_NAME \
    --name $MYSQL_NAME \
    --rule-name AllowCurrentMachineToConnect \
    --start-ip-address ${MY_IP} \
    --end-ip-address ${MY_IP}
Next, prepare an SQL file to create a database user for the managed identity. The following example adds a user with login name identity-contoso and grants the user privileges to access database contoso:
export IDENTITY_LOGIN_NAME="identity-contoso"

cat <<EOF >createuser.sql
SET aad_auth_validate_oids_in_tenant = OFF;
DROP USER IF EXISTS '${IDENTITY_LOGIN_NAME}'@'%';
CREATE AADUSER '${IDENTITY_LOGIN_NAME}' IDENTIFIED BY '${CLIENT_ID}';
GRANT ALL PRIVILEGES ON ${DATABASE_NAME}.* TO '${IDENTITY_LOGIN_NAME}'@'%';
FLUSH privileges;
EOF
Execute the SQL file with the command az mysql flexible-server execute. You can retrieve your access token with the command az account get-access-token.
export RDBMS_ACCESS_TOKEN=$(az account get-access-token \
    --resource-type oss-rdbms \
    --query accessToken \
    --output tsv)

az mysql flexible-server execute \
    --name ${MYSQL_NAME} \
    --admin-user ${CURRENT_USER} \
    --admin-password ${RDBMS_ACCESS_TOKEN} \
    --file-path "createuser.sql"
You might be prompted to install the rdbms-connect extension, as shown in the following output. Press y to continue. If you're not working with the root user, you need to input the user password.
The command requires the extension rdbms-connect. Do you want to install it now? The command will continue to run after the extension is installed. (Y/n): y
Run 'az config set extension.use_dynamic_install=yes_without_prompt' to allow installing extensions without prompt.
This extension depends on gcc, libpq-dev, python3-dev and they will be installed first.
[sudo] password for user:
If the SQL file executes successfully, your output is similar to the following example:
Running *.sql* file 'createuser.sql'...
Successfully executed the file.
Closed the connection to mysql20221201
The managed identity myManagedIdentity now has access to the database when authenticating with the username identity-contoso.
If you no longer want to access the server from this IP address, you can remove the firewall rule by using the following command:
az mysql flexible-server firewall-rule delete \
    --resource-group $RESOURCE_GROUP_NAME \
    --name $MYSQL_NAME \
    --rule-name AllowCurrentMachineToConnect \
    --yes
Finally, use the following command to get the connection string that you use in the next section:
export CONNECTION_STRING="jdbc:mysql://${MYSQL_NAME}.mysql.database.azure.com:3306/${DATABASE_NAME}?useSSL=true"
echo ${CONNECTION_STRING}
Configure a passwordless database connection for Oracle WebLogic Server on Azure VMs
This section shows you how to configure the passwordless data source connection using the Azure Marketplace offers for Oracle WebLogic Server.
First, begin the process of deploying an offer. The following offers support passwordless database connections:
- Oracle WebLogic Server on Azure Kubernetes Service (AKS)
- Oracle WebLogic Server Cluster on VMs
- Oracle WebLogic Server with Admin Server on VMs
- Oracle WebLogic Server Dynamic Cluster on VMs
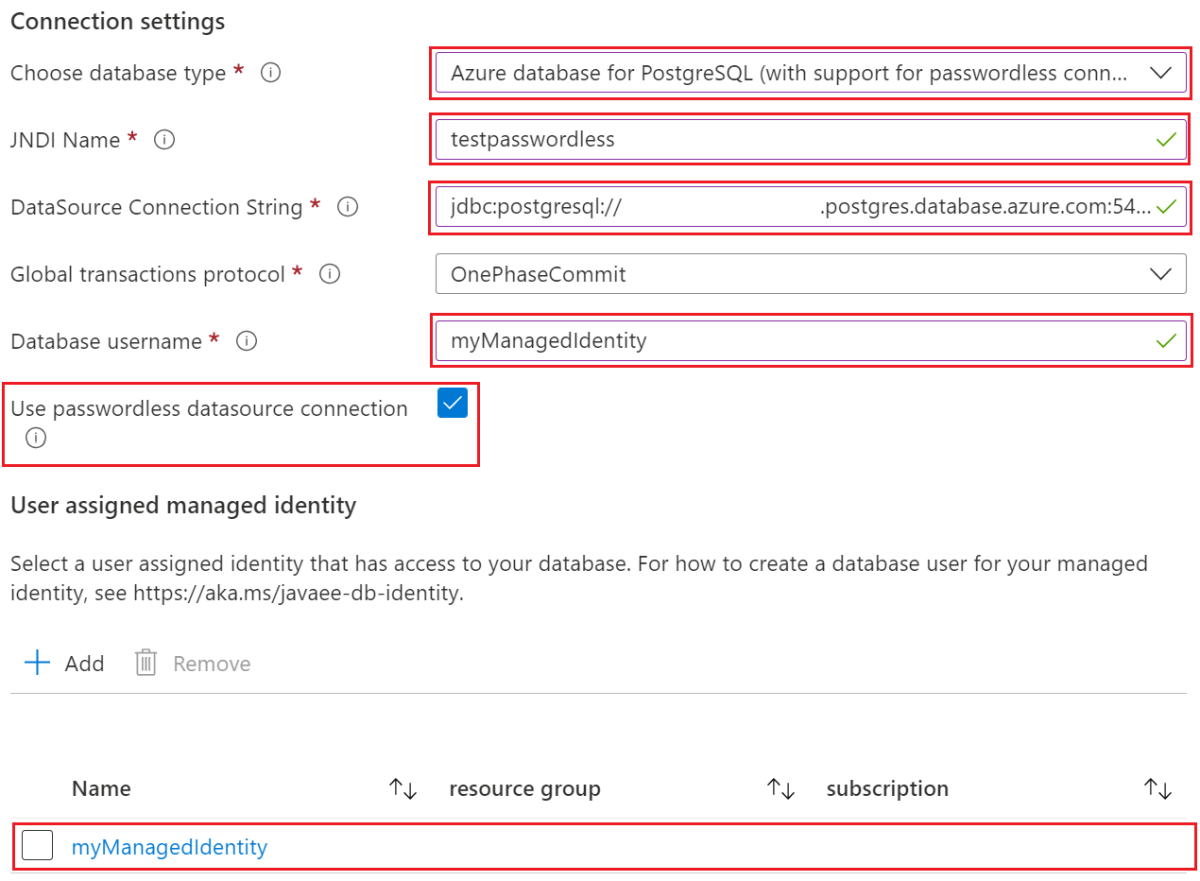
Enter the required information in the Basics pane and other panes if you want to enable the features. When you reach the Database pane, enter the passwordless configuration as shown in the following steps:
- For Connect to database?, select Yes.
- Under Connection settings, for Choose database type, from the dropdown menu select MySQL (with support for passwordless connection).
- For JNDI Name, enter testpasswordless or your expected value.
- For DataSource Connection String, enter the connection string you obtained in the last section.
- For Database username, enter the database user name of your managed identity, which is the value of
${IDENTITY_LOGIN_NAME}. In this example, the value is identity-contoso. - Select Use passwordless datasource connection.
- For User assigned managed identity, select the managed identity you created previously. In this example, its name is myManagedIdentity.
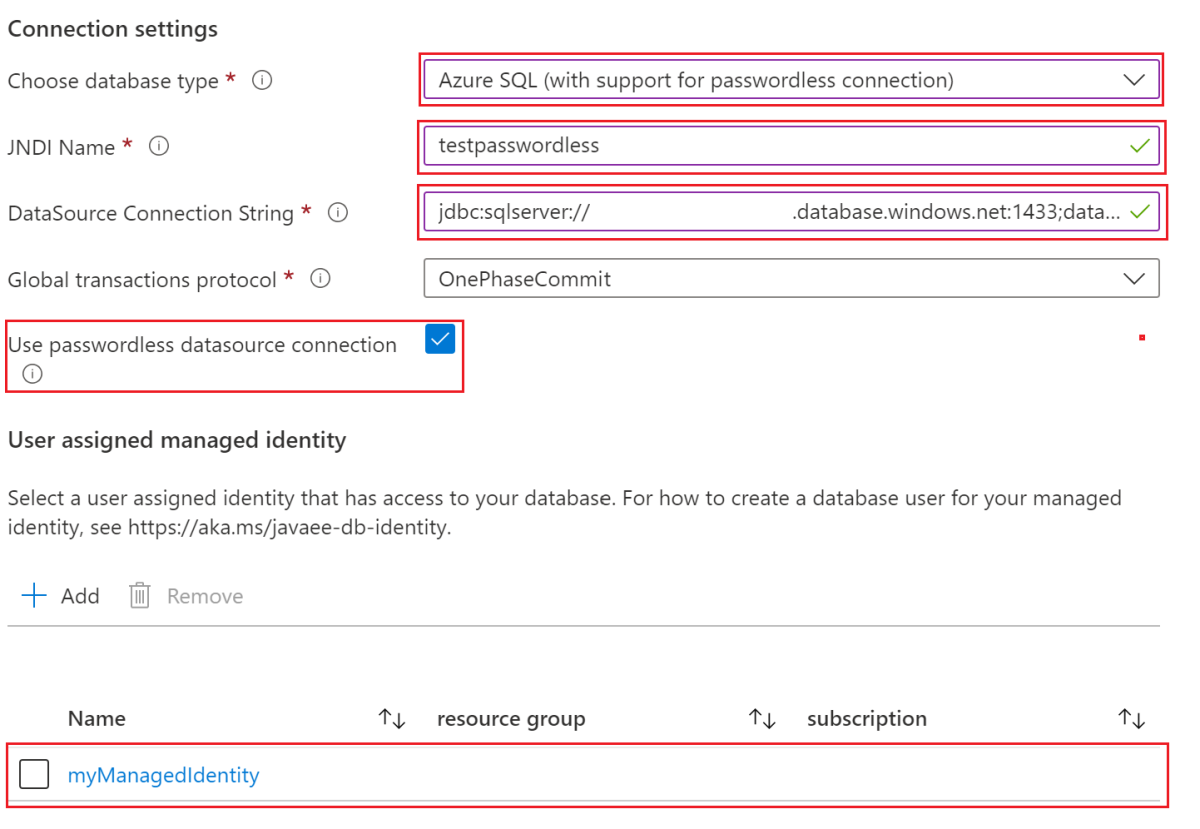
The Connection settings section should look like the following screenshot, which uses Oracle WebLogic Server Cluster on VMs as an example.
You finished configuring the passwordless connection. You can continue to fill in the following panes or select Review + create, then Create to deploy the offer.
Verify the database connection
The database connection is configured successfully if the offer deployment completes without error.
Continuing to take Oracle WebLogic Server Cluster on VMs as an example, after the deployment completes, follow these steps in the Azure portal to find the Admin console URL.
- Find the resource group in which you deployed WLS.
- Under Settings, select Deployments.
- Select the deployment with the longest Duration. This deployment should be at the bottom of the list.
- Select Outputs.
- The URL of the WebLogic Administration Console is the value of the adminConsoleUrl output.
- Copy the value of the output variable adminConsoleUrl.
- Paste the value into your browser address bar and press Enter to open the sign-in page of the WebLogic Administration Console.
Use the following steps to verify the database connection:
Sign in to the WebLogic Administration Console with the username and password you provided on the Basics pane.
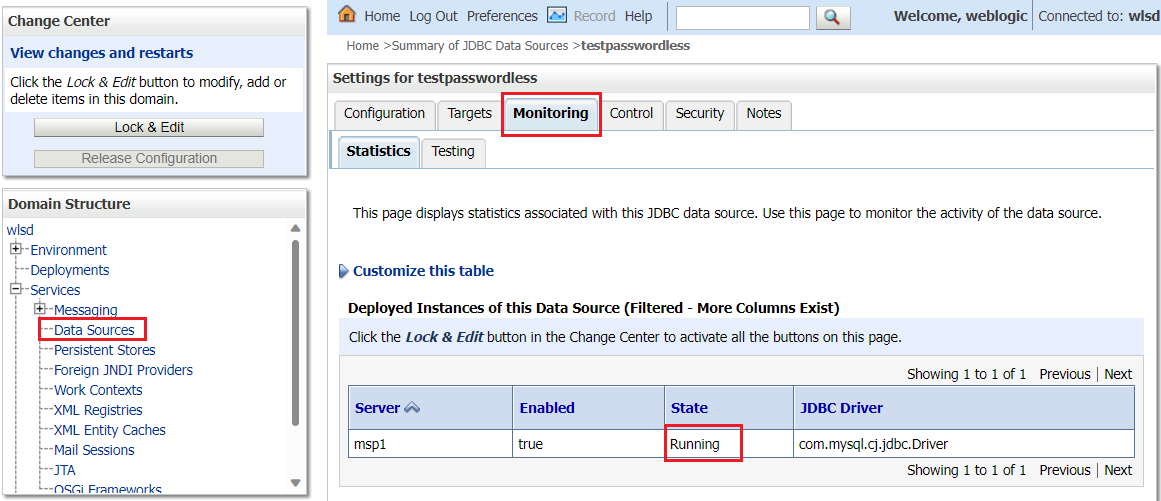
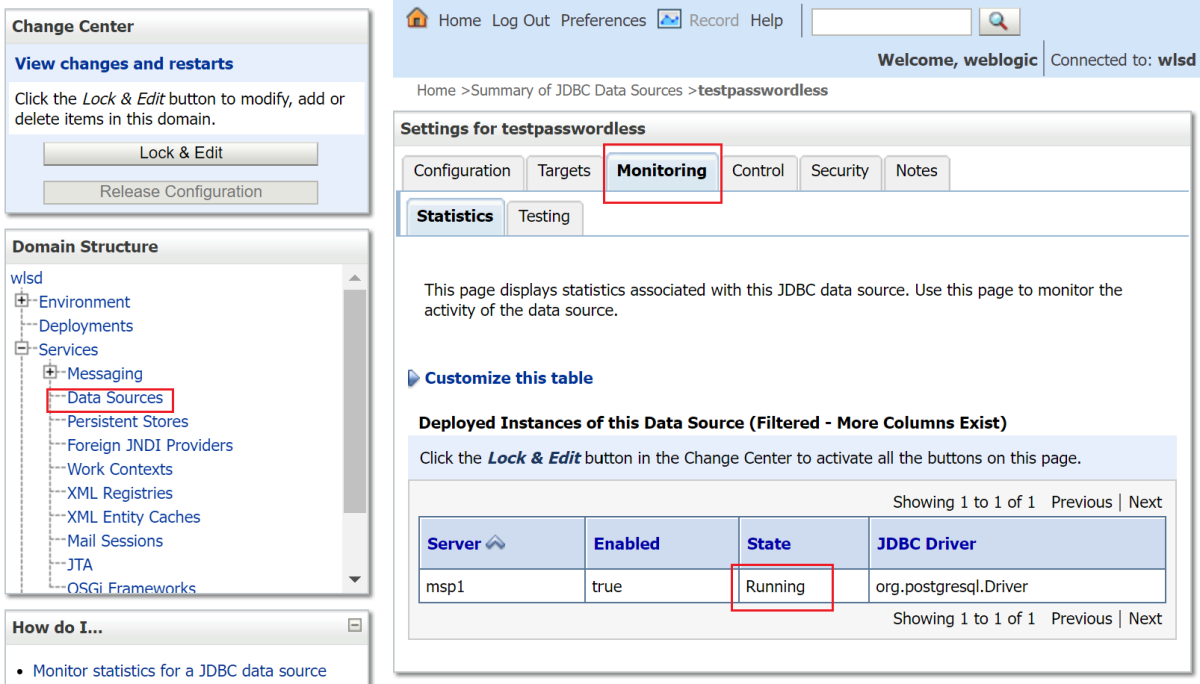
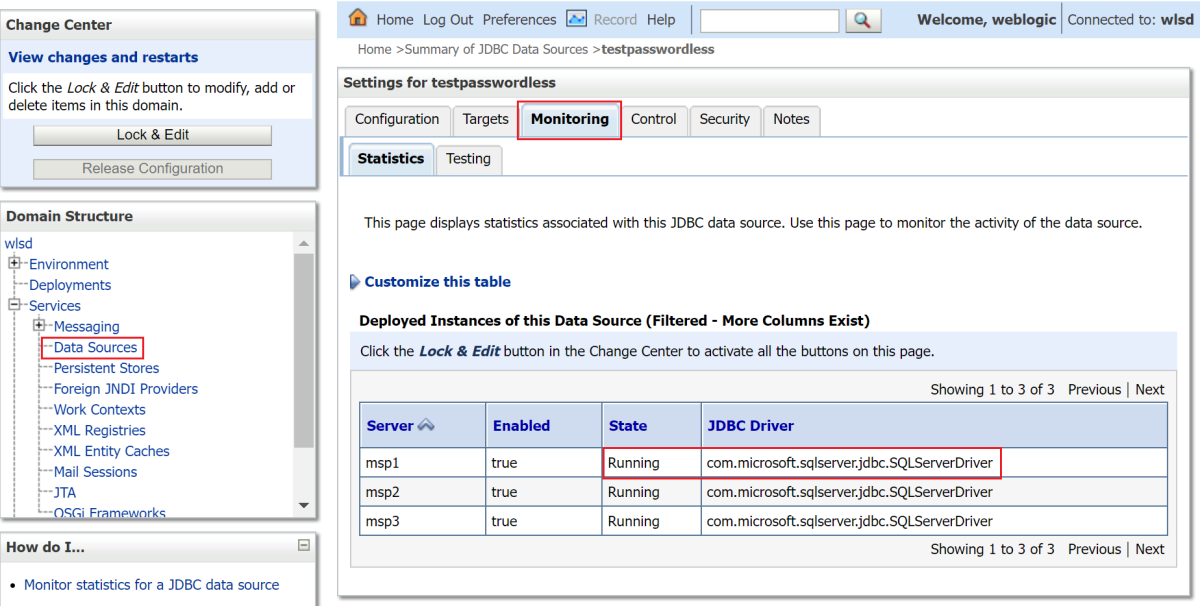
Under the Domain Structure, select Services, Data Sources, then testpasswordless.
Select the Monitoring tab, where the state of the data source is Running, as shown in the following screenshot:
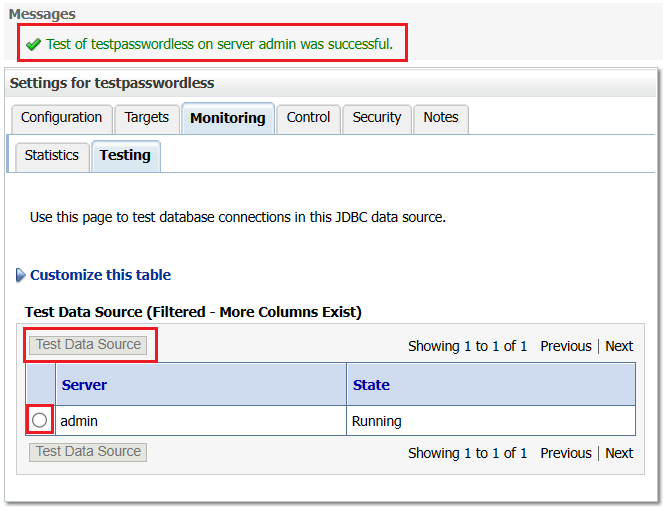
Select the Testing tab, and then select the radio button next to the desired server.
Select Test Data Source. You should see a message indicating a successful test, as shown in the following screenshot:
Clean up resources
If you don't need these resources, you can delete them by using the following commands:
az group delete --name ${RESOURCE_GROUP_NAME}
az group delete --name <resource-group-name-that-deploys-the-offer>
Next steps
Learn more about running WLS on AKS or virtual machines by following these links:


