Connect to Azure Blob Storage from workflows in Azure Logic Apps
Applies to: Azure Logic Apps (Consumption + Standard)
This how-to guide shows how to access your Azure Blob Storage account and container from a workflow in Azure Logic Apps using the Azure Blob Storage connector. This connector provides triggers and actions that your workflow can use for blob operations. You can then create automated workflows that run when triggered by events in your storage container or in other systems, and run actions to work with data in your storage container. For example, you can access and manage files stored as blobs in your Azure storage account.
You can connect to Azure Blob Storage from a workflow in Logic App (Consumption) and Logic App (Standard) resource types. You can use the connector with logic app workflows in multitenant Azure Logic Apps and single-tenant Azure Logic Apps. With Logic App (Standard), you can use either the Azure Blob built-in connector operations or the Azure Blob Storage managed connector operations.
Connector technical reference
The Azure Blob Storage connector has different versions, based on logic app type and host environment.
| Logic app | Environment | Connector version |
|---|---|---|
| Consumption | Multitenant Azure Logic Apps | Managed connector, which appears in the connector gallery under Runtime > Shared. For more information, review the following documentation: - Azure Blob Storage managed connector reference - Managed connectors in Azure Logic Apps |
| Standard | Single-tenant Azure Logic Apps and App Service Environment v3 (Windows plans only) | Managed connector (Azure-hosted), which appears in the connector gallery under Runtime > Shared, and built-in connector, which is service provider based, and appears in the connector gallery under Runtime > In App. The built-in version differs in the following ways: - The built-in version connects directly to your Azure Storage account requiring only a connection string. - The built-in version can directly access Azure virtual networks. For more information, review the following documentation: - Azure Blob Storage managed connector reference - Azure Blob built-in connector reference - Built-in connectors in Azure Logic Apps |
Limitations
Azure Blob Storage managed connector actions can read or write files that are 50 MB or smaller. To handle files larger than 50 MB but up to 1024 MB, Azure Blob Storage actions support message chunking. The Blob Storage action named Get blob content implicitly uses chunking.
While Azure Blob Storage managed and built-in triggers don't support chunking, the built-in triggers can handle files that are 50 MB or more. However, when a managed trigger requests file content, the trigger selects only files that are 50 MB or smaller. To get files larger than 50 MB, follow this pattern:
Use a Blob trigger that returns file properties, such as When a blob is added or modified (properties only).
Follow the trigger with the Azure Blob Storage managed connector action named Get blob content, which reads the complete file and implicitly uses chunking.
Azure Blob Storage trigger limits
- The managed connector trigger is limited to 30,000 blobs in the polling virtual folder.
- The built-in connector trigger is limited to 10,000 blobs in the entire polling container.
If the limit is exceeded, a new blob might not be able to trigger the workflow, so the trigger is skipped.
Prerequisites
An Azure account and subscription. If you don't have an Azure subscription, sign up for a free Azure account.
The logic app workflow from where you want to access your Azure Storage account. To start your workflow with an Azure Blob trigger, you need a blank workflow. To use an Azure Blob action, start your workflow with any trigger.
Add a Blob trigger
A Consumption logic app workflow can use only the Azure Blob Storage managed connector. However, a Standard logic app workflow can use the Azure Blob Storage managed connector and the Azure blob built-in connector. Although both connector versions provide only one Blob trigger, the trigger name differs as follows, based on whether you're working with a Consumption or Standard workflow:
| Logic app | Connector version | Trigger name | Description |
|---|---|---|---|
| Consumption | Managed connector only | When a blob is added or modified (properties only) | The trigger fires when a blob's properties are added or updated in your storage container's root folder. When you set up the managed trigger, the managed version ignores existing blobs in your storage container. |
| Standard | - Built-in connector - Managed connector |
- Built-in: When a blob is added or updated - Managed: When a blob is added or modified (properties only) |
- Built-in: The trigger fires when a blob is added or updated in your storage container, and fires for any nested folders in your storage container, not just the root folder. When you set up the built-in trigger, the built-in version processes all existing blobs in your storage container. - Managed: The trigger fires when a blob's properties are added or updated in your storage container's root folder. When you set up the managed trigger, the managed version ignores existing blobs in your storage container. |
The following steps use the Azure portal, but with the appropriate Azure Logic Apps extension, you can also use the following tools to create logic app workflows:
Consumption logic app workflows: Visual Studio Code
Standard logic app workflows: Visual Studio Code
In the Azure portal, open your Consumption logic app and blank workflow in the designer.
In the designer, under the search box, select Standard, and then follow these general steps to add the Azure Blob Storage managed trigger you want.
This example continues with the trigger named When a blob is added or modified (properties only).
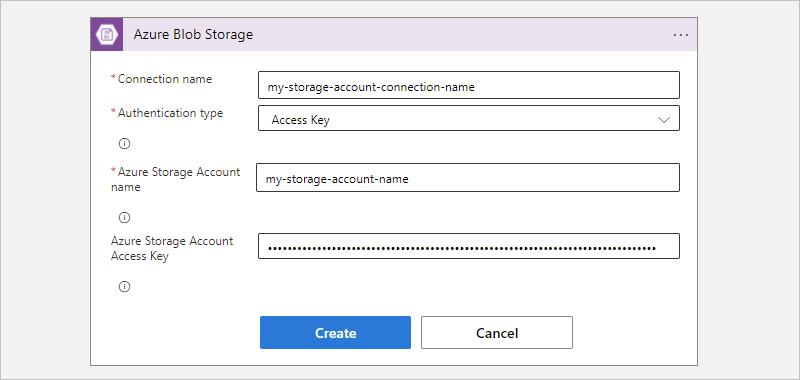
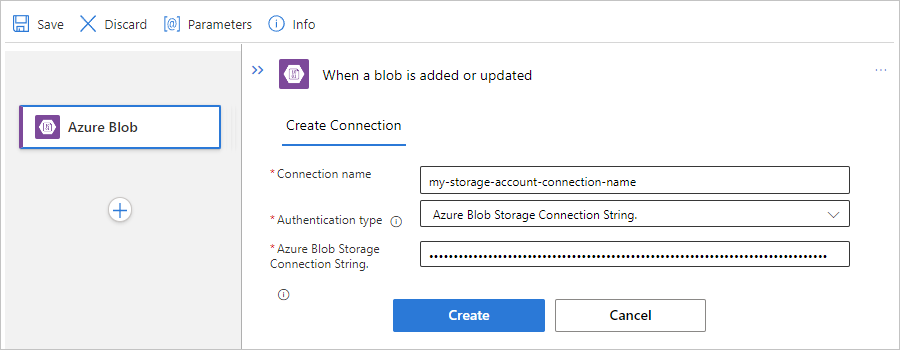
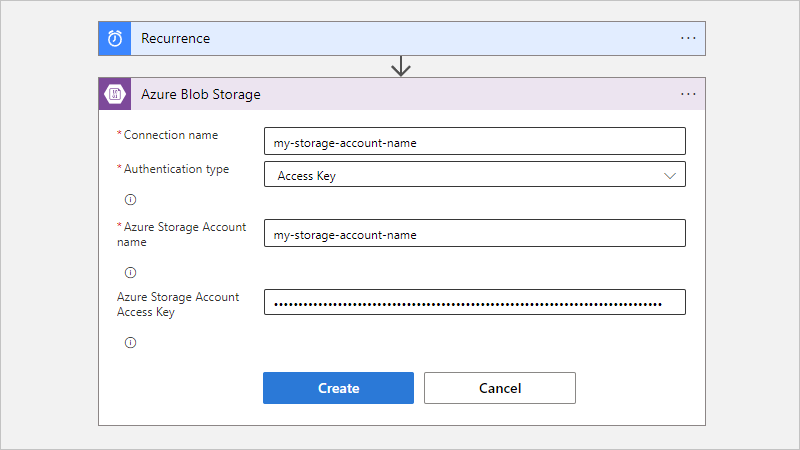
If prompted, provide the following information for your connection to your storage account. When you're done, select Create.
Property Required Description Connection name Yes A name for your connection Authentication Type Yes The authentication type for your storage account. For more information, review Authentication types for triggers and actions that support authentication - Secure access and data. For example, this connection uses access key authentication and provides the access key value for the storage account along with the following property values:
Property Required Value Description Azure Storage Account name Yes, but only for access key authentication <storage-account-name> The name for the Azure storage account where your blob container exists.
Note: To find the storage account name, open your storage account resource in the Azure portal. In the resource menu, under Security + networking, select Access keys. Under Storage account name, copy and save the name.Azure Storage Account Access Key Yes,
but only for access key authentication<storage-account-access-key> The access key for your Azure storage account.
Note: To find the access key, open your storage account resource in the Azure portal. In the resource menu, under Security + networking, select Access keys > key1 > Show. Copy and save the primary key value.After the trigger information box appears, provide the necessary information.
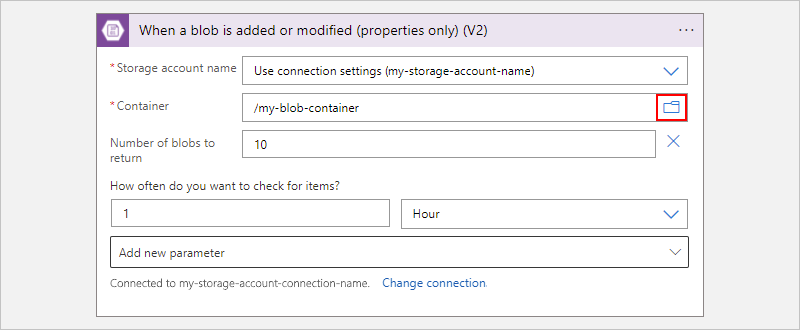
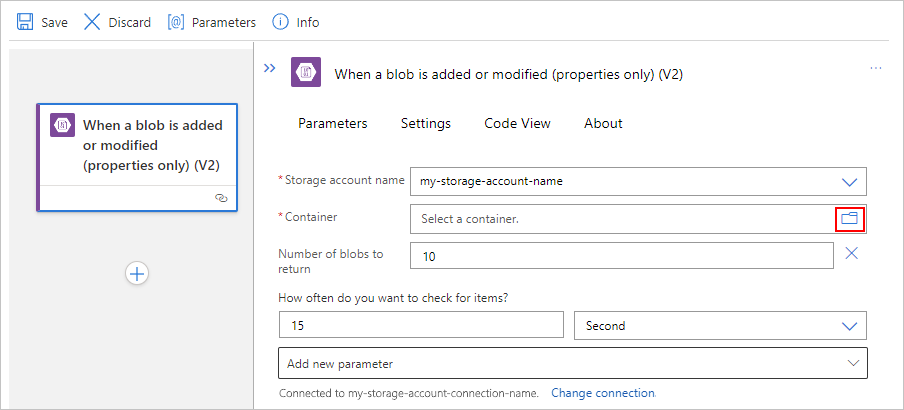
For the Container property value, select the folder icon to browse for your blob container. Or, enter the path manually using the syntax /<container-name>, for example:
To add other properties available for this trigger, open the Add new parameter list, and select the properties that you want.
For more information, review Azure Blob Storage managed connector trigger properties.
Add any other actions that your workflow requires.
When you're done, save your workflow. On the designer toolbar, select Save.
Add a Blob action
A Consumption logic app workflow can use only the Azure Blob Storage managed connector. However, a Standard logic app workflow can use the Azure Blob Storage managed connector and the Azure blob built-in connector. Each version has multiple, but differently named actions. For example, both managed and built-in connector versions have their own actions to get file metadata and get file content.
Managed connector actions: These actions run in a Consumption or Standard workflow.
Built-in connector actions: These actions run only in a Standard workflow.
The following steps use the Azure portal, but with the appropriate Azure Logic Apps extension, you can also use the following tools to build logic app workflows:
- Consumption workflows: Visual Studio Code
- Standard workflows: Visual Studio Code
In the Azure portal, open your Consumption logic app and workflow in the designer.
If your workflow is blank, add the trigger that your scenario requires.
This example uses the Recurrence trigger.
In the designer, follow these general steps to find and add the Azure Blob Storage managed action you want.
This example continues with the action named Get blob content.
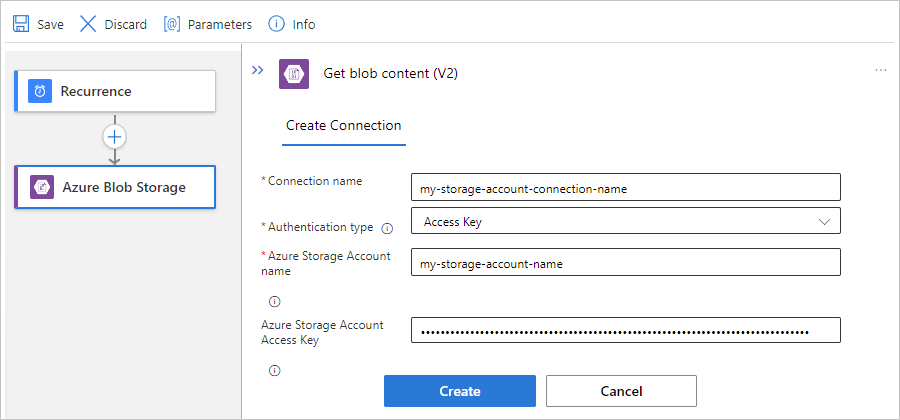
If prompted, provide the following information for your connection. When you're done, select Create.
Property Required Description Connection name Yes A name for your connection Authentication Type Yes The authentication type for your storage account. For more information, review Authentication types for triggers and actions that support authentication - Secure access and data. For example, this connection uses access key authentication and provides the access key value for the storage account along with the following property values:
Property Required Value Description Azure Storage Account name Yes,
but only for access key authentication<storage-account-name> The name for the Azure storage account where your blob container exists.
Note: To find the storage account name, open your storage account resource in the Azure portal. In the resource menu, under Security + networking, select Access keys. Under Storage account name, copy and save the name.Azure Storage Account Access Key Yes,
but only for access key authentication<storage-account-access-key> The access key for your Azure storage account.
Note: To find the access key, open your storage account resource in the Azure portal. In the resource menu, under Security + networking, select Access keys > key1 > Show. Copy and save the primary key value.In the action information box, provide the necessary information.
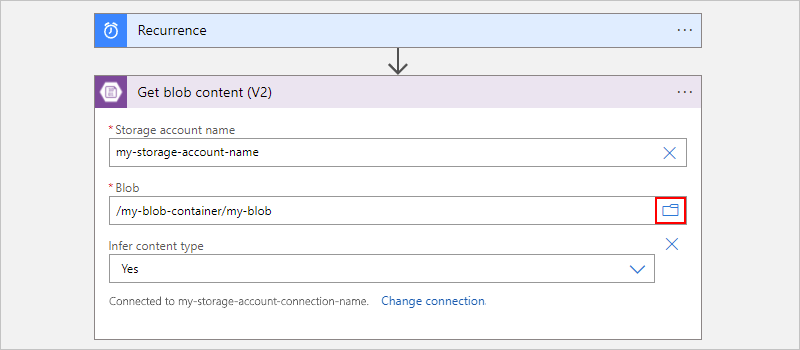
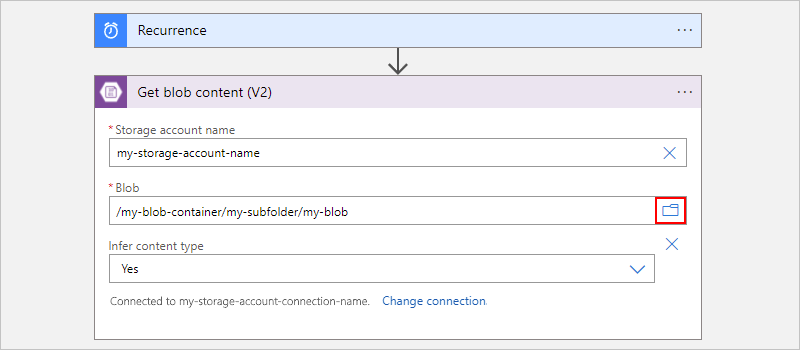
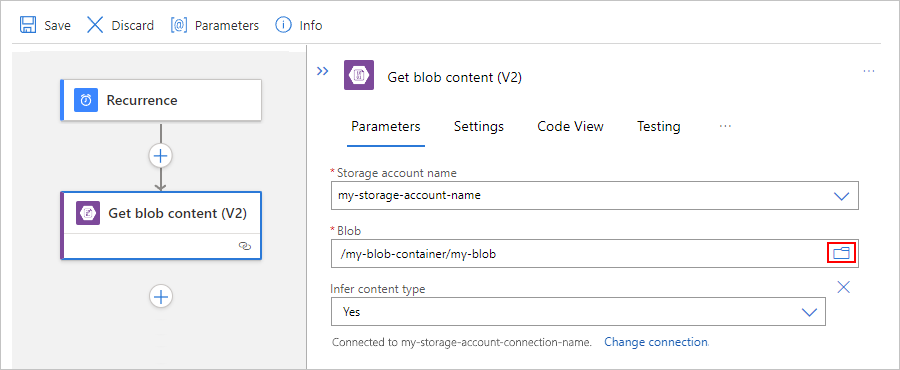
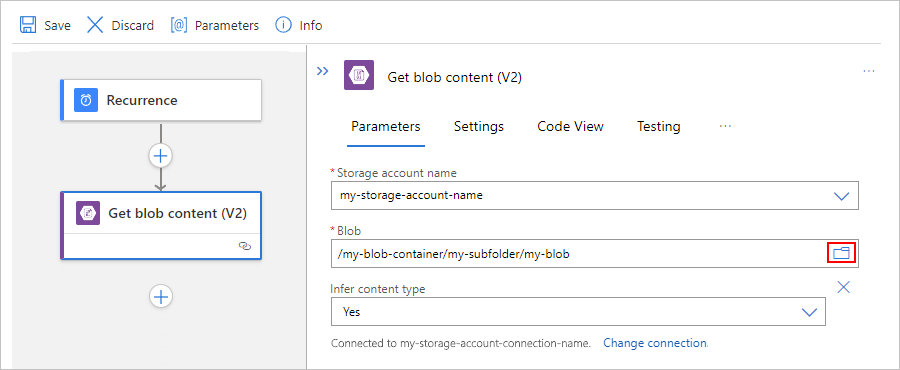
For example, in the Get blob content action, provide your storage account name. For the Blob property value, select the folder icon to browse for your storage container or folder. Or, enter the path manually.
Task Blob path syntax Get the content from a specific blob in the root folder. /<container-name>/<blob-name> Get the content from a specific blob in a subfolder. /<container-name>/<subfolder>/<blob-name> The following example shows the action setup that gets the content from a blob in the root folder:
The following example shows the action setup that gets the content from a blob in the subfolder:
Add any other actions that your workflow requires.
When you're done, save your workflow. On the designer toolbar, select Save.
Access storage accounts behind firewalls
You can add network security to an Azure storage account by restricting access with a firewall and firewall rules. However, this setup creates a challenge for Azure and other Microsoft services that need access to the storage account. Local communication in the data center abstracts the internal IP addresses, so just permitting traffic through IP addresses might not be enough to successfully allow communication across the firewall. Based on which Azure Blob Storage connector you use, the following options are available:
To access storage accounts behind firewalls using the Azure Blob Storage managed connector in Consumption logic apps, see the following documentation:
To access storage accounts behind firewalls in Standard logic apps, review the following documentation:
Azure Blob Storage built-in connector: Access storage accounts through virtual network integration
Azure Blob Storage managed connector: Access storage accounts in other regions
Access storage accounts in other regions
If you don't use managed identity authentication, logic app workflows can't directly access storage accounts behind firewalls when both the logic app resource and storage account exist in the same region. As a workaround, put your logic app resource in a different region than your storage account. Then, give access to the outbound IP addresses for the managed connectors in your region.
Note
This solution doesn't apply to the Azure Table Storage connector and Azure Queue Storage connector. Instead, to access your Table Storage or Queue Storage, use the built-in HTTP trigger and action.
To add your outbound IP addresses to the storage account firewall, follow these steps:
Note the managed connector outbound IP addresses for your logic app resource's region.
In the Azure portal, find and open your storage account resource.
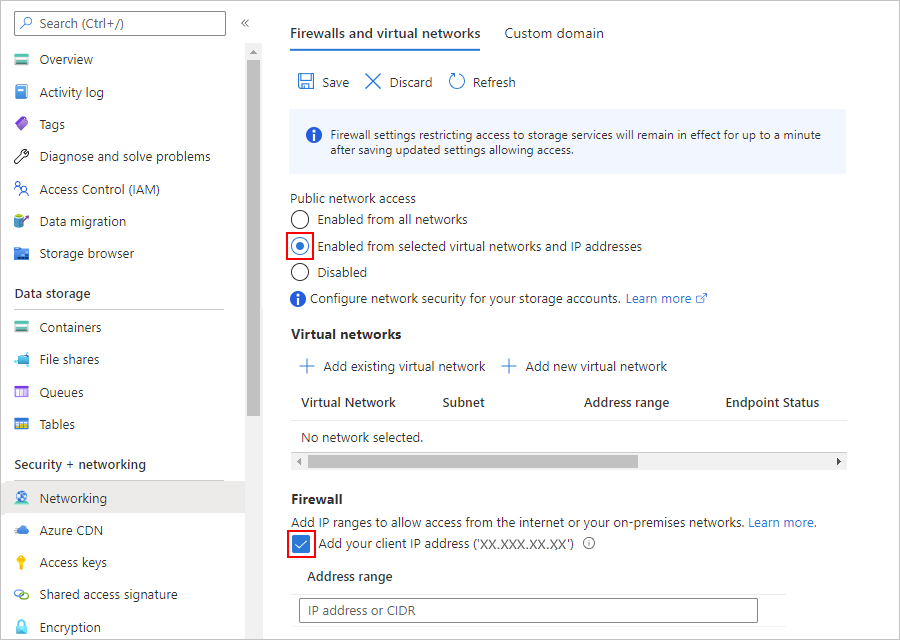
On the storage account navigation menu, under Security + networking, select Networking.
Access storage accounts through trusted virtual network
Your logic app and storage account exist in the same region.
You can put your storage account in an Azure virtual network by creating a private endpoint, and then add that virtual network to the trusted virtual networks list. To give your logic app access to the storage account through a trusted virtual network, you need to create a Standard logic app, which can connect to resources in a virtual network.
Your logic app and storage account exist in different regions.
Create a private endpoint on your storage account for access.
Access storage accounts through virtual network integration
Your logic app and storage account exist in the same region.
You can put the storage account in an Azure virtual network by creating a private endpoint, and then add that virtual network to the trusted virtual networks list. To give your logic app access to the storage account, you have to Set up outbound traffic using virtual network integration to enable connecting to resources in a virtual network. You can then add the virtual network to the storage account's trusted virtual networks list.
Your logic app and storage account exist in different regions.
Create a private endpoint on your storage account for access.
Access Blob Storage in same region with system-managed identities
To connect to Azure Blob Storage in any region, you can use managed identities for authentication. You can create an exception that gives Microsoft trusted services, such as a managed identity, access to your storage account through a firewall.
Note
This solution doesn't apply to Standard logic apps. Even if you use a system-assigned managed identity with a Standard logic app, the Azure Blob Storage managed connector can't connect to a storage account in the same region.
To use managed identities in your logic app to access Blob Storage, follow these steps:
Note
This solution has the following limitations:
To authenticate your storage account connection, you have to set up a system-assigned managed identity. A user-assigned managed identity won't work.
Configure storage account access
To set up the exception and managed identity support, first configure appropriate access to your storage account:
In the Azure portal, find and open your storage account resource.
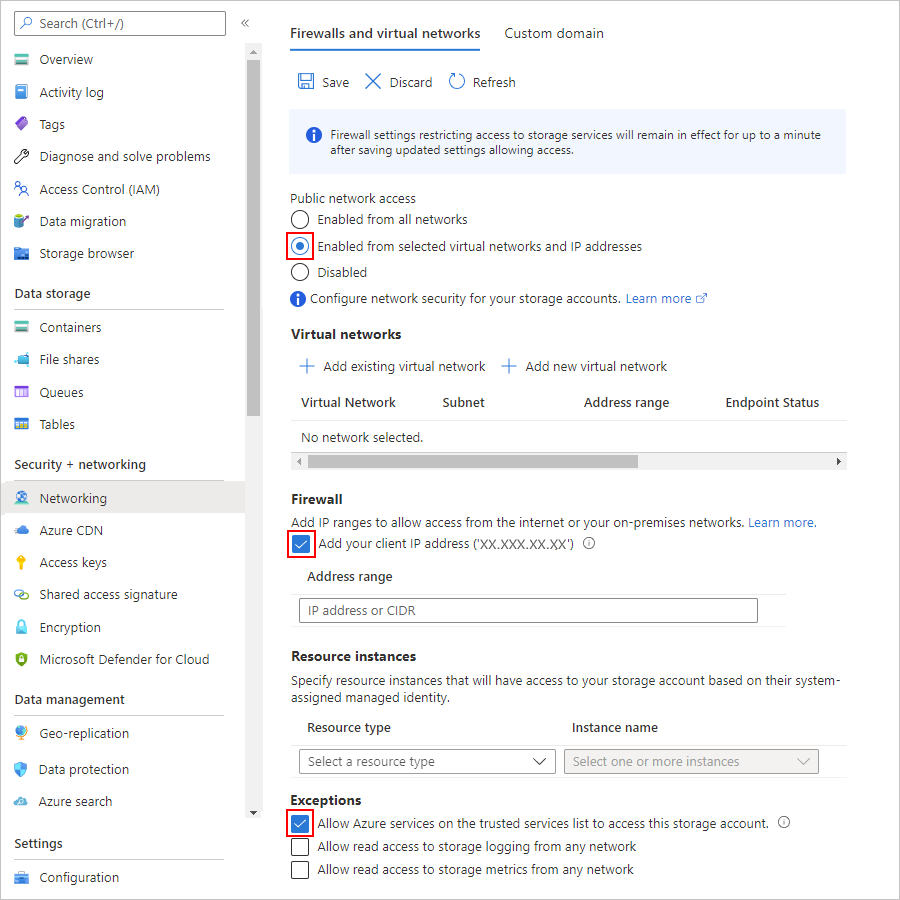
On the storage account navigation menu, under Security + networking, select Networking.
Under Allow access from, select Selected networks, which shows the relevant settings.
If you need to access the storage account from your computer, under Firewall, select Add your client IP address.
Under Exceptions, select Allow trusted Microsoft services to access this storage account.
When you're done, select Save.
Note
If you receive a 403 Forbidden error when you try to connect to the storage account from your workflow, multiple possible causes exist. Try the following resolution before moving on to additional steps. First, disable the setting Allow trusted Microsoft services to access this storage account and save your changes. Then, re-enable the setting, and save your changes again.
Create role assignment for logic app
Next, enable managed identity support on your logic app resource.
The following steps are the same for Consumption logic apps in multitenant environments and Standard logic apps in single-tenant environments.
In the Azure portal, open your logic app resource.
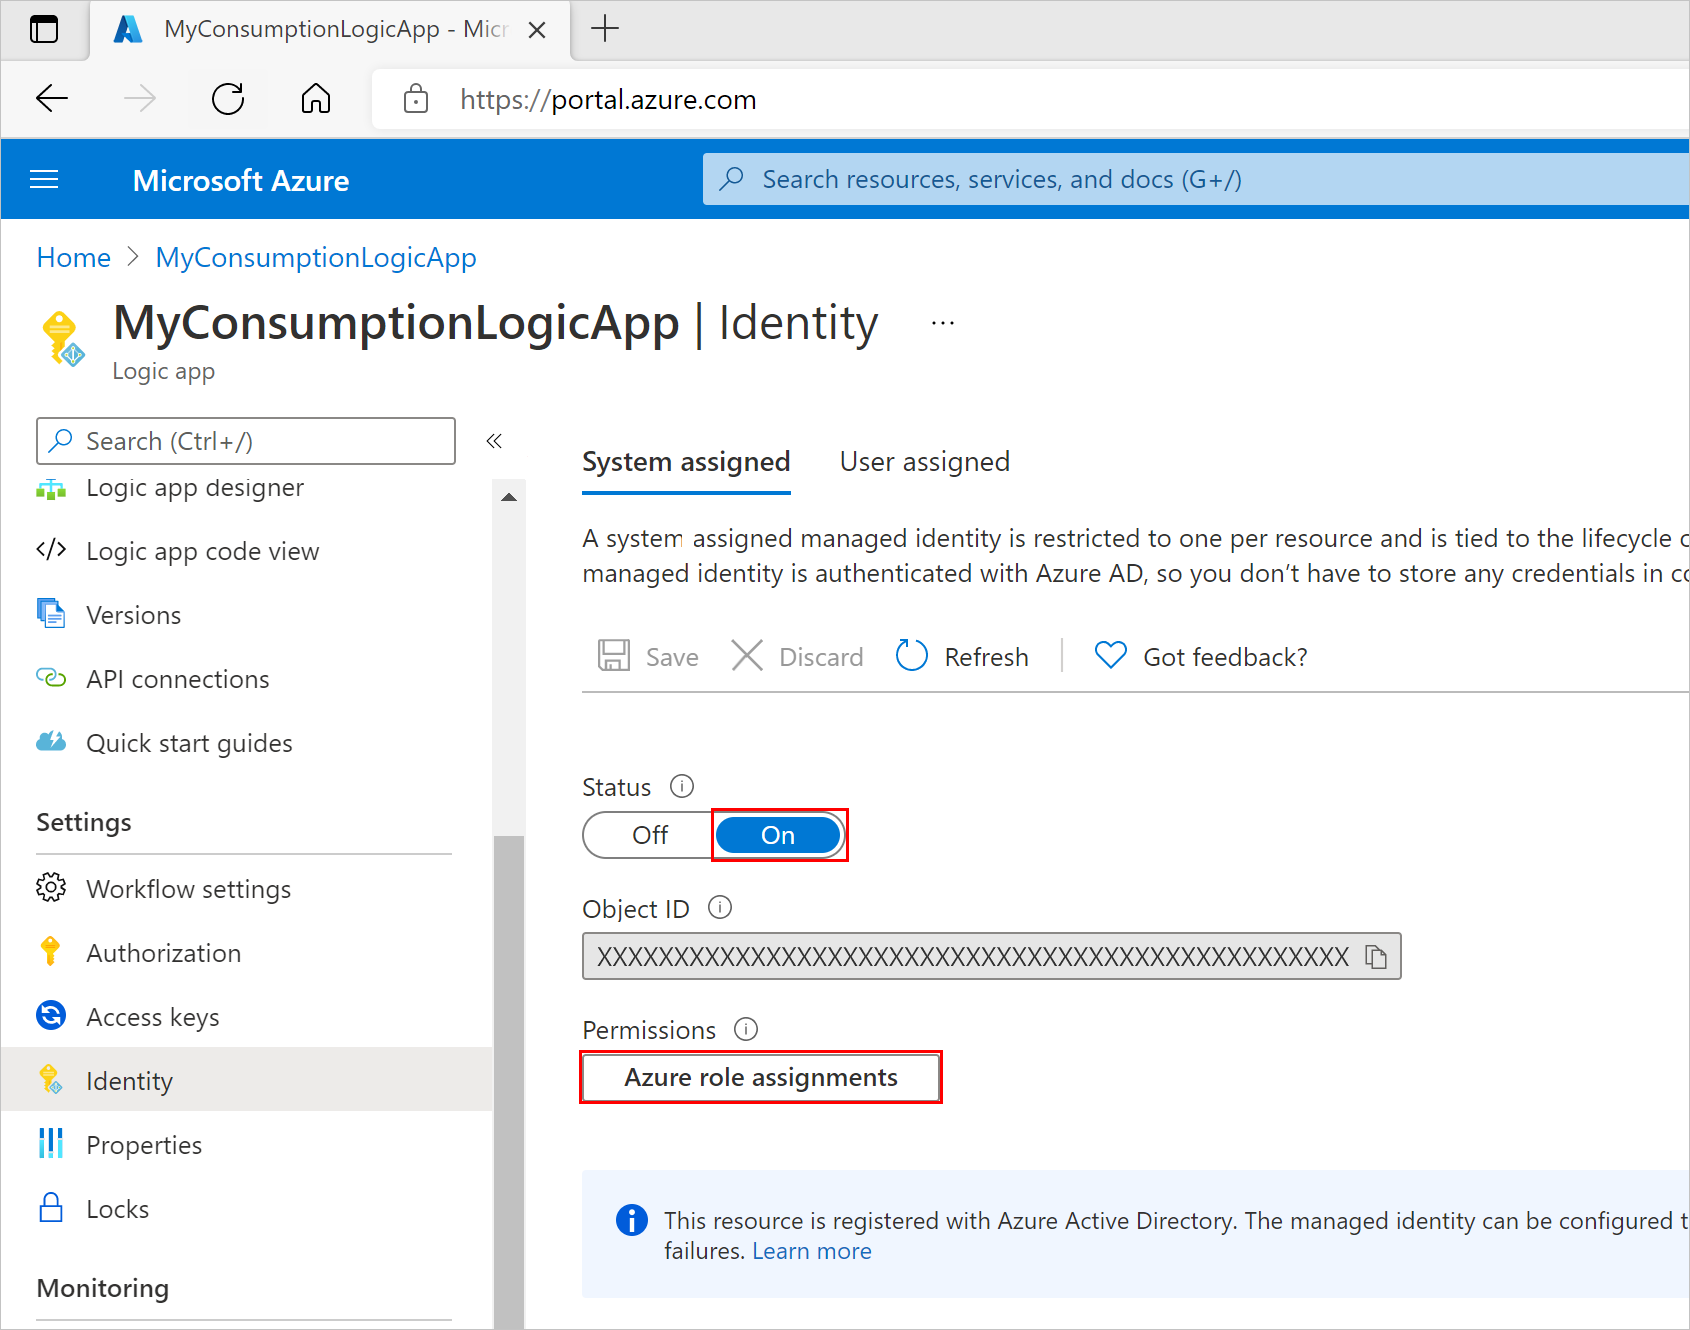
On the logic app resource navigation menu, under Settings, select Identity.
On the System assigned pane, set Status to On, if not already enabled, select Save, and confirm your changes. Under Permissions, select Azure role assignments.
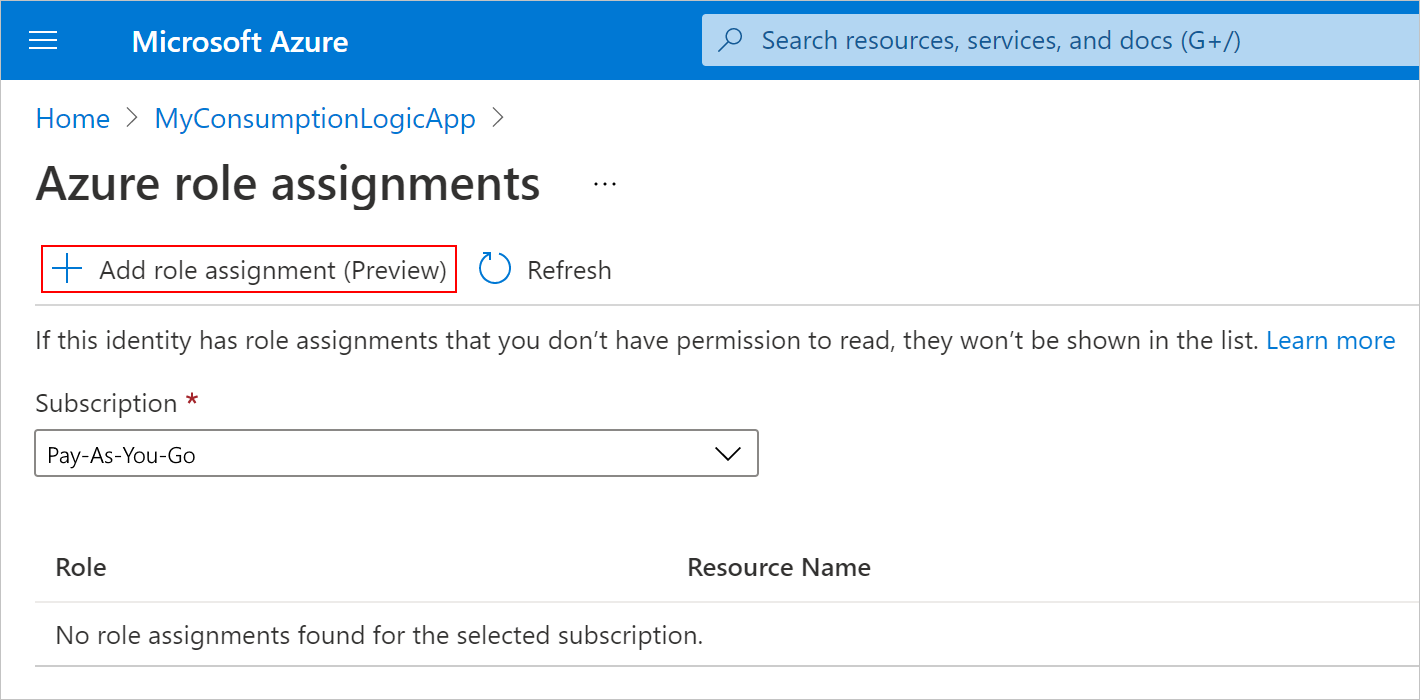
On the Azure role assignments pane, select Add role assignment.
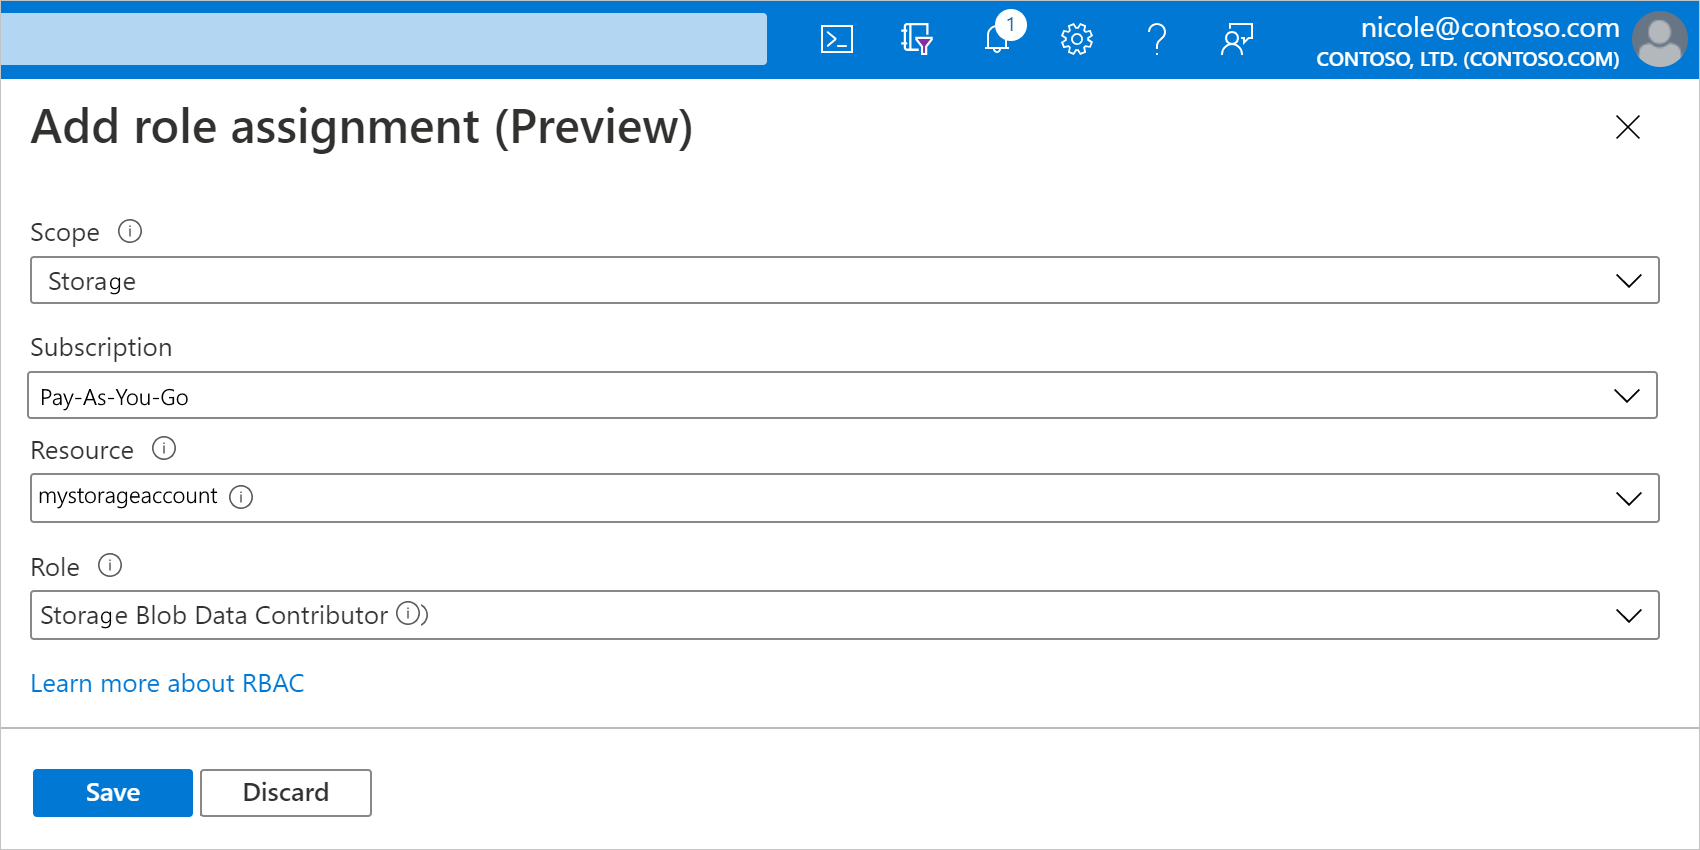
On the Add role assignments pane, set up the new role assignment with the following values:
Property Value Description Scope <resource-scope> The resource set where you want to apply the role assignment. For this example, select Storage. Subscription <Azure-subscription> The Azure subscription for your storage account. Resource <storage-account-name> The name for the storage account that you want to access from your logic app workflow. Role <role-to-assign> The role that your scenario requires for your workflow to work with the resource. This example requires Storage Blob Data Contributor, which allows read, write, and delete access to blob containers and date. For permissions details, move your mouse over the information icon next to a role in the drop-down menu. When you're done, select Save to finish creating the role assignment.
Enable managed identity support on logic app
Next, complete the following steps:
If you have a blank workflow, add an Azure Blob Storage connector trigger. Otherwise, add an Azure Blob Storage connector action. Make sure that you create a new connection for the trigger or action, rather than use an existing connection.
Make sure that you set the authentication type to use the managed identity.
After you configure the trigger or action, you can save the workflow and test the trigger or action.
Troubleshoot problems with accessing storage accounts
"This request is not authorized to perform this operation."
The following error is a commonly reported problem that happens when your logic app and storage account exist in the same region. However, options are available to resolve this limitation as described in the section, Access storage accounts behind firewalls.
{
   "status": 403,
   "message": "This request is not authorized to perform this operation.\\r\\nclientRequestId: a3da2269-7120-44b4-9fe5-ede7a9b0fbb8",
   "error": {
      "message": "This request is not authorized to perform this operation."
   },
   "source": "azureblob-ase.azconn-ase.p.azurewebsites.net"
}
Application Insights errors
404 and 409 errors
If your Standard workflow uses an Azure Blob built-in action that adds a blob to your storage container, you might get 404 and 409 errors in Application Insights for failed requests. These errors are expected because the connector checks whether the blob file exists before adding the blob. The errors result when the file doesn't exist. Despite these errors, the built-in action successfully adds the blob.
