Quickstart: Apply for 10DLC (10 digit long codes)
This guide walks you through the steps required to register a brand and campaign for 10DLC (10-Digit Long Code) messaging in ACS. This process ensures compliance with carrier requirements and enables reliable, high-quality message delivery. Refer to 10DLC guidelines for instructions on how to fill the registration form.
Important
This feature of Azure Communication Services is currently in preview.
Preview APIs and SDKs are provided without a service-level agreement. We recommend that you don't use them for production workloads. Some features might not be supported, or they might have constrained capabilities.
For more information, review Supplemental Terms of Use for Microsoft Azure Previews.
Prerequisites
- An active Communication Services resource.
- An eligible subscription: Check eligibility here
- Company Information: Information about your business, such as your company's legal name, tax ID, and other relevant details.
- Campaign Details: A description of the use case and sample messages you plan to send through 10DLC.
10DLC Registration
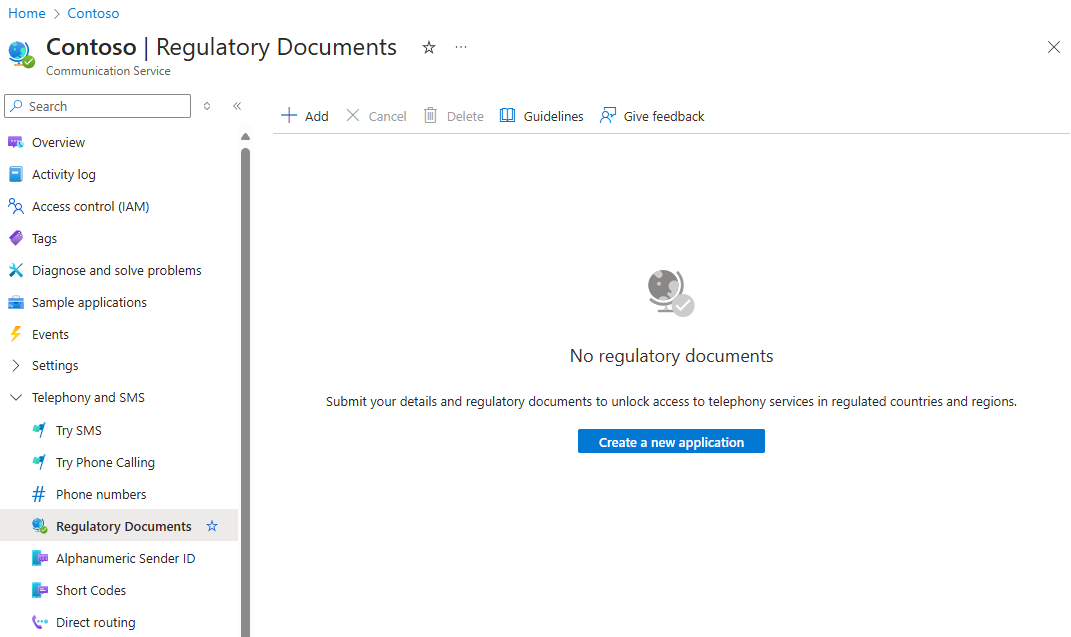
Navigate to the Regulatory Documents blade in your ACS resource and select Add to start the 10DLC brand registration wizard.
Brand Registration
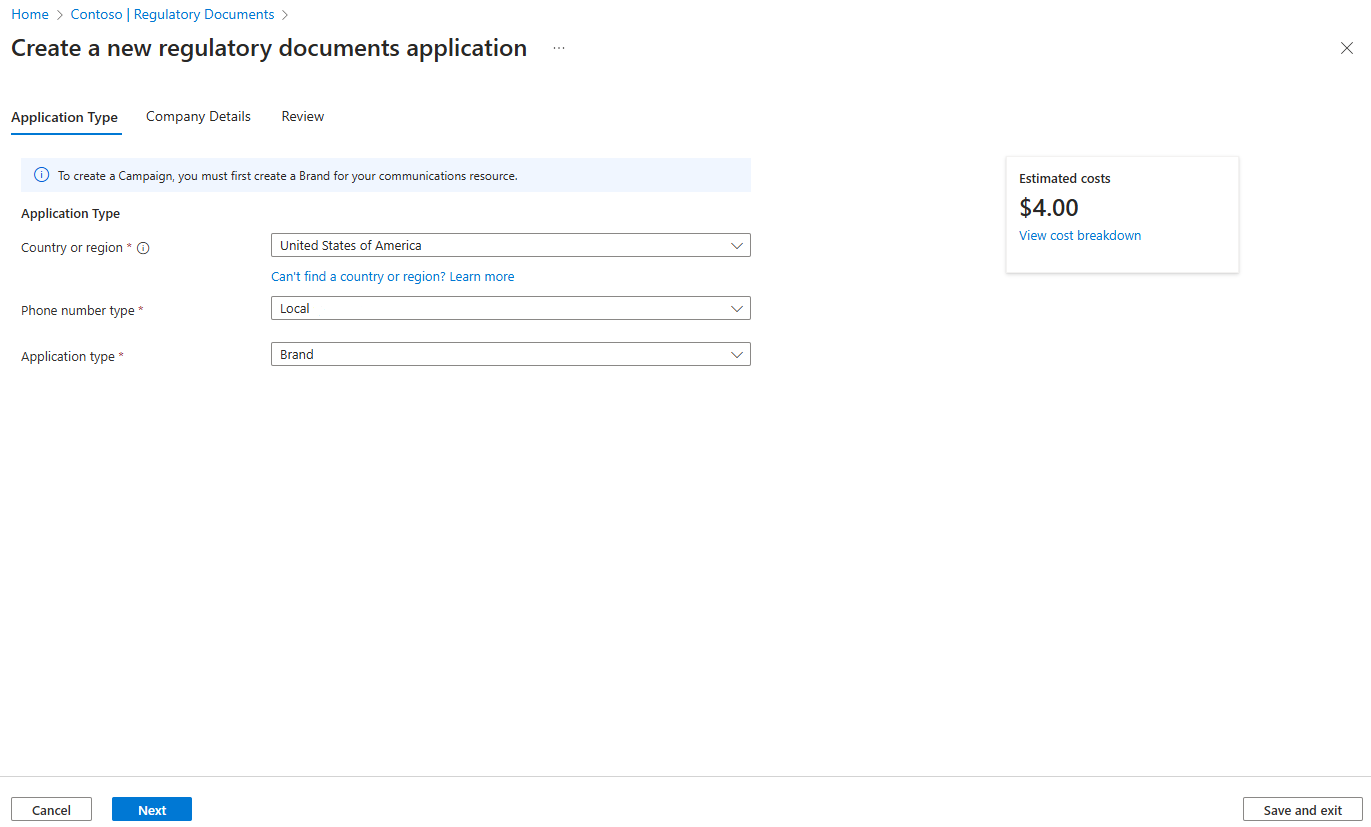
You first need to choose country/region and phone number type you would like to get verified. You need to apply for brand and campaign registration before acquiring 10DLC numbers for SMS. If you have acquired a 10DLC number for calling and want to enable it for SMS, then you need to first register the brand and campaign and then associate the number.
Company details
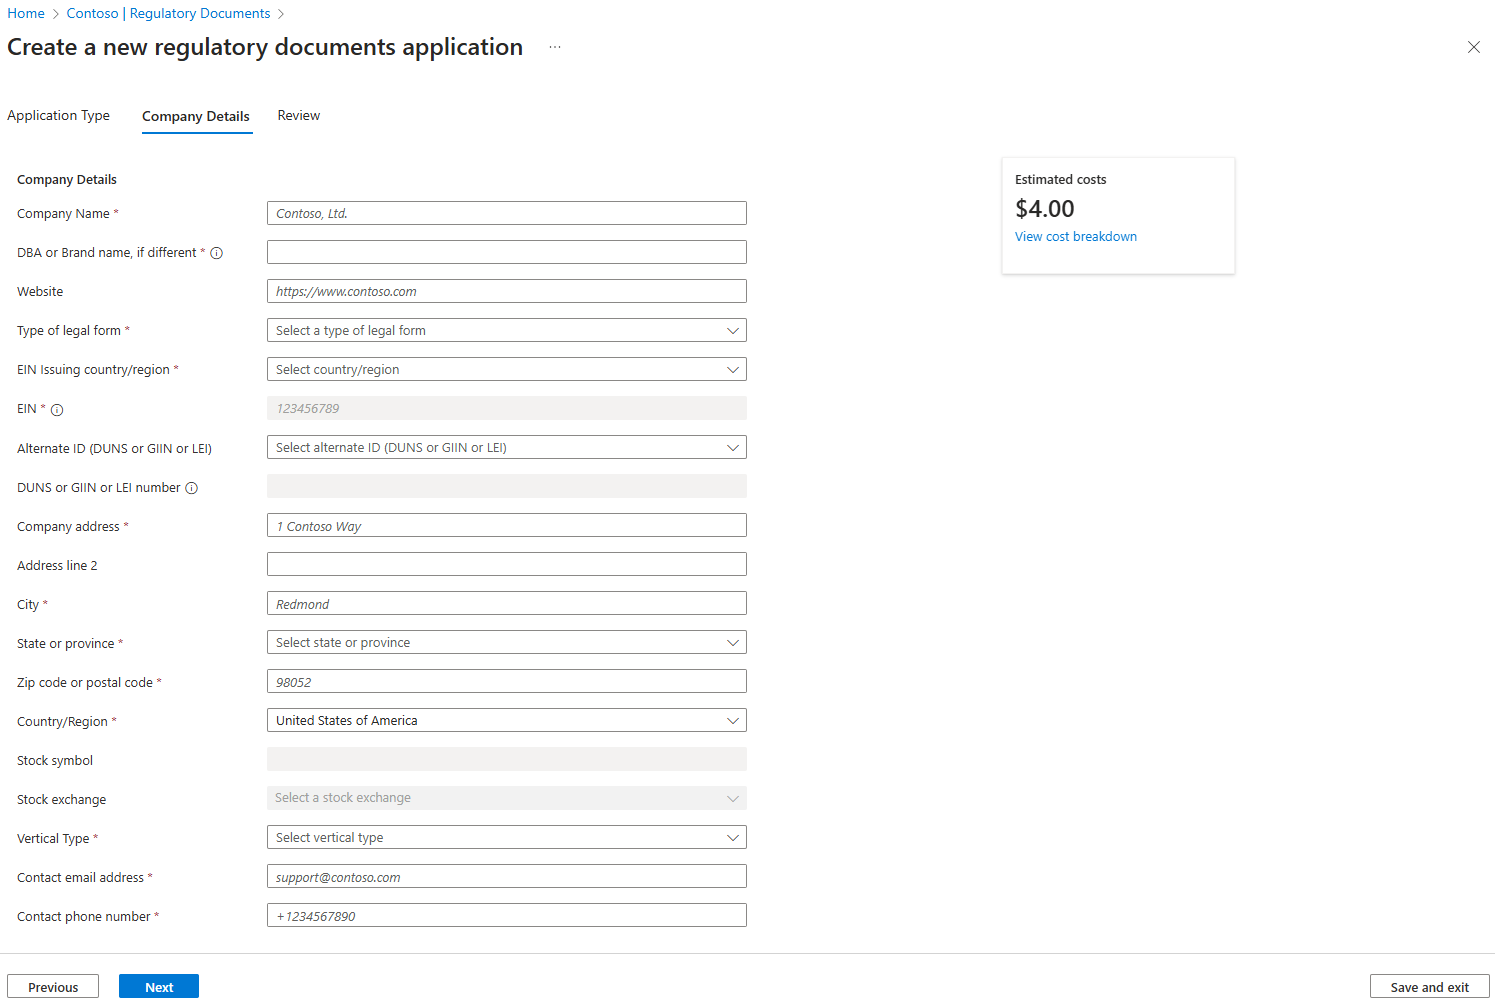
In the brand registration form, provide details about your company:
- Company Name: Your official registered business name.
- DBA or Brand Name: Doing Business As (DBA) or brand name, if different.
- Website: A website URL representing your business.
- Type of Legal Form: Select the legal structure of your company (e.g., Private Company).
- EIN: Employer Identification Number.
- EIN Issuing Country: Country where your EIN was issued.
- Alternate ID: Specify an alternate ID type (e.g., DUNS, GIIN, or LEI).
- DUNS or GIIN or LEI Number: Enter the applicable ID number based on your alternate ID type.
- Company Address: Primary address of your business.
- Address Line 2: Additional address information, if needed.
- City: City of the business location.
- State or Province: State or province of the business location.
- Zip Code or Postal Code: ZIP or postal code for the business location.
- Country: Country where the business is located.
- Stock Symbol: Stock symbol, if publicly listed.
- Stock Exchange: Name of the stock exchange where your business is listed, if applicable.
- Vertical Type: Business category (e.g., Education, Finance).
- Contact Email Address: Contact email for inquiries related to the brand registration.
- Contact Phone Number: Phone number for inquiries related to the brand registration.
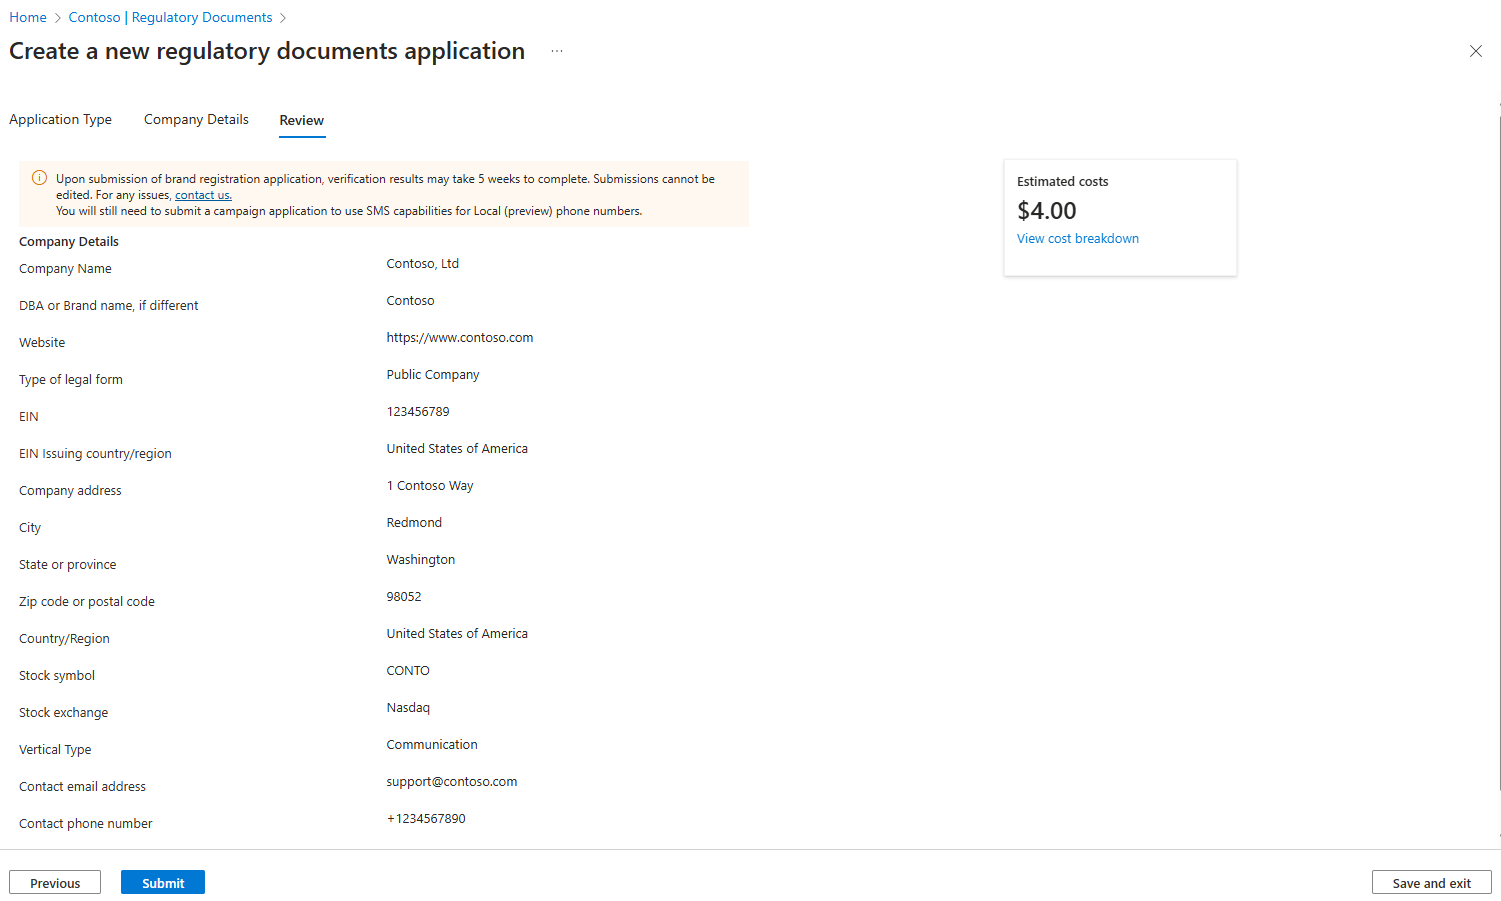
Review and submit
Submit the form for verification. Brand verification may take up to 48 hours.
Important
Providing incorrect or incomplete information may result in brand verification failure. Double-check all details before submitting to avoid delays or rejections in the registration process.
Campaign Registration
After your brand is verified, proceed with the campaign registration:
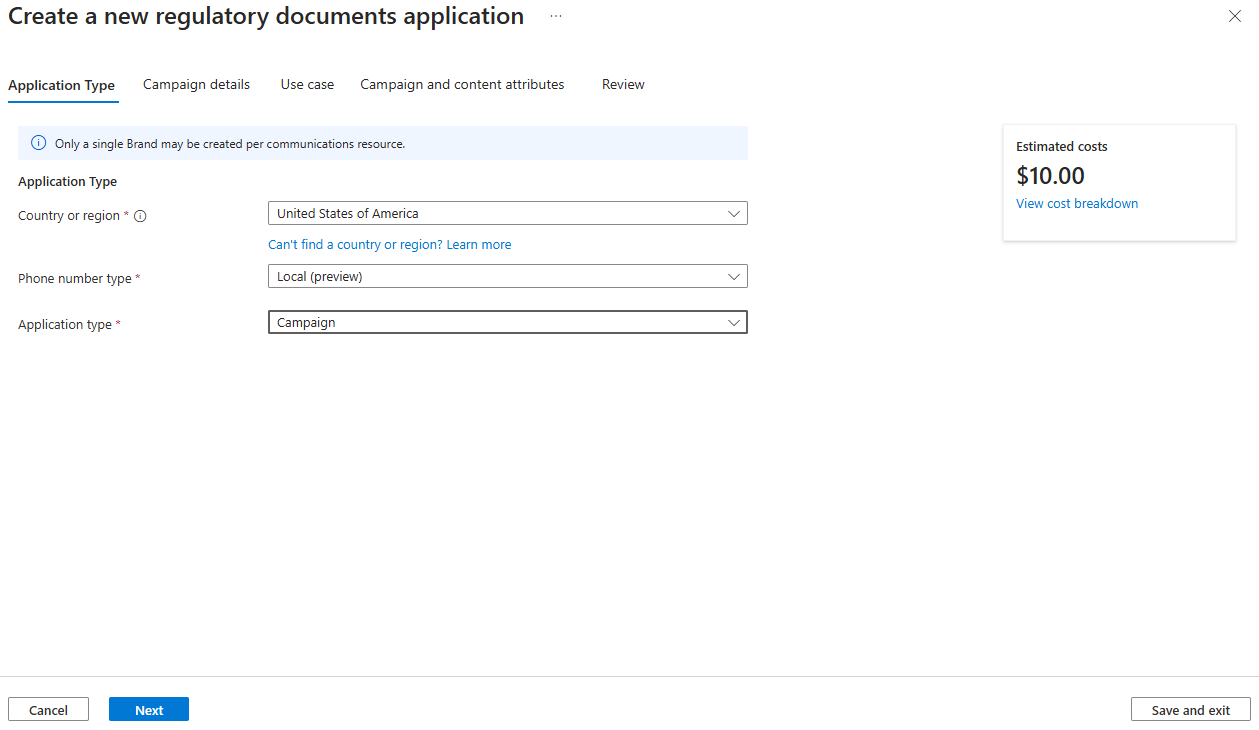
Select Add and begin by filling in the Application Type details:
- Country or Region: Select the country or region where you plan to run your campaign.
- Phone Number Type: Choose the type of phone number for your campaign (e.g., Local).
- Application Type: Select the Campaign application type.
Click Next to proceed to the Campaign Details section.
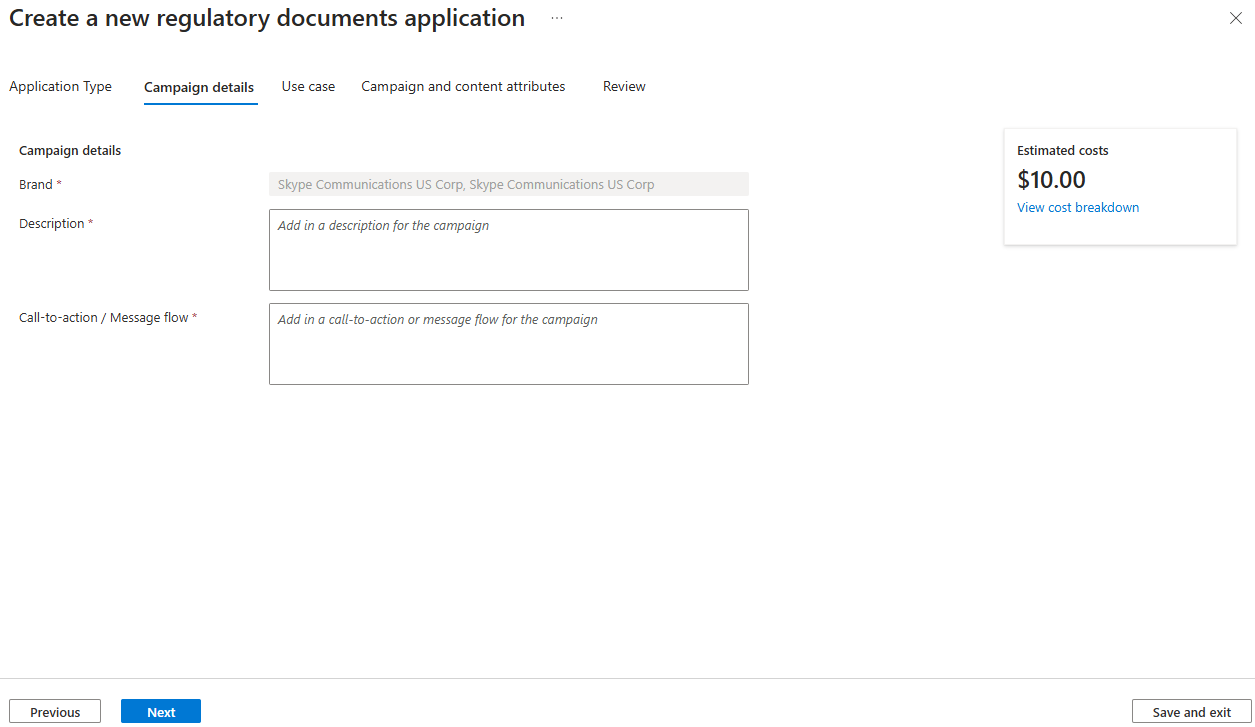
Campaign Details
- Brand: Select the brand associated with this campaign.
- Description: Add a description for the campaign, explaining its purpose and target audience.
- Call-to-Action / Message Flow: Describe how end users are expected to engage with this campaign (e.g., opt-in process, expected interaction).
Click Next to proceed to the Use Case section
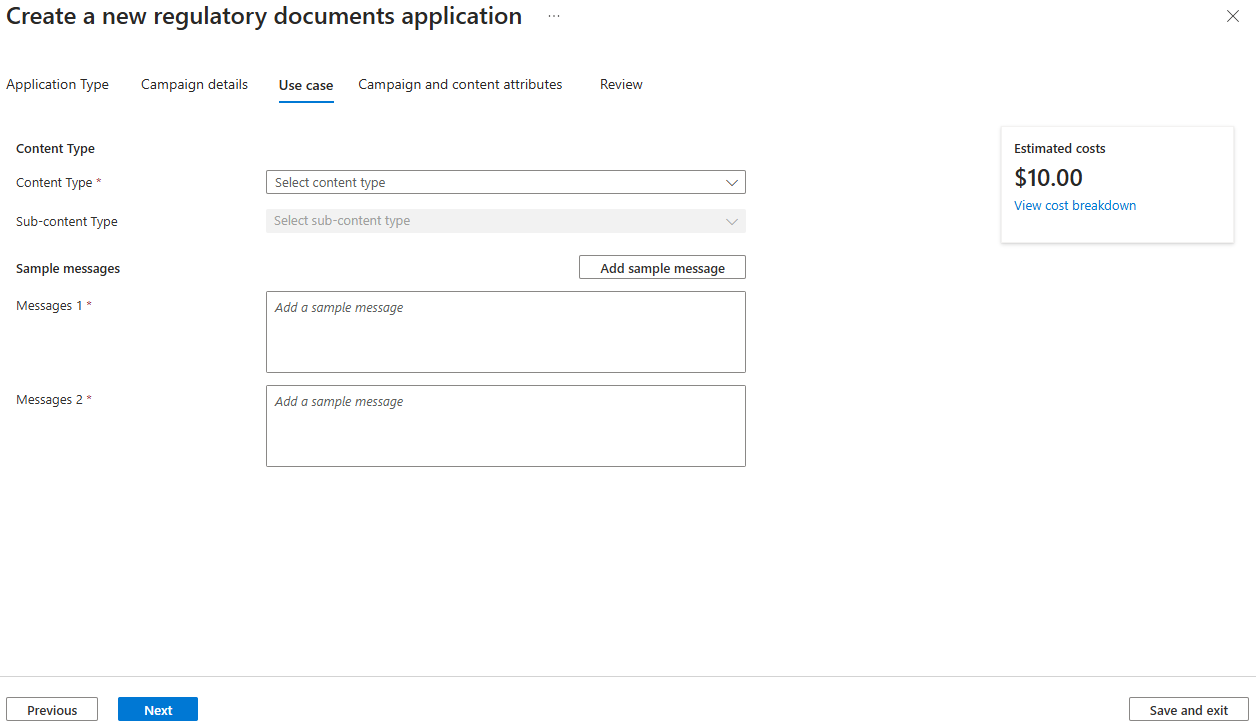
Use Case
- Content Type: Select the type of content you intend to send (e.g., Marketing, Customer Care).
- Sub-content Type: Choose a more specific content category if applicable.
- Sample Message: Provide a sample message that aligns with the campaign's use case. You can add multiple sample messages if needed by clicking Add Sample Message.
After completing the Use Case tab, proceed to the Campaign and Content Attributes tab:
Campaign and Content Attributes
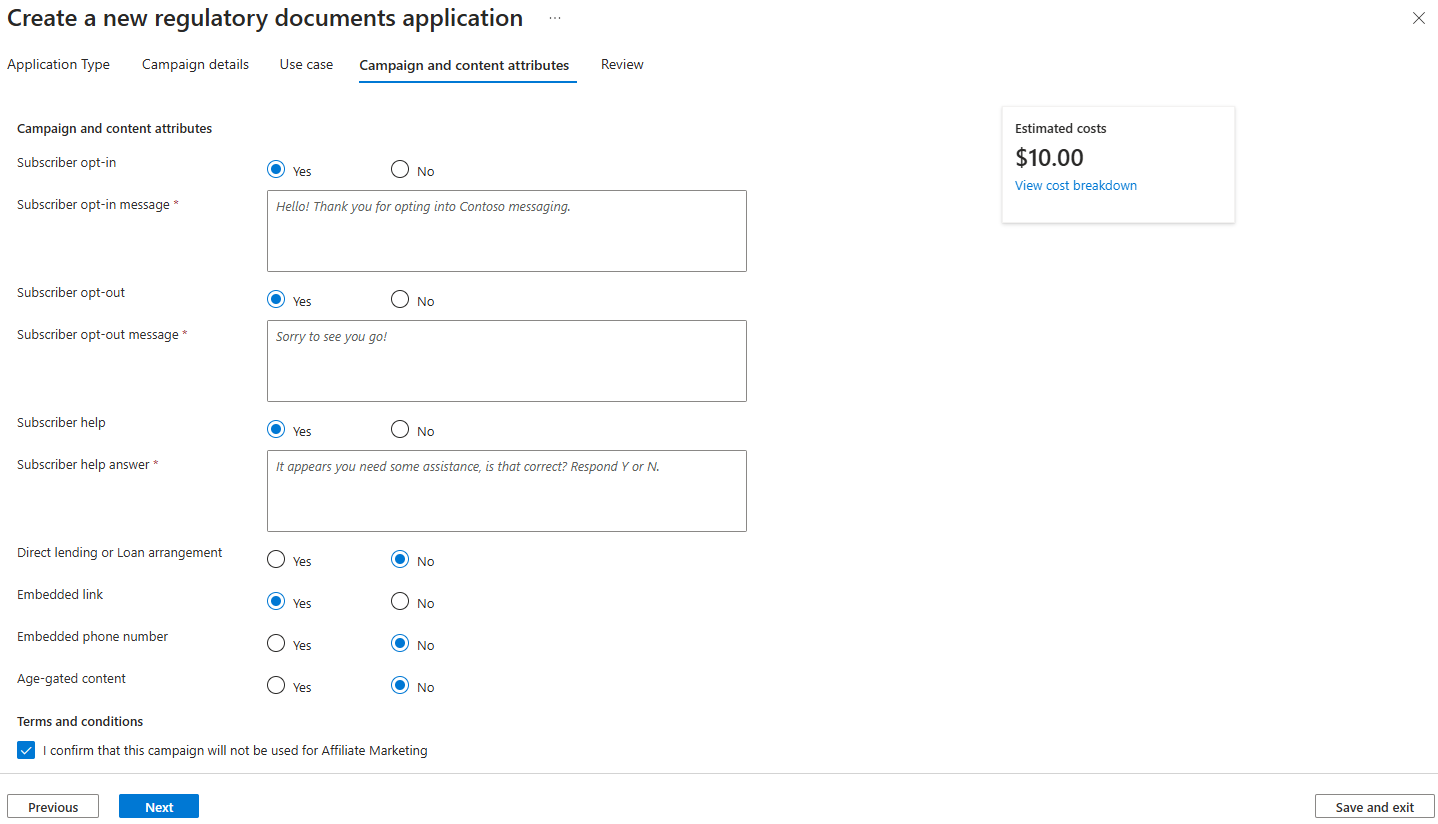
Fill in the campaign and content attributes as follows:
- Subscriber Opt-in: Select Yes or No to indicate if subscriber opt-in is required.
- Subscriber Opt-in Message: If Yes is selected, enter the message subscribers will receive when opting into the campaign.
- Subscriber Opt-out: Select Yes or No to indicate if subscribers can opt out.
- Subscriber Opt-out Answer: If Yes is selected, enter the response message subscribers will receive when opting out.
- Subscriber Help: Select Yes or No to indicate if subscriber help is available.
- Subscriber Help Answer: If Yes is selected, provide the message for subscribers seeking assistance.
Additional Attributes
- Direct Lending or Loan Arrangement: Indicate if the campaign involves any lending or loan arrangements.
- Embedded Link: Select Yes or No to specify if the campaign includes an embedded link.
- Embedded Phone Number: Select Yes or No to specify if a phone number is embedded within the campaign content.
- Age-gated Content: Select Yes or No to indicate if the content is age-restricted.
Terms and Conditions
- Affiliate marketing is not permitted on 10DLC numbers. Check the box to confirm that the campaign will not be used for Affiliate Marketing.
Once all fields are completed, click Next to proceed to the Review tab.
Important
Providing accurate information in the attributes section ensures compliance with regulatory requirements and reduces the risk of rejection.
Review and Submit
Review all information on the Review tab and submit your campaign application. Campaign approval may take 2–3 business days.
Checking Status of Brand and Campaign Registration
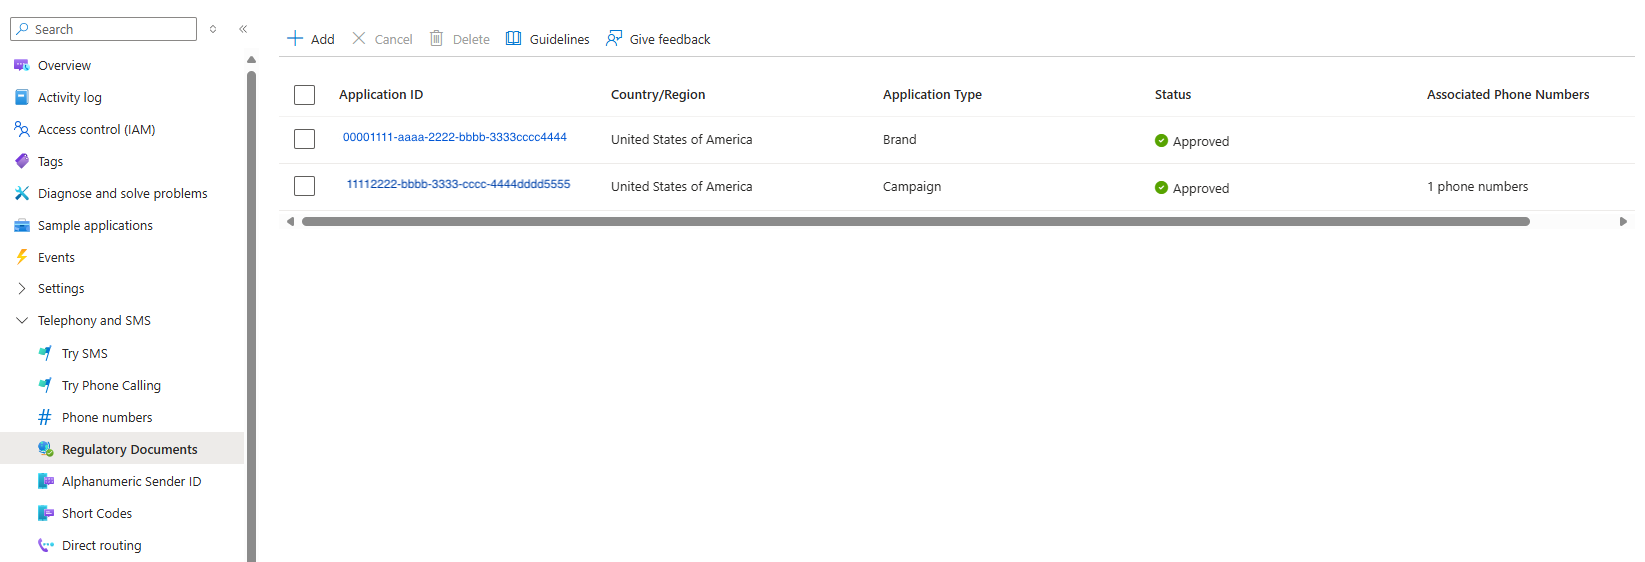
After submitting your brand and campaign registration, you can check the status in the Regulatory Documents blade. Follow these steps:
Open the Regulatory Documents Blade:
- Go to the Azure Communication Services portal.
- In the left navigation pane, select Regulatory Documents.
View Brand Status:
- Under the Brand Registration section, locate your brand name.
- The status will display as one of the following:
- Pending: Your brand registration is under review.
- Approved: Your brand registration has been approved, and you may proceed with campaign registration.
- Rejected: Your brand registration was rejected. Review the reason provided, make any necessary updates, and resubmit.
View Campaign Status:
- In the Campaign Registration section of the Regulatory Documents blade, find the campaign you submitted.
- Campaign status options include:
- Pending: Your campaign is under review.
- Approved: Your campaign is approved, and you are authorized to start messaging.
- Rejected: Your campaign was rejected. Check the details for the reason, make corrections, and resubmit as needed.
Using the Regulatory Documents blade to monitor the status of your brand and campaign registration allows you to stay informed and quickly address any issues to keep your messaging operations uninterrupted.
Linking a Phone Number to an Approved Campaign
Once your campaign is approved, follow these steps to link a phone number to it:
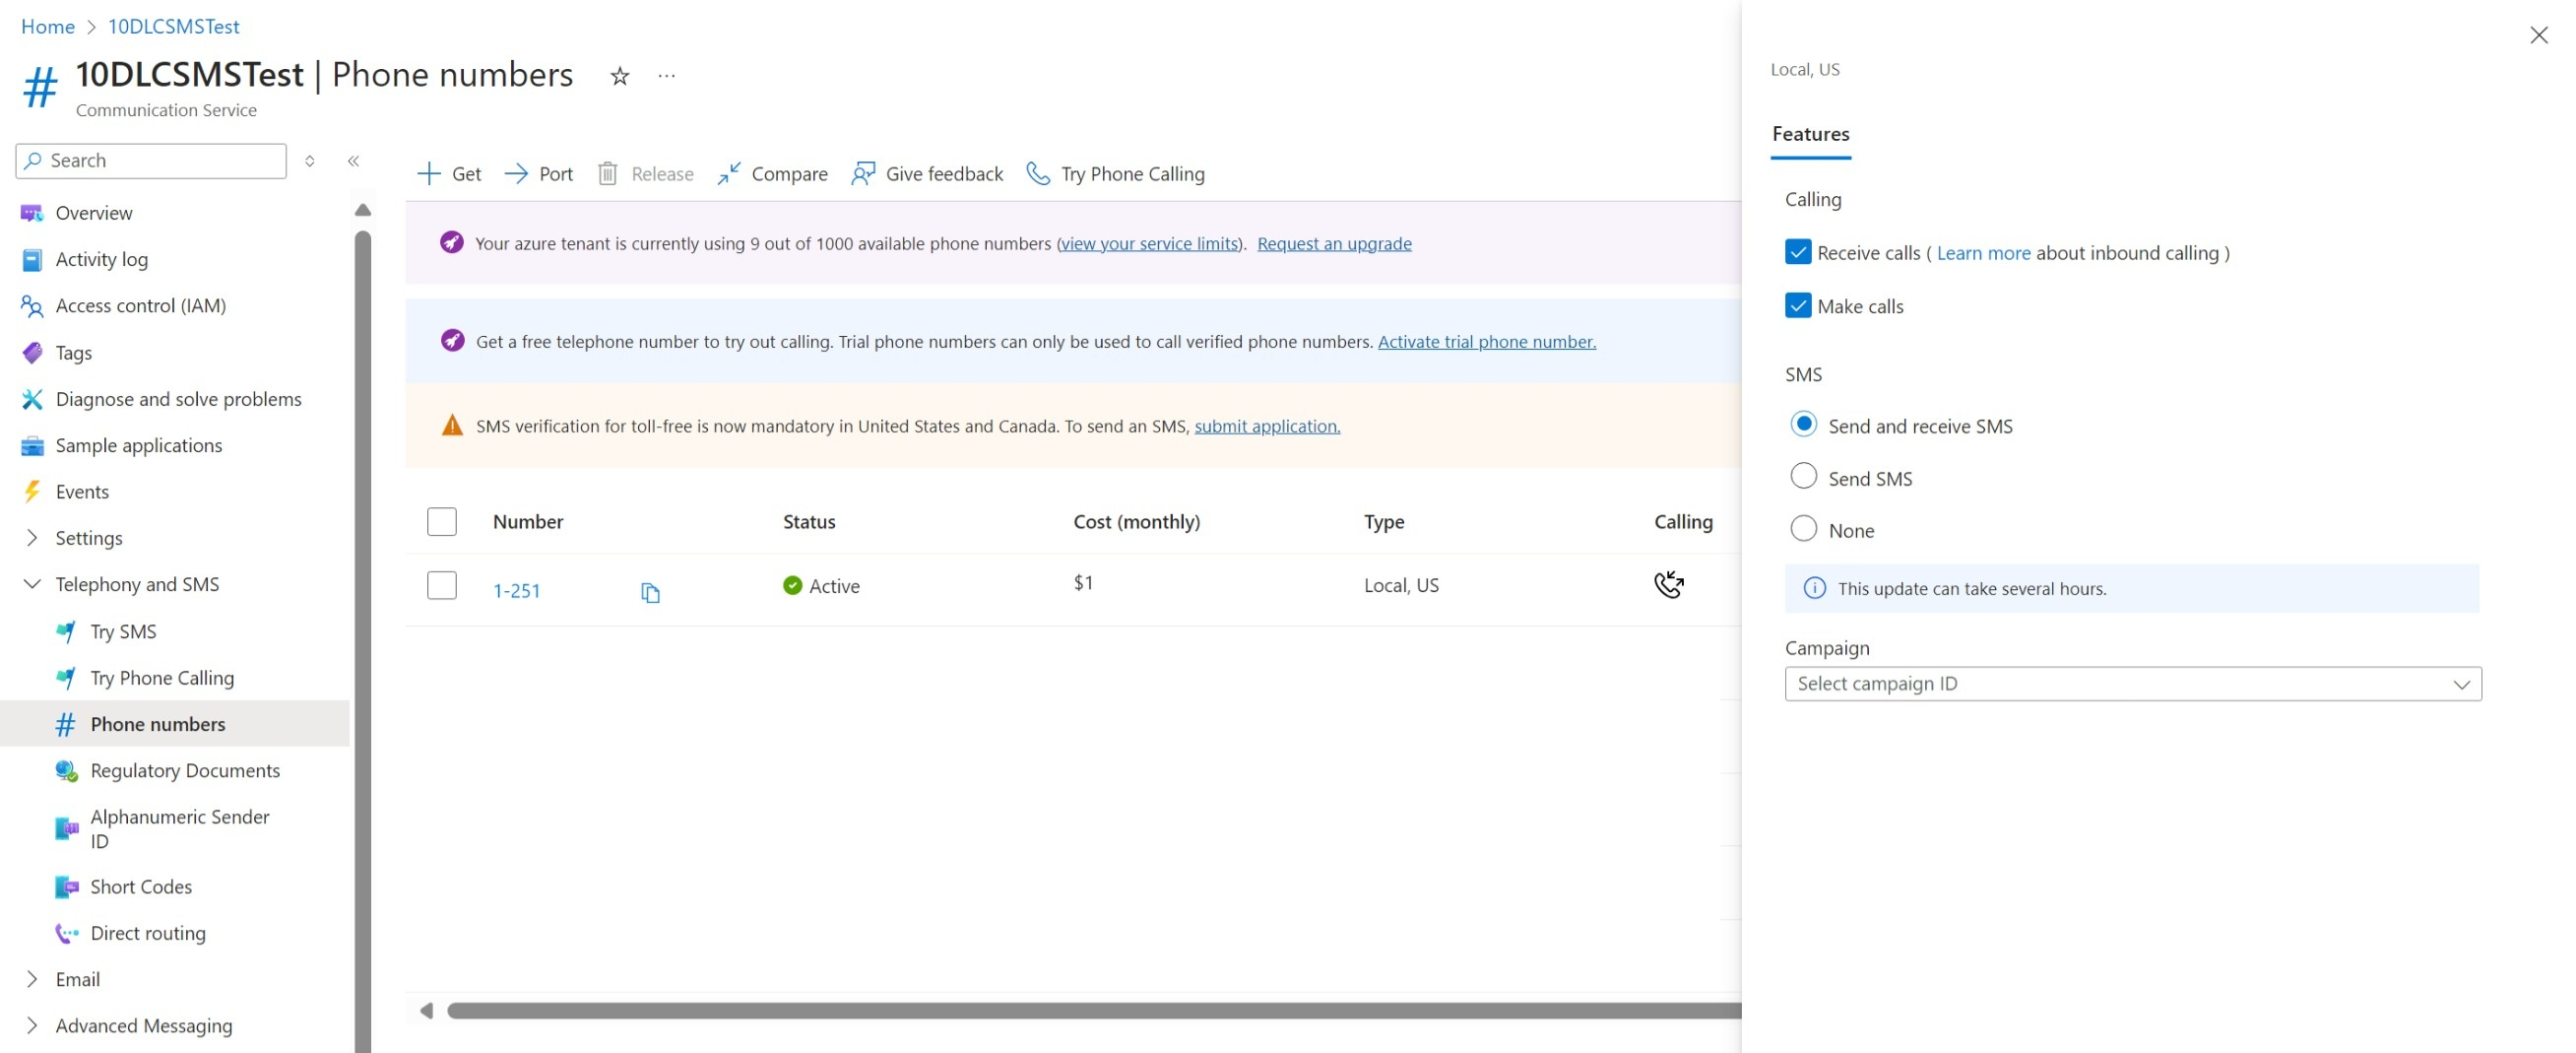
Access the Phone Numbers Blade:
- Go to the Azure Communication Services portal.
- Select Phone Numbers from the left navigation pane.
Select the Phone Number:
- Choose the phone number you want to associate with the approved campaign by clicking on it.
Set SMS Capability and Campaign:
- Under Features, select Send SMS or Send and receive SMS as needed.
- In the Campaign section, select the appropriate campaign ID from the dropdown list.
Save Changes:
- Click Save to apply the settings.
Important
It may take several hours for the number to be fully associated with the campaign. Please check back after some time to confirm that the association is complete.
Next steps
See the following articles for more information:
- Check SMS FAQ for questions regarding SMS
- Familiarize yourself with the SMS SDK
- Get an SMS capable phone number
- Learn about SMS number types
