Tutorial: Set Azure Content Delivery Network caching rules
Important
Azure CDN Standard from Microsoft (classic) will be retired on September 30, 2027. To avoid any service disruption, it's important that you migrate your Azure CDN Standard from Microsoft (classic) profiles to Azure Front Door Standard or Premium tier by September 30, 2027. For more information, see Azure CDN Standard from Microsoft (classic) retirement.
Azure CDN from Edgio was retired on January 15, 2025. For more information, see Azure CDN from Edgio retirement FAQ.
This tutorial describes how you can use Azure Content Delivery Network caching rules to set or modify default cache expiration behavior both globally and with custom conditions, such as a URL path and file extension. Azure Content Delivery Network provides two types of caching rules:
Global caching rules: You can set one global caching rule for each endpoint in your profile, which affects all requests to the endpoint. The global caching rule overrides any HTTP cache-directive headers, if set.
Custom caching rules: You can set one or more custom caching rules for each endpoint in your profile. Custom caching rules match specific paths and file extensions, are processed in order, and override the global caching rule, if set.
In this tutorial, you learn how to:
- Open the caching rules page.
- Create a global caching rule.
- Create a custom caching rule.
If you don't have an Azure subscription, create an Azure free account before you begin.
Prerequisites
Before you can complete the steps in this tutorial, you must first create a content delivery network profile and at least one content delivery network endpoint. For more information, see Quickstart: Create an Azure Content Delivery Network profile and endpoint.
Open the Azure content delivery network caching rules page
In the Azure portal, select a content delivery network profile, then select an endpoint.
In the left pane under Settings, select Caching rules.
The Caching rules page appears.
Set global caching rules
Create a global caching rule as follows:
Under Global caching rules, set Query string caching behavior to Ignore query strings.
Set Caching behavior to Set if missing.
For Cache expiration duration, enter 10 in the Days field.
The global caching rule affects all requests to the endpoint. This rule honors the origin cache-directive headers, if they exist (
Cache-ControlorExpires); otherwise, if they are not specified, it sets the cache to 10 days.
Set custom caching rules
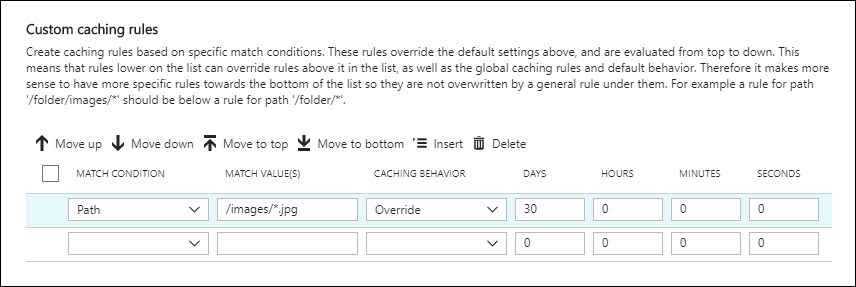
Create a custom caching rule as follows:
Under Custom caching rules, set Match condition to Path and Match value to
/images/*.jpg.Set Caching behavior to Override and enter 30 in the Days field.
This custom caching rule sets a cache duration of 30 days on any
.jpgimage files in the/imagesfolder of your endpoint. It overrides anyCache-ControlorExpiresHTTP headers that are sent by the origin server.
Clean up resources
In the preceding steps, you created caching rules. If you no longer want to use these caching rules, you can remove them by performing these steps:
Select a content delivery network profile, then select the endpoint with the caching rules you want to remove.
In the left pane under Settings, select Caching rules.
Under Global caching rules, set Caching behavior to Not set.
Under Custom caching rules, select the checkbox next to the rule you want to delete.
Select Delete.
From the top of the page, select Save.
Next steps
In this tutorial, you learned how to:
- Open the caching rules page.
- Create a global caching rule.
- Create a custom caching rule.
Advance to the next article to learn how to configure additional caching rule settings.