Tutorial: Expose an on-premises WCF service to a web application in the cloud by using Azure Relay
This article shows how to build a hybrid cloud application with Microsoft Azure and Visual Studio. You create an application that uses multiple Azure resources in the cloud. This tutorial helps you learn:
- How to create or adapt an existing web service for consumption by a web solution.
- How to use the Azure Windows Communication Foundation (WCF) Relay service to share data between an Azure application and a web service hosted elsewhere.
You do the following tasks in this tutorial:
- Install prerequisites for this tutorial.
- Review the scenario.
- Create a namespace.
- Create an on-premises server.
- Create an ASP .NET application.
- Run the app locally.
- Deploy the web app to Azure.
- Run the app on Azure.
Prerequisites
To complete this tutorial, you need the following prerequisites:
- An Azure subscription. If you don't have one, create a free account before you begin.
- Visual Studio 2015 or later. The examples in this tutorial use Visual Studio 2019.
- Azure SDK for .NET. Install it from the SDK downloads page.
How Azure Relay helps with hybrid solutions
Business solutions are typically composed of a combination of custom code and existing functionality. Custom code tackles new and unique business requirements. Solutions and systems that are already in place provide existing functionality.
Solution architects are starting to use the cloud for easier handling of scale requirements and lower operational costs. In doing so, they find that existing service assets they'd like to use as building blocks for their solutions are inside the corporate firewall and out of easy reach by the cloud solution. Many internal services aren't built or hosted in a way that they can be easily exposed at the corporate network edge.
Azure Relay takes existing WCF web services and makes those services securely accessible to solutions that are outside the corporate perimeter without requiring intrusive changes to the corporate network infrastructure. Such relay services are still hosted inside their existing environment, but they delegate listening for incoming sessions and requests to the cloud-hosted relay service. Azure Relay also protects those services from unauthorized access by using Shared Access Signature (SAS) authentication.
Review the scenario
In this tutorial, you create an ASP.NET website that enables you to see a list of products on the product inventory page.
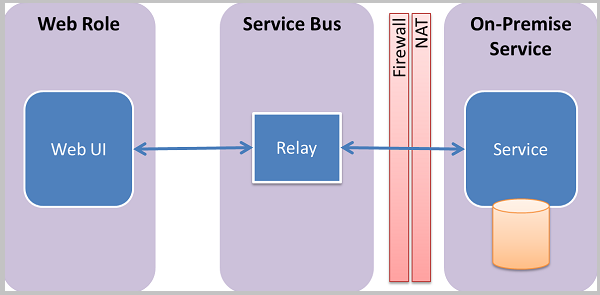
The tutorial assumes that you have product information in an existing on-premises system, and uses Azure Relay to reach into that system. A web service that runs in a simple console application simulates this situation. It contains an in-memory set of products. You can run this console application on your own computer and deploy the web role into Azure. By doing so, you see how the web role running in the Azure datacenter calls into your computer. This call happens even though your computer will almost certainly be behind at least one firewall and a network address translation (NAT) layer.
Set up the development environment
Before you can begin developing Azure applications, download the tools and set up your development environment:
- Install the Azure SDK for .NET from the SDK downloads page.
- In the .NET column, choose the version of Visual Studio you're using. This tutorial uses Visual Studio 2019.
- When prompted to run or save the installer, select Run.
- In the Web Platform Installer dialog box, select Install and continue with the installation.
Once the installation is finished, you have everything necessary to start to develop the app. The SDK includes tools that let you easily develop Azure applications in Visual Studio.
Create a namespace
The first step is to create a namespace, and to obtain a Shared Access Signature (SAS) key. A namespace provides an application boundary for each application exposed through the relay service. An SAS key is automatically generated by the system when a service namespace is created. The combination of service namespace and SAS key provides the credentials for Azure to authenticate access to an application.
Sign in to the Azure portal.
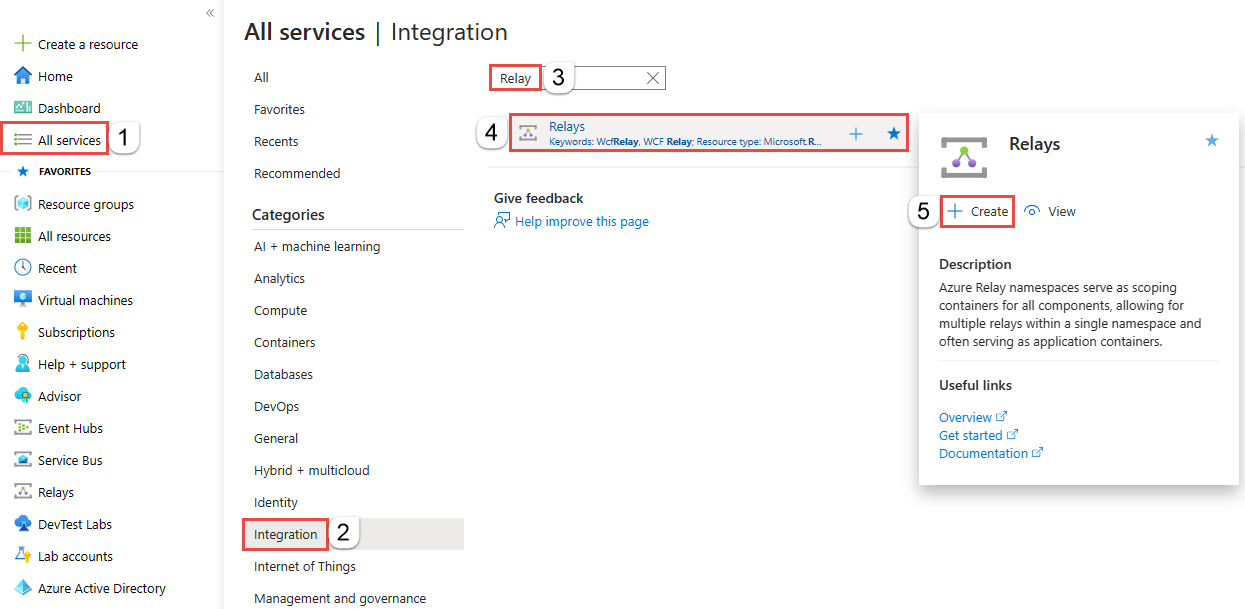
Select All services on the left menu. Select Integration, search for Relays, move the mouse over Relays, and then select Create.
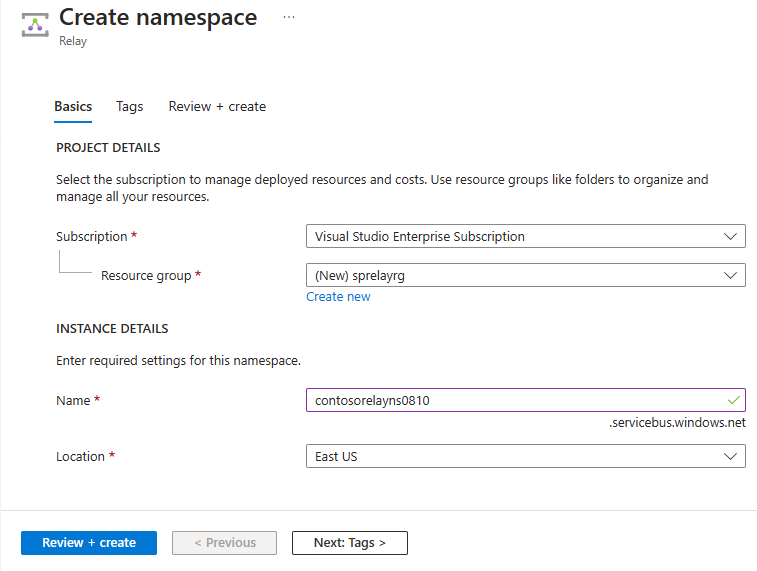
On the Create namespace page, follow these steps:
Choose an Azure subscription in which to create the namespace.
For Resource group, choose an existing resource group in which to place the namespace, or create a new one.
Enter a name for the Relay namespace.
Select the region in which your namespace should be hosted.
Select Review + create at the bottom of the page.
On the Review + create page, select Create.
After a few minutes, you see the Relay page for the namespace.

Get management credentials
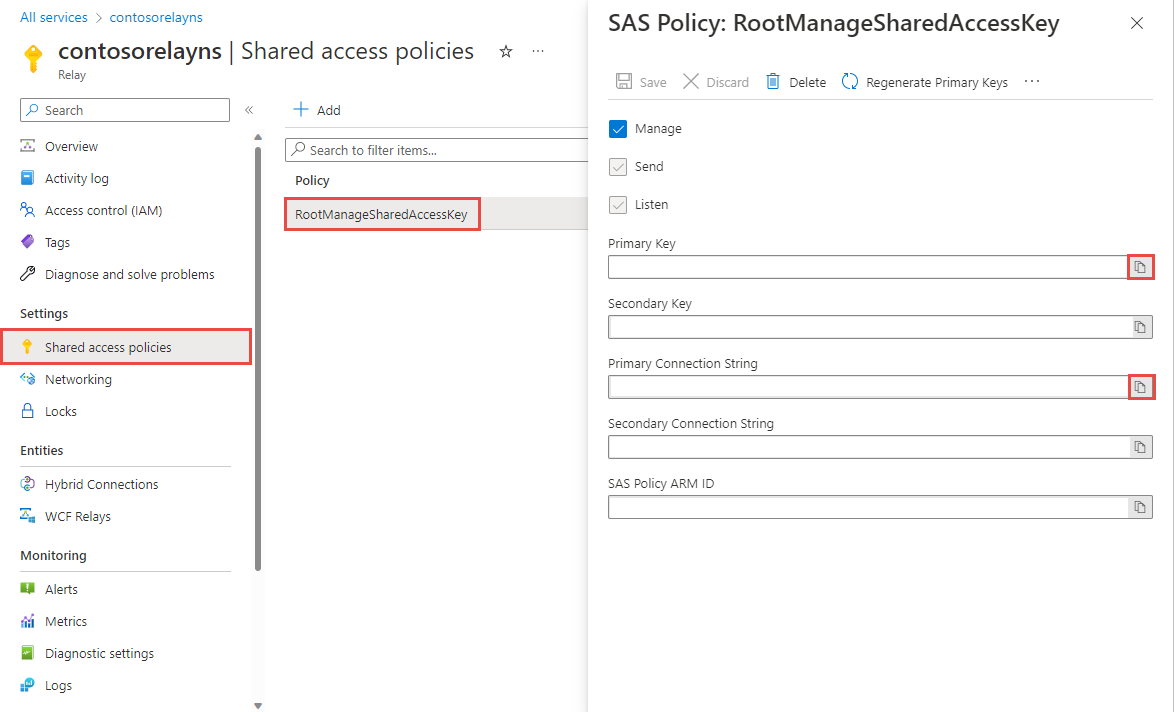
On the Relay page, select Shared access policies on the left menu.
On the Shared access policies page, select RootManageSharedAccessKey.
Under SAS Policy: RootManageSharedAccessKey, select the Copy button next to Primary Connection String. This action copies the connection string to your clipboard for later use. Paste this value into Notepad or some other temporary location.
Repeat the preceding step to copy and paste the value of Primary key to a temporary location for later use.
Create an on-premises server
First, you build a simulated on-premises product catalog system. This project is a Visual Studio console application, and uses the Azure Service Bus NuGet package to include the Service Bus libraries and configuration settings.
Start Microsoft Visual Studio as an administrator. To do so, right-click the Visual Studio program icon, and select Run as administrator.
In Visual Studio, select Create a new project.
In Create a new project, select Console App (.NET Framework) for C# and select Next.
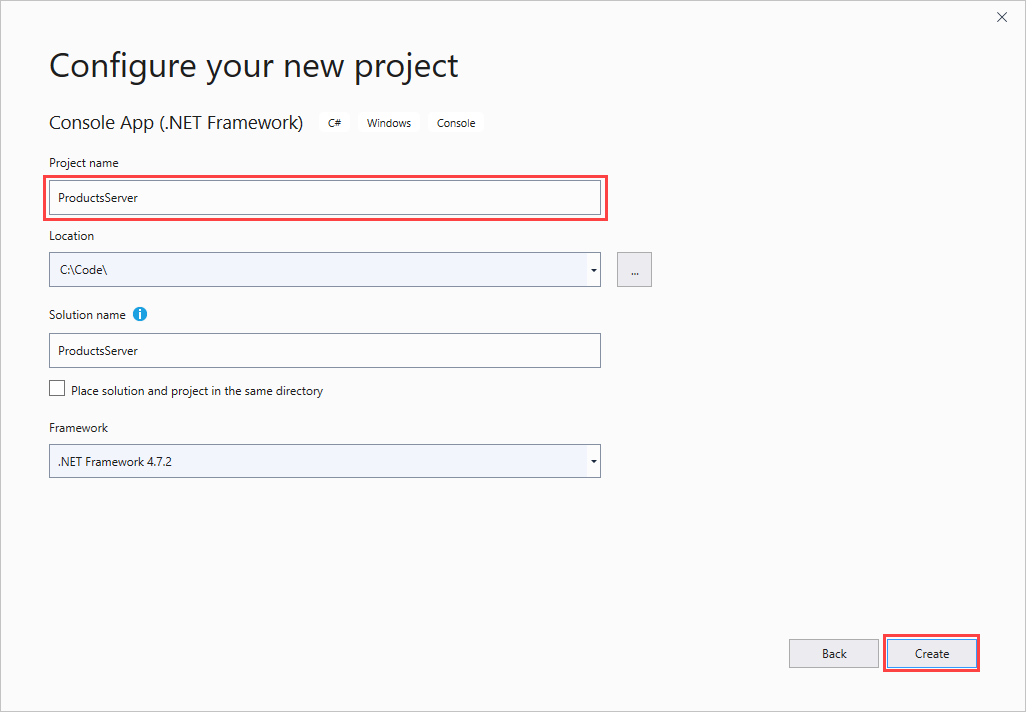
Name the project ProductsServer and select Create.
In Solution Explorer, right-click the ProductsServer project, then select Manage NuGet Packages.
Select Browse, then search for and choose WindowsAzure.ServiceBus. Select Install, and accept the terms of use.

The required client assemblies are now referenced.
Add a new class for your product contract. In Solution Explorer, right-click the ProductsServer project and select Add > Class.
In Name, enter the name ProductsContract.cs and select Add.
Make the following code changes to your solution:
In ProductsContract.cs, replace the namespace definition with the following code, which defines the contract for the service.
namespace ProductsServer
{
    using System.Collections.Generic;
    using System.Runtime.Serialization;
    using System.ServiceModel;

    // Define the data contract for the service
    [DataContract]
    // Declare the serializable properties.
    public class ProductData
    {
        [DataMember]
        public string Id { get; set; }
        [DataMember]
        public string Name { get; set; }
        [DataMember]
        public string Quantity { get; set; }
    }

    // Define the service contract.
    [ServiceContract]
    interface IProducts
    {
        [OperationContract]
        IList<ProductData> GetProducts();

    }

    interface IProductsChannel : IProducts, IClientChannel
    {
    }
}
In Program.cs, replace the namespace definition with the following code, which adds the profile service and the host for it.
namespace ProductsServer
{
    using System;
    using System.Linq;
    using System.Collections.Generic;
    using System.ServiceModel;

    // Implement the IProducts interface.
    class ProductsService : IProducts
    {

        // Populate array of products for display on website
        ProductData[] products =
            new []
                {
                    new ProductData{ Id = "1", Name = "Rock",
                                     Quantity = "1"},
                    new ProductData{ Id = "2", Name = "Paper",
                                     Quantity = "3"},
                    new ProductData{ Id = "3", Name = "Scissors",
                                     Quantity = "5"},
                    new ProductData{ Id = "4", Name = "Well",
                                     Quantity = "2500"},
                };

        // Display a message in the service console application
        // when the list of products is retrieved.
        public IList<ProductData> GetProducts()
        {
            Console.WriteLine("GetProducts called.");
            return products;
        }

    }

    class Program
    {
        // Define the Main() function in the service application.
        static void Main(string[] args)
        {
            var sh = new ServiceHost(typeof(ProductsService));
            sh.Open();

            Console.WriteLine("Press ENTER to close");
            Console.ReadLine();

            sh.Close();
        }
    }
}
In Solution Explorer, double-click App.config to open the file in the Visual Studio editor. At the bottom of the
<system.ServiceModel>element, but still within<system.ServiceModel>, add the following XML code.Important
Replace
yourServiceNamespacewith the name of your namespace, andyourKeywith the SAS key you retrieved earlier from the portal:<services> <service name="ProductsServer.ProductsService"> <endpoint address="sb://yourServiceNamespace.servicebus.windows.net/products" binding="netTcpRelayBinding" contract="ProductsServer.IProducts" behaviorConfiguration="products"/> </service> </services> <behaviors> <endpointBehaviors> <behavior name="products"> <transportClientEndpointBehavior> <tokenProvider> <sharedAccessSignature keyName="RootManageSharedAccessKey" key="yourKey" /> </tokenProvider> </transportClientEndpointBehavior> </behavior> </endpointBehaviors> </behaviors>Note
The error caused by
transportClientEndpointBehavioris just a warning and isn't a blocking issue for this example.Still in App.config, in the
<appSettings>element, replace the connection string value with the connection string you previously obtained from the portal.<appSettings> <!-- Service Bus specific app settings for messaging connections --> <add key="Microsoft.ServiceBus.ConnectionString" value="Endpoint=sb://yourNamespace.servicebus.windows.net/;SharedAccessKeyName=RootManageSharedAccessKey;SharedAccessKey=yourKey"/> </appSettings>Select Ctrl+Shift+B or select Build > Build Solution to build the application and verify the accuracy of your work so far.
Create an ASP.NET application
In this section, you build a simple ASP.NET application that displays data retrieved from your product service.
Create the project
Ensure that Visual Studio is running as administrator.
In Visual Studio, select Create a new project.
In Create a new project, select ASP.NET Web Application (.NET Framework) for C# and select Next.
Name the project ProductsPortal and select Create.
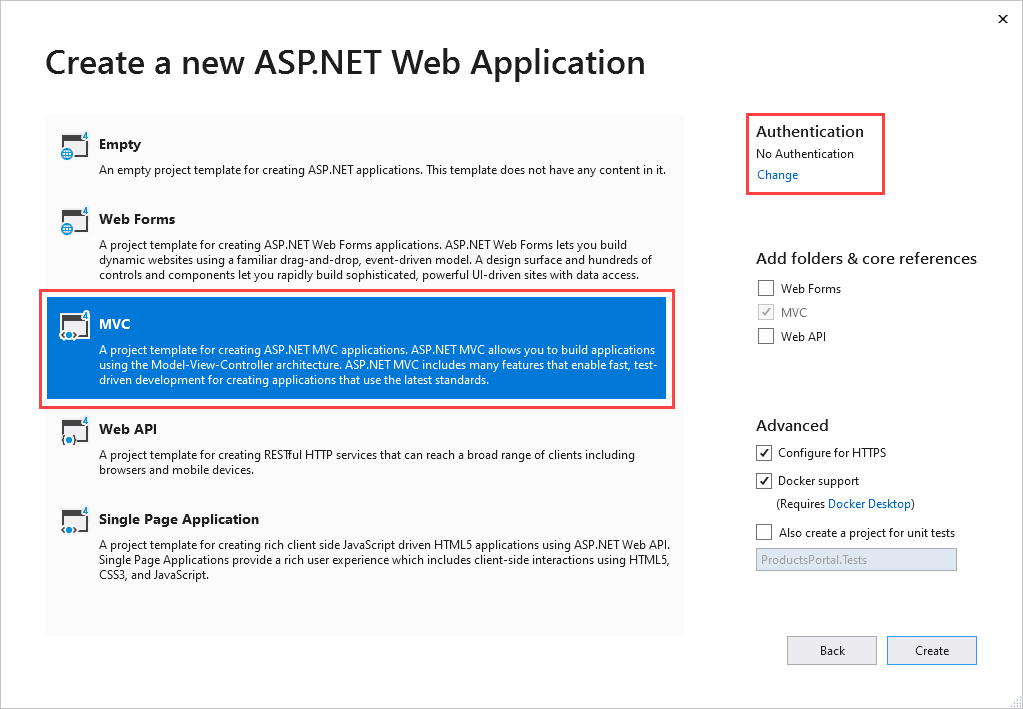
In Create a new ASP.NET Web Application, choose **MVC, and select Change under Authentication.
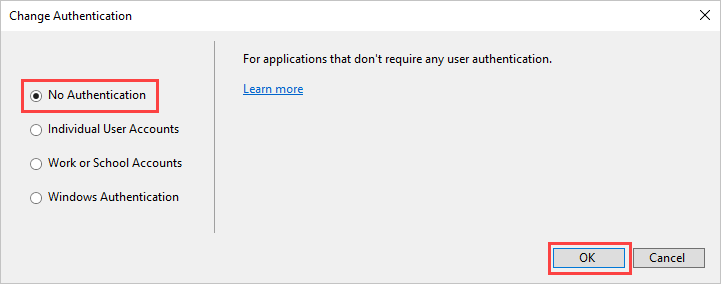
In Change Authentication, choose No Authentication then select OK. For this tutorial, you're deploying an app that doesn't need a user to sign in.
Back in Create a new ASP.NET Web Application, select Create to create the MVC app.
Configure Azure resources for a new web app. Follow the steps in Publish your web app. Then, return to this tutorial and continue to the next step.
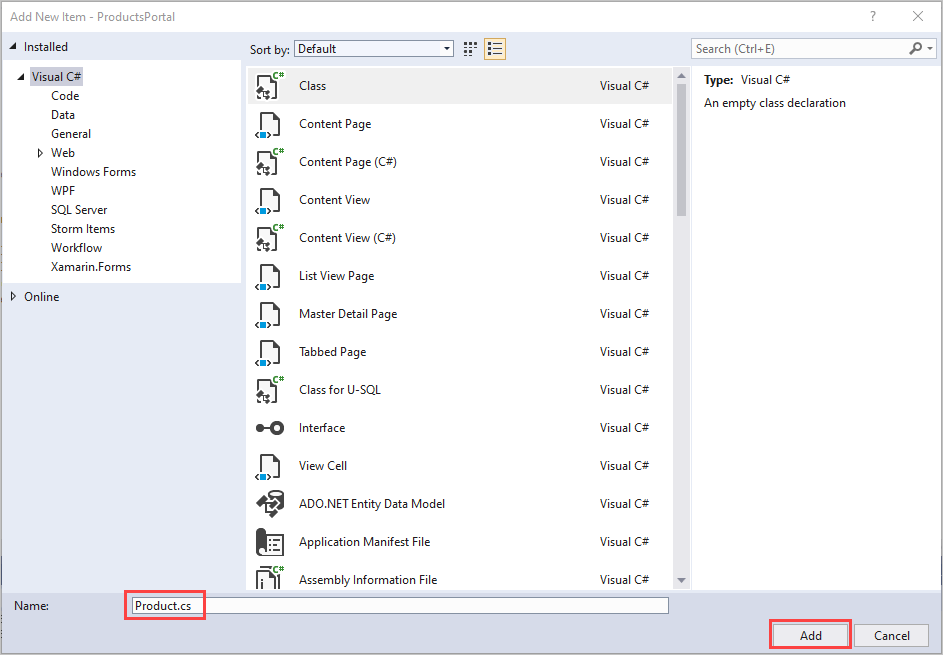
In Solution Explorer, right-click Models and then select Add > Class.
Name the class Product.cs, then select Add.
Modify the web application
In the Product.cs file in Visual Studio, replace the existing namespace definition with the following code:
 // Declare properties for the products inventory.
 namespace ProductsWeb.Models
 {
    public class Product
    {
        public string Id { get; set; }
        public string Name { get; set; }
        public string Quantity { get; set; }
    }
 }
In Solution Explorer, expand Controllers, then double-click HomeController.cs to open the file in Visual Studio.
In HomeController.cs, replace the existing namespace definition with the following code:
namespace ProductsWeb.Controllers
{
    using System.Collections.Generic;
    using System.Web.Mvc;
    using Models;

    public class HomeController : Controller
    {
        // Return a view of the products inventory.
        public ActionResult Index(string Identifier, string ProductName)
        {
            var products = new List<Product>
                {new Product {Id = Identifier, Name = ProductName}};
            return View(products);
        }
     }
}
In Solution Explorer, expand Views > Shared, then double-click _Layout.cshtml to open the file in the Visual Studio editor.
Change all occurrences of
My ASP.NET Applicationto Northwind Traders Products.Remove the
Home,About, andContactlinks. In the following example, delete the highlighted code.
In Solution Explorer, expand Views > Home, then double-click Index.cshtml to open the file in the Visual Studio editor. Replace the entire contents of the file with the following code:
@model IEnumerable<ProductsWeb.Models.Product>

@{
         ViewBag.Title = "Index";
}

<h2>Prod Inventory</h2>

<table>
          <tr>
              <th>
                  @Html.DisplayNameFor(model => model.Name)
              </th>
              <th></th>
              <th>
                  @Html.DisplayNameFor(model => model.Quantity)
              </th>
          </tr>

@foreach (var item in Model) {
          <tr>
              <td>
                  @Html.DisplayFor(modelItem => item.Name)
              </td>
              <td>
                  @Html.DisplayFor(modelItem => item.Quantity)
              </td>
          </tr>
}

</table>
To verify the accuracy of your work so far, you can select Ctrl+Shift+B to build the project.
Run the app locally
Run the application to verify that it works.
- Ensure that ProductsPortal is the active project. Right-click the project name in Solution Explorer and select Set As Startup Project.
- In Visual Studio, select F5.
Your application should appear, running in a browser.
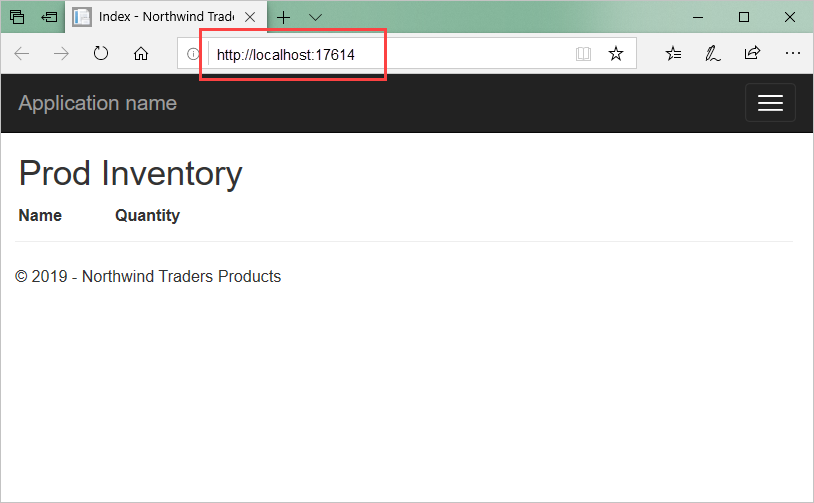
Put the pieces together
The next step is to hook up the on-premises products server with the ASP.NET application.
If it isn't already open, in Visual Studio, open the ProductsPortal project you created in the Create an ASP.NET application section.
Similar to the step in the Create an on-premises server section, add the NuGet package to the project references. In Solution Explorer, right-click the ProductsPortal project, then select Manage NuGet Packages.
Search for WindowsAzure.ServiceBus and select the WindowsAzure.ServiceBus item. Then finish the installation and close this dialog box.
In Solution Explorer, right-click the ProductsPortal project, then select Add > Existing Item.
Navigate to the ProductsContract.cs file from the ProductsServer console project. Highlight ProductsContract.cs. Select the down arrow next to Add, then choose Add as Link.
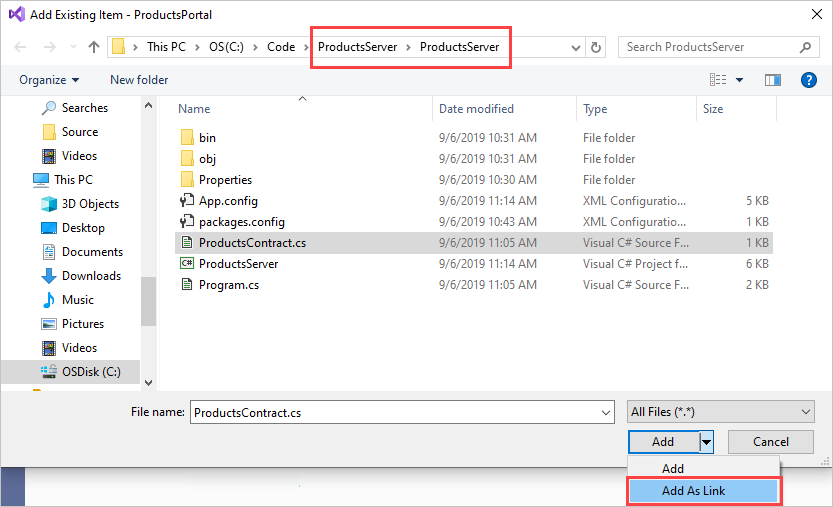
Now open the HomeController.cs file in the Visual Studio editor and replace the namespace definition with the following code. Be sure to replace
yourServiceNamespacewith the name of your Relay namespace, andyourKeywith your SAS key. This code lets the client call the on-premises service, returning the result of the call.namespace ProductsWeb.Controllers { using System.Linq; using System.ServiceModel; using System.Web.Mvc; using Microsoft.ServiceBus; using Models; using ProductsServer; public class HomeController : Controller { // Declare the channel factory. static ChannelFactory<IProductsChannel> channelFactory; static HomeController() { // Create shared access signature token credentials for authentication. channelFactory = new ChannelFactory<IProductsChannel>(new NetTcpRelayBinding(), "sb://yourServiceNamespace.servicebus.windows.net/products"); channelFactory.Endpoint.Behaviors.Add(new TransportClientEndpointBehavior { TokenProvider = TokenProvider.CreateSharedAccessSignatureTokenProvider( "RootManageSharedAccessKey", "yourKey") }); } public ActionResult Index() { using (IProductsChannel channel = channelFactory.CreateChannel()) { // Return a view of the products inventory. return this.View(from prod in channel.GetProducts() select new Product { Id = prod.Id, Name = prod.Name, Quantity = prod.Quantity }); } } } }In Solution Explorer, right-click the ProductsPortal solution. Make sure to right-click the solution, not the project. Select Add > Existing Project.
Navigate to the ProductsServer project, then double-click the ProductsServer.csproj solution file to add it.
ProductsServer must be running to display the data on ProductsPortal. In Solution Explorer, right-click the ProductsPortal solution and select Properties to display Property Pages.
Select Common Properties > Startup Project and choose Multiple startup projects. Ensure that ProductsServer and ProductsPortal appear, in that order, and that the Action for both is Start.
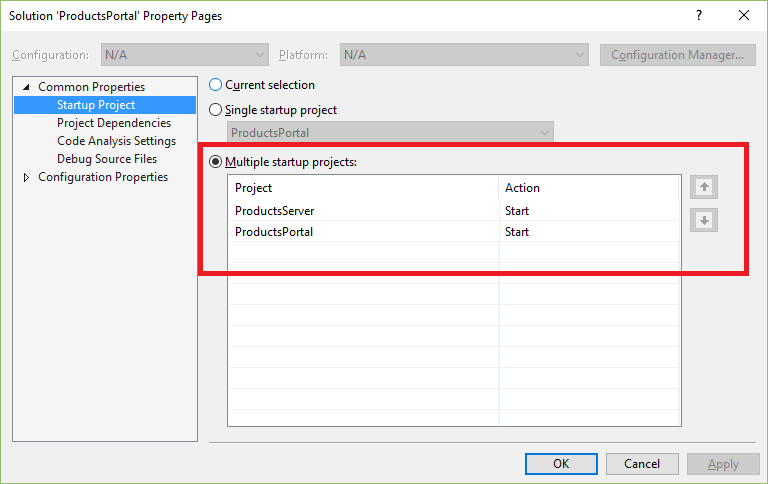
Select Common Properties > Project Dependencies on the left side.
For Projects, choose ProductsPortal. Ensure that ProductsServer is selected.
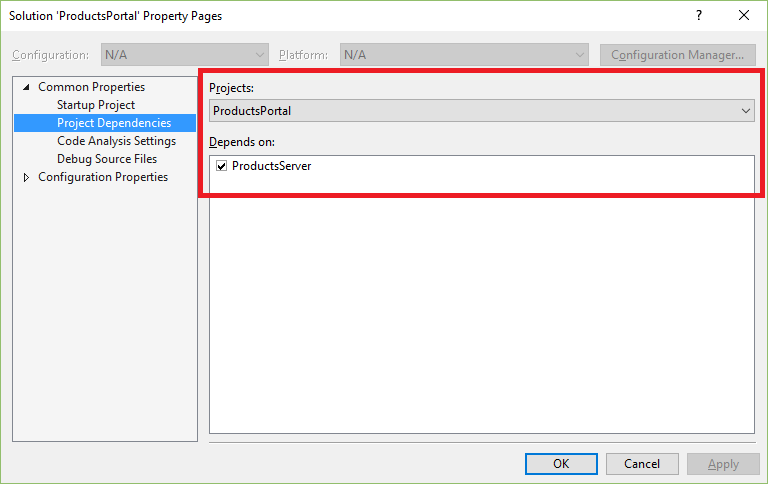
For Projects, choose ProductsServer. Ensure that ProductsPortal isn't selected, and then select OK to save your changes.
Run the project locally
To test the application locally, in Visual Studio select F5. The on-premises server, ProductsServer, should start first, then the ProductsPortal application should start in a browser window. This time, you see that the product inventory lists data retrieved from the product service on-premises system.
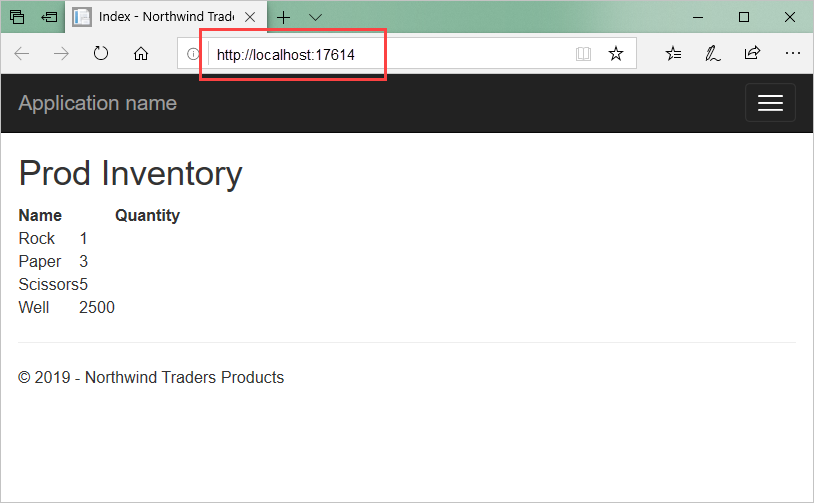
Select Refresh on the ProductsPortal page. Each time you refresh the page, you see the server app display a message when GetProducts() from ProductsServer is called.
Close both applications before proceeding to the next section.
Deploy the ProductsPortal project to an Azure web app
The next step is to republish the Azure Web app ProductsPortal front end:
In Solution Explorer, right-click the ProductsPortal project, and select Publish. On the Publish page, select Publish.
Note
You may see an error message in the browser window when the ProductsPortal web project is automatically launched after the deployment. This is expected, and occurs because the ProductsServer application isn't running yet.
Copy the URL of the deployed web app. You need the URL later. You can also get this URL from the Azure App Service Activity window in Visual Studio:
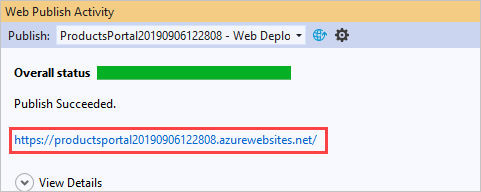
Close the browser window to stop the running application.
Before running the application in the cloud, you must ensure that ProductsPortal is launched from within Visual Studio as a web app.
In Visual Studio, right-click the ProductsPortal project and select Properties.
Select Web. Under Start Action, choose Start URL. Enter the URL for your previously deployed web app, in this example,
https://productsportal20190906122808.azurewebsites.net/.
Select File > Save All.
Select Build > Rebuild Solution.
Run the application
Select F5 to build and run the application. The on-premises server, which is the ProductsServer console application, should start first, then the ProductsPortal application should start in a browser window, as shown here:
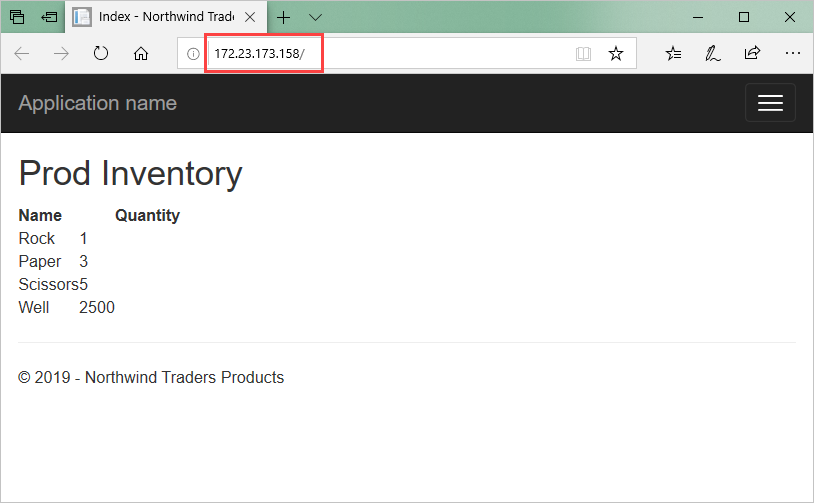
The product inventory lists data retrieved from the product service on-premises system, and displays that data in the web app. Check the URL to make sure that ProductsPortal is running in the cloud, as an Azure web app.
Important
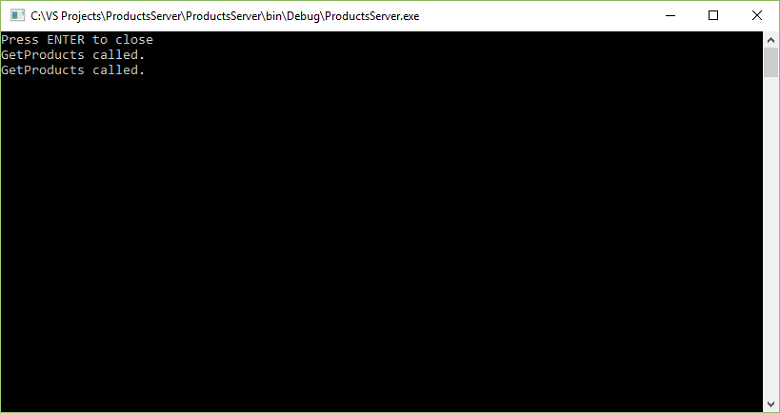
The ProductsServer console application must be running and able to serve the data to the ProductsPortal application. If the browser displays an error, wait a few more seconds for ProductsServer to load and display the following message, then refresh the browser.
In the browser, refresh the ProductsPortal page. Each time you refresh the page, you see the server app display a message when GetProducts() from ProductsServer is called.
Next step
Advance to the following tutorial: