Create your first model
The following procedure shows you how to create a Document processing model in AI Builder. This guided experience walks through each step of the model creation process. You can save your work and return at any time. Power Automate saves your progress automatically as you move between the steps.
Sign in to AI Builder and select the model
Follow these steps to sign in to AI Builder and select the model:
Go to Power Automate and sign in with your organizational account.
In the left navigation pane, select AI Hub, then AI Models. If you don't see the option for AI Hub, select the More option and you should be able to find AI Hub in the popup.
Under Discover an AI capability select AI models.
On the AI models screen, notice there are multiple AI models to choose from. When you first arrive on the screen, the Most popular models are visible, but you can see the different filtering options for the models across the top. There are many different ones to choose from.
Invoice processing is the one we want. Go ahead and select that one.
The Extract information from invoices window pops up on your screen with some information and a quick demonstration showing invoice images you can select, and the Extracted information gathered from the AI model recognizing text fields and data tables. Since we're going to create a custom model, select Create custom model.
Power Automate opens this AI model into a guided experience for setup. Since we've already defined this document as an invoice, we land on the Choose information to extract step. Notice that our model already includes 29 fields, and 1 table. We have the option to add more data fields as well.
The fields that we'll spot check for inclusions are as follows:
Invoice number (the invoiceID field)
Billing/Customer name and address (the billingAddressRecipient and billingAddress fields, or customerAddressRecipient and customerAddress fields)
Total amount (invoiceTotal)
Invoice date (invoiceDate)
Notice that any numeric, date, and table fields are selectable so that you can define formatting for each of those fields. For example, select amountDue and you'll see a Format dropdown where you can tell AI Builder what to use as the decimal separator.
Our invoice model already includes the fields that we need, so we don't need to define any custom fields. Select Next at the bottom to continue.
Add collections of documents
If you want to create your model by using your own documents, make sure that you have at least five examples that use the same layout. Otherwise, you can use sample data we'll be using in this guided experience. You can download the sample data in English version or in Japanese version. You'll need to extract the zipped file to a location of your choice.
Once you have setup a folder with at least five documents, we'll build our first collection. Select the New collection button.
You've now created a space to add a collection called Collection 1. Rename the name of the first collection to Adatum.
Add a second New collection and name the second collection Contoso.
Now that we created our two collections, we need to upload at least five samples for each collection.
For the collection named Adatum, upload the five documents from the AI Builder Document processing Sample Data/Adatum/Train folder. You'll do the same with the Contoso training documents. Repeat the steps below with each collection.
Select the + icon. A panel appears on the right side of your screen, prompting you to add documents.
Notice that your documents can be in various formats, but they must have a similar structure for AI Builder to use them. They can be up to 50 MB or 500 pages in total. Select Add documents to continue.
From Select source, select My device (or wherever you've saved invoice documents).
If you're using sample documents, find the folder where you extracted the documents, open the sub-folder marked Train and select all five of the documents. Then select Open.
An Upload documents popup window appears with a thumbnail preview. Select the Upload 5 documents button to continue. Select Done to close the popup.
Once you've uploaded the sample documents to both collections, select Next to continue.
Tag documents
Now is the time to teach (or verify) your AI model can extract the pre-defined fields and tables. We begin by tagging/checking the sample documents you've uploaded. As you tag (or annotate) all of the expected fields in each document, you'll see a check appear over that document and the red dot at the top corner will disappear.
AI builder expects you to check its work in finding the right/required fields in all of the training documents.
To start the tagging process, select the Contoso collection from the panel on the right.
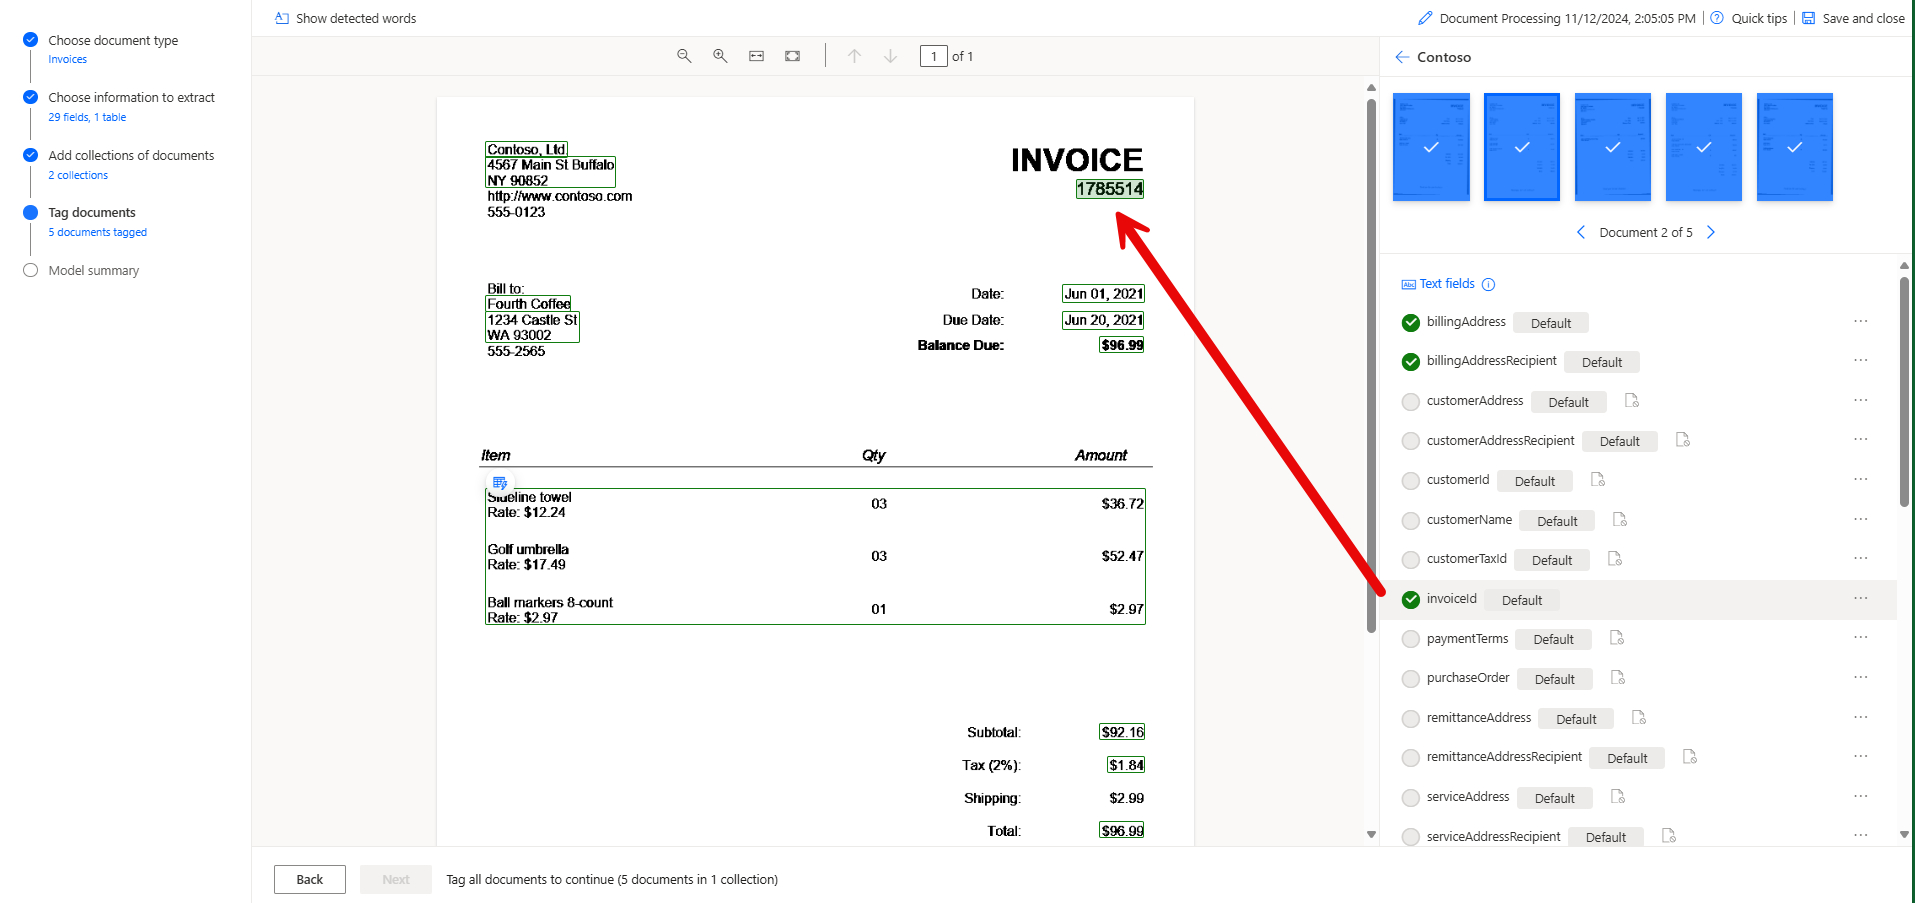
On the first document, AI Builder has already identified some fields in our document, including billingAddress, billingAddressRecipient, invoiceId, vendorAddress, vendorAddressRecipient, amountDue, invoiceTotal, subTotal, totalTax, dueDate, invoiceDate, and a table of items.
Check and Tag fields
Let’s start by checking/tagging our defined fields Invoice number, Billing name, Billing address, Due date, and Total amount. AI builder has already tagged them.
In the tagged fields panel on the right for each document, as you hover over these fields, highlights appear in the document. This is how you can verify that AI builder has the correct field tagged. Scroll through the list, hover over the green-checked fields and ensure that AI builder is tagging the correct information.
As you work your way through, and see that all of our fields are tagged, simply select the next training document from the right side panel to continue the process. Once you've checked all of the documents, your model is ready for testing.
If your invoice doesn't have the right field tagged, you can easily fix this problem.
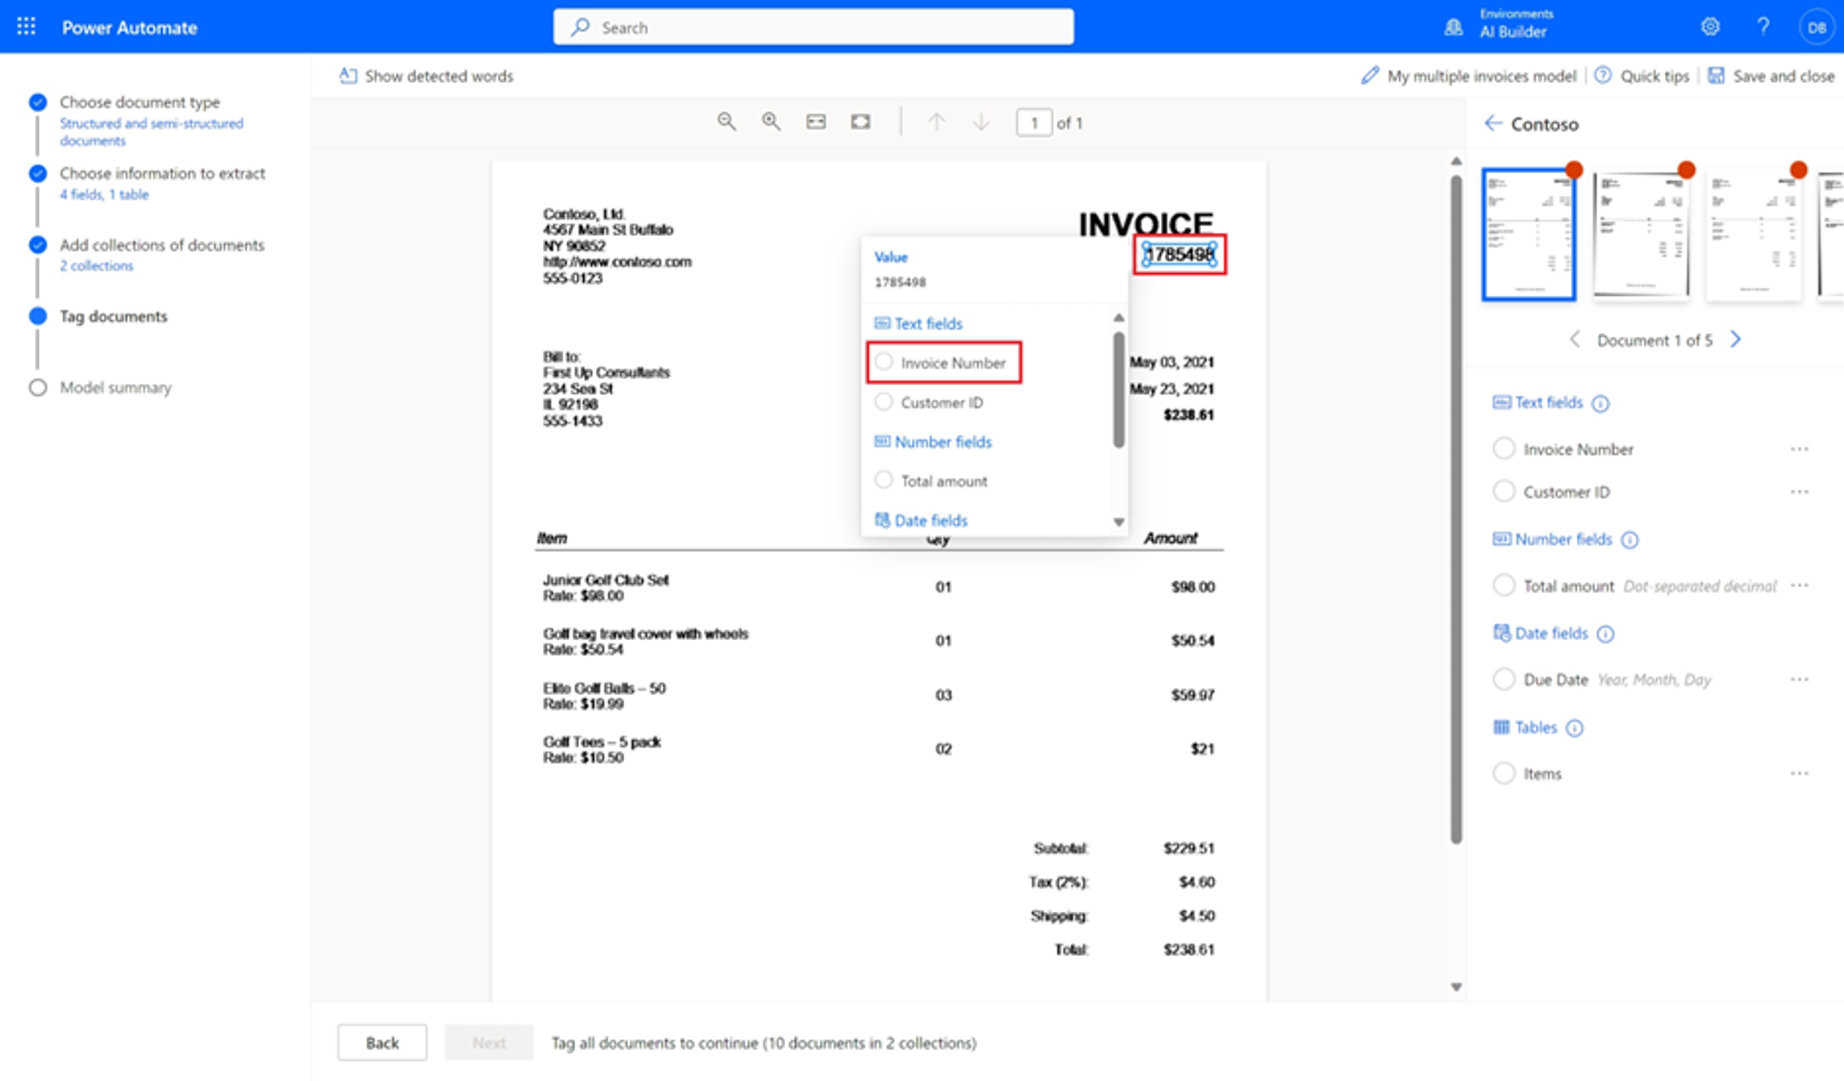
To tag a field, draw a rectangle around the field on the document and select the field name it corresponds to, as in the image below.
You can resize to adjust your selection at any time.
When you hover over any untagged words in your documents, light blue dashed boxes appear. The boxes indicate that you can draw a rectangle around those words to select a field.
Not all defined fields and tables need to necessarily be in all documents. In the Contoso collection, you'll see that the Customer ID field isn't present. If AI model can't find a field that it's looking for, it will simply mark it as "Not available in document" and display a document icon with a slashed circle in the bottom right corner just to the right of the field name.
If you think AI builder is wrong, you can tell the AI model that fields are or aren't present by going to the field or table on the right panel and selecting the ellipsis (...) to the right of the field. Then you can select either Not available in document or Available in document, accordingly.
As you check the Adatum documents, you'll see that AI Builder has tagged customerAddress and customerAddressRecipients, whereas billingAddress and billingAddressRecipient are marked as Not available in document.
Power Automate will warn you if you have more than one field tagged with the same data, so you'll want to go to one of those fields and remove the tag, by selecting the ellipsis next to the field and then selecting the Remove tag option. However, you must tag all fields that are available in the document to continue.
Check and Tag tables
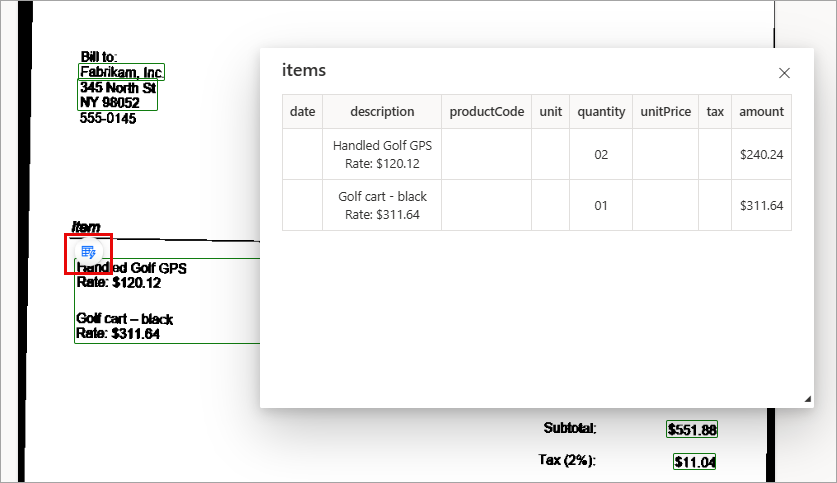
In the Contoso training documents, AI Builder has already tagged this table as items. Let's check this table to see what data is coming back.
If you go to any of the training invoices and select the data table icon that appears at the top left of the table inside of the invoice. Selecting the icon reveals an option to Preview table, Edit table, or Remove tag. Select the Preview table option. Below is an example of what you'll see with Preview table.
In the event that AI Builder might not have your table automatically tagged. Here's how you can tag one manually (if your table is tagged, you can skip to the next section Tag all documents below):
Draw a rectangle around the table in the document you're interested in, and then select the table name that it corresponds to.
The content of the panel on the right changes.
Draw rows by left clicking between row separators.
Draw columns by pressing Ctrl + left-click (or ⌘ left-click on macOS).
Once the rows and columns have been set, assign the headers to extract by selecting the header column and mapping it to the desired one.
A preview of how the table with the extracted data appears on the panel on the right.
If the header of the table has been tagged, select Ignore first row so the header of the table isn't extracted as the table content.
Tag all documents
Once you have finished tagging one document, move to the next one to tag by clicking the navigation arrows below the document preview on the top right.
Once you have finished tagging one collection, navigate back to the collection list to tag the second collection.
Model summary and train
After you've successfully tagged all documents across all collections, you'll see a green notification at the top of your screen. Follow these steps to continue:
Select the Next button at the bottom of the screen.
Review the Model summary. Under Information to extract you'll see that Customer ID and Due Date only appeared in five examples out of 10, same with our Billing and Customer information fields. Other fields appeared in all 10 examples.
If everything looks acceptable, select Train.
Next steps
Now that you've created a Document processing model in AI Builder, you'll learn how to test your model and use it in Power Apps and Power Automate.


