Provide a Source Query (SQL Server Import and Export Wizard)
Applies to:
SQL Server
SSIS Integration Runtime in Azure Data Factory
If you specified that you want to provide a query to select the data to copy, the SQL Server Import and Export Wizard shows Provide a Source Query. On this page, you write and test the SQL query that selects the data to copy from the data source to the destination. You can also paste the text of a saved query, or load the query text from a file.
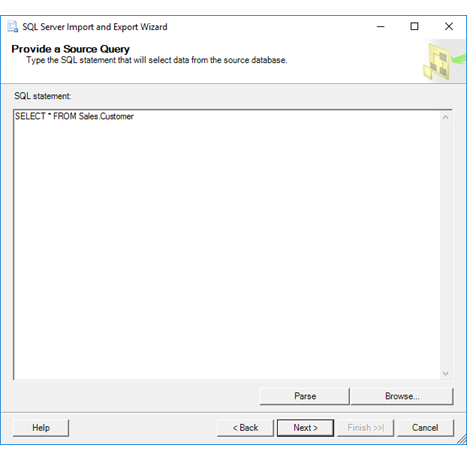
Screen shot of the Source Query page
The following screen shot shows the Provide a Source Query page of the Wizard.
In this simple example, the user has entered the query SELECT * FROM Sales.Customer to copy all rows and all columns from the Sales.Customer table in the source database.
SELECT *means copy all columns.- The absence of a
WHEREclause means copy all rows.

Provide the query and check its syntax
SQL statement
Type a SELECT query to retrieve specific rows and columns of data from the source database. You can also paste the text of a saved query, or load the query from a file by clicking Browse.
For example, the following query retrieves the SalesPersonID, SalesQuota, and SalesYTD from the AdventureWorks sample database for sales persons whose commission percentage is more than 1.5 percent.
SELECT SalesPersonID, SalesQuota, SalesYTD
FROM Sales.SalesPerson
WHERE CommissionPct > 0.015
For more examples of SELECT queries, see SELECT Examples (Transact-SQL) or search online.
If your data source is Excel, see Provide a source query for Excel later in this topic to learn how to specify Excel worksheets and ranges in a query.
Parse
Check the syntax of the SQL statement that you entered in the SQL statement text box.
Note
If the time that's required to check the syntax of the statement exceeds the timeout value of 30 seconds, parsing stops and raises an error. You won't be able to move past this page of the wizard until parsing succeeds. One solution to avoid a timeout is to create a database view based on the query that you want to use, and then to query the view from the wizard, instead of entering the query text directly.
Browse
Select a saved file that contains the text of a SQL query by using the Open dialog box. Selecting a file copies the text from the file into the SQL statement text box.
Provide a source query for Excel
Important
For detailed info about connecting to Excel files, and about limitations and known issues for loading data from or to Excel files, see Load data from or to Excel with SQL Server Integration Services (SSIS).
There are three types of Excel objects that you can query.
Worksheet. To query a worksheet, append the $ character to the end of the sheet name and add delimiters around the string - for example, [Sheet1$].
SELECT * FROM [Sheet1$]Named range. To query a named range, simply use the range name - for example, MyDataRange.
SELECT * FROM MyDataRangeUnnamed range. To specify a range of cells that you haven't named, append the $ character to the end of the sheet name, add the range specification, and add delimiters around the string - for example, [Sheet1$A1:B4].
SELECT * FROM [Sheet1$A1:B4]
What's next?
After you write and test the SQL query that selects the data to copy, the next page depends on the destination for your data.
For most destinations the next page is Select Source Tables and Views. On this page, you review the query that you provided and optionally choose columns to copy and preview sample data. For more info, see Select Source Tables and Views.
If your destination is a flat file, the next page is Configure Flat File Destination. On this page, you specify formatting options for the destination flat file. (After you configure the flat file, the next page is then Select Source Tables and Views.) For more info, see Configure Flat File Destination.