External key providers in SQL Server Big Data Clusters
Important
The Microsoft SQL Server 2019 Big Data Clusters add-on will be retired. Support for SQL Server 2019 Big Data Clusters will end on February 28, 2025. All existing users of SQL Server 2019 with Software Assurance will be fully supported on the platform and the software will continue to be maintained through SQL Server cumulative updates until that time. For more information, see the announcement blog post and Big data options on the Microsoft SQL Server platform.
This article provides details for how to configure external key providers in SQL Server Big Data Clusters for key management.
To learn more about how key versions are used on SQL Server Big Data Clusters, see: Key Versions in SQL Server Big Data Clusters.
For information on configuring and using encryption at rest see the following guides:
- Encryption at rest concepts and configuration guide
- SQL Server Big Data Clusters HDFS Encryption Zones usage guide
- SQL Server Big Data Clusters Transparent Data Encryption (TDE) at rest usage guide
Prerequisites
- SQL Server 2019 Big Data Clusters release notes. CU11+ required.
- Big data tools including azdata 20.3.5+.
- SQL Server Big Data Clusters user with Kubernetes administrative privileges, a member of the clusterAdmins role. For more information, see Manage big data cluster access in Active Directory mode.
- External provider template application. See SQL Server BDC Encryption at Rest.
Root key encryption using external providers
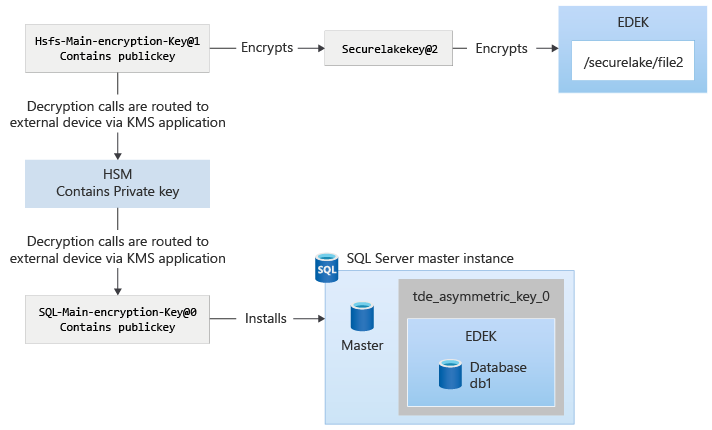
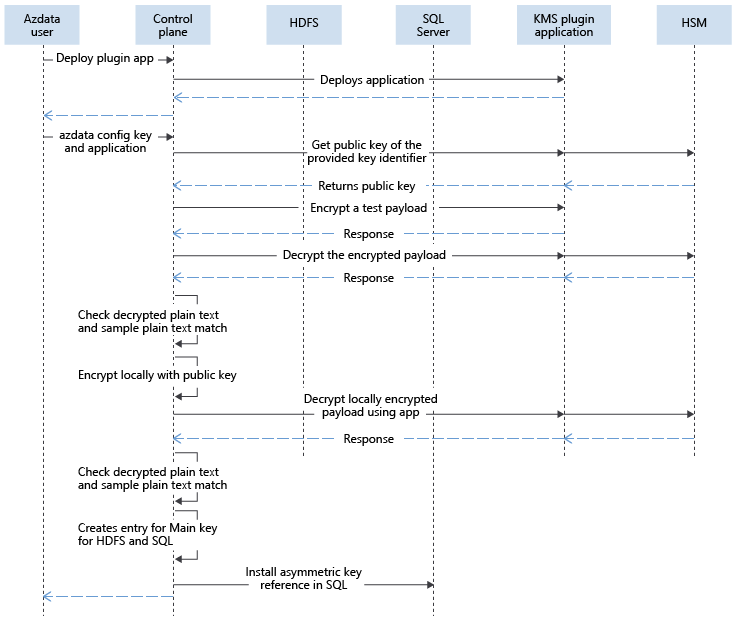
With the capability to bring in external keys in SQL Server Big Data Clusters, the main encryption key fetches the public key using the application that the customer deploys. When HDFS keys are rotated and used, the calls to decrypt the HDFS keys are sent to the control plane, and then redirected to the application using the key identifier provided by the customer. For SQL Server, the requests to encrypt are sent and fulfilled by the control plane, since it has the public key. The requests to decrypt the Data Encryption Key (DEK) from SQL Server are sent to control plane as well, and then are redirected to the application that interfaces with the external provider, such as a Hardware Security Module (HSM).

The following diagram explains the interactions while configuring external keys in control plane:
After the key is installed, the encryption and decryption of different payloads are protected by the main encryption key. This protection is similar to system-managed keys, except that the decryption calls routed to control plane are then routed to the key management service (KMS) plugin app. The KMS plugin app routes the request to appropriate location, such as an HSM, Hashicorp Vault, or another product.
Configuration
The provided template application is the plugin used to interface with the external key provider. This application needs to be customized and deployed into Big Data Clusters to serve as an integration point with the chosen external key provider.
In the template application, there are examples on how to integrate with external provider implementations using the standard PKCS11 protocol using SoftHSM. There are also examples using Azure Key Vault and Hashicorp Vault. The template applications are provided as-is as reference implementations.
The following sections provide the steps required to configure an external key provider to serve as the root key of encryption for SQL Server databases and HDFS encryption zones.
Create an RSA 2048 key in your external key provider
Create a PEM file with a 2048-bit RSA key and upload it to the key value store in your external key provider.
For example, the key file might be added to the KV store in Hashicorp Vault at path bdc-encryption-secret and the name of the secret can be rsa2048.
Customize and deploy the integration application on Big Data Clusters
In your local machine, navigate to the folder that contains kms_plugin_app, the Big Data Clusters AppDeploy template applications.
Customize the application by choosing one of the templates and adjusting it to your scenario:
- File custom_softhsm.py contains a reference implementation using SoftHSM
- File custom_akv.py contains an Azure Key Vault example
- File custom_hcv.py contains a HashiCorp Vault example
Caution
Don't change the function contracts or signatures, which are the integration points. Change only the function implementations, if needed.
Name the file you're creating from the template above accordingly. For example, save custom_softhsm.py as my_custom_integration_v1.py and then perform your customizations. This approach is important for the next step.
app.py is the entry point that will load the application. In this file, you're required to change line 11 to point to the custom file name without the .py extension from the previous step. Per the example above, change:
...
import utils
from json_objects import EncryptDecryptRequest
import custom_softhsm as custom

def handler(operation, payload, pin, key_attributes, version):
...
to the following value:
...
import utils
from json_objects import EncryptDecryptRequest
import my_custom_integration_v1 as custom

def handler(operation, payload, pin, key_attributes, version):
...
From the folder that has the spec.yaml, deploy the application to Big Data Clusters by using this command:
azdata app create -sWait for the application deployment to complete and the ready status can be checked using this command:
azdata app list
Configure Big Data Clusters to use the external key provider
Set the
AZDATA_EXTERNAL_KEY_PINenvironment variable to provide the token that allows access to the external key provider:export AZDATA_EXTERNAL_KEY_PIN=<your PIN/token here>Note
The integration application deployment process uses the token to access your external key provider. However the
AZDATA_EXTERNAL_KEY_PINvariable is saved encrypted in Big Data Clusters control plane so that it can be interpreted by the application. A different authentication mechanism can be used too, but the application needs to be changed. Check the custom*.py python application for the complete integration logic that's being used.Configure the key in Big Data Clusters using the following
azdatacommand structure. Change the required parameters to your specific implementation. The following example uses a HashiCorp Vault structure as provided by custom2.py.azdata bdc kms update --app-name <YOUR-APP-NAME> --app-version <YOUR-APP-VERSION> \ --key-attributes keypath=<YOUR-KEY-PATH>,vaulturl=http://<YOUR-IP>:<YOUR-PORT>,keyname=<YOUR-KEY-NAME> \ --provider ExternalThe
--provider Externalparameter value configures Big Data Clusters KMS to use the integration application as the endpoint for key operations.Verify the root encryption key as the externally managed one by using the following command.
azdata bdc kms show
Encrypt your databases and encryption zones with the new keys
After the configuration, SQL Server databases and HDFS encryption zones are still encrypted by the previous key hierarchy. You need to explicitly encrypt using the externally managed keys.
In SQL Server, a new asymmetric key based on the externally managed key is installed. Use that to encrypt your databases.
The asymmetric key can be seen using the following T-SQL query, with the sys.asymmetric_keys system catalog view.
USE master;
select * from sys.asymmetric_keys;
The asymmetric key appears with the naming convention tde_asymmetric_key_<version>. The SQL Server administrator can then change the protector of the DEK to the asymmetric key using ALTER DATABASE ENCRYPTION KEY. For example, use the following T-SQL command:
USE db1;
ALTER DATABASE ENCRYPTION KEY ENCRYPTION BY SERVER ASYMMETRIC KEY tde_asymmetric_key_0;
Run the following command to check the current encryption key:
azdata bdc hdfs key describeGet information about the version of the key protecting the encryption zone key:
azdata bdc hdfs key describe --name <key name>Roll your key to the new external managed key:
azdata bdc hdfs key roll --name <new key name>Start encryption by using this command:
azdata bdc hdfs encryption-zone reencrypt –-path <your EZ path> --action startVerify the key hierarchy using the following commands:
azdata bdc kms show
azdata bdc hdfs key describe
