Send in-app notifications within model-driven apps
Developers of model-driven apps can configure notifications to be displayed to app users as a toast or within the notification center. Your model-driven app automatically polls the system for new notifications and displays them to the user. The notification sender or your system administrator can configure how the notification is shown and how it can be dismissed. Notifications appear in the notification center until the recipient dismisses them or they expire. By default, a notification expires after 14 days but your administrator can override this setting.
Notifications are user-specific. Each notification is intended for a single user, identified as the recipient when the notification is sent. Sending a notification to a team isn't supported. If you need to send notifications to multiple users, you must create notifications for each individual user.
This article outlines the steps for how to send in-app notifications to a specific user. To see how these notifications appear in applications, see In-app notifications in model-driven apps.
Enable the in-app notification feature
To use the in-app notification feature, you need to enable the In-app notifications setting. This setting is stored within the model-driven app.
Sign in to Power Apps.
Open the solution that contains the model-driven app.
Select the model-driven app and select the Edit split menu to open using the modern app designer.
Open Settings and switch to Features.
Enable In-app notifications.

Select Save to save the settings change.
Select Publish on the model-driven app.
Send basic in-app notifications
Notifications can be sent using the SendAppNotification message.
See SendAppNotification Action for information on the message and parameters.
The SendAppNotification message doesn't currently have request and response classes in the Dataverse SDK for .NET. To get strongly typed classes for this message, you must generate classes or use the underlying OrganizationRequest and OrganizationResponse classes. More information: Use messages with the SDK for .NET.
The SendAppNotification message uses open types, enabling dynamic properties on the in-app notification. For example, a notification can have zero to many actions, and each action may have different action types. Open types enable having dynamic properties for the actions depending on the action types selected. More information: Use open types with custom APIs
The following basic examples show how to use the API to send in-app notifications.

This example uses the custom Example.SendAppNotificationRequest function described in Creating a function for your client script below.
var SendAppNotificationRequest = new Example.SendAppNotificationRequest(
    title = "Welcome",
    recipient = "/systemusers(<GUID of the user>)",
    body = "Welcome to the world of app notifications!",
    priority = 200000000,
    iconType = 100000000,
    toastType = 200000000,
);

Xrm.WebApi.online.execute(SendAppNotificationRequest).then(function (response) {
    if (response.ok) {
        console.log("Status: %s %s", response.status, response.statusText);

        return response.json();
    }
})
.then(function (responseBody) {
    console.log("Response Body: %s", responseBody.NotificationId);
})
.catch(function (error) {
    console.log(error.message);
});
Notification polling
In-app notifications use polling to retrieve notifications periodically when the app is running. New notifications are retrieved at start of the model-driven app and when a page navigation occurs as long as the last retrieval is more than one minute ago. If a user stays on a page for a long duration, new notifications aren't retrieved until the user navigates to another page.
Notification table
Notifications sent using the SendAppNotification message are stored in the Notification (appnotification) table (Web API appnotification). The following are selected columns for the table.
| Display Name | Schema Name | Description |
|---|---|---|
| Title | Title |
The title of the notification. |
| Owner | OwnerId |
The user who receives the notification. While this column can be set to either a user or team, you must only set this to a user. The notification can't be set to a team. |
| Body | Body |
Details about the notification. |
| IconType | IconType |
The list of predefined icons. The default value is Info. For more information, go to Changing the notification icon later in this article. |
| Toast Type | ToastType |
The list of notification behaviors. The default value is Timed. For more information, go to Changing the notification behavior later in this article. |
| Priority | Priority |
Enables prioritization of notifications, which determines the order in which the notifications are displayed in the notification center. For more information, see Changing the notification behavior later in this article. |
| Expiry (seconds) | TTLInSeconds |
The number of seconds from when the notification should be deleted if not already dismissed. |
| Data | Data |
JSON that's used for extensibility and parsing richer data into the notification. The maximum length is 5,000 characters. |
Note
The appmoduleid field is not used in the table.
Customizing the notification
In addition to the basic properties of the notification, you have options for customizing the notification delivered to the user. Customizing the notification involves changing the styles in the Title and Body of the notification, customizing the notification icon, and changing the behavior of the notification.
Using markdown in Title and Body
The Title and Body parameters of the SendAppNotification message don't support markdown defined within the properties. You can adjust the styles of these properties using markdown in the OverrideContent property. This field supports overriding the Title and Body simple strings with a limited subset of markdown styles.
The following is the supported markdown.
| Text Style | Markdown |
|---|---|
| Bold | **Bold** |
| Italic | _Italic_ |
| Bullet list | - Item 1\r- Item 2\r- Item 3 |
| Numbered list | 1. Green\r2. Orange\r3. Blue |
| Hyperlinks | [Title](url) |
Newlines can be included with the body using \n\n\n\n.
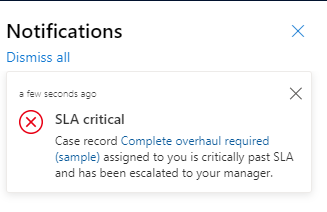
This example shows how to create a notification by adding a custom body definition that includes an inline link.

This example uses the custom Example.SendAppNotificationRequest function described in Creating a function for your client script below.
var SendAppNotificationRequest = new Example.SendAppNotificationRequest(title = "SLA critical",
    recipient = "/systemusers(<GUID of the user>)",
    body = "Record assigned to you is critically past SLA.",
    iconType = 100000003,
    toastType = 200000000,
    overrideContent = {
        "@odata.type": "#Microsoft.Dynamics.CRM.expando",
        "title": "**SLA critical**",
        "body": "Case record [Complete overhaul required (sample)](?pagetype=entityrecord&etn=incident&id=0a9f62a8-90df-e311-9565-a45d36fc5fe8) assigned is critically past SLA and has been escalated to your manager."

    }
);

Xrm.WebApi.online.execute(SendAppNotificationRequest).then(function (response) {
    if (response.ok) {
        console.log("Status: %s %s", response.status, response.statusText);

        return response.json();
    }
})
.then(function (responseBody) {
    console.log("Response Body: %s", responseBody.NotificationId);
})
.catch(function (error) {
    console.log(error.message);
});
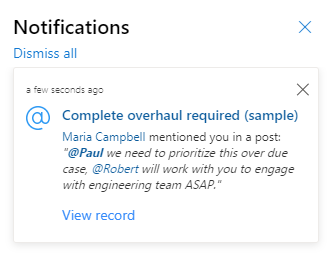
This example adds a custom title and a body definition that allows multiple links, bold formatting, and italic formatting.

This example uses the custom Example.SendAppNotificationRequest function described in Creating a function for your client script below.
var SendAppNotificationRequest = new Example.SendAppNotificationRequest(title = "Complete overhaul required (sample)",
    recipient = "/systemusers(<GUID of the user>)",
    body = "Maria Campbell mentioned you in a post.",
    priority = 200000000,
    iconType = 100000004,
    toastType = 200000000,
    expiry = 120000,
    overrideContent = {
        "@odata.type": "#Microsoft.Dynamics.CRM.expando",
        "title": "[Complete overhaul required (sample)](?pagetype=entityrecord&etn=incident&id=0a9f62a8-90df-e311-9565-a45d36fc5fe8)",
        "body": "[Maria Campbell](?pagetype=entityrecord&etn=contact&id=43m770h2-6567-ebm1-ob2b-000d3ac3kd6c) mentioned you in a post: _\"**[@Paul](?pagetype=entityrecord&etn=contact&id=03f770b2-6567-eb11-bb2b-000d3ac2be4d)** we need to prioritize this overdue case, [@Robert](?pagetype=entityrecord&etn=contact&id=73f970b2-6567-eb11-bb2b-000d3ac2se4h) will work with you to engage with engineering team ASAP.\"_"
    }
);

// Use the request object to execute the function
Xrm.WebApi.online.execute(SendAppNotificationRequest).then(function (response) {
    if (response.ok) {
        console.log("Status: %s %s", response.status, response.statusText);

        // Use response.json() to access the content of the response body.
        return response.json();
    }
})
.then(function (responseBody) {
    console.log("Response Body: %s", responseBody.NotificationId);
})
.catch(function (error) {
    console.log(error.message);
    // handle error conditions
});
Note
OverrideContent is not supported in Power Fx with the xSendAppNotification function.
Changing the notification behavior
You can change in-app notification behavior by setting ToastType to one of the following values.
| Toast Type | Behavior | Value |
|---|---|---|
| Timed | The notification appears for a brief duration (the default is four seconds) and then disappears. | 200000000 |
| Hidden | The notification appears only in the notification center and not as a toast notification. | 200000001 |
Changing the notification icon
You can change the in-app notification icon by setting IconType to one of the following values. When using a custom icon, specify the iconUrl parameter within the OverrideContent parameter.
| Icon Type | Value | Image |
|---|---|---|
| Info | 100000000 |
|
| Success | 100000001 |
|
| Failure | 100000002 |
|
| Warning | 100000003 |
|
| Mention | 100000004 |
|
| Custom | 100000005 |
The following example demonstrates using Web API to send a notification with a custom icon.
POST [Organization URI]/api/data/v9.2/SendAppNotification
HTTP/1.1
Content-Type: application/json; charset=utf-8
OData-MaxVersion: 4.0
OData-Version: 4.0
Accept: application/json

{
  "Title": "Welcome",
  "Body": "Welcome to the world of app notifications!",
  "Recipient": "/systemusers(<Guid of the user>)",
  "IconType": 100000005, // custom
  "OverrideContent": {
    "@odata.type": "#Microsoft.Dynamics.CRM.expando",
    "iconUrl": "/WebResources/cr245_AlertOn" //URL of the image file to be used for the notification icon
  }
}
Setting the notification priority
You can change the order in which notifications display in the notification center by setting the Priority. The following are the optional values:
| Priority | Value |
|---|---|
| Normal | 200000000 |
| High | 200000001 |
The default value is Normal. Notifications are sorted in the notification center by Priority and Created On date, descending. High priority notifications display at the top of the list in the notification center.
Notification actions
In-app notifications support zero to many actions on the notification card. There are three supported action types:
- URL: When the action is selected the web browser navigates to the defined URL.
- Side Pane: When the action is selected, a side pane is opened in the app and loads the defined context in the pane.
- Teams Chat: When the action is selected, a Teams chat is initiated with defined users in the context of a Dynamics 365 record.
Defining a URL action
The URL action type enables navigation from the action on the app notification to a defined URL. The following are the parameters for this action type:
| Parameter | Required | Data type | Description |
|---|---|---|---|
url |
Yes | String | The URL of the web address to be opened when the action is selected. |
navigationTarget |
No | String | This parameter controls where a navigation link opens. The options are:
|
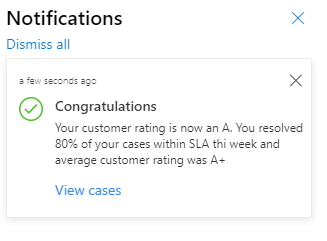
The following example shows how to create a notification with a single URL action.

This example uses the custom Example.SendAppNotificationRequest function described in Creating a function for your client script below.
var SendAppNotificationRequest = new Example.SendAppNotificationRequest(title = "Congratulations",
    recipient = "/systemusers(<GUID of the user>)",
    body = "Your customer rating is now an A. You resolved 80% of your cases within SLA thi week and average customer rating was A+",
    iconType = 100000001,
    toastType = 200000000,
    overrideContent = {
        "@odata.type": "#Microsoft.Dynamics.CRM.expando",
        "title": "**SLA critical**",
        "body": "Case record [Complete overhaul required (sample)](?pagetype=entityrecord&etn=incident&id=0a9f62a8-90df-e311-9565-a45d36fc5fe8) assigned is critically past SLA and has been escalated to your manager."

    },
    actions = {
        "@odata.type": "Microsoft.Dynamics.CRM.expando",
        "actions@odata.type": "#Collection(Microsoft.Dynamics.CRM.expando)",
        "actions": [
            {
                "title": "View cases",
                "data": {
                    "@odata.type": "#Microsoft.Dynamics.CRM.expando",
                    "type": "url",
                    "url": "?pagetype=entitylist&etn=incident&viewid=00000000-0000-0000-00aa-000010001028&viewType=1039",
                    "navigationTarget": "newWindow"
                }
            }
        ]
    }
);

Xrm.WebApi.online.execute(SendAppNotificationRequest).then(function (response) {
    if (response.ok) {
        console.log("Status: %s %s", response.status, response.statusText);

        return response.json();
    }
})
.then(function (responseBody) {
    console.log("Response Body: %s", responseBody.NotificationId);
})
.catch(function (error) {
    console.log(error.message);
});
Defining a side pane action
A side pane action enables opening a side pane to load a defined page when the action is selected from the app notification. More information: Creating side panes by using a client API for more information.
When using the side pane action type, you have control over the options of the side pane itself, and the page that loads in the side pane.
- See createPane for the optional parameters for the pane that is created.
- See navigateTo (Client API reference) for the parameters to be defined for the page that is loaded in the side pane.
The following example shows creating an app notification with a two side pane actions.
This example uses the custom Example.SendAppNotificationRequest function described in Creating a function for your client script below.
var SendAppNotificationRequest = new Example.SendAppNotificationRequest(title = "New task",
    recipient = "/systemusers(<GUID of the user>)",
    body = "A new task has been assigned to you to follow up on the Contoso account",
    iconType = 100000000,
    toastType = 200000000,
    actions = {
        "@odata.type": "Microsoft.Dynamics.CRM.expando",
        "actions@odata.type": "#Collection(Microsoft.Dynamics.CRM.expando)",
        "actions": [
            {
                "title": "View task",
                "data": {
                    "@odata.type": "#Microsoft.Dynamics.CRM.expando",
                    "type": "sidepane",
                    "paneOptions": {
                        "@odata.type": "#Microsoft.Dynamics.CRM.expando",
                        "title": "Task Record",
                        "width": 400
                    },
                    "navigationTarget": {
                        "@odata.type": "#Microsoft.Dynamics.CRM.expando",
                        "pageType": "entityrecord",
                        "entityName": "task",
                        "entityId": "<Task ID>"
                    }
                }
            }
        ]
    }
);

Xrm.WebApi.online.execute(SendAppNotificationRequest).then(function (response) {
    if (response.ok) {
        console.log("Status: %s %s", response.status, response.statusText);

        return response.json();
    }
})
.then(function (responseBody) {
    console.log("Response Body: %s", responseBody.NotificationId);
})
.catch(function (error) {
    console.log(error.message);
});
Defining a Teams chat action
A Teams chat action enables scenarios where a Teams chat is initiated from the app notification. This action uses the embedded Teams feature for Dynamics 365 apps, which provides sellers and agents the ability to chat in Microsoft Teams from within the customer engagement apps, such as Sales Hub, Customer Service Hub, and custom apps.
Note
Microsoft Teams chat in Dynamics 365 must be enabled to use the Teams chat action type. See Work with Microsoft Teams chat in Dynamics 365 for more information.
The action type provides the following options:
- Create a new chat session or open an existing chat session.
- Link the chat session to a Dynamics 365 record or create an unlinked chat.
The following are the parameters for defining a Teams chat action on the app notification.
| Parameter | Data type | Description |
|---|---|---|
chatId |
String | Define a value for the chat ID to open an existing chat. This is the ID of the Teams chat session, which can be obtained from the id property of the chat entity in Microsoft Graph. More information: Get chat for more information. For Teams chat sessions that have been linked to Dynamics 365 records, the association is stored in the Microsoft Teams chat association entity (msdyn_teamschatassociation) table in Dataverse. The ID for the chat session is stored in the Teams Chat Id property of this table. Leave this parameter blank to initiate a new chat session. |
memberIds |
GUID[] | An array of the Microsoft Entra ID user ID values of each of the participants that to be included in a new chat session. Member ID values shouldn't be defined if a value has been defined for the chatId parameter. If the chatId has been defined, then the existing chat is opened, and the members of the existing chat are included in the chat when opened. |
entityContext |
Expando | The entity context provides the Dynamics 365 record to which the chat session should be linked. For example, if the chat session is regarding a specific customer account record, define the account record in this parameter to have the chat session linked to the account and display in the account's timeline. The entity context includes the entityName and recordId parameters, which must be defined to identify the record for the entity context. An entity context shouldn't be defined if a value has been defined for the chatId parameter. If the chatId has been defined, then the existing chat is opened, and the entityContext, whether linked or unlinked, will already have been defined for the existing chat. If the action is creating a new chat session (that is, the chatId parameter hasn't been provided), and the entity context isn't defined, then the new chat session won't be linked to a Dynamics 365 record. |
entityName |
String | Part of the entity context, the logical name of the Dataverse table for the record to which the chat is related to. |
recordId |
GUID | Part of the entity context, this is the ID property of the table defined in the entityName parameter for the record to which the chat will be linked. |
chatTitle |
String | The title of the Teams chat. |
initialMessage |
String | The text of an introduction message you may optionally provide that will be automatically sent when the chat is created. |
The following example shows creating an app notification with a single Teams chat action. When the action is selected on the toast notification it initiates the chat with the participants defined. The chat is linked to a defined account record.
This example uses the custom Example.SendAppNotificationRequest function described in Creating a function for your client script below.
var SendAppNotificationRequest = new Example.SendAppNotificationRequest(title = "New order posted",
    recipient = "/systemusers(<GUID of the user>)",
    body = "A new sales order has been posted for Contoso",
    iconType = 100000000,
    toastType = 200000000,
    actions = {
        "@odata.type": "Microsoft.Dynamics.CRM.expando",
        "actions@odata.type": "#Collection(Microsoft.Dynamics.CRM.expando)",
        "actions": [
            {
                "title": "Chat with sales rep",
                "data": {
                    "@odata.type": "#Microsoft.Dynamics.CRM.expando",
                    "type": "teamsChat",
                    "memberIds@odata.type": "#Collection(String)",
                    "memberIds": ["<Microsoft Entra ID User ID 1>", "<Microsoft Entra ID User ID 2>"],
                    "entityContext": {
                        "@odata.type": "#Microsoft.Dynamics.CRM.expando",
                        "entityName": "account",
                        "recordId": "<Account ID value>"
                    }
                }
            }
        ]
    }
);

Xrm.WebApi.online.execute(SendAppNotificationRequest).then(function (response) {
    if (response.ok) {
        console.log("Status: %s %s", response.status, response.statusText);

        return response.json();
    }
})
.then(function (responseBody) {
    console.log("Response Body: %s", responseBody.NotificationId);
})
.catch(function (error) {
    console.log(error.message);
});
Creating a function for your client script
The client API examples in this topic provide examples of client scripting to send in-app notifications. The examples call a SendAppNotificationRequest function. To complete the examples, you will need to construct the reusable function in your environment. Below is an example of the function.
var Example = window.Example || {};
Example.SendAppNotificationRequest = function (
   title,
   recipient,
   body,
   priority,
   iconType,
   toastType,
   expiry,
   overrideContent,
   actions)
{
    this.Title = title;
    this.Recipient = recipient;
    this.Body = body;
    this.Priority = priority;
    this.IconType = iconType;
    this.ToastType = toastType;
    this.Expiry = expiry;
    this.OverrideContent = overrideContent;
    this.Actions = actions;
};

Example.SendAppNotificationRequest.prototype.getMetadata = function () {
    return {
        boundParameter: null,
        parameterTypes: {
            "Title": {
                "typeName": "Edm.String",
                "structuralProperty": 1
            },
            "Recipient": {
                "typeName": "mscrm.systemuser",
                "structuralProperty": 5
            },
            "Body": {
                "typeName": "Edm.String",
                "structuralProperty": 1
            },
            "Priority": {
                "typeName": "Edm.Int",
                "structuralProperty": 1
            },
            "IconType": {
                "typeName": "Edm.Int",
                "structuralProperty": 1
            },
            "ToastType": {
                "typeName": "Edm.Int",
                "structuralProperty": 1
            },
            "Expiry": {
                "typeName": "Edm.Int",
                "structuralProperty": 1
            },
            "OverrideContent": {
                "typeName": "mscrm.expando",
                "structuralProperty": 5
            },
            "Actions": {
                "typeName": "mscrm.expando",
                "structuralProperty": 5
            },
        },
        operationType: 0,
        operationName: "SendAppNotification",
    };
};
For more examples of client scripting using client API, see Walkthrough: Write your first client script.
Managing security for notifications
The in-app notification feature uses three tables. A user needs to have the correct security roles to receive notifications and to send notifications to themselves or other users.
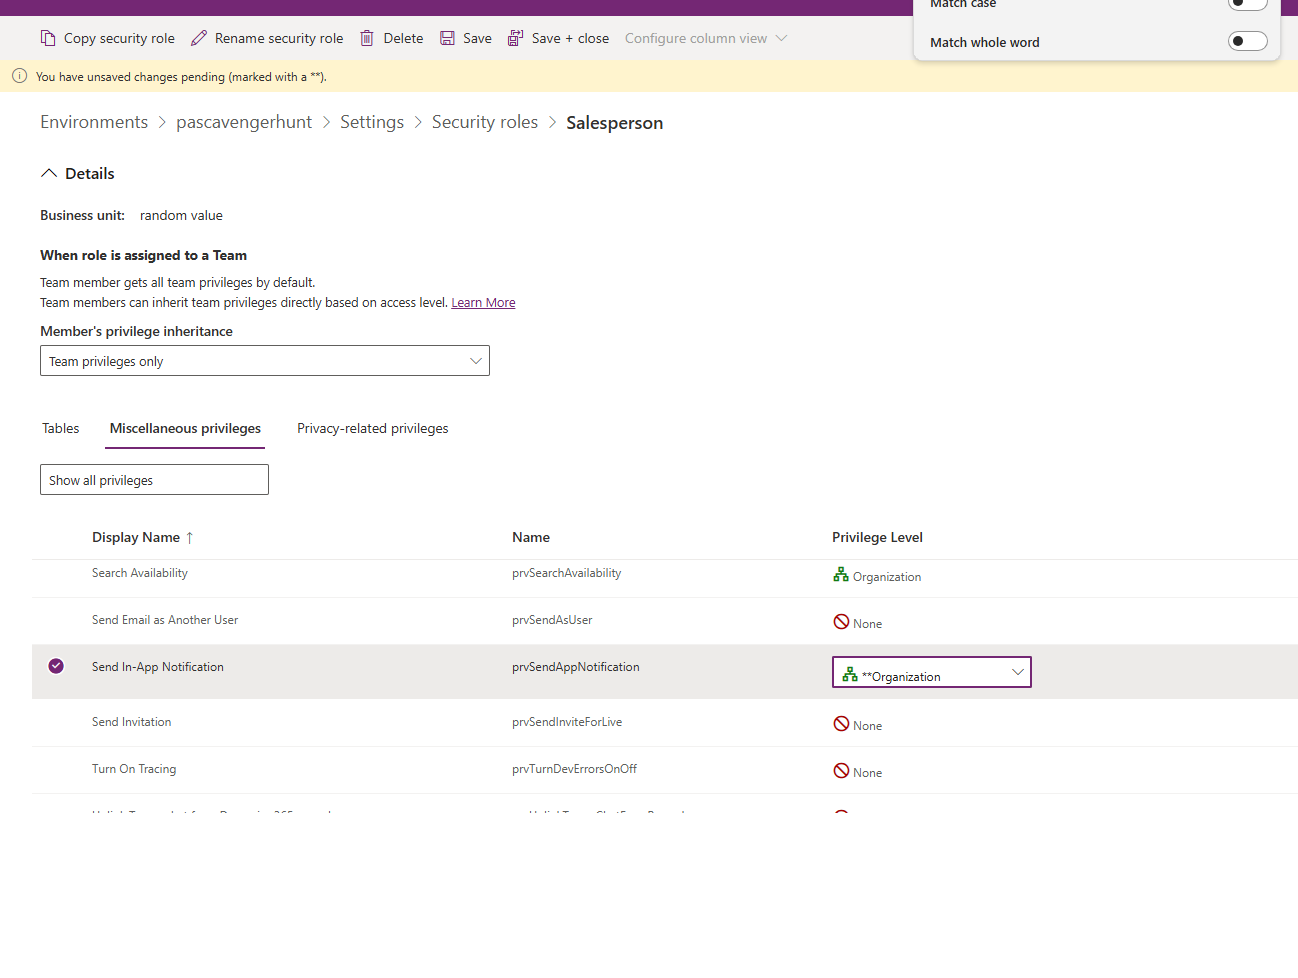
In addition to the appropriate table permissions, a user must be assigned the Send In-App Notification prvSendAppNotification privilege to execute the SendAppNotification message. The privilege is granted to the Environment Maker role by default. It isn't required for sending in-app notifications by directly creating appnotification entity records without executing the SendAppNotification message. It isn't required to receive notifications.
| Usage | Required table privileges |
|---|---|
| User has no in-app notification bell and receives no in-app notification | None |
| User can receive in-app notifications |
|
| User can send in-app notifications to self | Basic: Create privilege on the app notification table. Additionally, Send In-App Notification privilege is needed if using SendAppNotification message. |
| User can send in-app notifications to others | Create privilege with Local, Deep, or Global access level on the app notification table based on the receiving user's business unit. Additionally, Send In-App Notification privilege is needed if using SendAppNotification message. |
| User can delete in-app notifications | Global: Delete privileges on the app notification table. |
The Send In-App Notification privilege can be added to a role using the Role Privilege Picker under the Miscellaneous privileges tab.

Notification storage
Because the app notification table uses the organization's database storage capacity, it's important to consider the volume of notifications sent and the expiration setting. More information: Microsoft Dataverse storage capacity
In-app notifications vs. push notifications
The Power Apps Notification connector is for push notifications, which are separate from in-app notification. Push notifications only appear on the mobile device notifications list to open the app. In-app notifications appear when the app is open. We recommend limiting the use of push notifications to high-priority items, to avoid overwhelming the user. For more information, go to:
- Power Apps Notification connector
- Power Apps Notification V2 connector
- Create push notifications for Power Apps Mobile
Related articles
SendAppNotification Action
Create a table row using the Web API
createRecord (Client API reference)
In-app notifications in model-driven apps
appnotification EntityType
Notification (appnotification) table/entity reference