Import custom ADMX and ADML administrative templates into Microsoft Intune (public preview)
You can import custom and third-party/partner ADMX and ADML templates into the Intune admin center. Once imported, you can create a device configuration policy using these settings, and then assign the policy to your managed devices.
This feature applies to:
- Windows 11
- Windows 10
This article shows you how to import custom ADMX and ADML files in the Intune admin center. For more information on administrative templates in Intune, go to Use ADMX templates to configure policy settings in Microsoft Intune.
Tip
The settings catalog has many settings natively built-in to Intune, including Google Chrome. For more information, go to:
What you need to know
This feature is in public preview.
There are some limits:
- A maximum of 20 ADMX files can be uploaded. Each file must be 1 MB or smaller.
- For each ADMX file, only one ADML file can be uploaded.
- Each ADMX file supports one language.
Currently, only
en-usADML files are supported.Some ADMX files have dependency prerequisites. Import any dependency ADMX files first. If you upload an ADMX file without the dependency, an error message lists the missing namespace.
For example, to import Mozilla Firefox ADMX and ADML files, you:
- Import the
mozilla.admxandmozilla.admlfiles. Make sure the status shows Available. - Import the
firefox.admxandfirefox.admlfiles.
If you upload
firefox.admxbeforemozilla.adml, then the import fails.To see if your ADMX has a dependency, open the ADMX file in a text editor and look for
using prefixin thepolicyNamespacesnode. Any dependencies are listed.In the following example, the
kerberos.admxfile requires theWindows.admxfile:<policyNamespaces> <target prefix="kerberos" namespace="Microsoft.Policies.Kerberos" /> <using prefix="windows" namespace="Microsoft.Policies.Windows" /> </policyNamespaces>To remove a dependency prerequisite, delete the associated ADMX file first. Then, delete the dependency prerequisite. In our Mozilla Firefox example, delete
firefox.admxand then deletemozilla.admx.- Import the
Some files might require
Windows.admxas a prerequisite. This file must be uploaded first. In a future release (no ETA), this namespace will be automatically included and eventually not be required.If
Windows.admxis required and not uploaded, then you can get the following error message:ADMX file referenced not found NamespaceMissing:Microsoft.Policies.Windows. Please upload it first.Currently, the combo box setting type isn't supported. ADMX files with the combo box setting type fails to import. All other setting types are supported.
Not all areas of the registry can be set using custom ADMX. For more information on the registry locations that can be used, go to Win32 and Desktop Bridge app ADMX policy Ingestion Overview.
ADMX settings that are built into Windows (located in the
C:\Windows\PolicyDefinitionsfolder) are enabled through configuration service providers (CSPs).- Don't import these built-in settings if your intent is to configure them. Instead, use the settings catalog or a custom profile.
- Do import these built-in settings if they're a required parent namespace of another file.
For a list of the ADMX backed CSP settings, go to ADMX-backed policies in Policy CSP.
Download the ADMX templates
Download the ADMX templates you want to import. Save these files to an easily accessible folder, like C:\ADMXTemplates. Some common ADMX template downloads include:
- Adobe Reader
- Mozilla Firefox
- Zoom
Add the ADMX and ADML files
Sign in to the Microsoft Intune admin center.
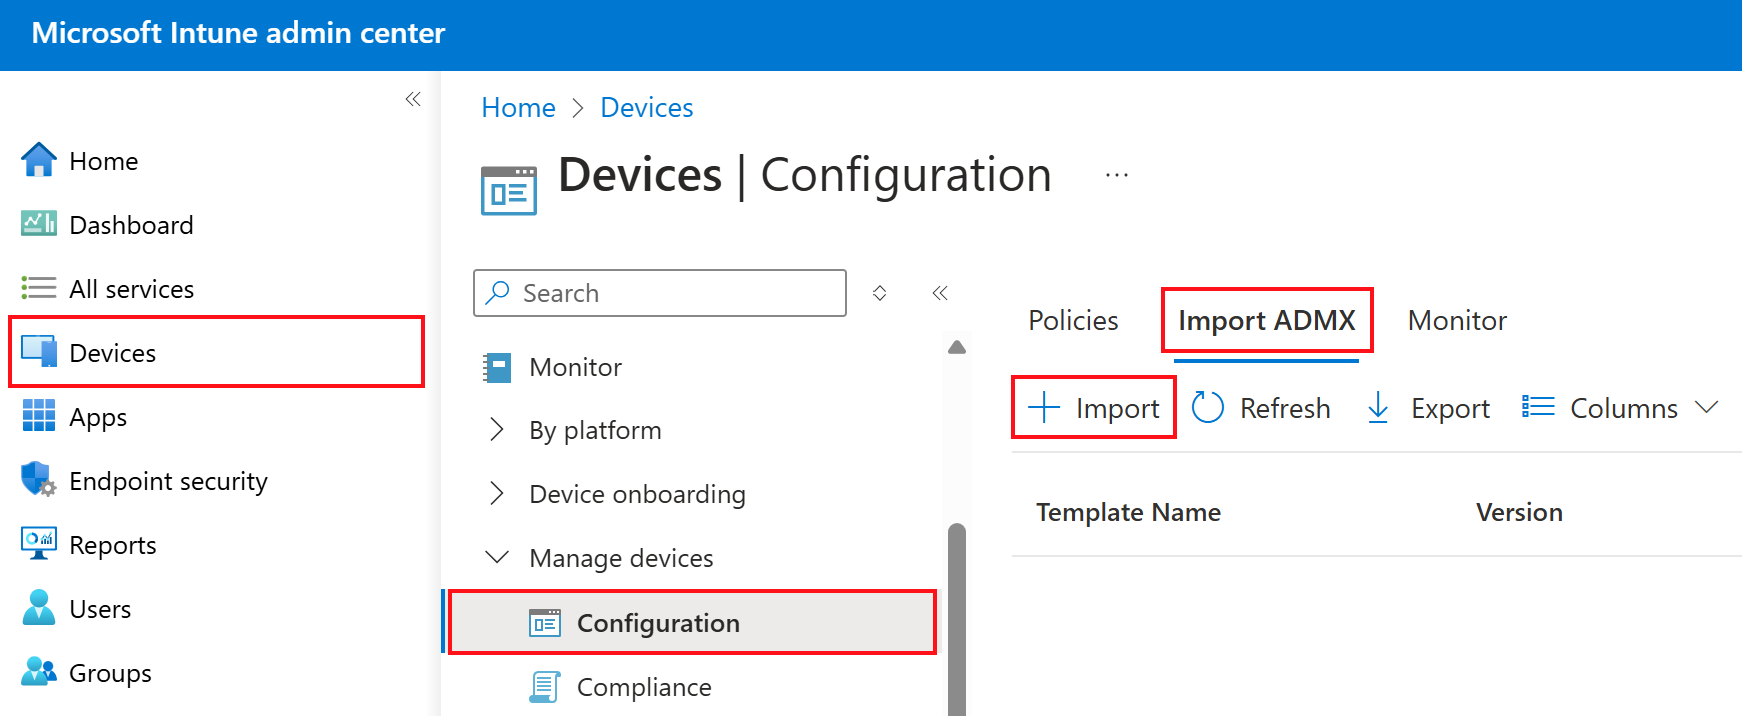
Select Devices > Manage devices > Configuration > Import ADMX tab > Import:

Or, you can also import from Devices > By platform > Windows > Manage devices > Configuration > Import ADMX tab.
Upload your files:
- ADMX file: Select the ADMX file you want to upload.
- ADML file for the default language: Select the ADML file you want to upload. Remember, you can add only one language file for each ADMX file you upload. For any other limitations, go to What you need to know (in this article).
- Specify the language of the ADML file: Shows the ADML language of the file you uploaded.
Select Next.
In Review + Create, review your changes. Select Create to import the files.
When the import completes, your ADMX templates are shown in the list. You can also:
- Select Refresh to see the updated state.
- See the upload Status.
- Delete an imported template.

Create a profile using your imported files
Sign in to the Microsoft Intune admin center.
Select Devices > Manage devices > Configuration > Create > New policy.
Enter the following properties:
Platform: Select Windows 10 and later.
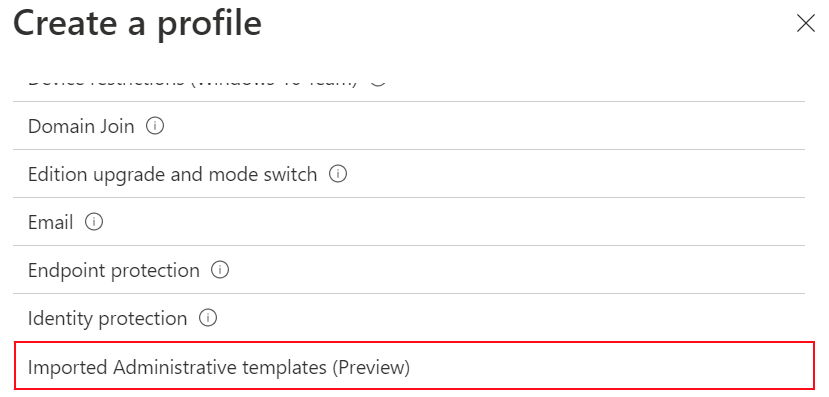
Profile type: Select Templates > Imported Administrative templates (Preview):

Select Create.
In Basics, enter the following properties:
- Name: Enter a descriptive name for the profile. Name your profiles so you can easily identify them later. For example, a good profile name is ADMX: Mozilla Firefox for Windows 10/11 devices.
- Description: Enter a description for the profile. This setting is optional, but recommended.
Select Next.
In Configuration settings, select and configure the settings you want in your policy. When finished, select Next.
In Scope tags (optional), assign a tag to filter the profile to specific IT groups, such as
US-NC IT TeamorJohnGlenn_ITDepartment. For more information about scope tags, see Use role-based access control (RBAC) and scope tags for distributed IT.Select Next.
In Assignments, select the user or groups that will receive your profile. For more information on assigning profiles, see Assign user and device profiles in Intune.
If the profile is assigned to user groups, then configured ADMX settings apply to any device that the user enrolls, and signs in to. If the profile is assigned to device groups, then configured ADMX settings apply to any user that signs into that device. This assignment happens if the ADMX setting is a computer configuration (
HKEY_LOCAL_MACHINE), or a user configuration (HKEY_CURRENT_USER). With some settings, a computer setting assigned to a user can also affect the experience of other users on that device.For more information, see User groups vs. device groups when assigning policies.
Select Next.
In Review + create, review your settings. When you select Create, your changes are saved, and the profile is assigned. The policy is also shown in the profiles list.
Replace existing ADMX files
If you upload an ADMX file with settings that are already imported, then the upload fails.
For example, if you upload a different version of an ADMX file that has the same settings as the original ADMX file, then the upload fails with a namespace error.
To update existing ADMX files that are imported, you have the following options:
Option 1: Replace the existing ADMX file
To replace an existing ADMX file with the same settings, you can use the following steps:
- Delete any profiles using the existing ADMX settings.
- Delete the original ADMX file you imported.
- Import the new ADMX and ADML files.
Option 2: Create a new ADMX file
- Create another version of the ADMX file with a different namespace than the original ADMX file. We recommend you add a version number in the namespace so the names are different.
- Add the new and different settings to this ADMX file.
- Import the new ADMX and ADML files.
Next steps
Overview: Use ADMX templates to configure policy settings in Microsoft Intune