Implement federated authentication between Microsoft Entra ID and SharePoint on-premises
Scenario description
In this article, you configure a federated authentication between Microsoft Entra ID and SharePoint on-premises. The goal is to allow users to sign in on Microsoft Entra ID and use their identity to access the SharePoint on-premises sites.
Prerequisites
To perform the configuration, you need the following resources:
- A Microsoft Entra tenant. If you don't have one, you can create a free account.
- A SharePoint 2013 farm or newer.
This article uses the following values:
- Enterprise application name (in Microsoft Entra ID):
SharePoint corporate farm - Trust identifier (in Microsoft Entra ID) / realm (in SharePoint):
urn:sharepoint:federation - loginUrl (to Microsoft Entra ID):
https://login.microsoftonline.com/dc38a67a-f981-4e24-ba16-4443ada44484/wsfed - SharePoint site URL:
https://spsites.contoso.local/ - SharePoint site reply URL:
https://spsites.contoso.local/_trust/ - SharePoint trust configuration name:
MicrosoftEntraTrust - UserPrincipalName of the Microsoft Entra test user:
AzureUser1@demo1984.onmicrosoft.com
Configure an enterprise application in Microsoft Entra ID
To configure the federation in Microsoft Entra ID, you need to create a dedicated Enterprise application. Its configuration is simplified using the pre-configured template SharePoint on-premises that can be found in the application gallery.
Create the enterprise application
- Sign in to the Microsoft Entra admin center as at least a Cloud Application Administrator.
- Browse to Identity > Applications > Enterprise applications > New application.
- In the search box, enter SharePoint on-premises. Select SharePoint on-premises from the result pane.
- Specify a name for your application (in this article, it is
SharePoint corporate farm), and click Create to add the application. - In the new enterprise application, select Properties, and check the value for User assignment required?. For this scenario, set its value to No and click Save.
Configure the enterprise application
In this section, you configure the SAML authentication and define the claims that will be sent to SharePoint upon successful authentication.
In the Overview of the Enterprise application
SharePoint corporate farm, select 2. Set up single sign-on and choose the SAML in the next dialog.On the Set up Single Sign-On with SAML page, select the Edit icon in the Basic SAML Configuration pane.
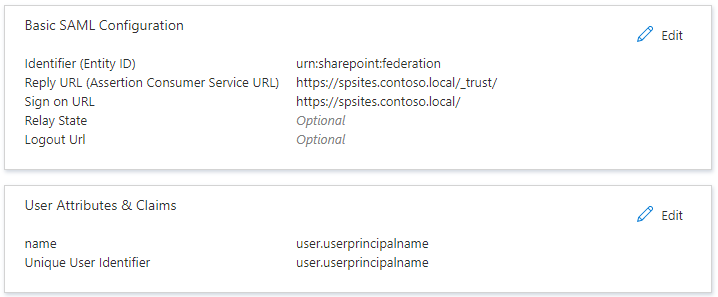
In the Basic SAML Configuration section, follow these steps:
In the Identifier box, ensure that this value is present:
urn:sharepoint:federation.In the Reply URL box, enter a URL by using this pattern:
https://spsites.contoso.local/_trust/.In the Sign on URL box, enter a URL by using this pattern:
https://spsites.contoso.local/.Select Save.
In the User Attributes & Claims section, delete the following claim types, which are useless since they won't be used by SharePoint to grant permissions:
http://schemas.xmlsoap.org/ws/2005/05/identity/claims/emailaddresshttp://schemas.xmlsoap.org/ws/2005/05/identity/claims/givennamehttp://schemas.xmlsoap.org/ws/2005/05/identity/claims/surname
The settings should now look like this:
Copy the information that you'll need later in SharePoint:
In the SAML Signing Certificate section, Download the Certificate (Base64). This is the public key of the signing certificate used by Microsoft Entra ID to sign the SAML token. SharePoint will need it to verify the integrity of the incoming SAML tokens.
In the Set up SharePoint corporate farm section, copy the Login URL in a notepad and replace the trailing string /saml2 with /wsfed.
Important
Make sure to replace /saml2 with /wsfed to ensure that Microsoft Entra ID issues a SAML 1.1 token, as required by SharePoint.
- In the Set up SharePoint corporate farm section, copy the Logout URL
Configure SharePoint to trust Microsoft Entra ID
Create the trust in SharePoint
In this step, you create a SPTrustedLoginProvider to store the configuration that SharePoint needs to trust Microsoft Entra ID. For that, you need the information from Microsoft Entra ID that you copied above.Note that using Windows PowerShell may make some commands to fail.Start the SharePoint Management Shell and run the following script to create it:
# Path to the public key of the Microsoft Entra SAML signing certificate (self-signed), downloaded from the Enterprise application in the Azure portal
$signingCert = New-Object System.Security.Cryptography.X509Certificates.X509Certificate2("C:\Microsoft Entra app\SharePoint corporate farm.cer")
# Unique realm (corresponds to the "Identifier (Entity ID)" in the Microsoft Entra enterprise application)
$realm = "urn:sharepoint:federation"
# Login URL copied from the Microsoft Entra enterprise application. Make sure to replace "saml2" with "wsfed" at the end of the URL:
$loginUrl = "https://login.microsoftonline.com/dc38a67a-f981-4e24-ba16-4443ada44484/wsfed"

# Define the claim types used for the authorization
$userIdentifier = New-SPClaimTypeMapping -IncomingClaimType "http://schemas.xmlsoap.org/ws/2005/05/identity/claims/name" -IncomingClaimTypeDisplayName "name" -LocalClaimType "http://schemas.xmlsoap.org/ws/2005/05/identity/claims/upn"
$role = New-SPClaimTypeMapping "http://schemas.microsoft.com/ws/2008/06/identity/claims/role" -IncomingClaimTypeDisplayName "Role" -SameAsIncoming

# Let SharePoint trust the Microsoft Entra signing certificate
New-SPTrustedRootAuthority -Name "Microsoft Entra signing certificate" -Certificate $signingCert

# Create a new SPTrustedIdentityTokenIssuer in SharePoint
$trust = New-SPTrustedIdentityTokenIssuer -Name "MicrosoftEntraTrust" -Description "Microsoft Entra ID" -Realm $realm -ImportTrustCertificate $signingCert -ClaimsMappings $userIdentifier, $role -SignInUrl $loginUrl -IdentifierClaim $userIdentifier.InputClaimType
Configure the SharePoint web application
In this step, you configure a web application in SharePoint to trust the Microsoft Entra Enterprise application created above. There are important rules to have in mind:
- The default zone of the SharePoint web application must have Windows authentication enabled. This is required for the Search crawler.
- The SharePoint URL that will use Microsoft Entra authentication must be set with HTTPS.
Create or extend the web application. This article describes two possible configurations:
If you create a new web application that uses both Windows and Microsoft Entra authentication in the Default zone:
Start the SharePoint Management Shell and run the following script:
# This script creates a new web application and sets Windows and Microsoft Entra authentication on the Default zone
# URL of the SharePoint site federated with Microsoft Entra
$trustedSharePointSiteUrl = "https://spsites.contoso.local/"
$applicationPoolManagedAccount = "Contoso\spapppool"

$winAp = New-SPAuthenticationProvider -UseWindowsIntegratedAuthentication -DisableKerberos:$true
$sptrust = Get-SPTrustedIdentityTokenIssuer "MicrosoftEntraTrust"
$trustedAp = New-SPAuthenticationProvider -TrustedIdentityTokenIssuer $sptrust

New-SPWebApplication -Name "SharePoint - Microsoft Entra" -Port 443 -SecureSocketsLayer -URL $trustedSharePointSiteUrl -ApplicationPool "SharePoint - Microsoft Entra" -ApplicationPoolAccount (Get-SPManagedAccount $applicationPoolManagedAccount) -AuthenticationProvider $winAp, $trustedAp
Open the SharePoint Central Administration site.
Under System Settings, select Configure Alternate Access Mappings. The Alternate Access Mapping Collection box opens.
Filter the display with the new web application and confirm that you see something like this:

If you extend an existing web application to use Microsoft Entra authentication on a new zone:
Start the SharePoint Management Shell and run the following script:
# This script extends an existing web application to set Microsoft Entra authentication on a new zone
# URL of the default zone of the web application
$webAppDefaultZoneUrl = "http://spsites/"
# URL of the SharePoint site federated with ADFS
$trustedSharePointSiteUrl = "https://spsites.contoso.local/"
$sptrust = Get-SPTrustedIdentityTokenIssuer "MicrosoftEntraTrust"
$ap = New-SPAuthenticationProvider -TrustedIdentityTokenIssuer $sptrust
$wa = Get-SPWebApplication $webAppDefaultZoneUrl

New-SPWebApplicationExtension -Name "SharePoint - Microsoft Entra" -Identity $wa -SecureSocketsLayer -Zone Internet -Url $trustedSharePointSiteUrl -AuthenticationProvider $ap
Open the SharePoint Central Administration site.
Under System Settings, select Configure Alternate Access Mappings. The Alternate Access Mapping Collection box opens.
Filter the display with the web application that was extended and confirm that you see something like this:

Once the web application is created, you can create a root site collection and add your Windows account as the primary site collection administrator.
Create a certificate for the SharePoint site
Since SharePoint URL uses HTTPS protocol (
https://spsites.contoso.local/), a certificate must be set on the corresponding Internet Information Services (IIS) site. Follow those steps to generate a self-signed certificate:Important
Self-signed certificates are suitable only for test purposes. In production environments, we strongly recommend that you use certificates issued by a certificate authority instead.
Open the Windows PowerShell console.
Run the following script to generate a self-signed certificate and add it to the computer's MY store:
New-SelfSignedCertificate -DnsName "spsites.contoso.local" -CertStoreLocation "cert:\LocalMachine\My"
Set the certificate in the IIS site
- Open the Internet Information Services Manager console.
- Expand the server in the tree view, expand Sites, select the site SharePoint - Microsoft Entra ID, and select Bindings.
- Select https binding and then select Edit.
- In the TLS/SSL certificate field, choose the certificate to use (for example, spsites.contoso.local created above) and select OK.
Note
If you have multiple Web Front End servers, you need to repeat this operation on each.
The basic configuration of the trust between SharePoint and Microsoft Entra ID is now finished. Let's see how to sign in to the SharePoint site as a Microsoft Entra user.
Sign in as a member user
Microsoft Entra ID has two type of users: Guest users and Member users. Let's start with a member user, which is merely a user that is homed in your organization.
Create a member user in Microsoft Entra ID
- Sign in to the Microsoft Entra admin center as at least a User Administrator.
- Browse to Identity > Users > All users.
- Select New user > Create new user, at the top of the screen.
- In the User properties, follow these steps:
- In the Display name field, enter
B.Simon. - In the User principal name field, enter the username@companydomain.extension. For example,
B.Simon@contoso.com. - Select the Show password check box, and then write down the value that's displayed in the Password box.
- Select Review + create.
- In the Display name field, enter
- Select Create.
- You can share the site with this user and permit access to it.
Grant permissions to the Microsoft Entra user in SharePoint
Sign in to the SharePoint root site collection as your Windows account (site collection administrator) and click Share.
In the dialog, you need to type the exact value of the userprincipalname, for example AzureUser1@demo1984.onmicrosoft.com, and be careful to select the name claim result (move your mouse on a result to see its claim type)
Important
Be careful to type the exact value of the user you want to invite, and choose the appropriate claim type in the list, otherwise the sharing will not work.
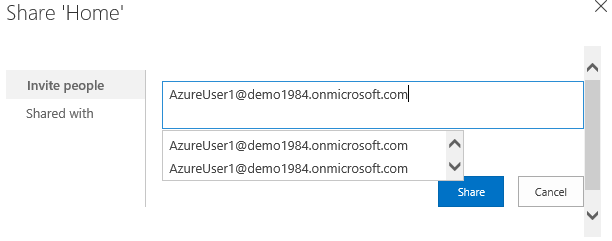
This limitation is because SharePoint does not validate the input from the people picker, which can be confusing and lead to misspellings or users accidentally choosing the wrong claim type.
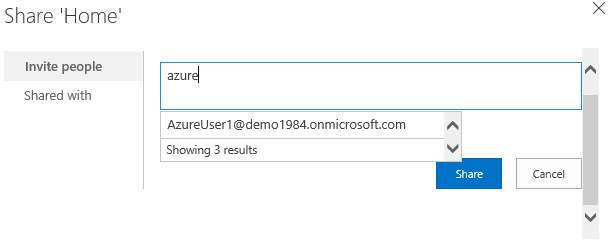
To fix this scenario, an open-source solution called EntraCP can be used to connect SharePoint 2019 / 2016 / 2013 with Microsoft Entra ID and resolve the input against your Microsoft Entra tenant. For more information, see EntraCP.
Below is the same search with EntraCP configured: SharePoint returns actual users based on the input:
Important
EntraCP isn't a Microsoft product and isn't supported by Microsoft Support. To download, install, and configure EntraCP on the on-premises SharePoint farm, see the EntraCP website.
Microsoft Entra user AzureUser1@demo1984.onmicrosoft.com can now use his/her identity to sign in to the SharePoint site https://spsites.contoso.local/.
Grant permissions to a security group
Add the group claim type to the enterprise application
In the Overview of the Enterprise application
SharePoint corporate farm, select 2. Set up single sign-on.In the User Attributes & Claims section, follow these steps if there is no group claim present:
- Select Add a group claim, select Security groups, make sure that Source Attribute is set to Group ID
- Check Customize the name of the group claim, then check Emit groups as role claims and click Save.
- The User Attributes & Claims should look like this:

Create a security group in Microsoft Entra ID
Let's create a security group.
Browse to Identity > Groups.
Select New group.
Fill in the Group type (Security), Group name (for example,
AzureGroup1), and Membership type. Add the user you created above as a member and click select Create: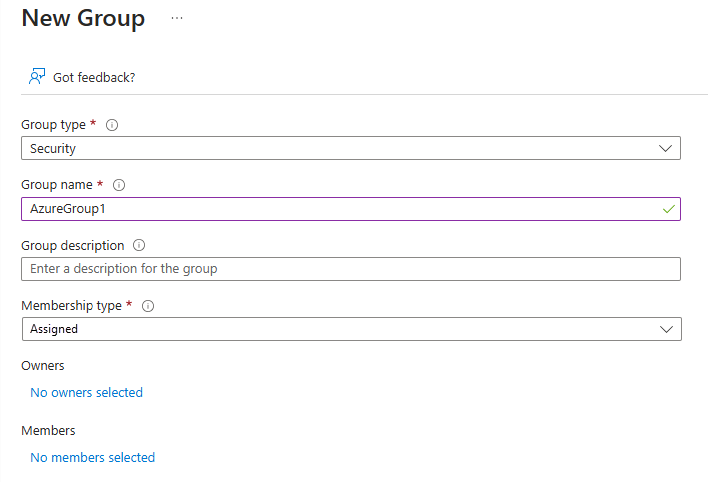
Grant permissions to the security group in SharePoint
Microsoft Entra security groups are identified with their attribute Id, which is a GUID (for example, 00aa00aa-bb11-cc22-dd33-44ee44ee44ee).
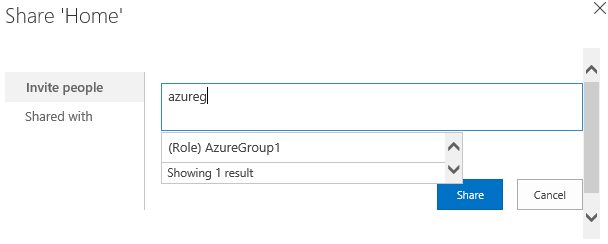
Without a custom claims provider, users need to type the exact value (Id) of the group in the people picker, and select the corresponding claim type. This is not user-friendly nor reliable.
To avoid this, this article uses third-party claims provider EntraCP to find the group in a friendly way in SharePoint:
Manage Guest users access
There are two types of guest accounts:
- B2B guest accounts: Those users are homed in an external Microsoft Entra tenant
- MSA guest accounts: Those users are homed in a Microsoft identify provider (Hotmail, Outlook) or a social account provider (Google or similar)
By default, Microsoft Entra ID sets both the "Unique User Identifier" and the claim "name" to the attribute user.userprincipalname.
Unfortunately, this attribute is ambiguous for guest accounts, as the table below shows:
| Source attribute set in Microsoft Entra ID | Actual property used by Microsoft Entra ID for B2B guests | Actual property used by Microsoft Entra ID for MSA guests | Property that SharePoint can rely on to validate the identity |
|---|---|---|---|
user.userprincipalname |
mail, for example: guest@PARTNERTENANT |
userprincipalname, for example: guest_outlook.com#EXT#@TENANT.onmicrosoft.com |
ambiguous |
user.localuserprincipalname |
userprincipalname, for example: guest_PARTNERTENANT#EXT#@TENANT.onmicrosoft.com |
userprincipalname, for example: guest_outlook.com#EXT#@TENANT.onmicrosoft.com |
userprincipalname |
As a conclusion, to ensure that guest accounts are all identified with the same attribute, the identifier claims of the enterprise application should be updated to use the attribute user.localuserprincipalname instead of user.userprincipalname.
Update the application to use a consistent attribute for all guest users
In the Overview of the Enterprise application
SharePoint corporate farm, select 2. Set up single sign-on.On the Set up Single Sign-On with SAML page, select the Edit icon in the User Attributes & Claims pane.
In the User Attributes & Claims section, follow these steps:
Select Unique User Identifier (Name ID), change its Source Attribute property to user.localuserprincipalname, and click Save.
Select
http://schemas.xmlsoap.org/ws/2005/05/identity/claims/name, change its Source Attribute property to user.localuserprincipalname, and click Save.The User Attributes & Claims should look like this:

Invite guest users in SharePoint
Note
This section assumes that claims provider EntraCP is used
In the section above, you updated the enterprise application to use a consistent attribute for all guest accounts.
Now, the configuration of EntraCP needs to be updated to reflect that change and use the attribute userprincipalname for guest accounts:
- Open the SharePoint Central Administration site.
- Under Security, select EntraCP global configuration.
- In the section User identifier property: Set the User identifier for 'Guest' users: to UserPrincipalName.
- Click Ok
You can now invite any guest user in the SharePoint sites.
Configure the federation for multiple web applications
The configuration works for a single web application, but additional configuration is needed if you intend to use the same trusted identity provider for multiple web applications. For example, assume you have a separate web application https://otherwebapp.contoso.local/ and you now want to enable Microsoft Entra authentication on it. To do this, configure SharePoint to pass the SAML WReply parameter, and add the URLs in the enterprise application.
Configure SharePoint to pass the SAML WReply parameter
- On the SharePoint server, open the SharePoint 201x Management Shell and run the following commands. Use the same name for the trusted identity token issuer as you used previously.
$t = Get-SPTrustedIdentityTokenIssuer "MicrosoftEntraTrust"
$t.UseWReplyParameter = $true
$t.Update()
Add the URLs in the enterprise application
Sign in to the Microsoft Entra admin center as at least a Cloud Application Administrator.
Browse to Identity > Applications > Enterprise applications > Select the previously created enterprise application, and select Single sign-on.
On the Set up Single Sign-On with SAML page, edit Basic SAML Configuration.
In the section Reply URL (Assertion Consumer Service URL), add the URL (for example,
https://otherwebapp.contoso.local/) of all additional web applications that need to sign in users with Microsoft Entra ID and click Save.

Configure the lifetime of the security token
By default, Microsoft Entra ID creates a SAML token that is valid for 1 hour, that cannot be customized in the Azure portal or using a Conditional Access policy.
However, it is possible to create a custom token lifetime policy, and assign it to the enterprise application you created for SharePoint Server.
You can run the script below to achieve this:
Install-Module Microsoft.Graph
Connect-MgGraph -Scopes "Policy.ReadWrite.ApplicationConfiguration","Policy.Read.All","Application.ReadWrite.All"

$appDisplayName = "SharePoint corporate farm"
$sp = Get-MgServicePrincipal -Search DisplayName:"$appDisplayName" -ConsistencyLevel eventual

$oldPolicy = Get-MgServicePrincipalTokenLifetimePolicy -ServicePrincipalId $sp.Id
if ($null -ne $oldPolicy) {
	# There can be only 1 TokenLifetimePolicy associated to the service principal (or 0, as by default)
    Remove-MgServicePrincipalAppManagementPolicy -AppManagementPolicyId $oldPolicy.Id -ServicePrincipalId $sp.Id
}

# Get / create a custom token lifetime policy
$policyDisplayName = "WebPolicyScenario"
$policy = Get-MgPolicyTokenLifetimePolicy -Filter "DisplayName eq '$policyDisplayName'"
if ($null -eq $policy) {
	$params = @{
		Definition = @('{"TokenLifetimePolicy":{"Version":1,"AccessTokenLifetime":"4:00:00"}}')
		DisplayName = $policyDisplayName
		IsOrganizationDefault = $false
	}
	$policy = New-MgPolicyTokenLifetimePolicy -BodyParameter $params
}

# Assign the token lifetime policy to an app
$body = @{
	"@odata.id" = "https://graph.microsoft.com/v1.0/policies/tokenLifetimePolicies/$($policy.Id)"
}
Invoke-GraphRequest -Uri ('https://graph.microsoft.com/v1.0/servicePrincipals/{0}/tokenLifetimePolicies/$ref' -f $sp.Id) -Method POST -Body $body