Create collections on the My Apps portal
Your users can use the My Apps portal to view and start the cloud-based applications they have access to. By default, all the applications a user can access are listed together on a single page. To better organize this page for your users, if you have a Microsoft Entra ID P1 or P2 license you can set up collections. With a collection, you can group together applications that are related. For example, by job role, task, or project and display them on a separate tab. A collection essentially applies a filter to the applications a user can already access, so the user sees only those applications in the collection that have been assigned to them.
Note
This article covers how an admin can enable and create collections. For information for the end user about how to use the My Apps portal and collections, see Access and use collections.
Prerequisites
To create collections on the My Apps portal, you need:
- An Azure account with an active subscription. Create an account for free.
- One of the following roles: Cloud Application Administrator, Application Administrator, or owner of the service principal.
Create a collection
To create a collection, you must have a Microsoft Entra ID P1 or P2 license.
Sign in to the Microsoft Entra admin center as at least a Cloud Application Administrator.
Browse to Identity > Applications > Enterprise applications.
Under Manage, select App launchers.
Select New collection. In the New collection page, enter a Name for the collection (we recommend not using "collection" in the name). Then enter a Description.
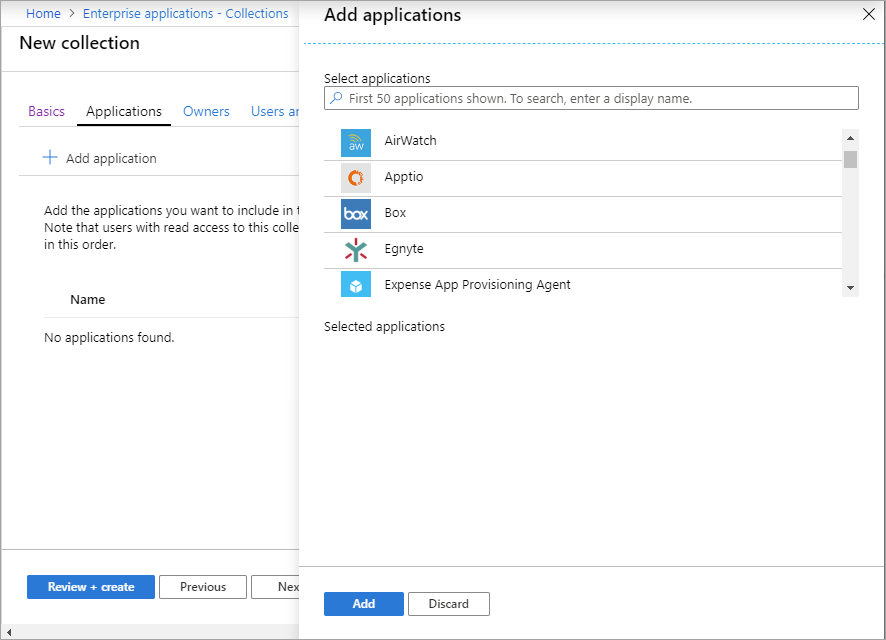
Select the Applications tab. Select + Add application, and then in the Add applications page, select all the applications you want to add to the collection, or use the Search box to find applications.

When you're finished adding applications, select Add. The list of selected applications appears. You can use the arrows to change the order of applications in the list.
Select the Owners tab. Select + Add users and groups, and then in the Add users and groups page, select the users or groups you want to assign ownership to. When you're finished selecting users and groups, choose Select.
Select the Users and groups tab. Select + Add users and groups, and then in the Add users and groups page, select the users or groups you want to assign the collection to. Or use the Search box to find users or groups. When you're finished selecting users and groups, choose Select.
Select Review + Create. The properties for the new collection appear.
Note
Admin collections are managed through the Microsoft Entra admin center, not from My Apps portal. For example, if you assign users or groups as an owner, then they can only manage the collection through the Microsoft Entra admin center.
Note
There is a known issue with Office apps in collections. If you already have at least one Office app in a collection and want to add more, follow these steps:
- Select the collection you'd like to manage, then select the Applications tab.
- Remove all Office apps from the collection but do not save the changes.
- Select + Add application.
- In the Add applications page, select all the Office apps you want to add to the collection (including the ones that you removed in step 2).
- When you're finished adding applications, select Add. The list of selected applications appears. You can use the arrows to change the order of applications in the list.
- Select Save to apply the changes.
View audit logs
The Audit logs record My Apps collections operations, including collection creation end-user actions. The following events are generated from My Apps:
- Create admin collection
- Edit admin collection
- Delete admin collection
- Self-service application adding (end user)
- Self-service application deletion (end user)
You can access audit logs in the Microsoft Entra admin center by selecting Identity > Applications > Enterprise applications > Audit logs in the Activity section. For Service, select My Apps.
Get support for My Account pages
From the My Apps page, a user can select My account > View account to open their account settings. On the Microsoft Entra ID My Account page, users can manage their security info, devices, passwords, and more. They can also access their Office account settings.
In case you need to submit a support request for an issue with the Microsoft Entra account page or the Office account page, follow these steps so your request is routed properly:
For issues with the Microsoft Entra ID "My Account" page, open a support request from within the Microsoft Entra admin center. Go to Microsoft Entra admin center > Identity > Learn & support > New support request.
For issues with the Office "My account" page, open a support request from within the Microsoft 365 admin center. Go to Microsoft 365 admin center > Support.