Configure a custom email provider for one time passcode send events (preview)
Applies to:  Workforce tenants
  External tenants (learn more)
This article provides a guide on configuring and setting up a custom email provider for the One Time Passcode (OTP) Send event type. The event is triggered when an OTP email is activated, it allows you to call a REST API to use your own email provider by calling a REST API.
Tip
To try out this feature, go to the Woodgrove Groceries demo and start the “Use a custom Email Provider for One Time code” use case.
Prerequisites
- A familiarity and understanding of the concepts covered in custom authentication extensions.
- An Azure subscription. If you don't have an existing Azure account, sign up for a free trial or use your Visual Studio Subscription benefits when you create an account.
- A Microsoft Entra ID external tenant.
- For Azure Communications Services users;
- An Azure Communications Services resource. If you don't have one, create one in Quickstart: Create and manage Communication Services resources using a new or existing resource group.
- An Azure Email Communication Services Resource created and ready with a provisioned domain. If you don't have one, refer to Quickstart: Create and manage Email Communication Service resources, and use the same resource group as the Azure Communication Services.
- An active Communication Services resource connected with an Email Domain. Refer to Quickstart: How to connect a verified email domain
- (Optional) Send an email using Azure Communication Services to test sending emails to the desired recipients using Azure Communication Services, while verifying the configuration for your application to send email.
- For SendGrid users:
- A SendGrid account. If you don't already have one, start by setting up a SendGrid account. For setup instructions, see the Create a SendGrid Account section of How to send email using SendGrid with Azure.
Step 1: Create an Azure Function app
This section shows you how to set up an Azure Function app in the Azure portal. The function API is the gateway to your email provider. You create an Azure Function app to host the HTTP trigger function and configure the settings in the function.
Tip
Steps in this article might vary slightly based on the portal you start from.
Sign in to the Azure portal as at least an Application Administrator and Authentication Administrator.
From the Azure portal menu or the Home page, select Create a resource.
Search for and select Function App and select Create.
On the Create Function App page, select Consumption, then Select.
On the Create Function App (Consumption) page, in the Basics tab, create a function app using the settings as specified in the following table:
Setting Suggested value Description Subscription Your subscription The subscription under which the new function app is created. Resource Group myResourceGroup Select the resource group used to set up the Azure Communications Service and Email Communication Service resources as part of the prerequisites Function App name Globally unique name A name that identifies the new function app. Valid characters are a-z(case insensitive),0-9, and-.Deploy code or container image Code Option to publish code files or a Docker container. For this tutorial, select Code. Runtime stack .NET Your preferred programming language. For this tutorial, select .NET. Version 8 (LTS) In-process Version of the .NET runtime. In-process signifies that you can create and modify functions in the portal, which is recommended for this guide Region Preferred region Select a region that's near you or near other services that your functions can access. Operating System Windows The operating system is preselected for you based on your runtime stack selection. Select Review + create to review the app configuration selections and then select Create. Deployment takes a few minutes.
Once deployed, select Go to resource to view your new function app.
1.1 Create an HTTP trigger function
After the Azure Function app is created, create an HTTP trigger function. The HTTP trigger lets you invoke a function with an HTTP request. This HTTP trigger is referenced by your Microsoft Entra custom authentication extension.
- Within your Function App, from the menu select Functions.
- Select Create function.
- In the Create Function window, under Select a template, search for and select the HTTP trigger template. Select Next.
- Under Template details, enter CustomAuthenticationExtensionsAPI for the Function Name property.
- For the Authorization level, select Function.
- Select Create.
1.2 Edit the function
The code starts with reading the incoming JSON object. Microsoft Entra ID sends the JSON object to your API. In this example, it reads the email address (identifier) and the OTP. Then, the code sends the details to the communications service to send the email using a dynamic template.
This how-to guide demonstrates the OTP send event using Azure Communication Services and SendGrid. Use the tabs to select your implementation.
From the menu, select Code + Test.
Replace the entire code with the following code snippet.
using System.Dynamic;
using System.Text.Json;
using System.Text.Json.Nodes;
using System.Text.Json.Serialization;
using Azure.Communication.Email;
using Microsoft.AspNetCore.Http;
using Microsoft.AspNetCore.Http.HttpResults;
using Microsoft.AspNetCore.Mvc;
using Microsoft.Azure.Functions.Worker;
using Microsoft.Extensions.Logging;

namespace Company.AuthEvents.OnOtpSend.CustomEmailACS
{
    public class CustomEmailACS
    {
        private readonly ILogger<CustomEmailACS> _logger;

        public CustomEmailACS(ILogger<CustomEmailACS> logger)
        {
            _logger = logger;
        }

        [Function("OnOtpSend_CustomEmailACS")]
        public async Task<IActionResult> RunAsync([HttpTrigger(AuthorizationLevel.Function, "post")] HttpRequest req)
        {
            _logger.LogInformation("C# HTTP trigger function processed a request.");

            // Get the request body
            string requestBody = await new StreamReader(req.Body).ReadToEndAsync();
            JsonNode jsonPayload = JsonNode.Parse(requestBody)!;

            // Get OTP and mail to
            string emailTo = jsonPayload["data"]!["otpContext"]!["identifier"]!.ToString();
            string otp = jsonPayload["data"]!["otpContext"]!["onetimecode"]!.ToString();

            // Send email
            await SendEmailAsync(emailTo, otp);

            // Prepare response
            ResponseObject responseData = new ResponseObject("microsoft.graph.OnOtpSendResponseData");
            responseData.Data.Actions = new List<ResponseAction>() { new ResponseAction(
                "microsoft.graph.OtpSend.continueWithDefaultBehavior") };

            return new OkObjectResult(responseData);
        }

        private async Task SendEmailAsync(string emailTo, string code)
        {
            // Get app settings
            var connectionString = Environment.GetEnvironmentVariable("mail_connectionString");
            var sender = Environment.GetEnvironmentVariable("mail_sender");
            var subject = Environment.GetEnvironmentVariable("mail_subject");

            try
            {
                if (!string.IsNullOrEmpty(connectionString))
                {
                    var emailClient = new EmailClient(connectionString);
                    var body = EmailTemplate.GenerateBody(code);

                    _logger.LogInformation($"Sending OTP to {emailTo}");

                    EmailSendOperation emailSendOperation = await emailClient.SendAsync(
                    Azure.WaitUntil.Started,
                    sender,
                    emailTo,
                    subject,
                    body);
                }
            }
            catch (System.Exception ex)
            {
                _logger.LogError(ex.Message);
            }
        }
    }

    public class ResponseObject
    {
        [JsonPropertyName("data")]
        public Data Data { get; set; }

        public ResponseObject(string dataType)
        {
            Data = new Data(dataType);
        }
    }

    public class Data
    {
        [JsonPropertyName("@odata.type")]
        public string DataType { get; set; }
        [JsonPropertyName("actions")]
        public List<ResponseAction> Actions { get; set; }

        public Data(string dataType)
        {
            DataType = dataType;
        }
    }

    public class ResponseAction
    {
        [JsonPropertyName("@odata.type")]
        public string DataType { get; set; }

        public ResponseAction(string dataType)
        {
            DataType = dataType;
        }
    }

    public class EmailTemplate
    {
        public static string GenerateBody(string oneTimeCode)
        {
            return @$"<html><body>
            <div style='background-color: #1F6402!important; padding: 15px'>
                <table>
                <tbody>
                    <tr>
                        <td colspan='2' style='padding: 0px;font-family: "Segoe UI Semibold", "Segoe UI Bold", "Segoe UI", "Helvetica Neue Medium", Arial, sans-serif;font-size: 17px;color: white;'>Woodgrove Groceries live demo</td>
                    </tr>
                    <tr>
                        <td colspan='2' style='padding: 15px 0px 0px;font-family: "Segoe UI Light", "Segoe UI", "Helvetica Neue Medium", Arial, sans-serif;font-size: 35px;color: white;'>Your Woodgrove verification code</td>
                    </tr>
                    <tr>
                        <td colspan='2' style='padding: 25px 0px 0px;font-family: "Segoe UI", Tahoma, Verdana, Arial, sans-serif;font-size: 14px;color: white;'> To access <span style='font-family: "Segoe UI Bold", "Segoe UI Semibold", "Segoe UI", "Helvetica Neue Medium", Arial, sans-serif; font-size: 14px; font-weight: bold; color: white;'>Woodgrove Groceries</span>'s app, please copy and enter the code below into the sign-up or sign-in page. This code is valid for 30 minutes. </td>
                    </tr>
                    <tr>
                        <td colspan='2' style='padding: 25px 0px 0px;font-family: "Segoe UI", Tahoma, Verdana, Arial, sans-serif;font-size: 14px;color: white;'>Your account verification code:</td>
                    </tr>
                    <tr>
                        <td style='padding: 0px;font-family: "Segoe UI Bold", "Segoe UI Semibold", "Segoe UI", "Helvetica Neue Medium", Arial, sans-serif;font-size: 25px;font-weight: bold;color: white;padding-top: 5px;'>
                        {oneTimeCode}</td>
                        <td rowspan='3' style='text-align: center;'>
                            <img src='https://woodgrovedemo.com/custom-email/shopping.png' style='border-radius: 50%; width: 100px'>
                        </td>
                    </tr>
                    <tr>
                        <td style='padding: 25px 0px 0px;font-family: "Segoe UI", Tahoma, Verdana, Arial, sans-serif;font-size: 14px;color: white;'> If you didn't request a code, you can ignore this email. </td>
                    </tr>
                    <tr>
                        <td style='padding: 25px 0px 0px;font-family: "Segoe UI", Tahoma, Verdana, Arial, sans-serif;font-size: 14px;color: white;'> Best regards, </td>
                    </tr>
                    <tr>
                        <td>
                            <img src='https://woodgrovedemo.com/Company-branding/headerlogo.png' height='20'>
                        </td>
                        <td style='font-family: "Segoe UI", Tahoma, Verdana, Arial, sans-serif;font-size: 14px;color: white; text-align: center;'>
                            <a href='https://woodgrovedemo.com/Privacy' style='color: white; text-decoration: none;'>Privacy Statement</a>
                        </td>
                    </tr>
                </tbody>
                </table>
            </div>
            </body></html>";
        }
    }
}
Select Get Function Url, and copy the Function key URL, which is henceforth used and referred to as
{Function_Url}. Close the function.
Step 2: Add connection strings to the Azure Function
Connection strings enable the Communication Services SDKs to connect and authenticate to Azure. For both Azure Communication Services and SendGrid You'll then need to add these connection strings to your Azure Function app as environment variables.
2.1: Extract the connection strings and service endpoints from your Azure Communication Services resource
You can access your Communication Services connection strings and service endpoints from the Azure portal or programmatically with Azure Resource Manager APIs.
From the Home page in the Azure portal, open the portal menu, search for and select All resources.
Search for and select the Azure Communications Service created as part of the Prerequisites to this article.
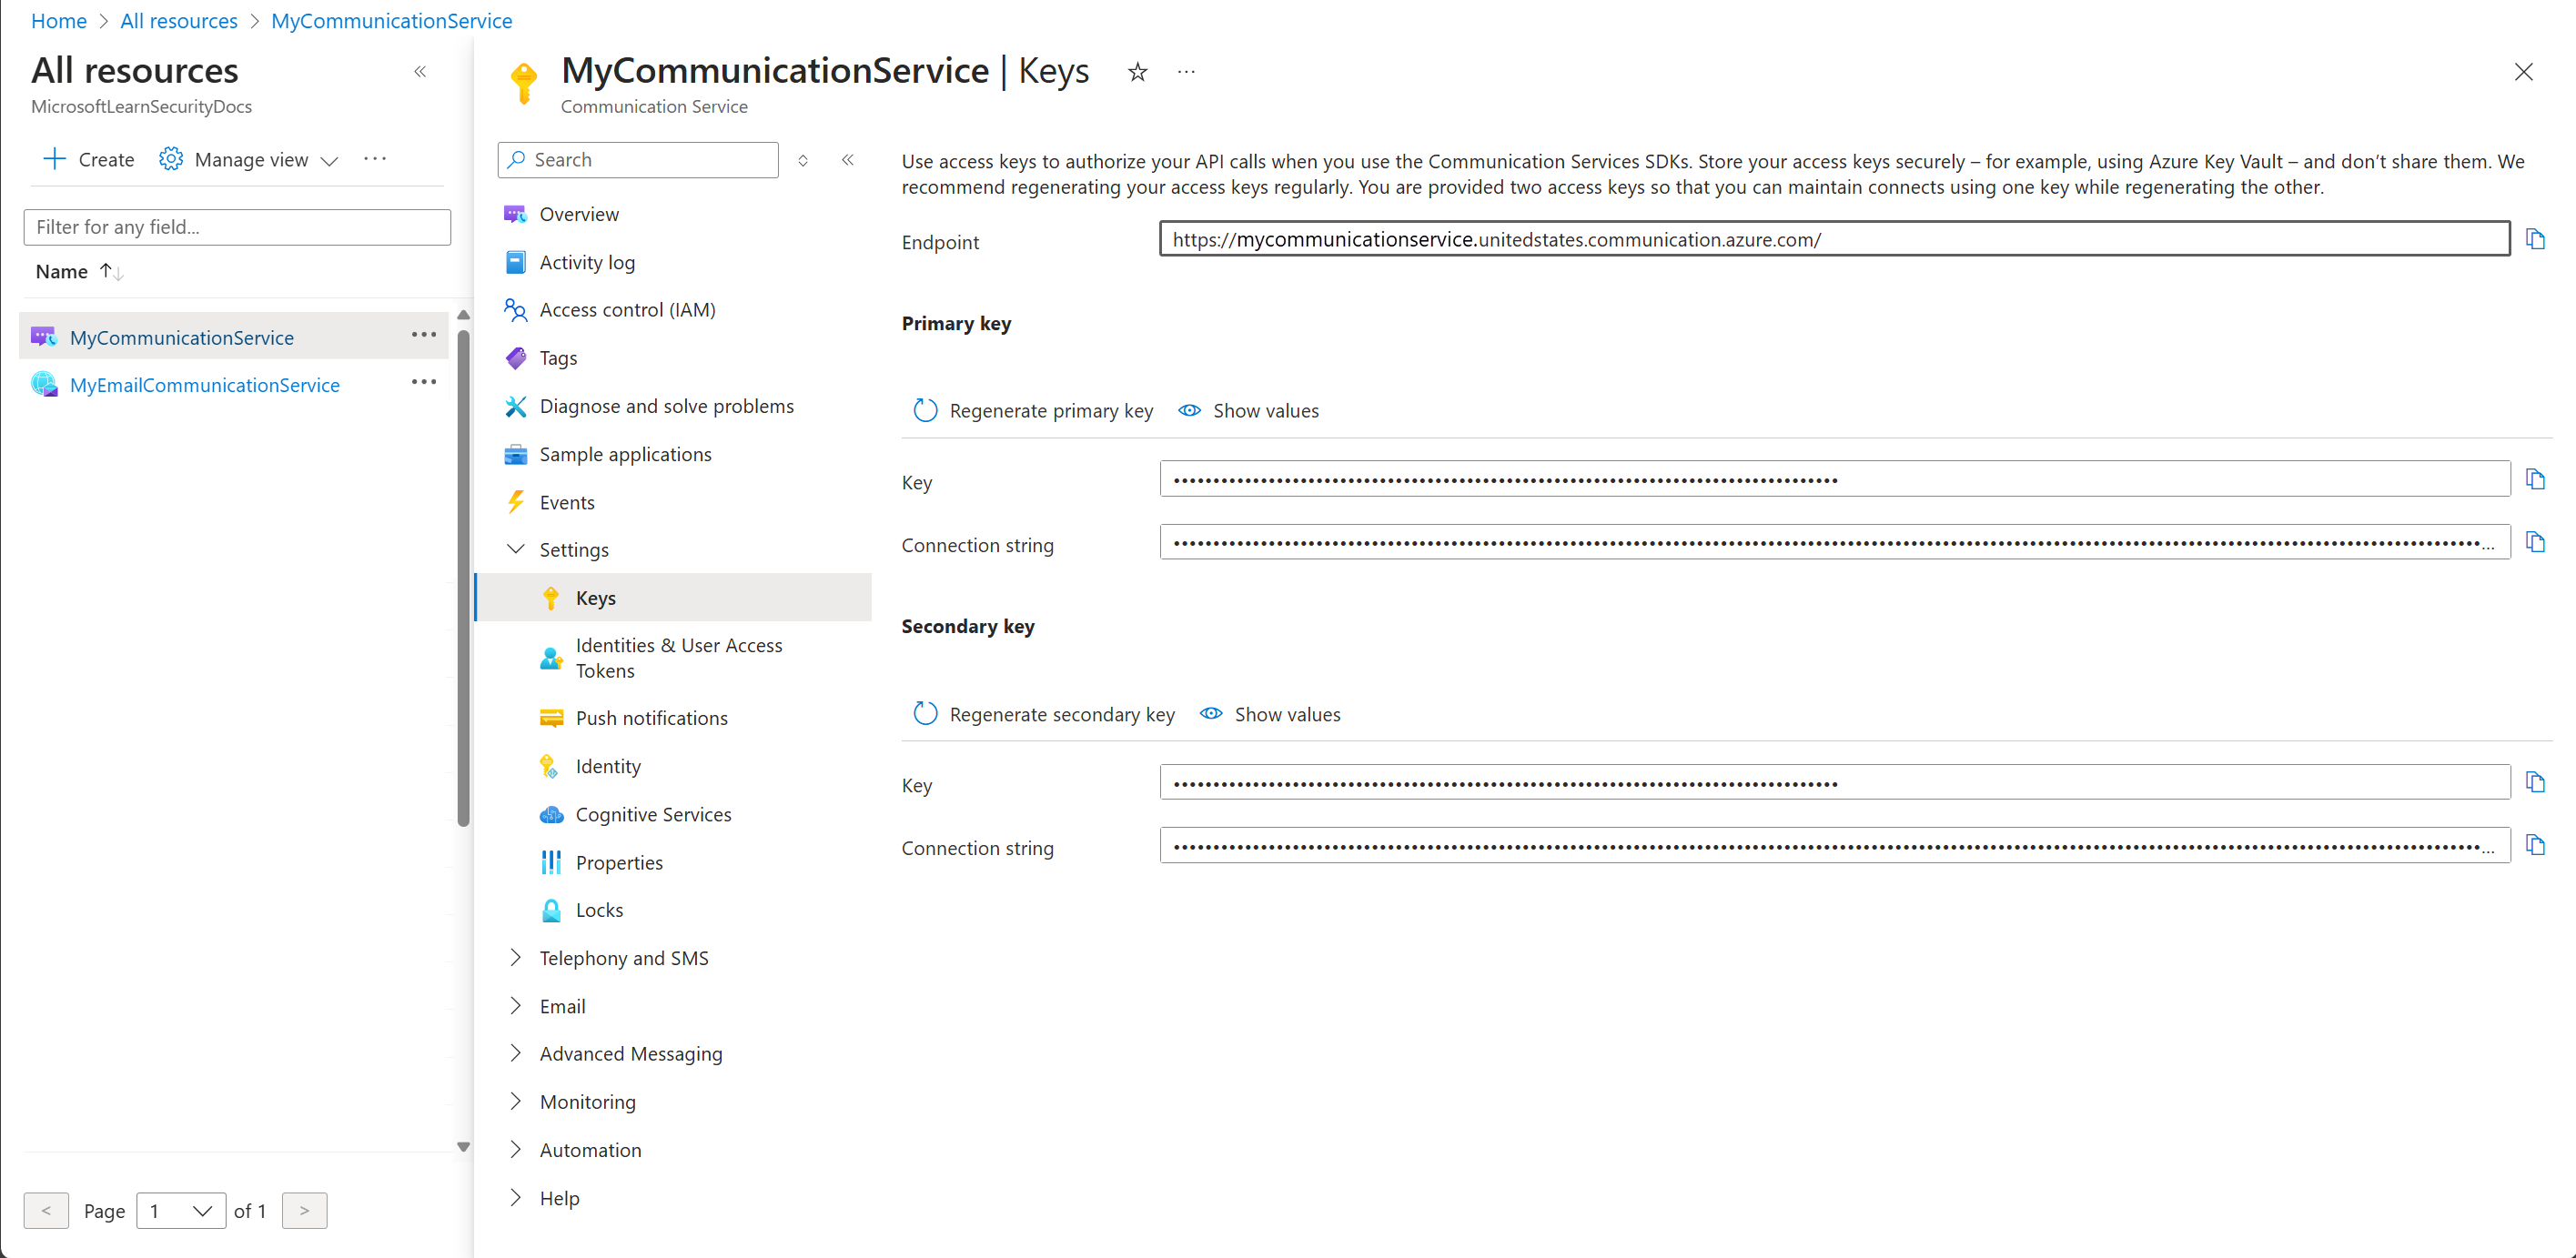
In the left pane, select the Settings dropdown, then select Keys.
Copy the Endpoint, and from Primary key copy the values for Key and Connection string.
2.2: Add the connection strings to the Azure Function
Navigate back to the Azure Function you created in Create an Azure Function app.
From Overview page of your function app, in the left menu, select Settings > Environment variables add the following App settings. Once all the settings are added, select Apply, then Confirm.
Setting Value (Example) Description mail_connectionString https://ciamotpcommsrvc.unitedstates.communication.azure.com/:accesskey=A1bC2dE3fH4iJ5kL6mN7oP8qR9sT0uThe Azure Communication Services endpoint mail_sender from.email@myemailprovider.com The from email address. mail_subject CIAM Demo The subject of the email.
Step 3: Register a custom authentication extension
In this step, you configure a custom authentication extension, which Microsoft Entra ID uses to call your Azure Function. The custom authentication extension contains information about your REST API endpoint, the claims that it parses from your REST API, and how to authenticate to your REST API. Use either the Azure portal or Microsoft Graph to register an application to authenticate your custom authentication extension to your Azure Function.
Register a custom authentication extension
Sign in to the Azure portal as at least an Application Administrator and Authentication Administrator.
Search for and select Microsoft Entra ID and select Enterprise applications.
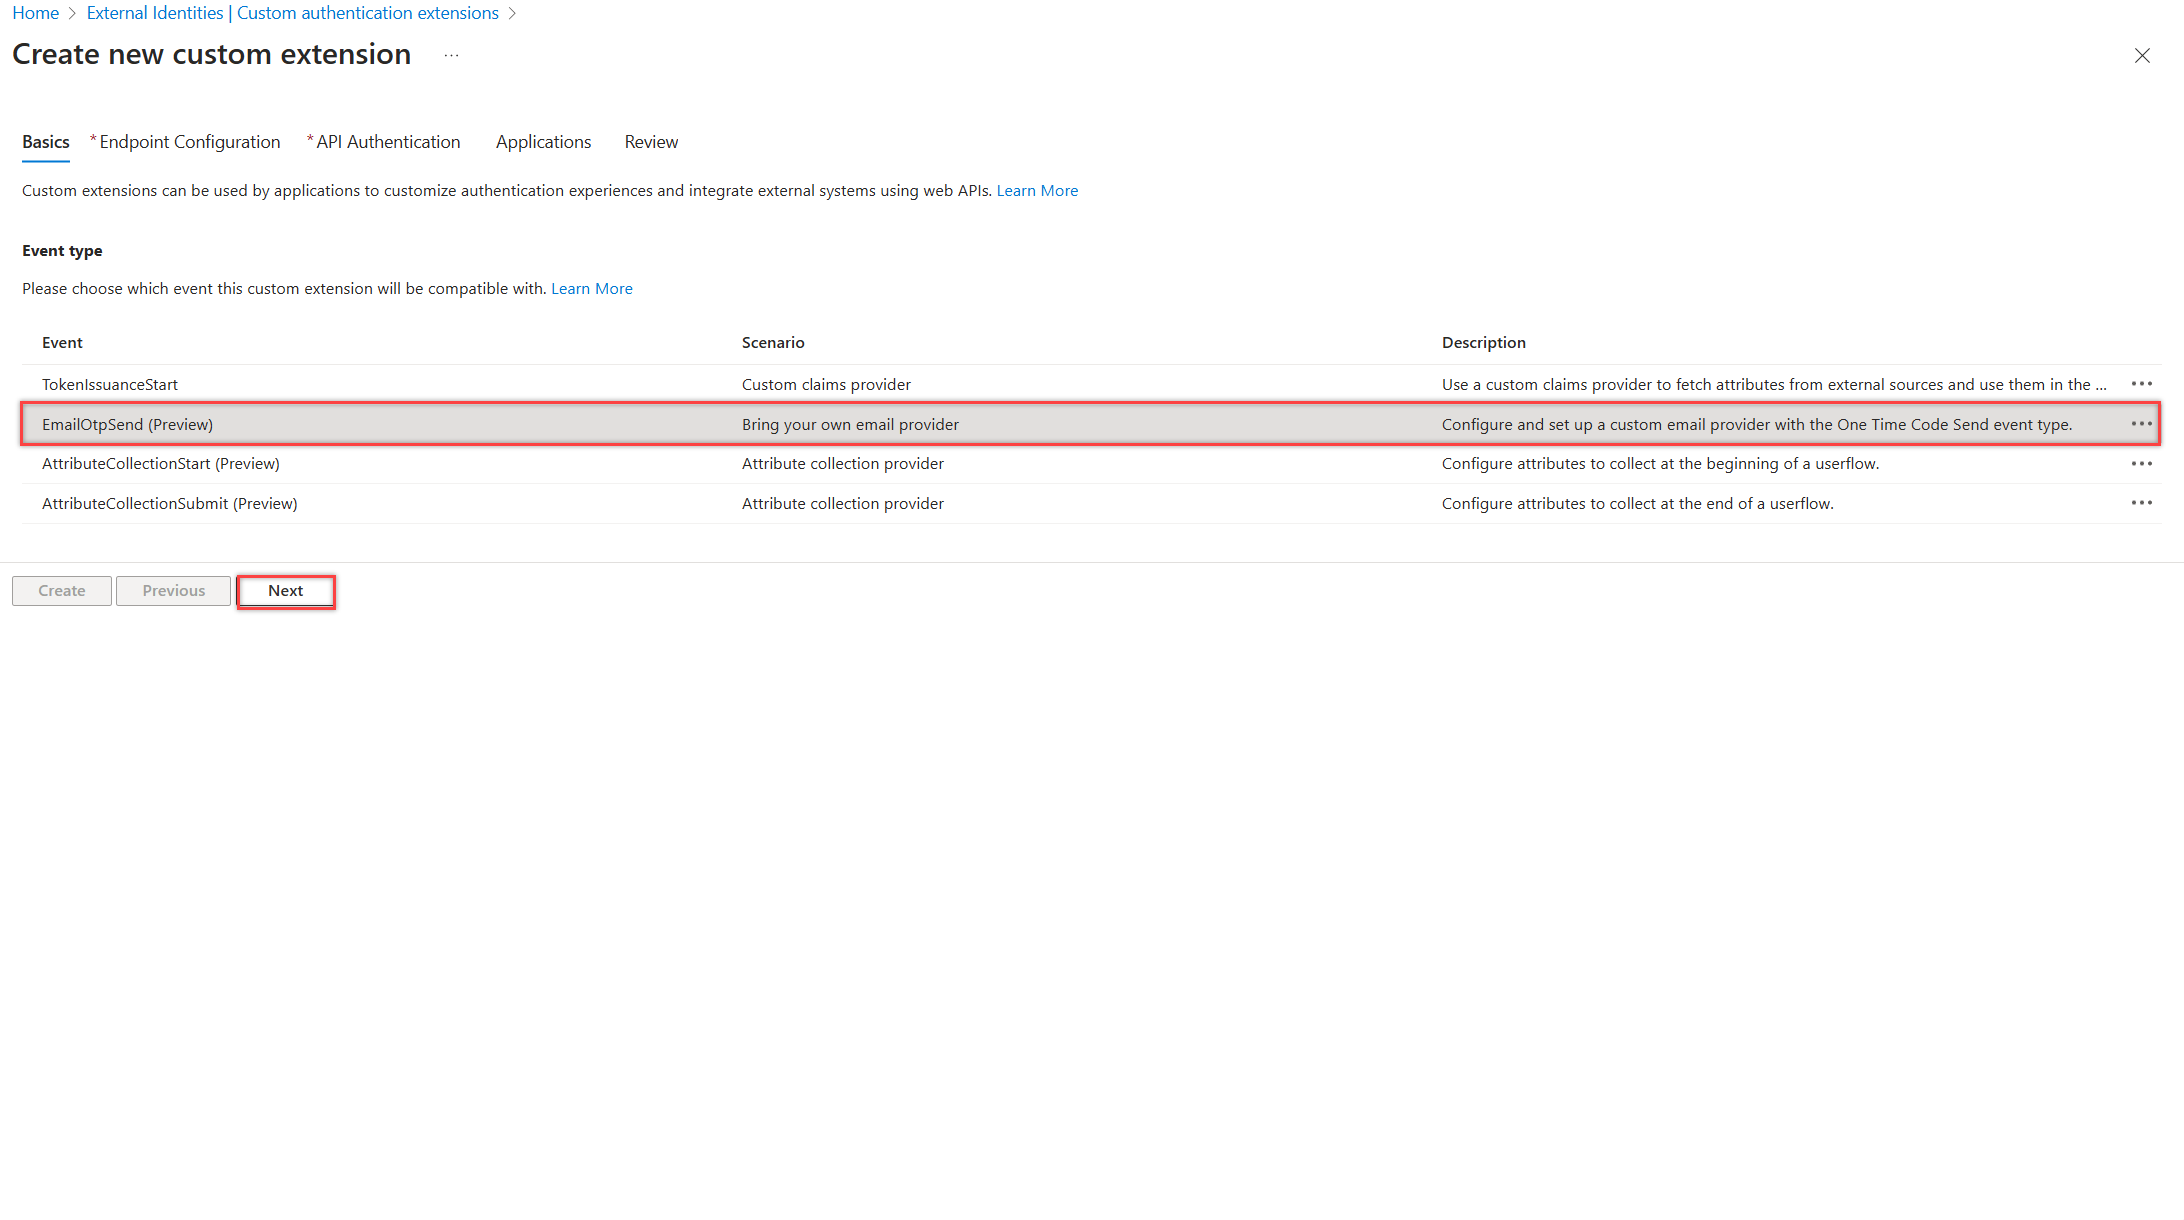
Select Custom authentication extensions, and then select Create a custom extension.
In Basics, select the EmailOtpSend event type and select Next.
In the Endpoint Configuration tab, fill in the following properties, then select Next to continue.
- Name - A name for your custom authentication extension. For example, Email OTP Send.
- Target Url - The
{Function_Url}of your Azure Function URL. Navigate to the Overview page of your Azure Function app, then select the function you created. In the function Overview page, select Get Function Url and use the copy icon to copy the customauthenticationextension_extension (System key) URL. - Description - A description for your custom authentication extensions.
In the API Authentication tab, select the Create new app registration option to create an app registration that represents your function app.
Give the app a name, for example Azure Functions authentication events API, and select Next.
In the Applications tab, select the application to associate with the custom authentication extension. Select Next. You have the option to apply it across the whole tenant by checking the box. Select Next to continue.
In the Review tab, check that the details are correct for the custom authentication extension. Note the App ID under API Authentication, which is needed to configure authentication for your Azure Function in your Azure Function app. Select Create.
Grant admin consent
After your custom authentication extension is created, open the application from the portal under App registrations and select API permissions.
From the API permissions page, select the Grant admin consent for "YourTenant" button to give admin consent to the registered app, which allows the custom authentication extension to authenticate to your API. The custom authentication extension uses client_credentials to authenticate to the Azure Function App using the Receive custom authentication extension HTTP requests permission.
The following screenshot shows how to grant permissions.
Step 4: Configure an OpenID Connect app to test with
To get a token and test the custom authentication extension, you can use the https://jwt.ms app. It's a Microsoft-owned web application that displays the decoded contents of a token (the contents of the token never leave your browser).
Follow these steps to register the jwt.ms web application:
4.1 Register a test web application
- Sign in to the Microsoft Entra admin center as at least an Application Administrator.
- Browse to Identity > Applications > Application registrations.
- Select New registration.
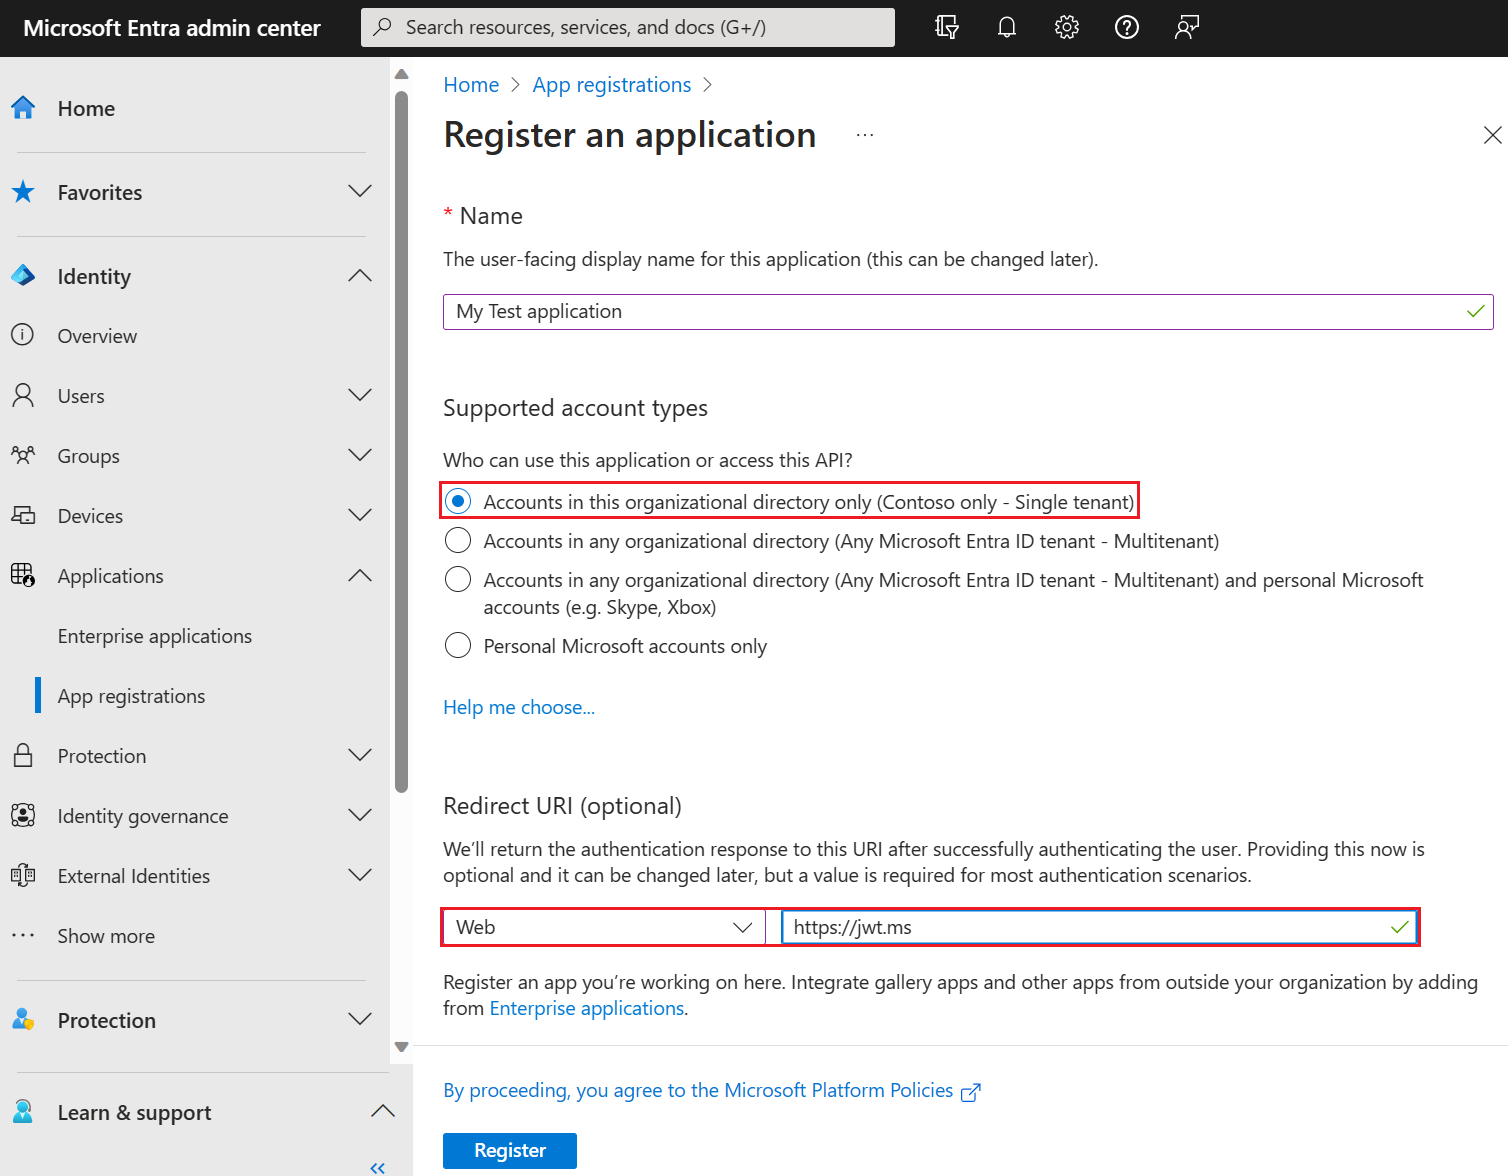
- Enter a Name for the application. For example, My Test application.
- Under Supported account types, select Accounts in this organizational directory only.
- In the Select a platform dropdown in Redirect URI, select Web, and then enter
https://jwt.msin the URL text box. - Select Register to complete the app registration.
- In your app registration, under Overview, copy the Application (client) ID, which is used later and referred to as the
{App_to_sendotp_ID}. In Microsoft Graph, it's referenced by the appId property.
The following screenshot shows how to register the My Test application.
4.1 Get the application ID
In your app registration, under Overview, copy the Application (client) ID. The app ID is referred to as the {App_to_sendotp_ID} in later steps. In Microsoft Graph, it's referenced by the appId property.
4.2 Enable implicit flow
The jwt.ms test application uses the implicit flow. Enable implicit flow in My Test application registration:
Important
Microsoft recommends using the most secure authentication flow available. The authentication flow used for testing in this procedure requires a very high degree of trust in the application, and carries risks that are not present in other flows. This approach shouldn't be used for authenticating users to your production apps (learn more).
- Under Manage, select Authentication.
- Under Implicit grant and hybrid flows, select the ID tokens (used for implicit and hybrid flows) checkbox.
- Select Save.
Step 5: Protect your Azure Function
Microsoft Entra custom authentication extension uses server to server flow to obtain an access token that is sent in the HTTP Authorization header to your Azure function. When publishing your function to Azure, especially in a production environment, you need to validate the token sent in the authorization header.
To protect your Azure function, follow these steps to integrate Microsoft Entra authentication, for validating incoming tokens with your Azure Functions authentication events API application registration.
Note
If the Azure function app is hosted in a different Azure tenant than the tenant in which your custom authentication extension is registered, skip to using OpenID Connect identity provider step.
- Sign in to the Azure portal.
- Navigate and select the function app you previously published.
- Select Authentication in the menu on the left.
- Select Add Identity provider.
- From the dropdown menuSelect Microsoft as the identity provider.
- Under App registration->App registration type, select Pick an existing app registration in this directory and pick the Azure Functions authentication events API app registration you previously created when registering the custom email provider.
- Add the Client secret expiration for the app.
- Under Unauthenticated requests, select HTTP 401 Unauthorized as the identity provider.
- Unselect the Token store option.
- Select Add to add authentication to your Azure Function.
5.1 Using OpenID Connect identity provider
If you configured the Microsoft identity provider, skip this step. Otherwise, if the Azure Function is hosted under a different tenant than the tenant in which your custom authentication extension is registered, follow these steps to protect your function:
Sign in to the Azure portal, then navigate and select the function app you previously published.
Select Authentication in the left pane.
Select Add Identity provider.
Select OpenID Connect as the identity provider.
Provide a name, such as Contoso Microsoft Entra ID.
Under the Metadata entry, enter the following URL to the Document URL. Replace the
{tenantId}with your Microsoft Entra tenant ID, and{tenantname}with the name of your tenant without the 'onmicrosoft.com'.https://{tenantname}.ciamlogin.com/{tenantId}/v2.0/.well-known/openid-configurationUnder the App registration, enter the application ID (client ID) of the Azure Functions authentication events API app registration you created previously.
In the Microsoft Entra admin center:
- Select the Azure Functions authentication events API app registration you created previously.
- Select Certificates & secrets > Client secrets > New client secret.
- Add a description for your client secret.
- Select an expiration for the secret or specify a custom lifetime.
- Select Add.
- Record the secret's value for use in your client application code. This secret value is never displayed again after you leave this page.
Back to the Azure Function, under the App registration, enter the Client secret.
Unselect the Token store option.
Select Add to add the OpenID Connect identity provider.
Step 6: Test the application
To test your custom email provider, follow these steps:
Open a new private browser and navigate and sign-in through the following URL.
https://{tenantname}.ciamlogin.com/{tenant-id}/oauth2/v2.0/authorize?client_id={App_to_sendotp_ID}&response_type=id_token&redirect_uri=https://jwt.ms&scope=openid&state=12345&nonce=12345Replace
{tenant-id}with your tenant ID, tenant name, or one of your verified domain names. For example,contoso.onmicrosoft.com.Replace
{tenantname}with the name of your tenant without the 'onmicrosoft.com'.Replace
{App_to_sendotp_ID}with the My Test application registration ID.Ensure you sign in using an Email One Time Passcode account. Then select Send Code. Ensure that the code sent to the registered email addresses uses the custom provider registered above.
Step 7: Fall back to Microsoft Provider
If an error occurs within your extension API, by default Entra ID will not send an OTP to the user. You can instead set the behavior on error to fall back to the Microsoft Provider.
To enable this, run the following request. Replace {customListenerOjectId} with the custom authentication listener ID recorded earlier.
- You need the EventListener.ReadWrite.All delegated permission.
PATCH https://graph.microsoft.com/beta/identity/authenticationEventListeners/{customListenerOjectId}

{
    "@odata.type": "#microsoft.graph.onEmailOtpSendListener",
    "handler": {
        "@odata.type": "#microsoft.graph.onOtpSendCustomExtensionHandler",
        "configuration": {
            "behaviorOnError": {
                "@odata.type": "#microsoft.graph.fallbackToMicrosoftProviderOnError"
            }
        }
    }
}


