Tutorial: Create customized reports in Azure Data Explorer by using data from Microsoft Entra
In this tutorial, you learn how to create customized reports in Azure Data Explorer by using data from Microsoft Entra ID and Microsoft Entra ID Governance services.
This tutorial complements reporting options such as archiving and reporting with Azure Monitor and entitlement management, which focuses on exporting the audit log into Azure Monitor for retention and analysis. By comparison, exporting Microsoft Entra ID data to Azure Data Explorer provides flexibility for creating custom reports on Microsoft Entra objects, including historical and deleted objects.
Use of Azure Data Explorer also enables data aggregation from additional sources, with massive scalability, flexible schemas, and retention policies. Azure Data Explorer is especially helpful when you need to retain user access data for years, perform ad hoc investigations, or run custom queries on access data.
This tutorial illustrates how to show configuration, users, and access rights exported from Microsoft Entra alongside data exported from other sources, such as applications with access rights in their own SQL databases. You can then use the Kusto Query Language (KQL) in Azure Data Explorer to build custom reports based on your organization's requirements.
In this tutorial, you:
- Set up Azure Data Explorer in an Azure subscription, or create a free cluster.
- Extract data from Microsoft Entra ID by using PowerShell scripts and Microsoft Graph.
- Create tables and import data from Microsoft Entra ID into Azure Data Explorer.
- Extract data from Microsoft Entra ID Governance.
- Create tables and import data from Microsoft Entra ID Governance into Azure Data Explorer.
- Build a custom query by using KQL.
- Query data in Azure Monitor.
By the end of this tutorial, you'll be able to develop customized views of the access rights and permissions of users. These views span multiple applications via Microsoft-supported tools. You can also bring in data from non-Microsoft databases or applications to report on those access rights and permissions.
Prerequisites
If you're new to Azure Data Explorer and you want to learn the scenarios that this tutorial shows, you can obtain a free Azure Data Explorer cluster. For production-supported use with a service-level agreement for Azure Data Explorer, you need an Azure subscription to host a full Azure Data Explorer cluster.
Determine what data you want to include in your reports. The scripts in this tutorial provide samples with specific data from users, groups, and applications from Microsoft Entra. These samples illustrate the types of reports that you can generate with this approach, but your specific reporting needs might vary and require different or additional data. You can start with these objects and bring in more kinds of Microsoft Entra objects over time.
This tutorial illustrates retrieving data from Microsoft Entra as a signed-in user. To do so, ensure that you have the required role assignments. You need the roles with the right permissions to export the type of Microsoft Entra data that you want to work with:
- User data: Global Administrator, Privileged Role Administrator, User Administrator
- Group data: Global Administrator, Privileged Role Administrator, Group Administrator
- Applications and app role assignments: Global Administrator, Privileged Role Administrator, Application Administrator, Cloud Application Administrator
Microsoft Graph PowerShell needs consent to retrieve Microsoft Entra objects via Microsoft Graph. The examples in this tutorial require the delegated
User.Read.All,Group.Read.All,Application.Read.All, andDirectory.Read.Allpermissions. If you're planning to retrieve data by using automation without a signed-in user, consent to the corresponding application permissions instead. For more information, see Microsoft Graph permissions reference.If you haven't already given Microsoft Graph PowerShell consent to those permissions, you need to be a Global Administrator to perform this consent operation.
This tutorial doesn't illustrate custom security attributes. By default, Global Administrator and other administrator roles don't include permissions to read custom security attributes from Microsoft Entra users. If you're planning to retrieve custom security attributes, you might need more roles and permissions.
On the computer where Microsoft Graph PowerShell is installed, ensure that you have write access to the file system directory. This directory is where you install the required Microsoft Graph PowerShell modules and where the exported Microsoft Entra data is saved.
Ensure that you have permissions to retrieve data from other data sources beyond Microsoft Entra, if you also want to incorporate that data into Azure Data Explorer.
Set up Azure Data Explorer
If you haven't previously used Azure Data Explorer, you need to set it up first. You can create a free cluster without an Azure subscription or credit card. Or you can create a full cluster, which requires an Azure subscription. To get started, see Quickstart: Create an Azure Data Explorer cluster and database.
Extract Microsoft Entra ID data by using PowerShell
In this section, you install Microsoft Graph PowerShell modules. In PowerShell, you connect to Microsoft Graph to extract Microsoft Entra ID data.
The first time that your organization uses these modules for this scenario, you need to have a Global Administrator role to allow Microsoft Graph PowerShell to grant consent for use in your tenant. Subsequent interactions can use a lower-privileged role.
Open PowerShell.
If you don't have all the Microsoft Graph PowerShell modules already installed, install the required Microsoft Graph modules. The following modules are required for this section of the tutorial:
Microsoft.Graph.Authentication,Microsoft.Graph.Users,Microsoft.Graph.Groups,Microsoft.Graph.Applications, andMicrosoft.Graph.DirectoryObjects. If you already have these modules installed, skip this step.$modules = @('Microsoft.Graph.Users', 'Microsoft.Graph.Groups', 'Microsoft.Graph.Applications', 'Microsoft.Graph.DirectoryObjects') foreach ($module in $modules) { Install-Module -Name $module -Scope CurrentUser -AllowClobber -Force }Import the modules into the current PowerShell session:
  $modules = @('Microsoft.Graph.Users', 'Microsoft.Graph.Groups', 'Microsoft.Graph.Applications', 'Microsoft.Graph.DirectoryObjects')
  foreach ($module in $modules) {
  Import-Module -Name $module
  }
Connect to Microsoft Graph. This section of the tutorial illustrates reading users, groups, and applications, so it requires the
User.Read.All,Group.Read.All,Application.Read.All, andDirectory.Read.Allpermission scopes. For more information on permissions, see Microsoft Graph permissions reference.Connect-MgGraph -Scopes "User.Read.All", "Group.Read.All", "Application.Read.All", "Directory.Read.All" -ContextScope Process -NoWelcomeThis command prompts you to sign in with your Microsoft Entra credentials. After you sign in, you might need to consent to the required permissions if it's your first time connecting, or if new permissions are required.
PowerShell queries to extract Microsoft Entra ID data for custom reports
The following queries extract Microsoft Entra ID data from Microsoft Graph by using PowerShell and export the data to JSON files. You import those files into Azure Data Explorer in a later section of this tutorial.
Scenarios for generating reports with this type of data include:
- An auditor wants to see a report that lists the group members for 10 groups, organized by the members' department.
- An auditor wants to see a report of all users who had access to an application between two dates.
You can also bring in data to Azure Data Explorer from sources beyond Microsoft Entra. A scenario for this capability might be:
- An admin wants to view all users added to an application from Microsoft Entra ID and their access rights in the application's own repository, such as a SQL database.
These types of reports aren't built into Microsoft Entra ID. However, you can create these reports yourself by extracting data from Microsoft Entra ID and combining data by using custom queries in Azure Data Explorer. This tutorial addresses this process later, in the Bring in data from other sources section.
For this tutorial, you extract Microsoft Entra ID data from these areas:
- User information such as display name, UPN, and job details
- Group information, including their memberships
- Applications and assignments to application roles
This data set enables you to perform a broad set of queries around who received access to an application, with their application role information and the associated timeframe. Remember that these are sample queries, and your data and specific requirements might vary from what's shown here.
Note
Larger tenants might experience throttling and 429 errors that the Microsoft Graph module handles. Azure Data Explorer might also limit file upload sizes.
In these PowerShell scripts, you export selected properties from the Microsoft Entra objects to JSON files. The data from these exported properties is used to generate custom reports in Azure Data Explorer.
The specific properties that follow are included in these examples because we're using this data to illustrate the types of reports that you can create in Azure Data Explorer. Because your specific reporting needs likely vary from what this tutorial shows, you should include the specific properties in these scripts that you're interested in viewing in your reports. However, you can follow the same pattern that's shown to help build your scripts.
Select a snapshot date
A hard-coded snapshot date identifies the data in the JSON file with a specific date. You can use it to keep track of similar data sets over time in Azure Data Explorer. The snapshot date is also useful for comparing changes in data between two snapshot dates.
$SnapshotDate = Get-Date -AsUTC -Format "yyyy-MM-dd"
Get Microsoft Entra user data
This script exports selected properties from the Microsoft Entra user object to a JSON file. You'll import this file and additional data from other JSON files into Azure Data Explorer in a later section of this tutorial.
  function Export-EntraUsersToJson {

  # Define a hash table for property mappings
   $propertyMappings = @{
    "Id" = "ObjectID"
    "DisplayName" = "DisplayName"
    "UserPrincipalName" = "UserPrincipalName"
    "EmployeeId" = "EmployeeId"
    "UserType" = "UserType"
    "CreatedDateTime" = "CreatedDateTime"
    "JobTitle" = "JobTitle"
    "Department" = "Department"
    "AccountEnabled" = "AccountEnabled"

   # Add custom properties as needed
    "custom_extension" = "CustomExtension"
   }
  # Retrieve users with specified properties and create custom objects directly
   $users = Get-MgUser -Select ($propertyMappings.Keys) -All | ForEach-Object {
      $userObject = @{}
      foreach ($key in $propertyMappings.Keys) {
        if ($key -eq "CreatedDateTime") {
          # Convert date string directly to DateTime and format it
          $date = [datetime]::Parse($_.$key)
          $userObject[$propertyMappings[$key]] = $date.ToString("yyyy-MM-dd")
        } else {
          $userObject[$propertyMappings[$key]] = $_.$key
        }
      }
      # Additional properties or transformations
      $userObject["SnapshotDate"] = $SnapshotDate
      [pscustomobject]$userObject
    }
    # Convert the user data to JSON and save it to a file
    $users | ConvertTo-Json -Depth 2 | Set-Content ".\EntraUsers.json"
  }
  # Execute the function
  Export-EntraUsersToJson
Get group data
Generate a JSON file with group names and IDs that are used to create custom views in Azure Data Explorer. The sample includes all groups, but you can include additional filtering if necessary. If you're filtering to include only certain groups, you might want to include logic in your script to check for nested groups.
    # Get all groups and select Id and DisplayName
    $groups = Get-MgGroup -All | Select-Object Id,DisplayName
    # Export the groups to a JSON file
    $groups | ConvertTo-Json | Set-Content ".\EntraGroups.json"
Get group membership data
Generate a JSON file with group membership, which is used to create custom views in Azure Data Explorer. The sample includes all groups, but you can include additional filtering if necessary.
    # Retrieve all groups from Microsoft Entra ID
    $groups = Get-MgGroup -All
    # Initialize an array to store results
    $results = @()
    # Iterate over each group
    foreach ($group in $groups) {
      # Extract the group ID
      $groupId = $group.Id
      # Get members of the current group and select their IDs
      $members = Get-MgGroupMember -GroupId $groupId | Select-Object -ExpandProperty Id
      # Add a custom object with group ID and member IDs to the results array
      $results += [PSCustomObject]@{
        GroupId = $groupId
        Members = $members
        SnapshotDate = $SnapshotDate
      }
      # Pause for a short time to avoid rate limits
      Start-Sleep -Milliseconds 200
    }
    # Convert the results array to JSON format and save it to a file
    $results | ConvertTo-Json | Set-Content "EntraGroupMembership.json"
Get application and service principal data
Generate a JSON file with all applications and the corresponding service principals in the tenant. You'll import this data into Azure Data Explorer in a later section of this tutorial, so that you can generate custom reports related to applications based on this data.
    # Fetch applications and their corresponding service principals, and then export to JSON
    Get-MgApplication -All | ForEach-Object {
      $app = $_
      $sp = Get-MgServicePrincipal -Filter "appId eq '$($app.AppId)'"
      [pscustomobject]@{
        Name        = $app.DisplayName
        ApplicationId   = $app.AppId
        ServicePrincipalId = $sp.Id
        SnapshotDate = $SnapshotDate
      }
    } | ConvertTo-Json -Depth 10 | Set-Content "Applications.json"
Get app role data
Generate a JSON file of all app roles for enterprise apps in Microsoft Entra. After you import this data to Azure Data Explorer, you'll use it to generate reports that involve app role assignments for users.
    # Get a list of all applications, and handle pagination manually if necessary
    $apps = Get-MgApplication -All
    # Loop through each application to gather the desired information
    $results = foreach ($app in $apps) {
      # Get the service principal for the application by using its app ID
      $spFilter = "appId eq '$($app.AppId)'"
      $sp = Get-MgServicePrincipal -Filter $spFilter | Select-Object -First 1
      # Process app roles, if any, for the application
      $appRoles = if ($app.AppRoles) {
        $app.AppRoles | Where-Object { $_.AllowedMemberTypes -contains "User" } |
        Select-Object Id, Value, DisplayName
      }
      # Construct a custom object with application and service principal details
      [PSCustomObject]@{
        ApplicationId    = $app.AppId
        DisplayName     = $app.DisplayName
        ServicePrincipalId = $sp.Id
        AppRoles      = $appRoles
        SnapshotDate = $SnapshotDate
      }
    }
    # Export the results to a JSON file
    $results | ConvertTo-Json -Depth 4 | Out-File 'AppRoles.json'
Get app role assignment data
Generate a JSON file of all app role assignments of users in the tenant:
    $users = Get-MgUser -All
    $result = @()
    foreach ($user in $users) {
      Get-MgUserAppRoleAssignment -UserId $user.Id | ForEach-Object {
        # Use the same date formatting approach
        $createdDateTime = $_.CreatedDateTime -replace "\\/Date\((\d+)\)\\/", '$1'
        # Convert the milliseconds timestamp to a readable date format if necessary
        $result += [PSCustomObject]@{
          AppRoleId      = $_.AppRoleId
          CreatedDateTime   = $createdDateTime
          PrincipalDisplayName = $_.PrincipalDisplayName
          PrincipalId     = $_.PrincipalId
          ResourceDisplayName = $_.ResourceDisplayName
          ResourceId      = $_.ResourceId
          SnapshotDate     = $SnapshotDate
        }
      }
    }
    $result | ConvertTo-Json -Depth 10 | Out-File "AppRoleAssignments.json"
Create tables and import JSON files with data from Microsoft Entra ID into Azure Data Explorer
In this section, you import the newly created JSON files for the Microsoft Entra ID services as tables in Azure Data Explorer for further analysis. On the first import via the Azure Data Explorer web UI, you create the tables based on schemas that the web UI suggests from each JSON file.
Sign in to the Azure Data Explorer web UI.
Go to the database that you set up in your Azure Data Explorer cluster or free cluster earlier in this tutorial.
On the left menu, select Query.
Follow these steps for each exported JSON file, to get your exported data into that Azure Data Explorer database as a new table:
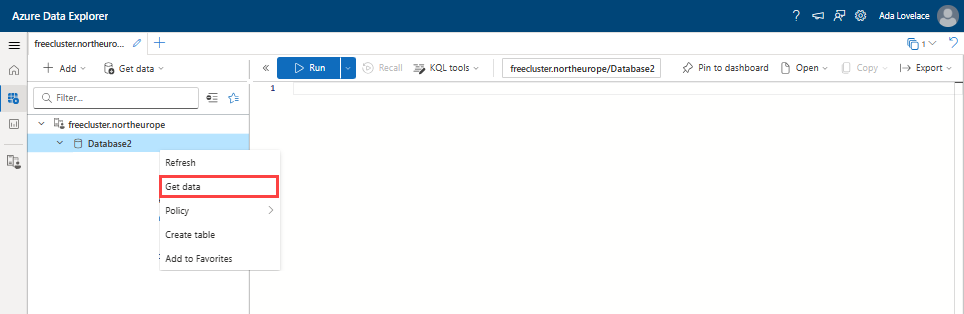
Right-click the name of the database where you want to ingest the data. Then select Get data.
Select the data source from the available list. In this tutorial, you're ingesting data from a local file, so select Local file.
Select + New table and enter a table name, based on the name of the JSON file that you're importing. For example, if you're importing EntraUsers.json, name the table EntraUsers. After the first import, the table already exists, and you can select it as the target table for a subsequent import.
Select Browse for files, select the JSON file, and then select Next.
Azure Data Explorer automatically detects the schema and provides a preview on the Inspect tab. Select Finish to create the table and import the data from that file. After the data is ingested, select Close.
Repeat the preceding steps for each of the JSON files that you generated in the previous section.

At the end of those steps, you have the tables EntraUsers, EntraGroups, EntraGroupMembership, Applications, AppRoles, and AppRoleAssignments in the database.
Extract Microsoft Entra ID Governance data by using PowerShell
In this section, you use PowerShell to extract data from Microsoft Entra ID Governance services. If you don't have Microsoft Entra ID Governance, Microsoft Entra ID P2, or Microsoft Entra Suite, continue in the section Use Azure Data Explorer to build custom reports.
For the following steps, you might need to install Microsoft Graph PowerShell modules to extract Microsoft Entra ID Governance data. The first time that your organization uses these modules for this scenario, you need to have a Global Administrator role to allow Microsoft Graph PowerShell to grant consent for use in your tenant. Subsequent interactions can use a lower-privileged role.
Open PowerShell.
If you don't have all the Microsoft Graph PowerShell modules already installed, install the required Microsoft Graph modules. The following module is required for this section of the tutorial:
Microsoft.Graph.Identity.Governance. If you already have the modules installed, skip to the next step.$modules = @('Microsoft.Graph.Identity.Governance') foreach ($module in $modules) { Install-Module -Name $module -Scope CurrentUser -AllowClobber -Force }Import the modules into the current PowerShell session:
  $modules = @('Microsoft.Graph.Identity.Governance')
  foreach ($module in $modules) {
  Import-Module -Name $module
  }
Connect to Microsoft Graph. This section of the tutorial illustrates retrieving data from entitlement management and access reviews, so it requires the
AccessReview.Read.AllandEntitlementManagement.Read.Allpermission scopes. For other reporting use cases, such as for Privileged Identity Management (PIM) or lifecycle workflows, update theScopesparameter with the necessary permissions. For more information on permissions, see Microsoft Graph permissions reference.Connect-MgGraph -Scopes "AccessReview.Read.All, EntitlementManagement.Read.All" -ContextScope Process -NoWelcomeThis command prompts you to sign in with your Microsoft Entra credentials. After you sign in, you might need to consent to the required permissions if it's your first time connecting, or if new permissions are required.
PowerShell queries to extract Microsoft Entra ID Governance data for custom reports
The following queries extract Microsoft Entra ID Governance data from Microsoft Graph by using PowerShell and export the data to JSON files. You import those files into Azure Data Explorer in a later section of this tutorial.
Scenarios for generating reports with this type of data include:
- Reporting on historical access reviews.
- Reporting on assignments via entitlement management.
Get access review schedule definition data
Generate a JSON file with access review definition names and IDs that are used to create custom views in Azure Data Explorer. The sample includes all access reviews, but you can include additional filtering if necessary. For more information, see Use the filter query parameter.
   $allsched = Get-MgIdentityGovernanceAccessReviewDefinition -All
   $definitions = @()
   # Iterate over each definition
   foreach ($definition in $allsched) {
      $definitions += [PSCustomObject]@{
         Id = $definition.Id
         DisplayName = $definition.DisplayName
         SnapshotDate = $SnapshotDate
      }
   }
   $definitions | ConvertTo-Json -Depth 10 | Set-Content "EntraAccessReviewDefinitions.json"
Get instance data for access reviews
To export all access review definitions, instances, and decisions into a structured folder format by using PowerShell, you can use the Microsoft Graph API. This approach ensures that your data is organized hierarchically and aligns with the specified folder structure.
Before you begin, be aware of the following points:
- Ensure that you have the necessary permissions to access review data in Microsoft Graph.
- Depending on the volume of data, the script's execution time might vary. Monitor the process and adjust parameters as needed.
To get the instance data:
Download the Export_Access_Reviews.ps1 script and save it locally.
In File Explorer, unblock the script so that you can run it in PowerShell.
Run the following command. The output places all data into three subfolders:
ReviewInstances,ReviewInstanceDecisionItems, andReviewInstanceContactedReviewers..\ExportAccessReviews.ps1 -InstanceStartDate "11/15/2024" -InstanceEndDate "12/15/2024" -ExportFolder "C:\AccessReviewsExport\11_15_to_12_15"
Get access package data for entitlement management
Generate a JSON file with access package names and IDs that are used to create custom views in Azure Data Explorer. The sample includes all access packages, but you can include additional filtering if necessary.
   $accesspackages1 = Get-MgEntitlementManagementAccessPackage -All
   $accesspackages2 = @()
   # Iterate over each access package
   foreach ($accesspackage in $accesspackages1) {
      $accesspackages2 += [PSCustomObject]@{
         Id = $accesspackage.Id
         DisplayName = $accesspackage.DisplayName
         SnapshotDate = $SnapshotDate
      }
   }
   $accesspackages2 | ConvertTo-Json -Depth 10 | Set-Content "EntraAccessPackages.json"
Get access package assignment data for entitlement management
Generate a JSON file with assignments to access packages that are used to create custom views in Azure Data Explorer. The sample includes all assignments that are delivered, but you can include additional filtering if necessary.
   $apassignments1 = Get-MgEntitlementManagementAssignment -ExpandProperty target,accessPackage -filter "state eq 'Delivered'" -all
   $apassignments2 = @()
   # Iterate over each access package assignment
   foreach ($assignment in $apassignments1) {
      $apassignments2 += [PSCustomObject]@{
         Id = $assignment.Id
         ScheduleStartDateTime = $assignment.Schedule.StartDateTime -replace "\\/Date\((\d+)\)\\/", '$1'
         AccessPackageId = $assignment.AccessPackage.Id
         AccessPackageDisplayName = $assignment.AccessPackage.DisplayName
         TargetId = $assignment.Target.Id
         TargetDisplayName = $assignment.Target.DisplayName
         TargetEmail = $assignment.Target.Email
         TargetObjectId = $assignment.Target.ObjectId
         TargetPrincipalName = $assignment.Target.PrincipalName
         TargetSubjectType = $assignment.Target.SubjectType
         SnapshotDate = $SnapshotDate
      }
   }
   $apassignments2 | ConvertTo-Json -Depth 10 | Set-Content "EntraAccessPackageAssignments.json"
Create tables and import JSON files with data from Microsoft Entra ID Governance into Azure Data Explorer
In this section, you import the newly created JSON files for the Microsoft Entra ID Governance services into Azure Data Explorer for further analysis. These files join the data that you already imported for the Microsoft Entra ID services. On the first import via the Azure Data Explorer web UI, you create tables based on schemas that the web UI suggests from each JSON file.
Sign in to the Azure Data Explorer web UI.
In your Azure Data Explorer cluster or free cluster, go to the database that holds your Microsoft Entra ID data.
On the left menu, select Query.
Follow these steps for each exported JSON file, to get your exported data into that Azure Data Explorer database as a new table:
Right-click the database name of the database where you want to ingest the data. Then select Get data.
Select the data source from the available list. In this tutorial, you're ingesting data from a local file, so select Local file.
Select + New table and enter a table name, based on the name of the JSON file that you're importing. After the first import, the table already exists, and you can select it as the target table for a subsequent import.
Select Browse for files, select the JSON file, and then select Next.
Azure Data Explorer automatically detects the schema and provides a preview on the Inspect tab. Select Finish to create the table and import the data from that file. After the data is ingested, select Close.
Repeat the preceding steps for each of the JSON files that you generated in the previous section, for each of the folders.
If there are many files in a folder, you can use
lightingestto import the rest after the table is created.
At the end of those steps, you have the tables EntraAccessReviewDefinitions, EntraAccessPackages, EntraAccessPackageAssignments, ReviewInstances, ReviewInstanceDecisionItems, and ReviewInstanceContactedReviewers in the database, in addition to the tables that you created earlier.
Use Azure Data Explorer to build custom reports
With the data now available in Azure Data Explorer, you're ready to begin creating customized reports based on your business requirements:
Sign in to the Azure Data Explorer web UI.
On the left menu, select Query.
The following queries provide examples of common reports, but you can customize these reports to suit your needs and create additional reports.
You can also view your reports in Excel, by selecting the Export tab and then selecting Open in Excel.
Example: Generate app role assignments for direct and group assignments for a specific snapshot date
This report provides a view of who had what access, and when, to the target app. You can use it for security audits, compliance verification, and understanding access patterns within the organization.
The following query targets a specific application within Microsoft Entra ID and analyzes the role assignments as of a certain date. The query retrieves both direct and group-based role assignments. It merges this data with user details from the EntraUsers table and role information from the AppRoles table. In the query, set targetSnapshotDate to the snapshotDate value that you used when you loaded the data.
/// Define constants
let targetServicePrincipalId = "<your service principal-id>"; // Target service principal ID
let targetSnapshotDate = datetime("2024-01-13"); // Target snapshot date for the data

// Extract role assignments for the target service principal and snapshot date
let roleAssignments = AppRoleAssignments
    | where ResourceId == targetServicePrincipalId and startofday(SnapshotDate) == targetSnapshotDate
    | extend AppRoleIdStr = tostring(AppRoleId); // Convert AppRoleId to a string for easier comparison

// Prepare user data from the EntraUsers table
let users = EntraUsers
    | project ObjectID, UserPrincipalName, DisplayName, ObjectIDStr = tostring(ObjectID); // Include ObjectID as string for joining

// Prepare role data from the AppRoles table
let roles = AppRoles
    | mvexpand AppRoles // Expand AppRoles to handle multiple roles
    | extend RoleName = AppRoles.DisplayName, RoleId = tostring(AppRoles.Id) // Extract role name and ID
    | project RoleId, RoleName;
// Process direct assignments
let directAssignments = roleAssignments
    | join kind=inner users on $left.PrincipalId == $right.ObjectID // Join with EntraUsers on PrincipalId
    | join kind=inner roles on $left.AppRoleIdStr == $right.RoleId // Join with roles to get role names
    | project UserPrincipalName, DisplayName, CreatedDateTime, RoleName, AssignmentType = "Direct", SnapshotDate;

// Process group-based assignments

let groupAssignments = roleAssignments
    | join kind=inner EntraGroupMembership on $left.PrincipalId == $right.GroupId // Join with group membership
    | mvexpand Members // Expand group members
    | extend MembersStr = tostring(Members) // Convert the member ID to a string
    | distinct MembersStr, CreatedDateTime, AppRoleIdStr, SnapshotDate // Get distinct values
    | join kind=inner users on $left.MembersStr == $right.ObjectIDStr // Join with EntraUsers for user details
    | join kind=inner roles on $left.AppRoleIdStr == $right.RoleId // Join with roles for role names
    | project UserPrincipalName, DisplayName, CreatedDateTime, RoleName, AssignmentType = "Group", SnapshotDate;

// Combine results from direct and group-based assignments
directAssignments
| union groupAssignments
Example: Build a basic auditor report with Microsoft Entra data that shows who had access to an app between two dates
This report provides a view of who had what access to the target app between two dates. You can use it for security audits, compliance verification, and understanding access patterns within the organization.
The following query targets a specific application within Microsoft Entra ID and analyzes the role assignments between two dates. The query retrieves direct role assignments from the AppRoleAssignments table and merges this data with user details from the EntraUsers table and role information from the AppRoles table.
// Set the date range and service principal ID for the query
let startDate = datetime('2024-01-01');
let endDate = datetime('2024-03-14');
let servicePrincipalId = "<your service principal-id>";

// Query AppRoleAssignments for the specified service principal within the date range
AppRoleAssignments
| where ResourceId == servicePrincipalId and
    todatetime(CreatedDateTime) between (startDate .. endDate)

// Extend AppRoleId to a string for joining
| extend AppRoleIdStr = tostring(AppRoleId)

// Project the necessary fields for the join with EntraUsers and AppRoles
| project PrincipalId, AppRoleIdStr, CreatedDateTime

// Join with EntraUsers to get user details
| join kind=inner (EntraUsers | project UserPrincipalName, DisplayName, ObjectID) on $left.PrincipalId == $right.ObjectID

// Join with AppRoles to get the role display names
| join kind=inner (
  AppRoles | mvexpand AppRoles | project RoleIdStr = tostring(AppRoles.Id), RoleDisplayName = tostring(AppRoles.DisplayName)
) on $left.AppRoleIdStr == $right.RoleIdStr

// Final projection of the report with the current date and time
| project UserPrincipalName, DisplayName, RoleDisplayName, CreatedDateTime, ReportDate = now()
Example: View users added to an app between two data snapshot dates
These reports provide a view of which users received an app role assignment to the target application between two dates. You can use these reports to track changes in app access over time.
This query targets a specific application within Microsoft Entra ID and changes to the role assignments between start and end dates:
// Define the date range and service principal ID for the query

let startDate = datetime("2024-03-01");
let endDate = datetime("2024-03-14");
let servicePrincipalId = "<your service principal-id>";
let earlierDate = startDate; // Update this to your specific earlier date

AppRoleAssignments
| where SnapshotDate < endDate and ResourceId == servicePrincipalId
| project PrincipalId, AppRoleId2 = tostring(AppRoleId), CreatedDateTime
| join kind=anti (
    AppRoleAssignments
    | where SnapshotDate < earlierDate and ResourceId == servicePrincipalId
    | project PrincipalId, AppRoleId1 = tostring(AppRoleId)
) on PrincipalId
| join kind=inner (EntraUsers) on $left.PrincipalId == $right.ObjectID
| join kind=inner (AppRoles
                   | mvexpand AppRoles
                   | project AppRoleId=tostring(AppRoles.Id), RoleDisplayName=tostring(AppRoles.DisplayName)
                  ) on $left.AppRoleId2 == $right.AppRoleId
| project UserPrincipalName, DisplayName, RoleDisplayName, CreatedDateTime, PrincipalId, Change = "Added"
Example: Various queries that use access reviews
View access review completion and timeline information
After the data is uploaded, use the following Kusto queries to review it:
When was the last access review cycle completed? How long did it take?
ReviewInstances
| summarize LastCompletedDate = max(ReviewInstanceEndDateTime),
            ReviewDuration = datetime_diff('minute', max(ReviewInstanceEndDateTime), min(ReviewInstanceStartDateTime))
Is the access review process conducted on time (for example, quarterly)?
ReviewInstances
| extend ExpectedFrequency = "Quarterly" // Replace with the organization's frequency
| summarize ReviewsCompleted = count(), LastReviewEndDate = max(ReviewInstanceEndDateTime)
| extend CurrentDate = now(),
         TimeSinceLastReview = datetime_diff('day', now(), LastReviewEndDate)
| extend IsOnSchedule = iff(TimeSinceLastReview <= 90, "Yes", "No") // Assuming quarterly = 90 days
View access review participation and engagement
Who were the assigned reviewers?
ReviewInstanceContactedReviewers
| project AccessReviewDefinitionId, AccessReviewInstanceId, ReviewerName = DisplayName, ReviewerUserPrincipalName = UserPrincipalName, CreatedDateTime
Which reviewers actively participated and provided responses?
ReviewInstanceDecisionItems
| where ReviewedBy_DisplayName != "AAD Access Reviews"
| where Decision in ("Approve", "Deny")
| project AccessReviewDefinitionId, AccessReviewInstanceId, ReviewerName = ReviewedBy_DisplayName,
ReviewerUserPrincipalName = ReviewedBy_UserPrincipalName, Decision, ReviewedDateTime
| distinct AccessReviewDefinitionId, AccessReviewInstanceId, ReviewerName, ReviewerUserPrincipalName, Decision
What percentage of reviewers responded to the access review request?
let TotalReviewers = ReviewInstanceContactedReviewers
    | summarize Total = dcount(Id) by AccessReviewDefinitionId, AccessReviewInstanceId;

let RespondedReviewers = ReviewInstanceDecisionItems
    | where ReviewedBy_DisplayName != "AAD Access Reviews"
    | where ReviewedBy_Id != "00000000-0000-0000-0000-000000000000"
    | where Decision in ("Approve", "Deny")
    | summarize Responded = dcount(ReviewedBy_Id) by AccessReviewDefinitionId, AccessReviewInstanceId;

TotalReviewers
| join kind=leftouter RespondedReviewers on AccessReviewDefinitionId, AccessReviewInstanceId
| extend Responded = coalesce(Responded, 0)  // Replace null with 0 for Responded
| extend NotResponded = Total - Responded   // Calculate the number of nonresponders
| extend ResponsePercentage = (Responded * 100.0) / Total  // Percentage of those who responded
| extend NonResponsePercentage = (NotResponded * 100.0) / Total  // Percentage of those who didn't respond
| project AccessReviewDefinitionId, AccessReviewInstanceId, Total, Responded, ResponsePercentage, NotResponded, NonResponsePercentage
When did each reviewer complete their tasks?
ReviewInstanceDecisionItems
| where Decision in ("Approve", "Deny")
| project AccessReviewDefinitionId, AccessReviewInstanceId, ReviewerName = ReviewedBy_DisplayName, ReviewerUserPrincipalName = ReviewedBy_UserPrincipalName, ReviewedDateTime
Which reviewers didn't make any decisions?
let AllReviewers = ReviewInstanceContactedReviewers
    | project AccessReviewDefinitionId, AccessReviewInstanceId, ReviewerId = Id, ReviewerUserPrincipalName = UserPrincipalName, ReviewerName = DisplayName;

let ActiveReviewers = ReviewInstanceDecisionItems
    | where Decision in ("Approve", "Deny")
    | where ReviewedBy_DisplayName != "AAD Access Reviews"
    | where ReviewedBy_Id != "00000000-0000-0000-0000-000000000000"
    | summarize ActiveReviewers = make_set(ReviewedBy_Id) by AccessReviewDefinitionId, AccessReviewInstanceId;

AllReviewers
| extend ReviewerId = tostring(ReviewerId)  // Ensure ReviewerId is a string
| join kind=leftanti (
    ActiveReviewers
    | mv-expand ActiveReviewers
    | extend ActiveReviewers = tostring(ActiveReviewers)  // Cast ActiveReviewers to a string
) on $left.ReviewerId == $right.ActiveReviewers
| project AccessReviewDefinitionId, AccessReviewInstanceId, ReviewerUserPrincipalName, ReviewerName
What percentage of reviewers didn't interact?
let TotalReviewers = ReviewInstanceContactedReviewers
    | summarize Total = dcount(Id) by AccessReviewDefinitionId, AccessReviewInstanceId;

let RespondedReviewers = ReviewInstanceDecisionItems
    | where ReviewedBy_DisplayName != "AAD Access Reviews"
    | where ReviewedBy_Id != "00000000-0000-0000-0000-000000000000"
    | where Decision in ("Approve", "Deny")
    | summarize Responded = dcount(ReviewedBy_Id) by AccessReviewDefinitionId, AccessReviewInstanceId;

TotalReviewers
| join kind=leftouter RespondedReviewers on AccessReviewDefinitionId, AccessReviewInstanceId
| extend Responded = coalesce(Responded, 0)  // Replace null with 0 for Responded
| extend NotResponded = Total - Responded   // Calculate the number of nonresponders
| extend ResponsePercentage = (Responded * 100.0) / Total  // Percentage of those who responded
| extend NonResponsePercentage = (NotResponded * 100.0) / Total  // Percentage of those who didn't respond
| project AccessReviewDefinitionId, AccessReviewInstanceId, Total, Responded, ResponsePercentage, NotResponded, NonResponsePercentage
Were reminders triggered for nonresponsive reviewers or pending decisions?
// Step 1: Get the list of all reviewers
let TotalReviewers = ReviewInstanceContactedReviewers
    | project AccessReviewDefinitionId, AccessReviewInstanceId, ReviewerId = Id, ReviewerUserPrincipalName = UserPrincipalName, ReviewerName = DisplayName;

// Step 2: Get the list of reviewers who responded
let RespondedReviewers = ReviewInstanceDecisionItems
    | where ReviewedBy_DisplayName != "AAD Access Reviews"
    | where ReviewedBy_Id != "00000000-0000-0000-0000-000000000000"
    | where Decision in ("Approve", "Deny")
    | project AccessReviewDefinitionId, AccessReviewInstanceId, RespondedReviewerId = ReviewedBy_Id;

// Step 3: Get the list of review instances
let ReviewInstancesWithDetails = ReviewInstances
    | project AccessReviewDefinitionId = ReviewDefinitionId,
              AccessReviewInstanceId = ReviewInstanceId,
              RemindersSent = ReviewDefinitionSettings_ReminderNotificationsEnabled,
              StartDate = todatetime(ReviewInstanceStartDateTime),
              EndDate = todatetime(ReviewInstanceEndDateTime)
    | extend
              ReminderSentDate = iif(RemindersSent, StartDate + (EndDate - StartDate) / 2, datetime(null));

// Step 4: Identify nonresponsive reviewers and join with review instance details
TotalReviewers
| join kind=leftouter (ReviewInstancesWithDetails) on AccessReviewDefinitionId, AccessReviewInstanceId
| join kind=leftanti RespondedReviewers on $left.ReviewerId == $right.RespondedReviewerId
| project AccessReviewDefinitionId, AccessReviewInstanceId, ReviewerUserPrincipalName, ReviewerName, RemindersSent, ReminderSentDate
View users and access changes that result from access reviews
Who lost access to specific resources during the access review?
ReviewInstanceDecisionItems
| where Decision == "Deny"
| project User = Principal_DisplayName, Resource = Resource_DisplayName, Decision, Justification
Were users flagged due to inactivity?
ReviewInstanceDecisionItems
| where Insights contains "inactive"
| project User = Principal_DisplayName, Resource = Resource_DisplayName, Insights, Decision
What was the access removal date and the reason for losing access?
ReviewInstanceDecisionItems
| where Decision == "Deny"
| project User = Principal_DisplayName, Resource=Resource_DisplayName, AccessRemovalDate = AppliedDateTime, Reason = Justification
Which users made no decisions?
ReviewInstanceDecisionItems
| where Decision == "NotReviewed"
| project User = Principal_DisplayName, Resource=Resource_DisplayName
Which reviews had no reviewers?
ReviewInstances
| join kind=leftanti (
    ReviewInstanceContactedReviewers
    | summarize by AccessReviewInstanceId
) on $left.ReviewInstanceId == $right.AccessReviewInstanceId
Which reviews had no users?
ReviewInstances
| join kind=leftanti (
    ReviewInstanceDecisionItems
    | summarize by AccessReviewInstanceId
) on $left.ReviewInstanceId == $right.AccessReviewInstanceId
Summarize access review decisions
What decisions did users make: approved, denied, or unchanged?
ReviewInstanceDecisionItems
| summarize count() by Decision
What number of users were approved or denied access?
ReviewInstanceDecisionItems
| summarize ApprovedCount = countif(Decision == "Approve"), DeniedCount = countif(Decision == "Deny")
Were approval reasons documented?
ReviewInstanceDecisionItems
| where Decision == "Approve" and isnotempty(Justification)
| summarize count() by ReviewedBy_DisplayName
Confirm access review quality and check for completeness
Were access revocations considered for dormant users?
ReviewInstanceDecisionItems
| where Insights contains "inactive" and Decision == "Deny"
| project User = Principal_DisplayName, Decision
Was any access not properly removed?
ReviewInstanceDecisionItems
| where ApplyResult != "New" and ApplyResult != "AppliedSuccessfully"
Did reviewers document their decisions?
ReviewInstanceDecisionItems
| where isnotempty(Justification)
| summarize count() by ReviewedBy_DisplayName
Were comments captured for each user?
ReviewInstanceDecisionItems
| where isnotempty(Justification)
| project User = Principal_DisplayName, Resource = Resource_DisplayName, Comments = Justification
Set up ongoing imports
This tutorial illustrates a one-time data extract, transform, and load (ETL) process to populate Azure Data Explorer with a single snapshot for reporting purposes. For ongoing reporting or to compare changes over time, you can automate the process of populating Azure Data Explorer from Microsoft Entra, so that your database continues to have current data.
You can use Azure Automation, an Azure cloud service, to host the PowerShell scripts that you need for extracting data from Microsoft Entra ID and Microsoft Entra ID Governance. For more information, see Automate Microsoft Entra ID Governance tasks via Azure Automation and Microsoft Graph.
You can also use Azure features or command-line tools such as lightingest to bring in data and populate an existing table. For more information, see Use LightIngest to ingest data into Azure Data Explorer.
For example, to load the EntraAccessPackages.json file in the current directory into the EntraAccessPackages table as the currently logged-in user, use this command:
az login
LightIngest.exe "https://ingest-CLUSTERHOSTNAME;Fed=True" -database:"DATABASE" -table:EntraAccessPackages -sourcepath:"." -pattern:"EntraAccessPackages.json" -format:multijson -azcli:true
Query data in Azure Monitor
If you're sending the audit, sign-in, or other Microsoft Entra logs to Azure Monitor, you can incorporate those logs from that Azure Monitor Log Analytics workspace in your queries. For more information on the relationship between Azure Monitor and Azure Data Explorer, see Query data in Azure Monitor using Azure Data Explorer.
Sign in to the Microsoft Entra admin center.
Select Diagnostic settings.
Select the Log Analytics workspace where you're sending your logs.
On the Log Analytics workspace overview, record the subscription ID, the name of the resource, and the name of the workspace.
Sign in to the Azure portal.
Go to the Azure Data Explorer web UI.
Ensure that your Azure Data Explorer cluster is listed.
Select + Add > Connection.
In the Add Connection window, enter the URL in the Log Analytics workspace. The URL is formed from the cloud-specific host name, subscription ID, resource group name, and workspace name of the Azure Monitor Log Analytics workspace, as described in Add a Log Analytics workspace.
After the connection is established, your Log Analytics workspace appears on the left pane with your native Azure Data Explorer cluster.
Select Query, and then select your Azure Data Explorer cluster.
On the query pane, refer to the Azure Monitor tables that contain the Microsoft Entra logs in your Azure Data Explorer queries. For example:
let CL1 = 'https://ade.loganalytics.io/subscriptions/*subscriptionid*/resourcegroups/*resourcegroupname*/providers/microsoft.operationalinsights/workspaces/*workspacename*';
cluster(CL1).database('*workspacename*').AuditLogs | where Category == "EntitlementManagement"  and OperationName == "Fulfill access package assignment request"
| mv-expand TargetResources | where TargetResources.type == 'AccessPackage' | project ActivityDateTime,APID = toguid(TargetResources.id)
| join EntraAccessPackage on $left.APID == $right.Id
| limit 100
Bring in data from other sources
You can create additional tables in Azure Data Explorer to ingest data from other sources. If the data is in a JSON file (similar to the preceding examples) or a CSV file, you can create the table at the time that you first get data from the file. After the table is created, you can also use LightIngest to ingest data into Azure Data Explorer from a JSON or CSV file.
For more information on data ingestion, see Azure Data Explorer data ingestion overview.
Example: Combine app assignments from Microsoft Entra and a second source to create a report of all users who had access to an application between two dates
This report illustrates how you can combine data from two separate systems to create custom reports in Azure Data Explorer. It aggregates data about users, their roles, and other attributes from two systems into a unified format for analysis or reporting.
The following example assumes that a table named salesforceAssignments was populated with data that came from another application. The table has the columns UserName, Name, EmployeeId, Department, JobTitle, AppName, Role, and CreatedDateTime.
// Define the date range and service principal ID for the query

let startDate = datetime("2023-06-01");
let endDate = datetime("2024-03-13");
let servicePrincipalId = "<your service principal-id>";

// Pre-process AppRoleAssignments with specific filters and projections
let processedAppRoleAssignments = AppRoleAssignments
    | where ResourceId == servicePrincipalId and todatetime(CreatedDateTime) between (startDate .. endDate)
    | extend AppRoleId = tostring(AppRoleId)
    | project PrincipalId, AppRoleId, CreatedDateTime, ResourceDisplayName; // Exclude DeletedDateTime and keep ResourceDisplayName

// Pre-process AppRoles to get RoleDisplayName for each role
let processedAppRoles = AppRoles
    | mvexpand AppRoles
    | project AppRoleId = tostring(AppRoles.Id), RoleDisplayName = tostring(AppRoles.DisplayName);

// Main query: Process EntraUsers by joining with processed role assignments and roles
EntraUsers
    | join kind=inner processedAppRoleAssignments on $left.ObjectID == $right.PrincipalId // Join with role assignments
    | join kind=inner processedAppRoles on $left.AppRoleId == $right.AppRoleId // Join with roles to get display names

    // Summarize to get the latest record for each unique combination of user and role attributes
    | summarize arg_max(AccountEnabled, *) by UserPrincipalName, DisplayName, tostring(EmployeeId), Department, JobTitle, ResourceDisplayName, RoleDisplayName, CreatedDateTime

    // Final projection of relevant fields, including source indicator and report date
    | project UserPrincipalName, DisplayName, EmployeeId=tostring(EmployeeId), Department, JobTitle, AccountEnabled=tostring(AccountEnabled), ResourceDisplayName, RoleDisplayName, CreatedDateTime, Source="EntraUsers", ReportDate = now()

// Union with processed salesforceAssignments to create a combined report
| union (
    salesforceAssignments

    // Project fields from salesforceAssignments to align with the EntraUsers data structure
    | project UserPrincipalName = UserName, DisplayName = Name, EmployeeId = tostring(EmployeeId), Department, JobTitle, AccountEnabled = "N/A", ResourceDisplayName = AppName, RoleDisplayName = Role, CreatedDateTime, Source = "salesforceAssignments", ReportDate = now()
)