Migrate Dynamics 365 Guides content from one Microsoft Dataverse environment to another using the Content Migration Tool (Public Preview)
The Content Migration Tool (Public Preview) for Microsoft Dynamics 365 Guides is a Windows PowerShell script that copies content from one environment of Microsoft Dataverse to another. You can migrate all the content in an environment or just specific types of content (for example, 3D objects, images, and videos). After the migration is completed, the content exists in both environments. The content in the source environment isn't changed in any way.
The tool connects to two Microsoft Dataverse environments at the same time. It reads the content in the source environment and writes it to the destination environment. The environments can be part of the same tenant, or they can be in different tenants.
The tool supports migration between commercial and/or Microsoft Government Community Cloud (GCC) environments.
Important
By using the Content Migration Tool (Public Preview) for Dynamics 365 Guides, you acknowledge and accept all the limitations of using a preview tool. For example, you accept that the terms and commitments for Dynamics 365 Guides and other Microsoft commercial services and products don't apply to the Content Migration Tool. You also assume all risks that are associated with migrating your data between Dynamics 365 tenants. These risks include but aren't limited to the risk of different security, compliance, and privacy commitments, the risk of damage to or loss of data, and the risk of unavailability or interruption of the tool.
The tool supports the following types of migration.
| Type of migration | What is migrated? |
|---|---|
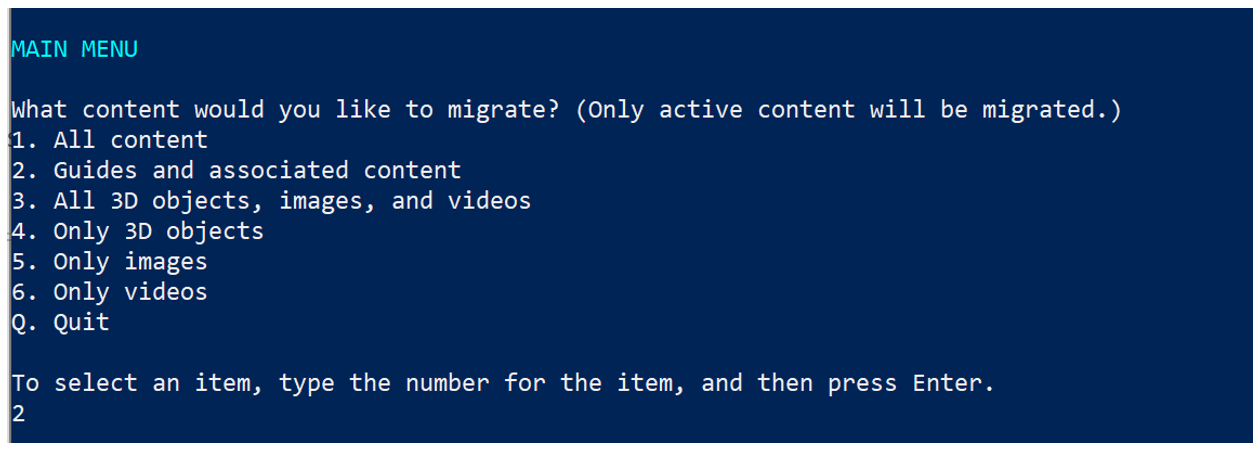
| All content | Everything that is stored in the instance that is active. (Telemetry events that are associated with a guide are excluded.) |
| Guides and associated content | Active guides, and any 3D objects, images, or videos that are related to those guides. Inactive content that is associated with a guide is also migrated. You can migrate all existing guides at one time or select specific guides. You can't migrate a combination of packaged and non-packaged guides. |
| All 3D objects, images, and videos | All active 3D objects, images, and videos that are stored in the instance. |
| Only 3D objects | Active 3D objects only. You can migrate all existing 3D objects at one time, all 3D objects that belong to a 3D object collection, or select specific 3D objects. |
| Only images | Active images only. You can migrate all existing images at one time or select specific images. |
| Only videos | Active videos only. You can migrate all existing videos at one time or select specific videos. |
| Only object anchors | Active object anchors only. You can migrate all existing object anchors at one time or select specific object anchors. |
Note
- If you have created a folder structure in your environment, migrate it using Power Platform's export/import functionality. Moving the folders first, and then the content ensures that the folder and content hierarchy is retained.
- Website and Power Apps links are migrated when you migrate guides. However, for Power Apps, manually import the apps into the new environment and update the links in the appropriate steps.
- The Content Migration Tool doesn't support migration of guides that are based on schema v3 or v4. If you've updated your Dynamics 365 Guides solution to the latest version, but you still have a guide that is based on schema v3 or v4, do a manual upgrade.
- For 3D objects that belong to a 3D object collection, the parent 3D object won't be migrated unless you have the System Admin role.
Prerequisites
A system admin for the computer that you use to run the Windows PowerShell script.
Windows PowerShell version 5.1.18362.752 or later.
Both the source environment and the destination environment uses Dynamics 365 Guides solution version 700.0.0.x or later.
Both the source environment and the destination environment have the same major and minor version numbers.
Credentials to sign in to the source environment in the System Admin role (preferable) or Operator/Author role (required).
Credentials to sign in to the destination environment in the System Admin role (preferable) or Author role (required).
We also highly recommend that you back up the contents of both environments before you start the migration process.
Download the tool and run the script
Download the Guides Content Migration Tool. The zipped folder is downloaded to your downloads folder.
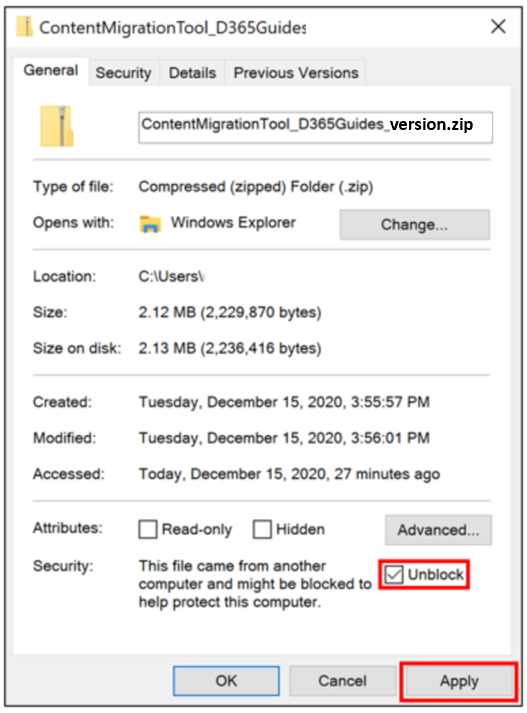
In Windows File Explorer, select the zipped folder, right-click and then select Properties.
In the Properties dialog box, on the General tab, select the Unblock check box, and then select Apply.
Select the zipped folder and extract the contents.
Run Windows PowerShell as an administrator. Select Start, type PowerShell, choose Windows PowerShell, and then select Run as administrator.
Navigate to the ContentMigrationTool_D365GuidesR2_v700 > MigrationToolScripts folder in the extracted archive.
In the User Account Control message box, select Yes to allow Windows PowerShell to make changes to your device.
Enter Set-ExecutionPolicy RemoteSigned, and then select Y to accept the change in execution policy.

Enter .\ContentMigrationTool_PublicPreview_Dynamics365Guides.ps1, and then select Enter.
Note
Be sure to include the period at the beginning of the string.
Select any key to continue.
In the PowerShell Interactive Login dialog box, connect to the source environment by following these steps:
In the Deployment Type field group, select the Microsoft 365 option.
Select the Display list of available organizations check box.
Select the Show Advanced check box.
In the Online Region field, select the online region for your environment. If your environment is in a GCC region, select North America 2. If you don't know the region, select Don't know.
In the User Name and Password fields, enter the user name and password for the Microsoft Dataverse environment that you want to connect to.
Select Login. If you don't select an organization to connect to, the tool connects to the last organization that was successful for both the source environment and the destination environment. If there is only one environment in the tenant, Windows PowerShell automatically connects to the default environment. In this case, skip to step 12.
In the Starting Login Process dialog box, select the source environment (organization) to connect to.
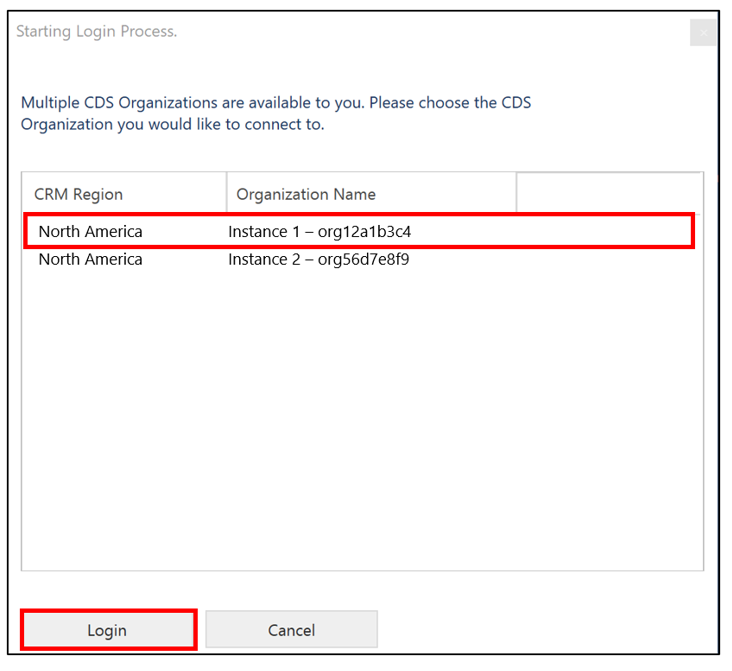
Select Login.
In the PowerShell Interactive Login dialog box, connect to the destination environment by following these steps:
In the Deployment Type field group, select the Microsoft 365 option.
Select the Display list of available organizations check box.
Select the Show Advanced check box.
In the Online Region field, select the online region for your environment. If your environment is in a GCC region, select North America 2. If you don't know the region, select Don't know.
In the User Name and Password fields, enter the user name and password for the Microsoft Dataverse environment that you want to connect to.
Select Login.
In the Starting Login Process dialog box, select the destination environment (organization) to connect to.
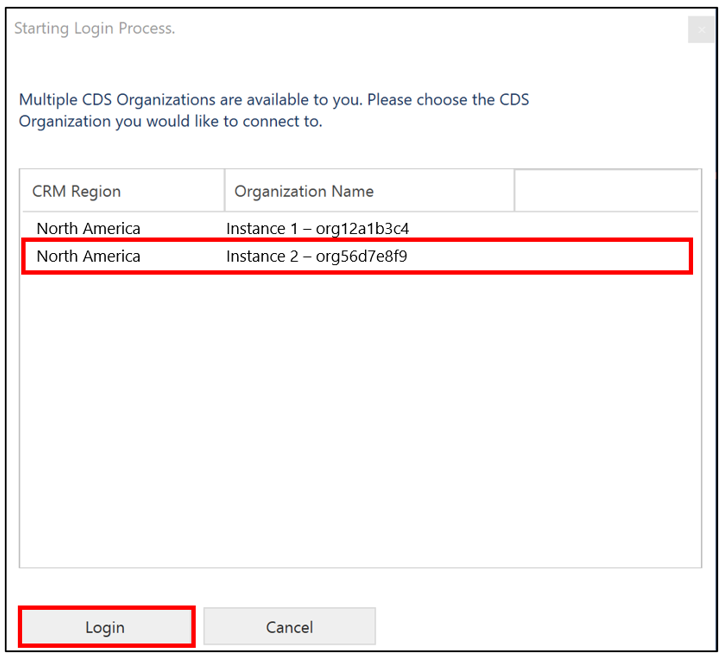
Select Login.
On the Main Menu page, select an option by entering the number that corresponds to it, and then select Enter.
Tip
In numbered lists where you can select more than one option, such as the numbered list on the Select Guides to Migrate page, separate the numbers for your selections with a comma, and then select Enter.
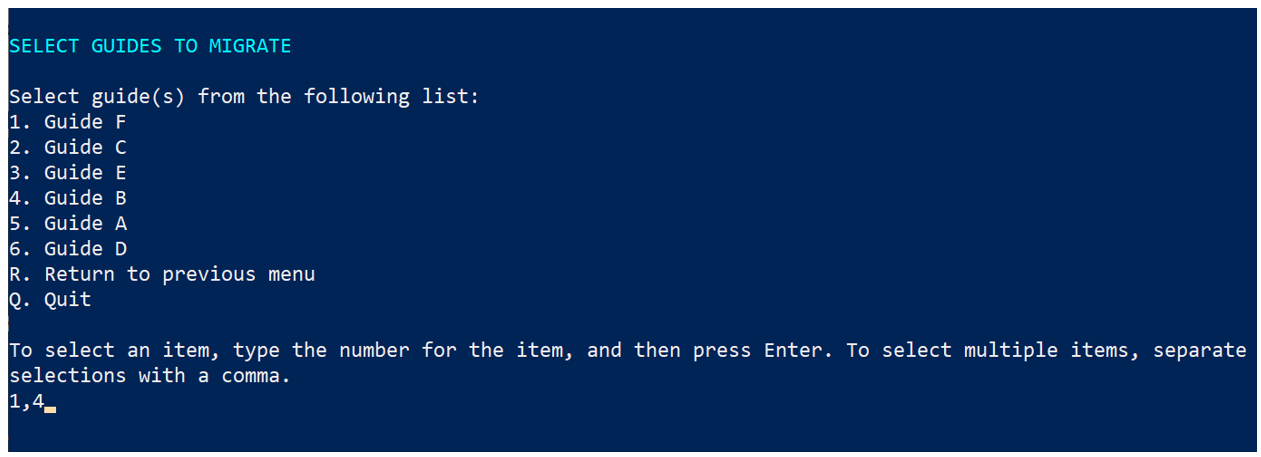
When you're prompted to confirm your selection, enter Y, and then select Enter. To cancel the action, enter N, and then select Enter.
