Use Autodesk ReCap Photo to create 3D objects for Dynamics 365 Guides or for mixed-reality components included in apps created with Power Apps
This tutorial guides you through the Autodesk ReCap Photo photogrammetry software to create 3D objects that can be used with Dynamics 365 Guides. The software can be used for mixed-reality components included in apps created with Microsoft Power Apps.
This tutorial is created only for informational purposes, to show how ReCap Photo works with Dynamics 365 Guides and Power Apps. Microsoft Corporation isn't affiliated with, isn't a partner of, and doesn't endorse or sponsor Autodesk or any of its products.
What is Autodesk ReCap Photo?
Autodesk ReCap Photo processes photographs that are taken from drones to create 3D representations of current conditions of sites, objects, and more. Learn more about Autodesk ReCap Photo.
Installing Autodesk ReCap Photo
You can sign up for a free trial of Autodesk ReCap Photo.
Photography tips
The following tips help you take quality photos for photogrammetry:
If you can, take photos in a location where lighting is consistent and doesn't cast shadows.
Try to keep your own shadow out of the picture.
Make sure that there are no moving objects in the background when you take the photos.
If the camera that you're using has a high dynamic range (HDR) setting, turn off the feature, and try not to adjust the exposure of your photographs while you capture images.
Take pictures about one meter apart while you circle the object.
If you can, maintain a perpendicular location relative to the object while you take photos.
If the object is large, move in a lateral motion from one end of the object to the other. Change the height at each pass until you capture all surfaces.
Start a new project
Open Autodesk ReCap Photo. When you first open Autodesk ReCap Photo, the dashboard appears.
Note
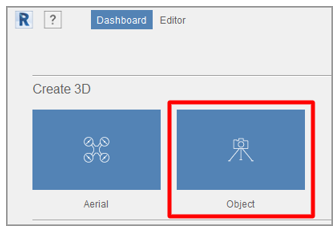
On the dashboard, you can select either Aerial or Object to create a new 3D project. This tutorial covers the Object workflow.
Under Create 3D, select Object.
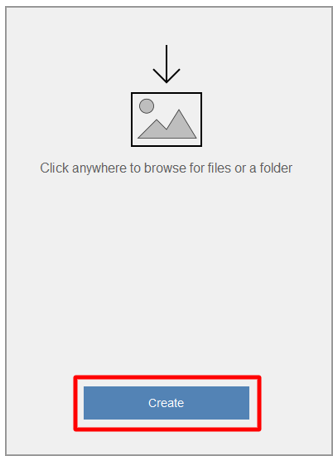
Select anywhere on the page that appears, according to the prompt, and then add the photos that you want to use to create your 3D object. After you finish importing the photos, select Create.
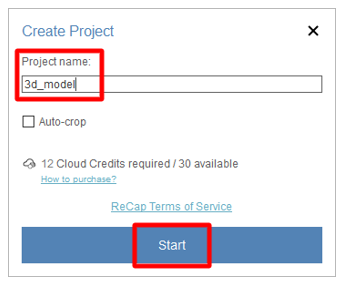
On the Create Project page, enter a name for your project, and then select Start to process your photos. Processing can take some time, depending on the number of photos that you added and the speed of your internet connection.
Note
At this point, you can use the Autocrop feature if you want. This tutorial shows how to crop the 3D object later in the process.
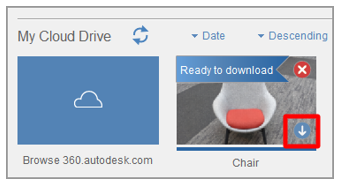
After your 3D object has been processed, it appears in the My Cloud Drive section of the dashboard. Select the Download this project from the cloud (down arrow) button to download your 3D object.
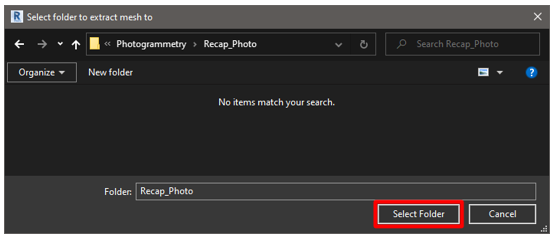
Select a location to save your model to, and then select Select Folder.
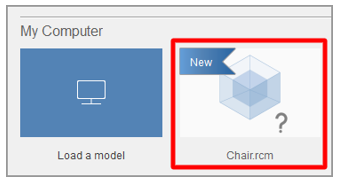
The new 3D object has the name that you entered. Select the model to open it in the editor.
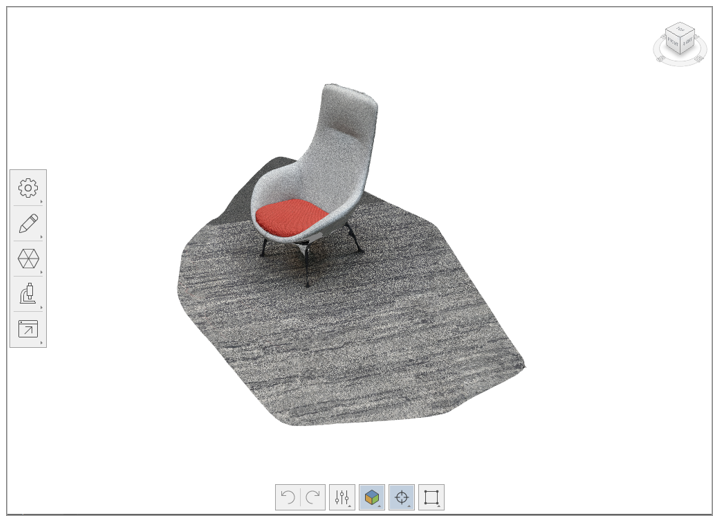
Your 3D object is loaded on the editor page.
Edit the 3D object
Several tools are available on the left side and at the bottom of the editor page. You can use these tools to clean up your 3D object. Experiment with these tools to clean up the parts of your 3D object that you don't want to keep. This tutorial shows how to remove the floor from the model.
At the bottom of the editor page, select the Lasso/Fence tool.
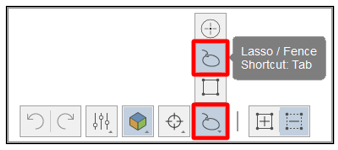
Use the Lasso/Fence tool to select everything except the object that you want to keep.
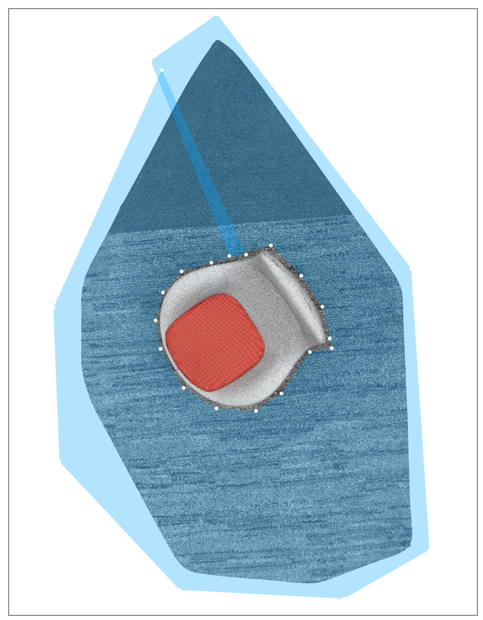
Press Enter, and then press Delete. You might have to repeat these steps a few times to remove most of the floor.
Select the Slice tool to remove the rest of the floor. This tool creates a slicing plane that you can use to cut away geometry below a specific point. The following settings are available in the Slice dialog box:
Fill: Select this option to close the model, based on the boundary of the open area of the model. In some cases, filling might not be easy.
No fill: Select this option to leave the model as an open model.
Transform plane: Select this check box to align the plane so that the floor isn't visible.
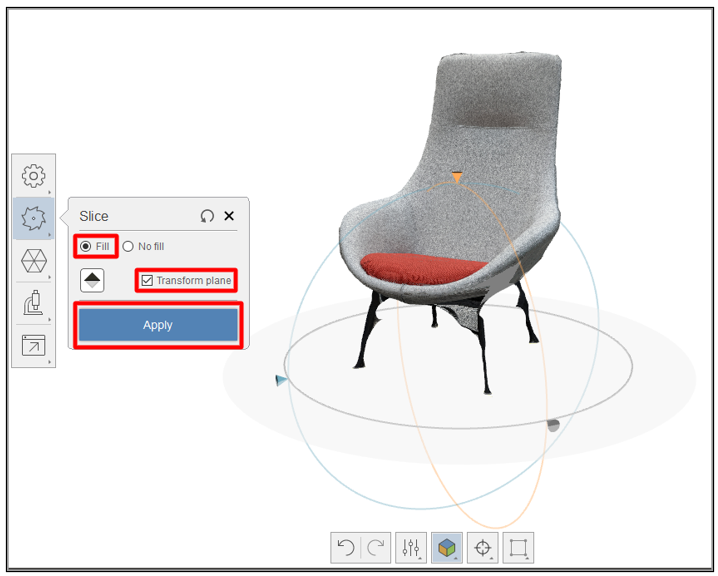
When the model looks the way that you want it to, select Apply.
The rest of the floor is removed from your 3D object and the mesh on the bottom is filled.
Decimate the 3D object to help increase performance
After you've finished removing the parts of the mesh that you don't want to keep, you can decimate it to a polygon count that meets the performance targets for Dynamics 365 Guides and Power Apps.
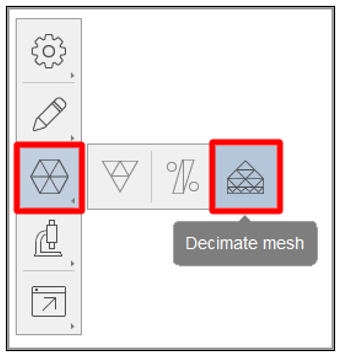
On the left side of the editor page, select the Decimate mesh tool.
In the Decimate dialog box, in the Target face count field, specify a polygon count that balances visual fidelity with performance requirements.
Note
Unless precise geometry is very important, don't select the Best geometry check box, because it will remove your textures. The textures that are produced through photogrammetry add significant detail to the 3D object.
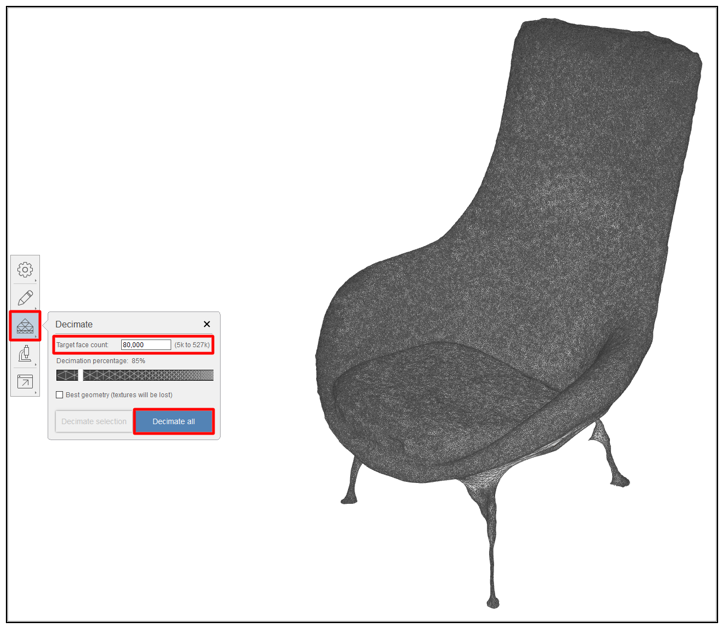
Select Decimate all.
The 3D object is optimized and ready for export.
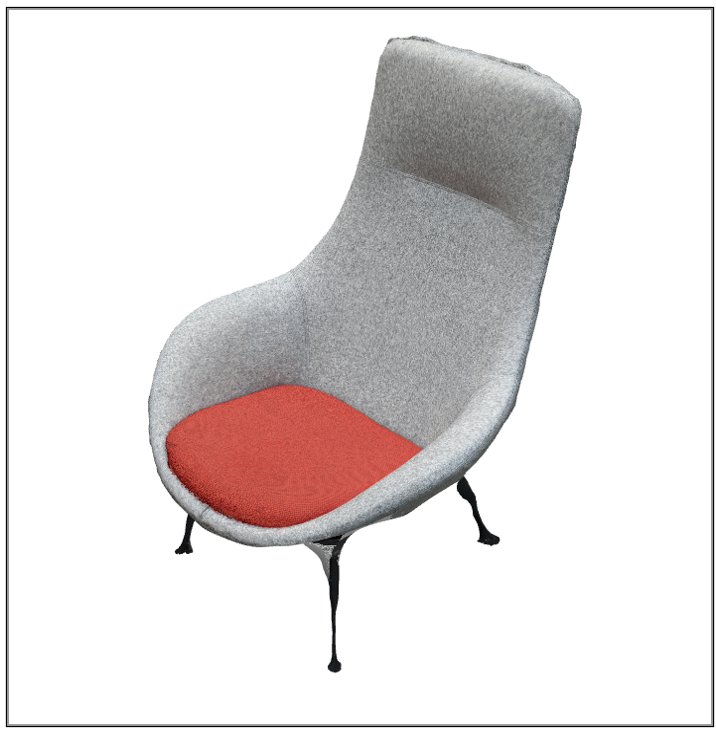
Export the 3D object as an OBJ file
Before you can use the 3D object in Dynamics 365 Guides or Power Apps, it must be in the GLB file format. In this step, you export the model as an OBJ file that can then be converted to a GLB file.
On the left side of the editor page, select the Export button, and then select the Export model button to open the export settings.
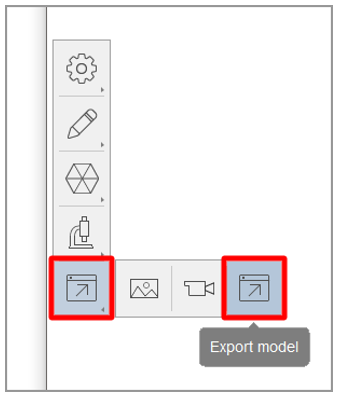
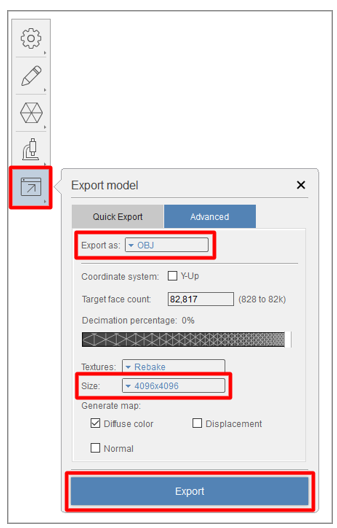
In the Export model dialog box, in the Export as field, select OBJ as the export file type, and then, in the Size field, select 4096x4096 as the texture size. When you finish, select Export.
Note
Although you can select a larger or smaller texture size, be aware that the size will affect either performance or visual fidelity.
Select a location to save your file to, and then select Select Folder.
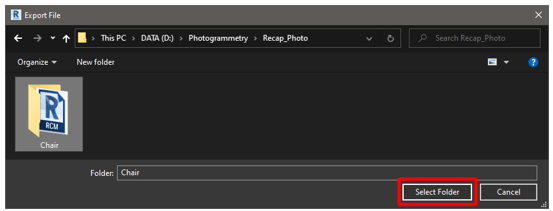
The 3D object is exported to the folder that you selected.
Use Blender to convert the OBJ file to a GLB file
There are several applications that you can use to convert an OBJ file to a GLB file. This tutorial shows how to use Blender.
What is Blender?
Blender is a free, open-source 3D creation suite. It supports the whole 3D pipeline: modeling, rigging, animation, simulation, rendering, compositing and motion tracking, and video editing and game creation.
If you use Blender to prepare your 3D objects, review the information on the Blender website, and download the latest version for Windows.
Import your 3D object into Blender
Open Blender. A new scene is automatically created.
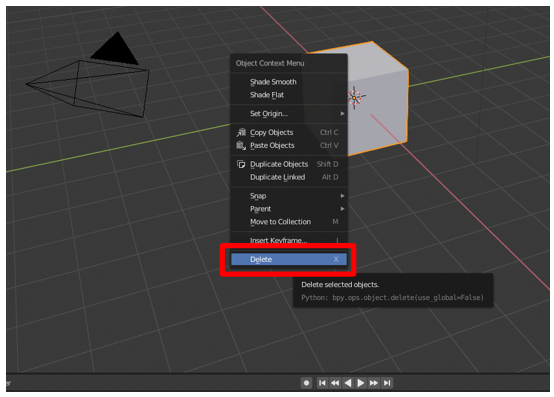
Right-click the cube, and then select Delete to delete it.
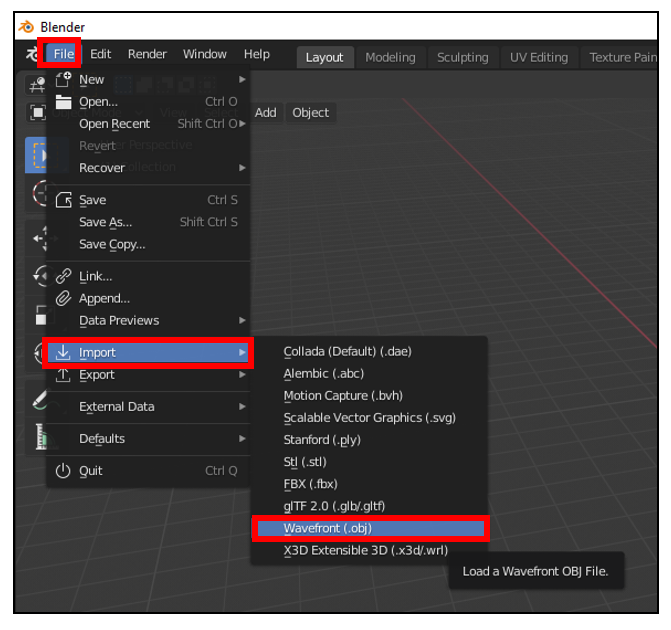
On the File menu, select Import > Wavefront (.obj) to import the OBJ file.
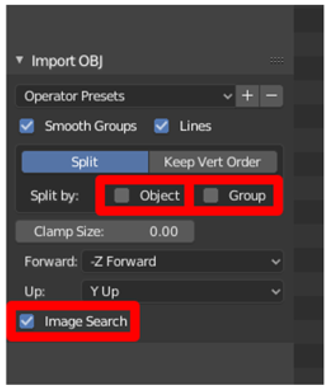
Under Import OBJ, follow these steps:
Clear the Object and Group check boxes, and select the Image Search check box.
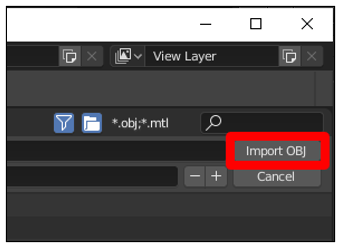
Select Import OBJ. Blender imports the 3D object as a single item and searches the subfolder for any materials.
Export the 3D object as a GLB file
The last step is to export the model as a GLB file so that it can be used with Dynamics 365 Guides or Power Apps.
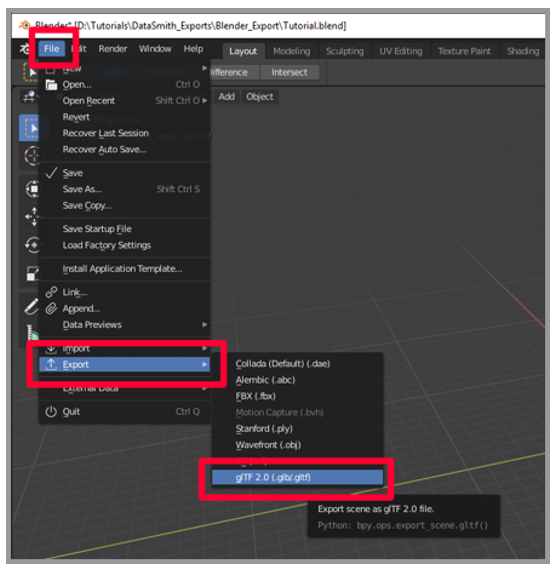
In Blender, on the File menu, select Export > glTF 2.0 (.glb/.gltf).
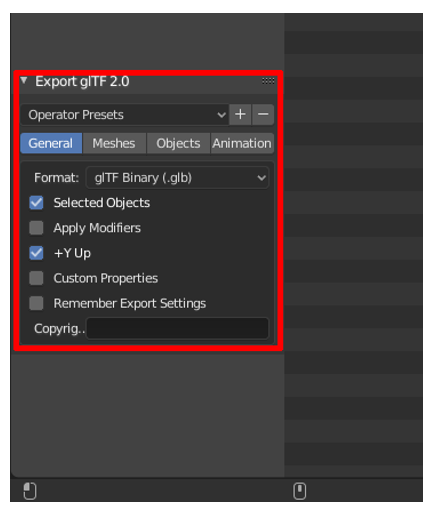
Under Export glTF 2.0, in the Format field, select glTF Binary (.glb), and then select the Selected Objects check box.
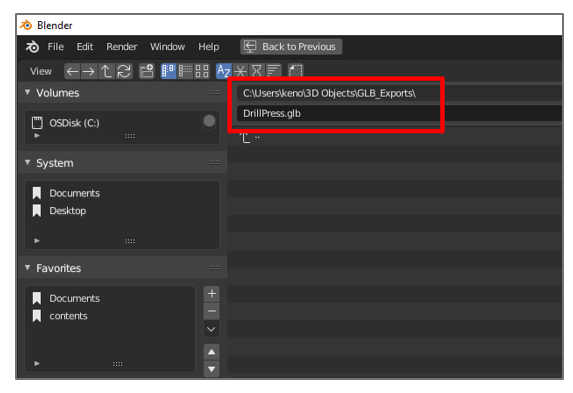
Enter a name for your file.
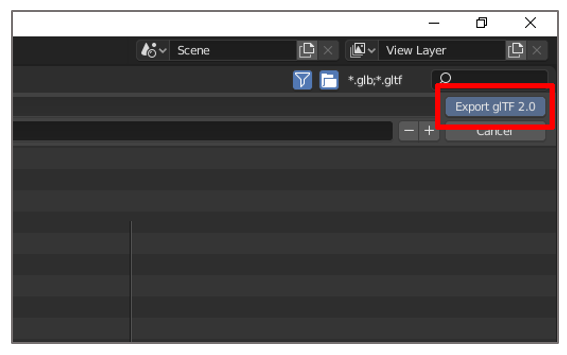
Select Export glTF 2.0.
View a 3D object in Dynamics 365 Guides or Power Apps
After you prepare a 3D object, use the following links to learn more about using the model in Dynamics 365 Guides or Power Apps:
More information
Screenshots in this tutorial were taken from the Autodesk ReCap Photo software program to provide clear instructions about how to use the ReCap Photo software. To learn more about ReCap Photo and Blender, see the following pages:
Microsoft Corporation isn't responsible for, and expressly disclaims all liability for damages of any kind arising out of the use of Autodesk ReCap Photo, or reliance on these instructions. This document is created only to provide general information to our customers and doesn't take into consideration any individualized business plans or specifications.
The use in this document of trademarked names and images is strictly for informative and descriptive purposes, and no commercial claim to their use, or suggestion of sponsorship or endorsement, is made by Microsoft Corporation.