Example for generic EU Sales list
This article explains how to set up and transfer a European Union (EU) sales list, including outlines on setting up country parameters and company information.
The following procedure uses the DEMF legal entity. It also uses Germany as a country of the Domestic country/region type, and Spain and Sweden as countries of the EU country/region type.
Setup
Set up country/region parameters
To set up country/region parameters, follow these steps.
- In Dynamics 365 Finance, go to Tax > Setup > Sales tax > Country/region parameters.
- On the Action Pane, select New.
- In the Country/region field, select SWE.
- In the Sales tax field, enter "SE".
- On the Action Pane, select New.
- In the Country/region field, select DEU.
- In the Sales tax field, enter "DE".
- On the Action Pane, select New.
- In the Country/region field, select ESP.
- In the Sales tax field, enter "ES"".
- On the Action Pane, select Save.
Set up company information
To set up company information, follow these steps.
In Dynamics 365 Finance, go to Organization administration > Organizations > Legal entities.
Select the DEMF legal entity.
In the Name field, enter "Contoso Entertainment System Germany".
On the Addresses FastTab, select Edit.
In the Edit address dialog, set the following fields.
Field Value Name or description Primary address Purpose Business Country/region DEU ZIP/postal code 10115 Street Bahnhofstraße 5 City Berlin Primary Yes Select OK.
On the Tax registration FastTab, in the Tax registration number field, enter "203/118/12345".
Note
The value of the Tax registration number field can be used in EU sales list report files, depending on the specific country or region.
Set up VAT IDs
Create a registration type for a company code
To create a registration type for a company code, follow these steps.
- In Dynamics 365 Finance, go to Organization administration > Global address book > Registration types > Registration types.
- On the Action Pane, select New.
- In the Enter registration type details dialog, in the Name field, enter "VAT ID".
- In the Country/region field, select DEU.
- Select Create.
- On the Applicable countries/regions, uses, and validation rules FastTab, select Add.
- In the Country/region field, select ESP.
- Select Add.
- In the Country/region field, select SWE.
Match the registration type with a registration category
To match the registration type with a registration category, follow these steps.
- In Dynamics 365 Finance, go to Organization administration > Global address book > Registration types > Registration categories.
- On the Action Pane, select New to create a link between a registration type and a registration category.
- For the VAT ID registration type for Germany, Spain, and Sweden, select the VAT ID registration category.
Set up the VAT ID of a data provider for your company
To set up the VAT ID of a data provider for your company, follow these steps.
In Dynamics 365 Finance, go to Organization administration > Organizations > Legal entities.
Select the DEMF legal entity.
On the Action Pane, select Registration IDs.
On the Registration ID FastTab, select Add.
In the Registration type field, select VAT ID.
In the Registration number field, enter "DE777666555".
On the General tab, in the General section, in the Effective field, select 8/1/2021 (August 1, 2021).
Close the page.
Note
Depending on the company localization, if the VAT exempt number export field in the Intrastat section of the Foreign trade and logistics FastTab is set (not blank), the value can be used instead of the VAT ID that you created.
Create a customer's VAT registration number
To create a customer's VAT registration number, follow these steps.
- In Dynamics 365 Finance, go to Accounts receivable > Customers > All customers.
- In the grid, select DE-010.
- On the Action Pane, on the Customer tab, in the Registration group, select Registration Ids.
- On the Registration ID FastTab, select Add to create a registration ID.
- In the Registration type field, select VAT ID.
- In the Registration number field, enter "ES1234567".
- On the General tab, in the General section, in the Effective field, select 8/1/2021 (August 1, 2021).
- On the Action Pane, select Save.
- Close the page.
- On the Invoice and delivery FastTab, in the Sales tax section, in the Tax exempt number field, select ES1234567.
- On the General tab, in the General section, in the Effective field, select 8/1/2021.
- On the Action Pane, select Save.
- Close the page.
- In the grid, select DE-011.
- Repeat steps 3 through 5.
- In the Registration number field, enter "SE100200300400".
- On the Action Pane, select Save.
- Close the page.
- On the Invoice and delivery FastTab, in the Sales tax section, in the Tax exempt number field, select SE100200300400.
Import electronic reporting configurations
To import electronic reporting configurations, follow these steps.
Sign in to Microsoft Dynamics Lifecycle Services (LCS).
Import the latest versions of the following electronic reporting (ER) configurations for the EU sales list:
- EU Sales list model
- EU Sales list by rows report
- EU Sales list (DE)
Set up foreign trade parameters
To set up foreign trade parameters, follow these steps.
In Dynamics 365 Finance, go to Tax > Setup > Foreign trade > Foreign trade parameters.
On the EU sales list tab, on the Rounding rules FastTab, in the Rounding rule field, enter "0.01".
In the Number of decimals field, enter "2".
On the Electronic reporting FastTab, in the File format mapping field, select EU Sales list (DE).
In the Report format mapping field, select EU Sales list by rows report.
On the Country/region properties tab, select New, and set the following fields:
- In the Country/region field, select DEU.
- In the Country/region type field, select Domestic.
Select New, and set the following fields:
- In the Country/region field, select ESP.
- In the Country/region type field, select EU.
Select New, and set the following fields:
- In the Country/region field, select SWE.
- In the Country/region type field, select EU.
On the Number sequences tab, verify that the Number sequence code field is set (not blank) for the EU sales list reference.
Set up sales tax codes and sales tax groups
To set up sales tax codes and sales tax groups, follow these steps.
- In Dynamics 365 Finance, go to Tax > Indirect taxes > Sales tax > Sales tax codes.
- Select the EUS sales tax code.
- Verify that the Percentage/Amount field is set to 0.00000.
- On the Report setup FastTab, in the Country/region type section, in the Country/region type field, select EU.
- In the EU sales list section, verify that the Excluded option is set to No.
- Go to Tax > Indirect taxes > Sales tax > Sales tax groups.
- Verify that the EUS sales tax code is included in the AR-EU sales tax group.
- On the Setup FastTab, verify that the Exempt checkbox is selected for the EUS sales tax code.
- Go to Tax > Indirect taxes > Sales tax > Item sales tax groups.
- Verify that the FULL item sales tax group includes the EUS sales tax code.
- In the Reporting type field, select Item.
Set up customer information
To set up customer information, follow these steps.
- In Dynamics 365 Finance, go to Accounts receivable > Customers > All customers.
- In the grid, select DE-010.
- On the Addresses FastTab, select Edit.
- In the Edit address dialog, in the Country/region field, select ESP.
- In the Primary field, select Yes.
- Select OK.
- On the Invoice and delivery FastTab, in the Sales tax section, in the Sales tax group field, select AR-EU.
- Select Save.
- Close the page.
- In the grid, select DE-011.
- On the Addresses FastTab, select Edit.
- In the Edit address dialog, in the Country/region field, select SWE.
- In the Primary field, select Yes.
- Select OK.
Create a free text invoice
To create a free text invoice, follow these steps.
In Dynamics 365 Finance, go to Accounts receivable > Invoices > All free text invoices.
On the Action Pane, select New.
On the Free text invoice header FastTab, in the Customer account field, select DE-010.
In the Invoice section, in the Date field, select 8/6/2021 (August 6, 2021).
On the Invoice lines FastTab, set the following fields:
- In the Main account field, select 112010.
- In the Sales tax group field, select AR-EU.
- In the Item sales tax group field, select FULL.
- In the Quantity field, select 1.
- In the Unit price field, select 120.
In the Header view, on the Foreign trade FastTab, verify that the List code field is set to EU trade.
Post the free text invoice.
Go to Tax > Indirect taxes > Sales tax > Item sales tax groups.
For the FULL item sales tax group, in the Reporting type field, select Service.
Repeat steps 1 through 7 for customer DE-011. However, set the invoice date to 8/2/2021 (August 2, 2021) and the unit price to 240.
Set up purchase transfers
Complete the following setup for countries or regions that include purchases in the EU sales list report.
Set up vendor information
To set up vendor information, follow these steps.
- In Dynamics 365 Finance, go to Accounts payable > Vendors > All vendors.
- In the grid, select DE-001.
- On the Addresses FastTab, select Edit.
- In the Edit address dialog, in the Country/region field, select DEU.
- In the Primary field, select Yes.
- Select OK.
- Close the page.
Set up VAT IDs
Create a registration type for a company code
To create a registration type for a company code, follow these steps.
- In Dynamics 365 Finance, go to Organization administration > Global address book > Registration types > Registration types.
- On the Action Pane, select New to create a registration type for the VAT ID.
- In the Enter registration type details dialog, in the Name field, enter "VAT ID".
- In the Country/region field, select DEU.
Match the registration type with a registration category
To match the registration type with a registration category, follow these steps.
- In Dynamics 365 Finance, go to Organization administration > Global address book > Registration types > Registration categories.
- On the Action Pane, select New to create a link between a registration type and a registration category.
- For the VAT ID registration type for Germany, select the VAT ID registration category.
Create a vendor's VAT registration number
To create a vendor's VAT registration number, follow these steps.
- In Dynamics 365 Finance, go to Accounts payable > Vendors > All vendors.
- In the grid, select DE-001.
- On the Action Pane, on the Vendor tab, in the Registration group, select Registration IDs.
- On the Registration ID FastTab, select Add to create a registration ID.
- In the Registration type field, select VAT ID.
- In the Registration number field, enter "DE100200400".
- On the General tab, in the General section, in the Effective field, select 8/1/2021 (August 1, 2021).
- On the Action Pane, select Save.
- Close the page.
- On the Invoice and delivery FastTab, in the Sales tax section, in the Tax exempt number field, select DE100200400.
- On the Action Pane, select Save.
- Close the page.
Set up foreign trade parameters
To set up foreign trade parameters, follow these steps.
- In Dynamics 365 Finance, go to Tax > Setup > Foreign trade > Foreign trade parameters.
- On the EU sales list tab, set the Transfer purchases option to Yes.
- On the Country/region properties tab, select New.
- In the Country/region field, select DEU.
- In the Country/region type field, select EU.
Set up sales tax codes and sales tax groups
To set up sales tax codes and sales tax groups, follow these steps.
- In Dynamics 365 Finance, go to Tax > Indirect taxes > Sales tax > Sales tax codes.
- Select the EUS sales tax code.
- Verify that the Percentage/Amount field is set to 0.00000.
- Go to Tax > Indirect taxes > Sales tax > Sales tax groups.
- Verify that the EUS sales tax code is included in the AP-EU sales tax group.
- On the Setup FastTab, verify that the Exempt checkbox is selected for the EUS sales tax code.
- Go to Tax > Indirect taxes > Sales tax > Item sales tax groups.
- Verify that the FULL item sales tax group includes the EUS sales tax code.
- In the Reporting type field, select Item.
Create a vendor invoice
To create a vendor invoice, follow these steps.
- In Dynamics 365 Finance, go to Accounts payable > Invoices > Invoice journal.
- On the Action Pane, select New.
- In the Name field, select APInvoice.
- On the Action Pane, select Lines.
- On the List tab, select New.
- In the Date field, select 8/6/2021 (August 6, 2021).
- In the Account field, select DE-001.
- In the Invoice date field, select 8/6/2021.
- In the Invoice field, enter "VI-001".
- In the Credit field, enter "120".
- In the Offset account field, enter "110130-001-022".
- In the Sales tax group field, select AP-EU.
- In the Item sales tax group field, select FULL.
- On the Action Pane, select Post.
Work with the EU sales list
Transfer transactions
To transfer transactions, follow these steps.
In Dynamics 365 Finance, go to Tax > Declarations > Foreign trade > EU sales list.
On the Action Pane, select Transfer.
In the Transfer transactions for EU sales list dialog, set the Item and Service options to Yes.
Select Select.
Find the line where the Table field is set to Customer invoice journal and the Field field is set to Date. In the Criteria field, select 8/1/2021..8/31/2021.
Find the line where the Table field is set to Customer invoice journal and the Field field is set to List code. Verify that the Criteria field is set to !Not included.
Select OK.
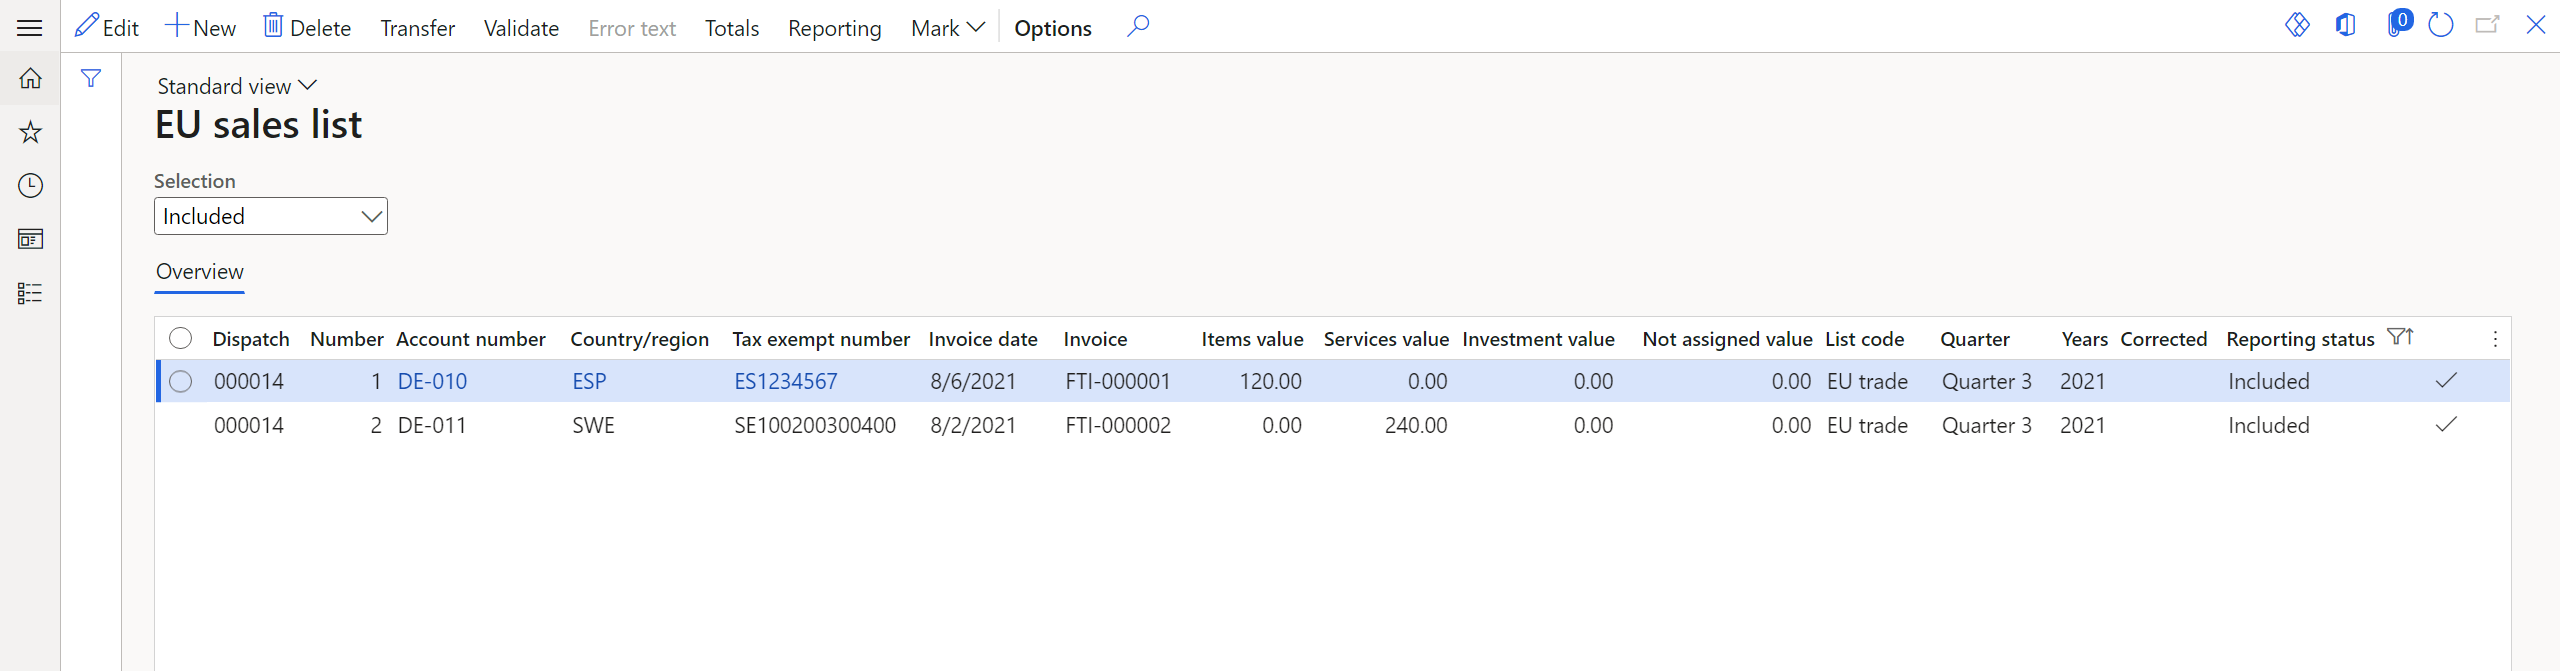
Select OK, and verify that the free text invoices that you created earlier have been moved to the EU sales list page.
Generate the EU sales list report
To generate the EU sales list report, follow these steps.
- On the EU sales list page, on the Action Pane, select Reporting.
- In the EU sales list reporting dialog, on the Parameters FastTab, set the fields to generate a report for a specific country or region.
Mark EU sales list lines as reported
To mark EU sales list lines as reported, follow these steps.
- On the EU sales list page, on the Action Pane, select Mark > Mark as reported.
- Find the line where the Field field is set to Reporting status.
- In the Criteria field, select Included.
- Select OK.
- To view the reported transactions, in the Selection field, select Reported.
Mark EU sales list lines as closed
To mark EU sales list lines as closed, follow these steps.
- On the EU sales list page, on the Action Pane, select Mark > Mark as closed.
- Find the line where the Field field is set to Reporting status. In the Criteria field, select Reported.
- Select OK.
- To view the closed transactions, in the Selection field, select Closed.