Moving Tables and Fields to Extensions Up the Dependency Graph
INTRODUCED IN: Business Central 2019 Release Wave 2, update 15.3, for on-premises only
This article explains how to move tables and fields from an extension to another extension that is up the dependency graph.
Tip
For more information about the general concepts for moving tables and fields between extensions, see Migrating Tables and Fields Between Extensions. This article explains the the difference between moving up and down the dependency graph.
Overview
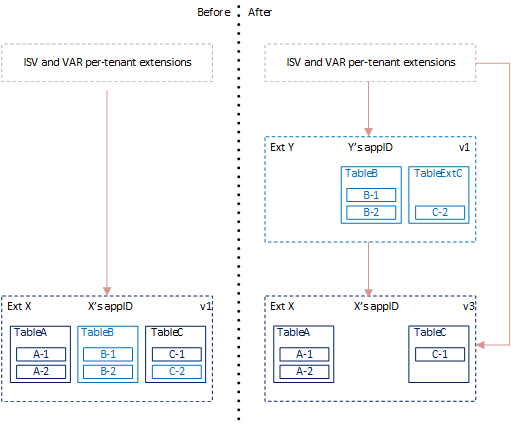
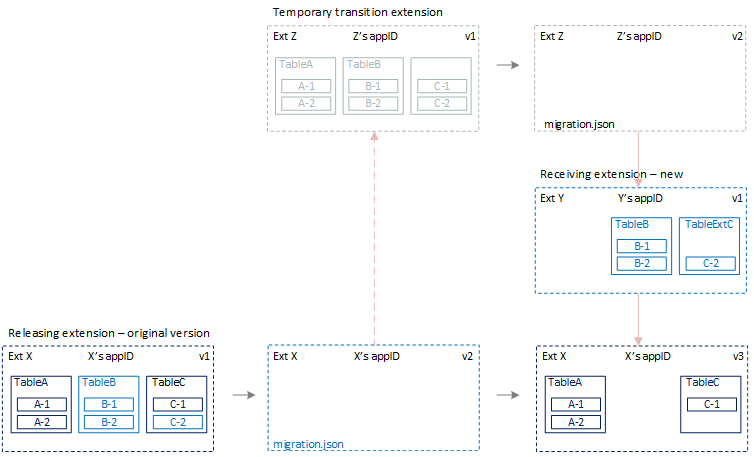
The steps are based on the example illustrated in the following figure. Although your scenario is different, the concept and process are much the same.

In the example, TableB and Field C-2 are customizations. You'll move these elements from the original extension (Ext X) up to a new extension (Ext Y). This new extension will have a dependency on the original extension. You'll keep TableA and TableC in the original extension.
To accommodate data migration, you'll have to create an extension that is only used for deployment. This extension is Ext Z in the figure. There are two stages of deployment:

- In the first stage, Ext Z temporarily takes ownership of tables and fields from Ext X.
- In the second stage, Ext Z releases ownership to extensions Ext X and Ext Y. You uninstall and unpublish transition extension Ext Z when you finish deployment.
This process is a two-step process because we only support moving down the dependency graph. So instead, the concept is to first move the tables' ownership to an extension above the receiving extensions in the dependency graph. Then, the extensions are moved down. This concept essentially turns the process into a two-step, move-down process.
Ext Z is used just as a temporary extension for moving ownership. So, it only includes schema objects. As a result, customers can't run on the tenant until both steps have been done.
Note
You can only use this process for on-premise solutions.
Prerequisite
If you're moving enum type fields, then your solution must be running on Business Central 2020 release wave 1, version 16.5 or later. For more information, see Known Issues.
Create transition extension (Ext Z v1)
The transition extension will contain replicas of all table object definitions in the releasing extension, except logic code. In the illustration, these objects include TableA, TableB, and TableC and current their field definitions. The transition extension is Ext Z.
Create an AL project for the transition extension.
Add a table object that exactly matches the table object definitions for TableA, TableB, and TableC in the releasing extension.
Compile the extension package.
Make a note of the
IDof the new extension. You'll use this ID in the next task.For purposes of the example, the ID is
00001111-aaaa-2222-bbbb-3333cccc4444. The value for your extension will be different.
Create empty version of releasing extension (Ext X v2)
In this step, you create a new version of the releasing extension that doesn't contain any objects. It only contains a migration.json file that points to Ext Z.
In the releasing extension AL project, add a migration.json file that points to the ID of the transition extension Ext Z.
{
"apprules": [
    {
        "id": "00001111-aaaa-2222-bbbb-3333cccc4444"
    }
]
}
For more information, see The Migration.json File.
Delete all objects from the extension. The objects include TableA, TableB, and TableC.
In the app.json file, increase the
versionvalue. Ensure that you've included"target": "OnPrem".Compile a new version of the extension package.
Create final version of releasing extension (Ext X v3)
In this step, you create another version of the releasing extension Ext X. This version will contain the objects and code that you want to finally publish.
Create an AL project for Ext X.
Add a table definition and code for TableA that exactly matches the definition in the original releasing extension.
Add a table object for TableC and field definition for C-1 that matches the definitions in the original TableC object of the releasing extension.
In the app.json file, increase the
versionvalue.Compile the extension package.
Make a note of the
IDandversionof the extension. You'll use these values in the next task.For purposes of the example, the ID is
66667777-aaaa-8888-bbbb-9999cccc0000. The value for your extension will be different.
Create receiving extension (Ext Y v1)
You now create a new extension that contains the customization you want to move from the releasing. In this example, the customizations include TableB and a TableExtC.
Create an AL project for Ext Y.
In the app.json file, set up a dependency on the third version of releasing extension Ext X v3 .
For example:
"dependencies": [{"id": "66667777-aaaa-8888-bbbb-9999cccc0000", "name": "releaseextension", "publisher": "Default publisher", "version": "1.0.0.3"}],The values for each parameter are for illustration purposes only. The values for your extension will be different.
Add a table definition and code for TableB that exactly matches the definition in the original releasing extension.
Add a table extension object called TableExtC. Then, add a field definition for field C-2 that matches its definition in the original TableC object of the releasing extension.
Compile the extension package.
Make a note of the
IDof the new extension. You'll use this ID in the next task.For purposes of the example, the ID is
44445555-eeee-6666-ffff-7777aaaa8888. The value for your extension will be different.
Create new empty version of transition extension (Ext Z v2)
In this step, you create a new version of Ext Z that only contains a migration.json file. This migration.json file points the IDS of Ext X and Ext Y. The file is used to release ownership.
In the extension AL project, add a migration.json file that points to the IDs of the releasing extension Ext X and receiving extension Ext Y.
{
"apprules": [
    {
        "id": "66667777-aaaa-8888-bbbb-9999cccc0000"
    }
    {
        "id": "44445555-eeee-6666-ffff-7777aaaa8888"
    }
]
}
For more information, see The Migration.json File.
Delete the object definitions for TableA, TableB, and TableC.
In the app.json file, increase the
versionvalue.Compile the extension package.
Deploy the extensions
Uninstall the current version of the releasing extension Ext X.
Complete the following steps for the first stage of deployment:
Publish the transition extension Ext Z and empty version of Ext X v2.
Synchronize the transition extension Ext Z.
This step creates empty database tables TableA, TableB, and TableC that are owned by Ext Z.
Important
Extensions receiving table objects must be synced first. Extension releasing/giving away table objects must be synced last.
Synchronize the releasing extension Ext X v2.
This step will read the migration.json of the extension. Then transfer ownership of the original tables TableA, TableB, and TableC to Ext Z.
Complete the following steps for the second stage of deployment:
Publish the next version for Ext Z v2 and Ext X v3, and the first version of Ext Y.
Synchronize the extensions in the following order: Ext X v3, Ext Y v1, and Ext Z v2.
Synchronize Ext Z v2 last. When you synchronize Ext Z v2, ownership of the tables is transferred from Ext Z to Ext X and Ext Y.
Run Start-NAVAppDataUpgrade cmdlet on the new releasing extension versionExt X v3.
This step basically installs the new extension version. You run a data upgrade because an earlier version has been installed and is still published.
Install the new receiving extension Ext Y v1.
Unpublish both versions of Ext Z.
Related information
Migrating Tables and Fields Between Extensions
Moving Tables and Fields to Extension Down the Dependency Graph
Upgrading Extensions
Publishing and Installing an Extension
JSON Files