How to: Create a Sequential Workflow
Workflows can be constructed from built-in activities as well as from custom activities. This topic steps through creating a workflow that uses both built-in activities such as the Sequence activity, and the custom activities from the previous How to: Create an Activity topic. The workflow models a number guessing game.
Note
Each topic in the Getting Started tutorial depends on the previous topics. To complete this topic, you must first complete How to: Create an Activity.
To create the workflow
Right-click NumberGuessWorkflowActivities in Solution Explorer and select Add, New Item.
In the Installed, Common Items node, select Workflow. Select Activity from the Workflow list.
Type
SequentialNumberGuessWorkflowinto the Name box and click Add.Drag a Sequence activity from the Control Flow section of the Toolbox and drop it onto the Drop activity here label on the workflow design surface.
To create the workflow variables and arguments
Double-click SequentialNumberGuessWorkflow.xaml in Solution Explorer to display the workflow in the designer, if it is not already displayed.
Click Arguments in the lower-left side of the workflow designer to display the Arguments pane.
Click Create Argument.
Type
MaxNumberinto the Name box, select In from the Direction drop-down list, select Int32 from the Argument type drop-down list, and then press ENTER to save the argument.Click Create Argument.
Type
Turnsinto the Name box that is below the newly addedMaxNumberargument, select Out from the Direction drop-down list, select Int32 from the Argument type drop-down list, and then press ENTER.Click Arguments in the lower-left side of the activity designer to close the Arguments pane.
Click Variables in the lower-left side of the workflow designer to display the Variables pane.
Click Create Variable.
Tip
If no Create Variable box is displayed, click the Sequence activity on the workflow designer surface to select it.
Type
Guessinto the Name box, select Int32 from the Variable type drop-down list, and then press ENTER to save the variable.Click Create Variable.
Type
Targetinto the Name box, select Int32 from the Variable type drop-down list, and then press ENTER to save the variable.Click Variables in the lower-left side of the activity designer to close the Variables pane.
To add the workflow activities
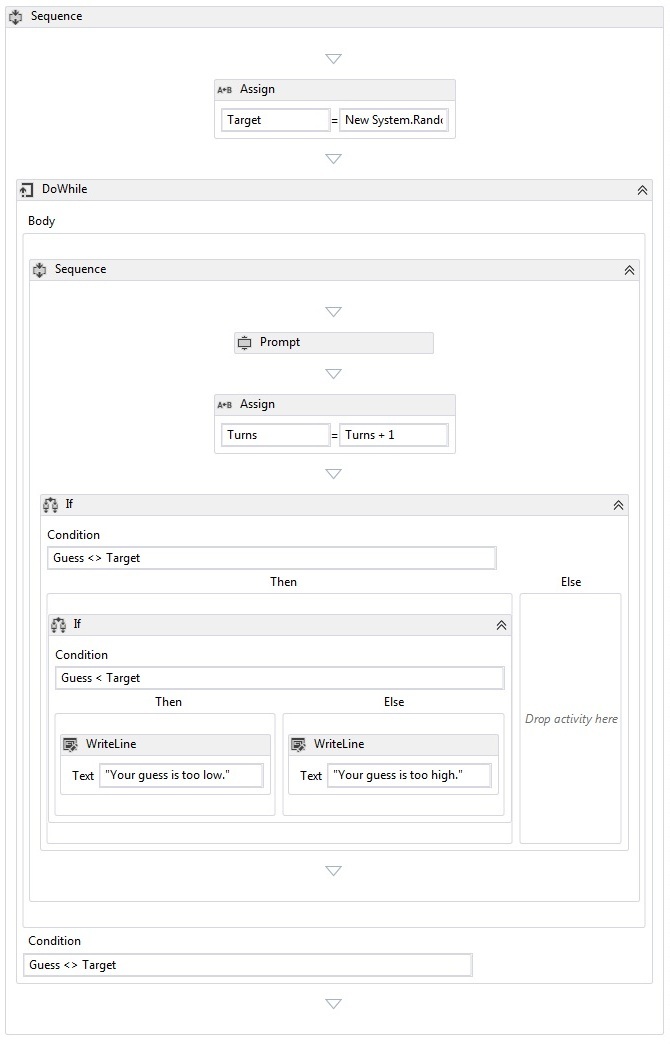
Drag an Assign activity from the Primitives section of the Toolbox and drop it onto the Sequence activity. Type
Targetinto the To box and the following expression into the Enter a C# expression or Enter a VB expression box.New System.Random().Next(1, MaxNumber + 1)new System.Random().Next(1, MaxNumber + 1)Tip
If the Toolbox window is not displayed, select Toolbox from the View menu.
Drag a DoWhile activity from the Control Flow section of the Toolbox and drop it on the workflow so that it is below the Assign activity.
Type the following expression into the DoWhile activity’s Condition property value box.
Guess <> TargetGuess != TargetA DoWhile activity executes its child activities and then evaluates its Condition. If the Condition evaluates to
True, then the activities in the DoWhile execute again. In this example, the user’s guess is evaluated and the DoWhile continues until the guess is correct.Drag a Prompt activity from the NumberGuessWorkflowActivities section of the Toolbox and drop it in the DoWhile activity from the previous step.
In the Properties Window, type
"EnterGuess"including the quotes into the BookmarkName property value box for the Prompt activity. TypeGuessinto the Result property value box, and type the following expression into the Text property box."Please enter a number between 1 and " & MaxNumber"Please enter a number between 1 and " + MaxNumberTip
If the Properties Window is not displayed, select Properties Window from the View menu.
Drag an Assign activity from the Primitives section of the Toolbox and drop it in the DoWhile activity so that it follows the Prompt activity.
Note
When you drop the Assign activity, note how the workflow designer automatically adds a Sequence activity to contain both the Prompt activity and the newly added Assign activity.
Type
Turnsinto the To box andTurns + 1into the Enter a C# expression or Enter a VB expression box.Drag an If activity from the Control Flow section of the Toolbox and drop it in the Sequence activity so that it follows the newly added Assign activity.
Type the following expression into the If activity’s Condition property value box.
Guess <> TargetGuess != TargetDrag another If activity from the Control Flow section of the Toolbox and drop it in the Then section of the first If activity.
Type the following expression into the newly added If activity’s Condition property value box.
Guess < TargetDrag two WriteLine activities from the Primitives section of the Toolbox and drop them so that one is in the Then section of the newly added If activity, and one is in the Else section.
Click the WriteLine activity in the Then section to select it, and type the following expression into the Text property value box.
"Your guess is too low."Click the WriteLine activity in the Else section to select it, and type the following expression into the Text property value box.
"Your guess is too high."The following example illustrates the completed workflow:

To build the workflow
Press CTRL+SHIFT+B to build the solution.
For instructions on how to run the workflow, please see the next topic, How to: Run a Workflow. If you have already completed the How to: Run a Workflow step with a different style of workflow and wish to run it using the sequential workflow from this step, skip ahead to the To build and run the application section of How to: Run a Workflow.
