Share or reuse Visual Studio project settings
To create a custom group of settings that you can share with others or reuse in multiple projects, use Property Manager to create a property sheet (a .props file) to store the settings for each kind of project that you want to be able to reuse or share with others. Using property sheets are far less error-prone than other ways of creating "global" settings.
Important
The problem with *.user files
Past versions of Visual Studio used global property sheets that had a .user file name extension and were located in the \<userprofile>\AppData\Local\Microsoft\MSBuild\v4.0\ folder. We no longer recommend these files because they set properties for project configurations on a per-user, per-computer basis. Such "global" settings can interfere with builds, especially when you are targeting more than one platform on your build computer. For example, if you have both an MFC project and Windows Phone project, the .user properties would be invalid for one of them. Reusable property sheets are more flexible and more robust.
Although .user files are still installed by Visual Studio and participate in property inheritance, they're empty by default. The best practice is to delete any reference to them in Property Manager to ensure that your projects operate independently of any per-user, per-computer settings. This practice is important to ensure correct behavior in a SCC (source code control) environment.
To display Property Manager, on the menu bar, choose View > Property Manager or View > Other Windows > Property Manager, depending on your settings.
If you want to apply a common, frequently used set of properties to multiple projects, you can use Property Manager to capture them in a reusable property sheet file, which by convention has a .props file name extension. You can apply the sheet (or sheets) to new projects so you don't have to set those properties from scratch.

Under each configuration node, you see nodes for each property sheet that applies to that configuration. The system adds property sheets that set common values based on options you choose in the app wizard when you create the project. Right-click any node and choose Properties to see the properties that apply to that node. All the property sheets are imported automatically into the project's primary property sheet (ms.cpp.props) and are evaluated in the order they appear in Property Manager. You can move them to change the evaluation order. Property sheets that are evaluated later override the values in previously evaluated sheets. For more information about the order of evaluation in the .vcxproj file, the .props and .targets files, environment variables, and the command line, see Project property inheritance.
If you choose Add New Project Property Sheet and then select, for example, the MyProps.props property sheet, a property page dialog box appears. Notice that it applies to the MyProps property sheet; any changes you make are written to the sheet, not to the project file (.vcxproj).
Properties in a property sheet are overridden if the same property is set directly in the .vcxproj file.
You can import a property sheet as often as required. Multiple projects in a solution can inherit settings from the same property sheet, and a project can have multiple sheets. A property sheet itself can inherit settings from another property sheet.
You can also create a common property sheet for multiple configurations. To create a property sheet for each configuration, open the shortcut menu for one of them, choose Add Existing Property Sheet, and then add the other sheets. However, if you use a common property sheet, properties you set for all configurations that the sheet applies to. The IDE doesn't show which projects or other property sheets inherit from a given property sheet.
In large solutions that have many projects, it can be useful to create a common property sheet for all the projects in the solution. Create the property sheet as usual. Use Property Manager to add that property sheet to each project in the solution. If necessary at the project level, you can add another property sheet to set project-specific values.
Important
A .props file by default does not participate in source control because it isn't created as a project item. You can manually add the file as a solution item if you want to include it in source control.
To create a property sheet
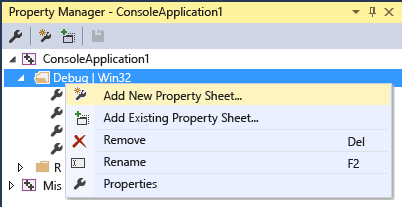
On the menu bar, choose View > Property Manager or View > Other Windows > Property Manager. The Property Manager opens.
To define the scope of the property sheet, select the item to which it applies. This item can be a particular configuration, or another property sheet. Open the shortcut menu for this item and then choose Add New Project Property Sheet. Specify a name and location.
In Property Manager, open the new property sheet and then set the properties you want to include.