This article shows you how to configure IP restriction rules in a web application firewall (WAF) for Azure Front Door by using the Azure portal, the Azure CLI, Azure PowerShell, or an Azure Resource Manager template.
An IP address–based access control rule is a custom WAF rule that lets you control access to your web applications. The rule specifies a list of IP addresses or IP address ranges in Classless Inter-Domain Routing (CIDR) format.
By default, your web application is accessible from the internet. If you want to limit access to clients from a list of known IP addresses or IP address ranges, you can create an IP matching rule that contains the list of IP addresses as matching values and sets the operator to Not (negate is true) and the action to Block. After an IP restriction rule is applied, requests that originate from addresses outside this allowed list receive a 403 Forbidden response.
Follow these steps to configure a WAF policy using the Azure portal.
Prerequisites
Create an Azure Front Door profile by following the instructions described in Quickstart: Create an Azure Front Door instance for a highly available global web application.
Create a WAF policy
On the Azure portal, select Create a resource. Enter Web application firewall in the Search services and marketplace search box and select Enter. Then select Web Application Firewall (WAF).
Select Create.
On the Create a WAF policy page, use the following values to complete the Basics tab.
| Setting |
Value |
| Policy for |
Global WAF (Front Door). |
| Front door tier |
Select Premium or Standard to match your Azure Front Door tier. |
| Subscription |
Select your subscription. |
| Resource group |
Select the resource group where your Azure Front Door instance is located. |
| Policy name |
Enter a name for your policy. |
| Policy state |
Selected |
| Policy mode |
Prevention |
Select Next: Managed rules.
Select Next: Policy settings.
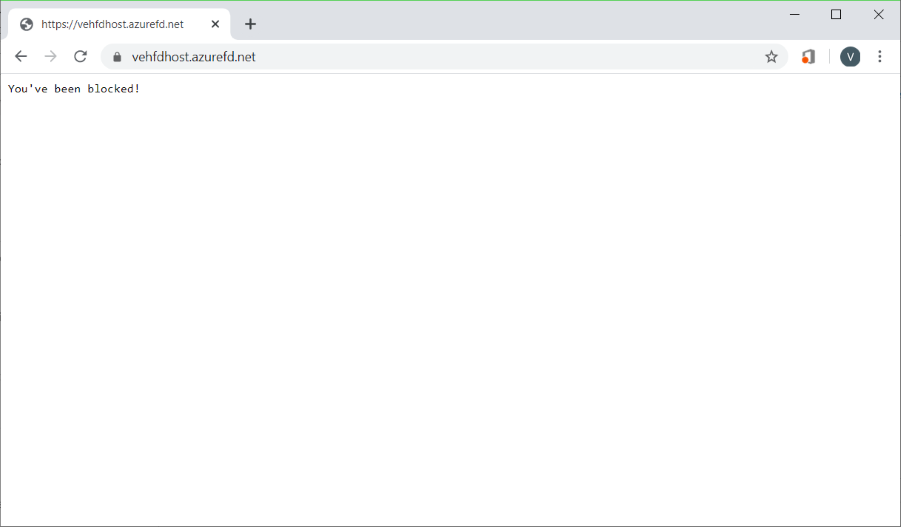
On the Policy settings tab, enter You've been blocked! for the Block response body so that you can see that your custom rule is in effect.
Select Next: Custom rules.
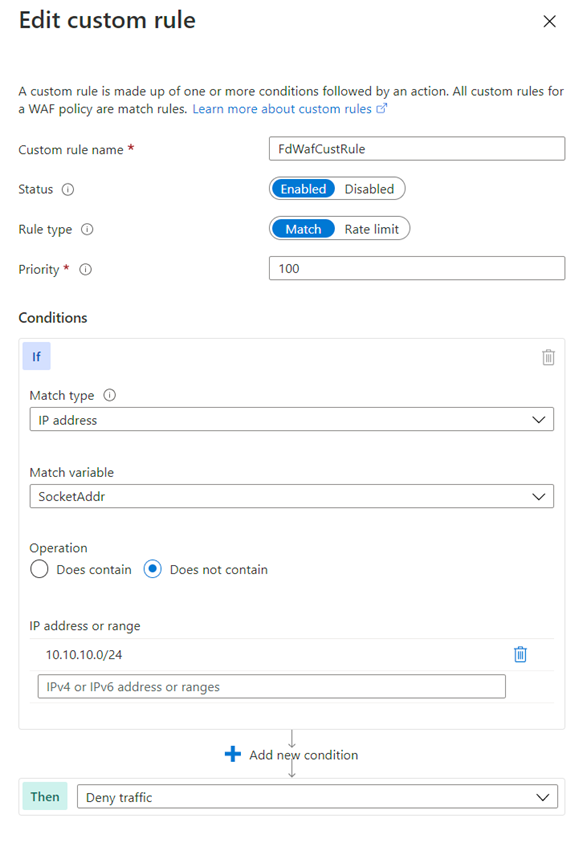
Select Add custom rule.
On the Add custom rule page, use the following test values to create a custom rule.
| Setting |
Value |
| Custom rule name |
FdWafCustRule |
| Status |
Enabled |
| Rule type |
Match |
| Priority |
100 |
| Match type |
IP address |
| Match variable |
SocketAddr |
| Operation |
Does not contain |
| IP address or range |
10.10.10.0/24 |
| Then |
Deny traffic |

Select Add.
Select Next: Association.
Select Associate a Front door profile.
For Frontend profile, select your front-end profile.
For Domain, select the domain.
Select Add.
Select Review + create.
After your policy validation passes, select Create.
Test your WAF policy
After your WAF policy deployment completes, browse to your Azure Front Door front-end host name.
You should see your custom block message.

Note
A private IP address was intentionally used in the custom rule to guarantee the rule would trigger. In an actual deployment, create allow and deny rules by using IP addresses for your particular situation.
Follow these steps to configure a WAF policy using the Azure CLI.
Prerequisites
Before you begin to configure an IP restriction policy, set up your CLI environment and create an Azure Front Door profile.
Set up the Azure CLI environment
- Install the Azure CLI or use Azure Cloud Shell. Azure Cloud Shell is a free Bash shell that you can run directly within the Azure portal. It has the Azure CLI preinstalled and configured to use with your account. Select the Try it button in the CLI commands that follow. Then sign in to your Azure account in the Cloud Shell session that opens. After the session starts, enter
az extension add --name front-door to add the Azure Front Door extension.
- If you're using the CLI locally in Bash, sign in to Azure by using
az login.
Create an Azure Front Door profile
Create an Azure Front Door profile by following the instructions described in Quickstart: Create an Azure Front Door instance for a highly available global web application.
Create a WAF policy
Create a WAF policy by using the az network front-door waf-policy create command.
In the example that follows, replace the policy name IPAllowPolicyExampleCLI with a unique policy name.
az network front-door waf-policy create \
  --resource-group <resource-group-name> \
  --subscription <subscription ID> \
  --name IPAllowPolicyExampleCLI
Add a custom IP access control rule
Use the az network front-door waf-policy custom-rule create command to add a custom IP access control rule for the WAF policy you created.
In the following examples:
- Replace IPAllowPolicyExampleCLI with your unique policy created earlier.
- Replace ip-address-range-1, ip-address-range-2 with your own range.
First, create an IP allow rule for the policy created from the previous step.
Note
--defer is required because a rule must have a match condition to be added in the next step.
az network front-door waf-policy rule create \
  --name IPAllowListRule \
  --priority 1 \
  --rule-type MatchRule \
  --action Block \
  --resource-group <resource-group-name> \
  --policy-name IPAllowPolicyExampleCLI --defer
Next, add a match condition to the rule:
az network front-door waf-policy rule match-condition add \
--match-variable SocketAddr \
--operator IPMatch \
--values "ip-address-range-1" "ip-address-range-2" \
--negate true \
--name IPAllowListRule \
  --resource-group <resource-group-name> \
  --policy-name IPAllowPolicyExampleCLI
Find the ID of a WAF policy
Find a WAF policy's ID by using the az network front-door waf-policy show command. Replace IPAllowPolicyExampleCLI in the following example with your unique policy that you created earlier.
az network front-door  waf-policy show \
  --resource-group <resource-group-name> \
  --name IPAllowPolicyExampleCLI
Link a WAF policy to an Azure Front Door front-end host
Set the Azure Front Door WebApplicationFirewallPolicyLink ID to the policy ID by using the az network front-door update command. Replace IPAllowPolicyExampleCLI with your unique policy that you created earlier.
az network front-door update \
  --set FrontendEndpoints[0].WebApplicationFirewallPolicyLink.id=/subscriptions/<subscription ID>/resourcegroups/resource-group-name/providers/Microsoft.Network/frontdoorwebapplicationfirewallpolicies/IPAllowPolicyExampleCLI \
  --name <frontdoor-name> \
  --resource-group <resource-group-name>
In this example, the WAF policy is applied to FrontendEndpoints[0]. You can link the WAF policy to any of your front ends.
Note
You need to set the WebApplicationFirewallPolicyLink property only once to link a WAF policy to an Azure Front Door front end. Subsequent policy updates are automatically applied to the front end.
Follow these steps to configure a WAF policy using Azure PowerShell.
Prerequisites
Before you begin to configure an IP restriction policy, set up your PowerShell environment and create an Azure Front Door profile.
Set up your PowerShell environment
Azure PowerShell provides a set of cmdlets that use the Azure Resource Manager model for managing Azure resources.
You can install Azure PowerShell on your local machine and use it in any PowerShell session. Follow the instructions on the page to sign in to PowerShell by using your Azure credentials and then install the Az PowerShell module module.
Connect to Azure by using the following command and then use an interactive dialog to sign in.
Connect-AzAccount
Before you install an Azure Front Door module, make sure you have the current version of the PowerShellGet module installed. Run the following command and then reopen PowerShell.
Install-Module PowerShellGet -Force -AllowClobber
Install the Az.FrontDoor module by using the following command:
Install-Module -Name Az.FrontDoor
Create an Azure Front Door profile
Create an Azure Front Door profile by following the instructions described in Quickstart: Create a Front Door for a highly available global web application.
Define an IP match condition
Use the New-AzFrontDoorWafMatchConditionObject command to define an IP match condition.
In the following example, replace ip-address-range-1, ip-address-range-2 with your own range.
$IPMatchCondition = New-AzFrontDoorWafMatchConditionObject `
-MatchVariable  SocketAddr `
-OperatorProperty IPMatch `
-MatchValue "ip-address-range-1", "ip-address-range-2"
-NegateCondition 1
Create a custom IP allow rule
Use the New-AzFrontDoorWafCustomRuleObject command to define an action and set a priority. In the following example, requests not from client IPs that match the list are blocked.
$IPAllowRule = New-AzFrontDoorWafCustomRuleObject `
-Name "IPAllowRule" `
-RuleType MatchRule `
-MatchCondition $IPMatchCondition `
-Action Block -Priority 1
Find the name of the resource group that contains the Azure Front Door profile by using Get-AzResourceGroup. Next, configure a WAF policy with the IP rule by using New-AzFrontDoorWafPolicy.
  $IPAllowPolicyExamplePS = New-AzFrontDoorWafPolicy `
    -Name "IPRestrictionExamplePS" `
    -resourceGroupName <resource-group-name> `
    -Customrule $IPAllowRule`
    -Mode Prevention `
    -EnabledState Enabled
Link a WAF policy to an Azure Front Door front-end host
Link a WAF policy object to an existing front-end host and update Azure Front Door properties. First, retrieve the Azure Front Door object by using Get-AzFrontDoor. Next, set the WebApplicationFirewallPolicyLink property to the resource ID of $IPAllowPolicyExamplePS, created in the previous step, by using the Set-AzFrontDoor command.
  $FrontDoorObjectExample = Get-AzFrontDoor `
    -ResourceGroupName <resource-group-name> `
    -Name $frontDoorName
  $FrontDoorObjectExample[0].FrontendEndpoints[0].WebApplicationFirewallPolicyLink = $IPBlockPolicy.Id
  Set-AzFrontDoor -InputObject $FrontDoorObjectExample[0]
Note
In this example, the WAF policy is applied to FrontendEndpoints[0]. You can link a WAF policy to any of your front ends. You need to set the WebApplicationFirewallPolicyLink property only once to link a WAF policy to an Azure Front Door front end. Subsequent policy updates are automatically applied to the front end.
To view the Resource Manager template that creates an Azure Front Door policy and a WAF policy with custom IP restriction rules, go to GitHub.

