Run an Azure Function in response to a blob rehydration event
To read a blob that is in the archive tier, you must first rehydrate the blob to the hot or cool tier. The rehydration process can take several hours to complete. Instead of repeatedly polling the status of the rehydration operation, you can configure Azure Event Grid to fire an event when the blob rehydration operation is complete and handle this event in your application.
When an event occurs, Event Grid sends the event to an event handler via an endpoint. A number of Azure services can serve as event handlers, including Azure Functions. An Azure Function is a block of code that can execute in response to an event. This how-to walks you through the process of developing an Azure Function and then configuring Event Grid to run the function in response to an event that occurs when a blob is rehydrated.
This article shows you how to create and test an Azure Function with .NET from Visual Studio. You can build Azure Functions from a variety of local development environments and using a variety of different programming languages. For more information about supported languages for Azure Functions, see Supported languages in Azure Functions. For more information about development options for Azure Functions, see Code and test Azure Functions locally.
For more information about rehydrating blobs from the archive tier, see Overview of blob rehydration from the archive tier.
Prerequisites
This article shows you how to use Visual Studio 2019 or later to develop an Azure Function with .NET. You can install Visual Studio Community for free. Make sure that you configure Visual Studio for Azure Development with .NET.
Install or use a tool that can send HTTP requests to test your solution, for example:
- Visual Studio Code with an extension from Visual Studio Marketplace
- PowerShell Invoke-RestMethod
- Microsoft Edge - Network Console tool
- Bruno
- curl
Caution
For scenarios where you have sensitive data, such as credentials, secrets, access tokens, API keys, and other similar information, make sure to use a tool that protects your data with the necessary security features, works offline or locally, doesn't sync your data to the cloud, and doesn't require that you sign in to an online account. This way, you reduce the risk around exposing sensitive data to the public.
An Azure subscription is required. If you don't already have an account, create a free one before you begin.
A provisioned Microsoft Entra ID security principal that has been assigned the Storage Blob Data Contributor role, scoped to the storage account, parent resource group, or subscription. See Assign roles to your Microsoft Entra user account.
Create an Azure Function app
A function app is an Azure resource that serves as a container for your Azure Functions. You can use a new or existing function app to complete the steps described in this article.
To create a new function app in the Azure portal, follow these steps:
In the Azure portal, search for Function App. Select the Function App icon to navigate to the list of function apps in your subscription.
Select the Create button to create a new function app.
On the Basics tab, specify a resource group, and provide a unique name for the new function app.
Make sure that the Publish option is set to Code.
From the Runtime stack dropdown, select .NET. The Version field is automatically populated to use the latest version of .NET core.
Select the region for the new function app.
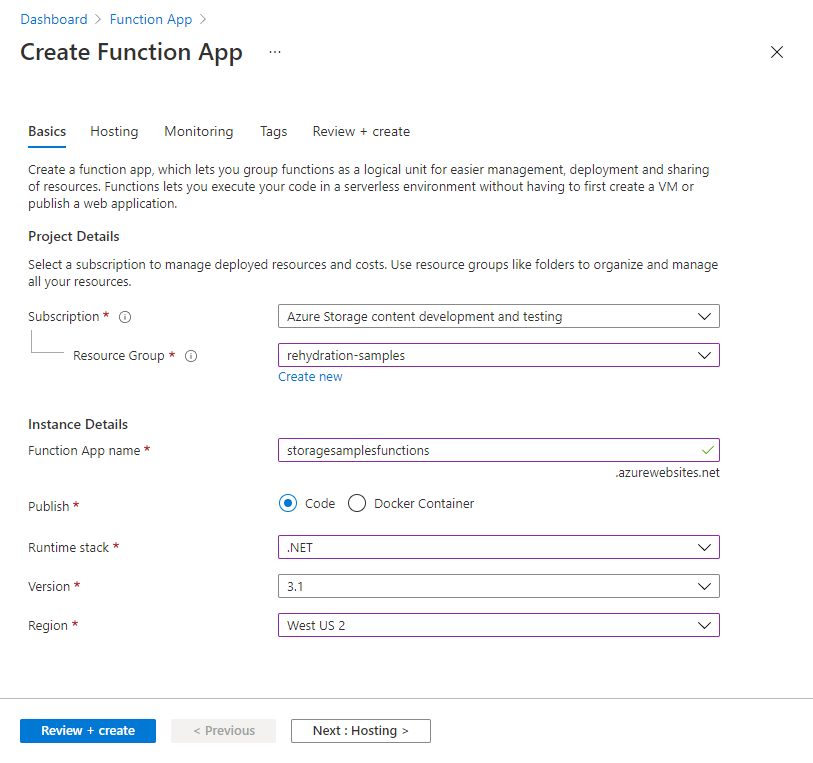
After you have completed the Basics tab, navigate to the Hosting tab.
On the Hosting tab, select the storage account where your Azure Function will be stored. You can choose an existing storage account or create a new one.
Make sure that the Operating system field is set to Windows.
In the Plan type field, select Consumption (Serverless). For more information about this plan, see Azure Functions Consumption plan hosting.
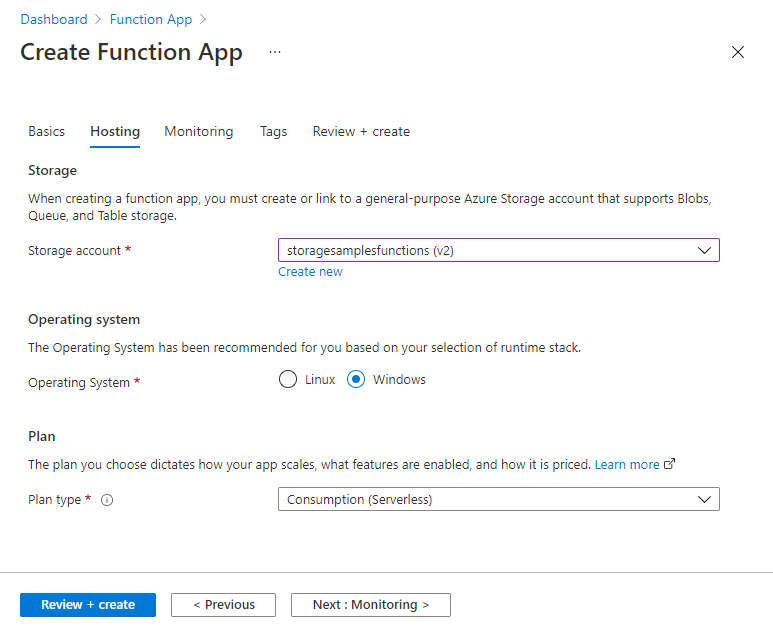
Select Review + Create to create the new function app.
To learn more about configuring your function app, see Manage your function app in the Azure Functions documentation.
Create an Azure Function as an Event Grid trigger
Next, create an Azure Function that will run when a blob is rehydrated in a particular storage account. Follow these steps to create an Azure Function in Visual Studio with C# and .NET Core:
Launch Visual Studio 2019. Then, Sign in and connect your app code to Azure using DefaultAzureCredential.
Create a new Azure Functions project. For details, follow the instructions described in Create a function app project.
On the Create a new Azure Functions application step, select the following values:
- By default, the Azure Functions runtime is set to Azure Functions v3 (.NET Core). Microsoft recommends using this version of the Azure Functions runtime.
- From the list of possible triggers, select Event Grid Trigger. For more information on why an Event Grid trigger is the recommended type of trigger for handling a Blob Storage event with an Azure Function, see Use a function as an event handler for Event Grid events.
- The Storage Account setting indicates where your Azure Function will be stored. You can select an existing storage account or create a new one.
Select Create to create the new project in Visual Studio.
Next, rename the class and Azure Function, as described in Rename the function. Choose a name that's appropriate for your scenario.
In Visual Studio, select Tools | NuGet Package Manager | Package Manager Console, and then install the following packages from the console:
Install-Package Azure.Storage.Blobs
Install-Package Microsoft.ApplicationInsights.WorkerService
Install-Package Microsoft.Azure.WebJobs.Logging.ApplicationInsights
In the class file for your Azure Function, paste in the following using statements:
using System;
using System.IO;
using System.Text;
using Microsoft.Azure.WebJobs;
using Microsoft.Azure.EventGrid.Models;
using Microsoft.Azure.WebJobs.Extensions.EventGrid;
using Microsoft.Extensions.Logging;
using Azure;
using Azure.Storage.Blobs;
using Azure.Storage.Blobs.Models;
Locate the Run method in the class file. This is the method that runs when an event occurs. Paste the following code into the body of the Run method. Remember to replace placeholder values in angle brackets with your own values:
// When either Microsoft.Storage.BlobCreated or Microsoft.Storage.BlobTierChanged
// event occurs, write the event details to a log blob in the same container
// as the event subject (the blob for which the event occurred).

// Create a unique name for the log blob.
string logBlobName = string.Format("function-log-{0}.txt", DateTime.UtcNow.Ticks);

// Get data from the event.
dynamic data = eventGridEvent.Data;
string eventBlobUrl = Convert.ToString(data.url);
string eventApi = Convert.ToString(data.api);

// Build string containing log information.
StringBuilder eventInfo = new StringBuilder();
eventInfo.AppendLine(string.Format("{0} operation occurred.", eventApi));
eventInfo.AppendLine(string.Format("Blob URL: {0}", eventBlobUrl));
eventInfo.AppendLine($@"Additional event details:
    Id=[{eventGridEvent.Id}]
    EventType=[{eventGridEvent.EventType}]
    EventTime=[{eventGridEvent.EventTime}]
    Subject=[{eventGridEvent.Subject}]
    Topic=[{eventGridEvent.Topic}]");

// If event was BlobCreated and API call was CopyBlob, respond to the event.
bool copyBlobEventOccurred = (eventGridEvent.EventType == "Microsoft.Storage.BlobCreated") &&
                             (eventApi == "CopyBlob");

// If event was BlobTierChanged and API call was SetBlobTier, respond to the event.
bool setTierEventOccurred = (eventGridEvent.EventType == "Microsoft.Storage.BlobTierChanged") &&
                            (eventApi == "SetBlobTier");

// If one of these two events occurred, write event info to a log blob.
if (copyBlobEventOccurred | setTierEventOccurred)
{
    // Create log blob in same account and container.
    BlobUriBuilder logBlobUriBuilder = new BlobUriBuilder(new Uri(eventBlobUrl))
    {
        BlobName = logBlobName
    };

    TokenCredential credential = new DefaultAzureCredential();

    string blobUri = "https://" + accountName + ".blob.core.windows.net/" + logBlobUriBuilder.BlobContainerName + "/" + logBlobName;

    BlobClient logBlobClient = new BlobClient(new Uri(blobUri), credential);

    byte[] byteArray = Encoding.ASCII.GetBytes(eventInfo.ToString());

    try
    {
        // Write the log info to the blob.
        // Overwrite if the blob already exists.
        using (MemoryStream memoryStream = new MemoryStream(byteArray))
        {
            BlobContentInfo blobContentInfo =
                logBlobClient.Upload(memoryStream, overwrite: true);
        }
    }
    catch (RequestFailedException e)
    {
        Console.WriteLine(e.Message);
        throw;
    }
}
For more information on developing Azure Functions, see Guidance for developing Azure Functions.
To learn more about the information that is included when a Blob Storage event is published to an event handler, see Azure Blob Storage as Event Grid source.
Run the Azure Function locally in the debugger
To test your Azure Function code locally, you need to manually send an HTTP request that triggers the event. You can post the request by using a tool such as those that are described in the prerequisite section of this article.
At the top of the class file for your Azure Function is a URL endpoint that you can use for testing in the local environment. Posting the request with this URL triggers the event in the local environment so that you can debug your code. The URL is in the following format:
http://localhost:7071/runtime/webhooks/EventGrid?functionName={functionname}
The request that you send to this endpoint is a simulated request. It does not send or receive data from your Azure Storage account.
Send a request to this endpoint by using your HTTP request tool and its instructions. Make sure to substitute the {functionname} placeholder with the name of your function (for example Get http://localhost:7071/runtime/webhooks/EventGrid?functionName=BlobRehydrateEventHandler).
- In Visual Studio, place any desired breakpoints in your code, and press F5 to run the debugger.
- In your HTTP request tool, send the request to the endpoint.
When you send the request, Event Grid calls your Azure Function, and you can debug it normally. For additional information and examples, see Manually post the request in the Azure Functions documentation.
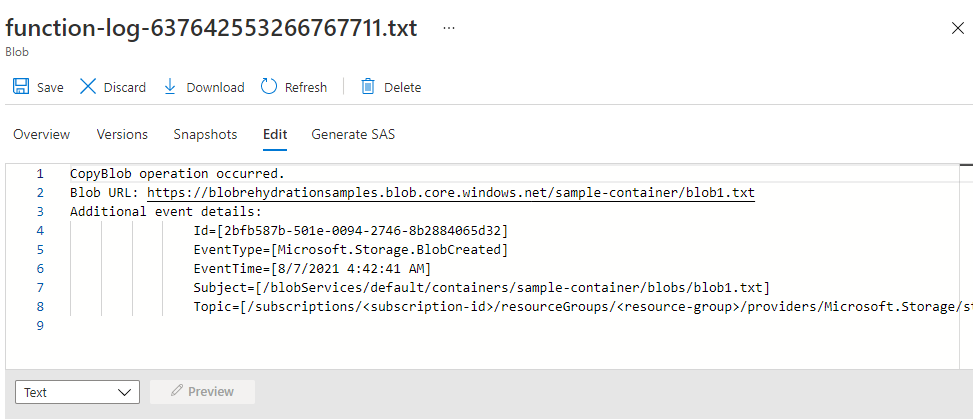
The request that triggers the event is simulated, but the Azure Function that runs when the event fires writes log information to a new blob in your storage account. You can verify the contents of the blob and view its last modified time in the Azure portal, as shown in the following image:
Publish the Azure Function
After you have tested your Azure Function locally, the next step is to publish the Azure Function to the Azure Function App that you created previously. The function must be published so that you can configure Event Grid to send events that happen on the storage account to the function endpoint.
Follow these steps to publish the function:
In Solution Explorer, select and hold (or right-click) your Azure Functions project and choose Publish.
In the Publish window, select Azure as the target, then choose Next.
Select Azure Function App (Windows) as the specific target, then choose Next.
On the Functions instance tab, select your subscription from the dropdown menu, then locate your Azure Function App in the list of available function apps.
Make sure that the Run from package file checkbox is selected.
Select Finish to prepare to publish the function.
On the Publish page, verify that the configuration is correct. If you see a warning that the service dependency to Application Insights is not configured, you can configure it from this page.
Select the Publish button to begin publishing the Azure Function to the Azure Function App that you created previously.
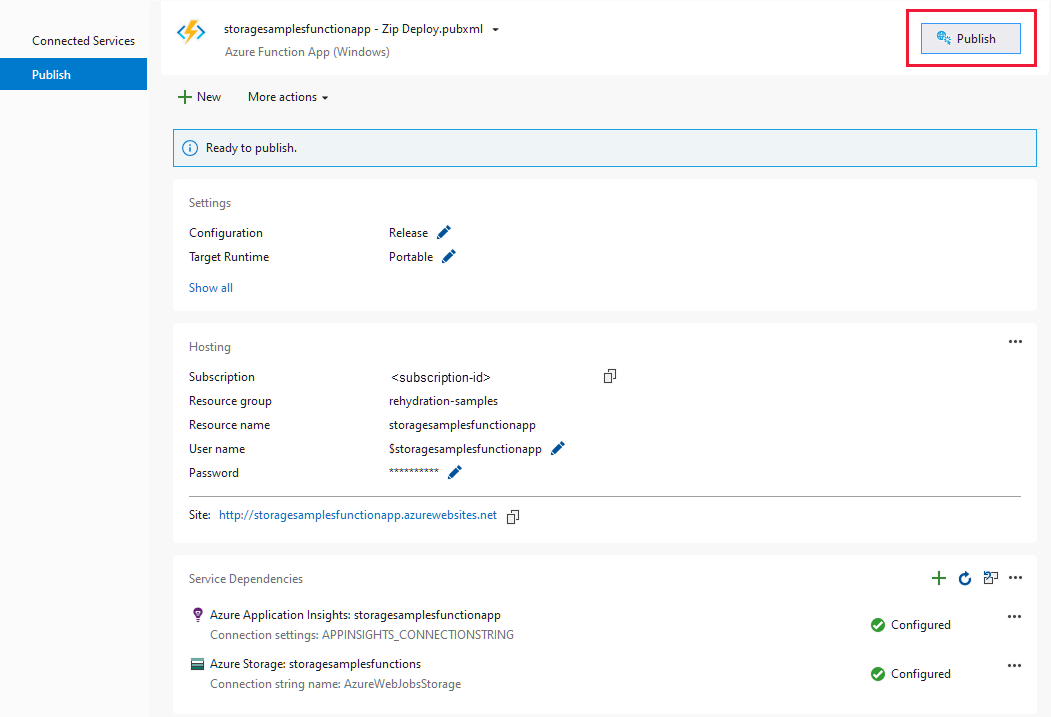
Whenever you make changes to the code in your Azure Function, you must publish the updated function to Azure.
Subscribe to blob rehydration events from a storage account
You now have a function app that contains an Azure Function that can run in response to an event. The next step is to create an event subscription from your storage account. The event subscription configures the storage account to publish an event through Event Grid in response to an operation on a blob in your storage account. Event Grid then sends the event to the event handler endpoint that you've specified. In this case, the event handler is the Azure Function that you created in the previous section.
When you create the event subscription, you can filter which events are sent to the event handler. The events to capture when rehydrating a blob from the archive tier are Microsoft.Storage.BlobTierChanged, corresponding to a Set Blob Tier operation, and Microsoft.Storage.BlobCreated events, corresponding to a Copy Blob operation. Depending on your scenario, you may want to handle only one of these events.
To create the event subscription, follow these steps:
In the Azure portal, navigate to the storage account that contains blobs to rehydrate from the archive tier.
Select the Events setting in the left navigation pane.
On the Events page, select More options.
Select Create Event Subscription.
On the Create Event Subscription page, in the Event subscription details section, provide a name for the event subscription.
In the Topic details section, provide a name for the system topic. The system topic represents one or more events that are published by Azure Storage. For more information about system topics, see System topics in Azure Event Grid.
In the Event Types section, select the Blob Created and Blob Tier Changed events. Depending on how you choose to rehydrate a blob from the archive tier, one of these two events will fire.

In the Endpoint details section, select Azure Function from the dropdown menu.
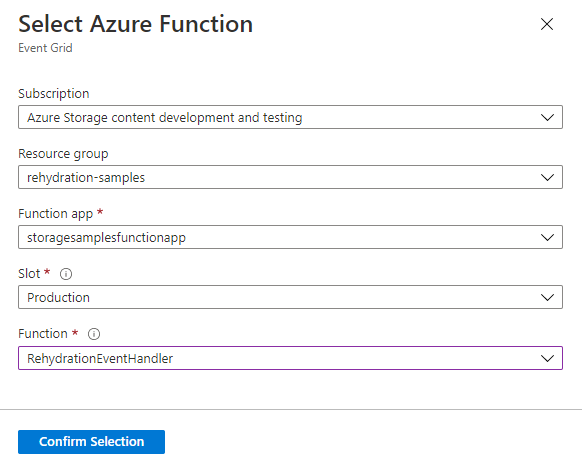
Choose Select an endpoint to specify the function that you created in the previous section. In the Select Azure Function dialog, choose the subscription, resource group, and function app for your Azure Function. Finally, select the function name from the dropdown and choose Confirm selection.
Select the Create button to create the event subscription and begin sending events to the Azure Function event handler.
To learn more about event subscriptions, see Azure Event Grid concepts.
Test the Azure Function event handler
To test the Azure Function, you can trigger an event in the storage account that contains the event subscription. The event subscription that you created previously is filtering on two events, Microsoft.Storage.BlobCreated and Microsoft.Storage.BlobTierChanged. When either of these events fires, it will trigger your Azure Function.
The Azure Function shown in this article writes to a log blob in two scenarios:
- When the event is Microsoft.Storage.BlobCreated and the API operation is Copy Blob.
- When the event is Microsoft.Storage.BlobTierChanged and the API operation is Set Blob Tier.
To learn how to test the function by rehydrating a blob, see one of these two procedures:
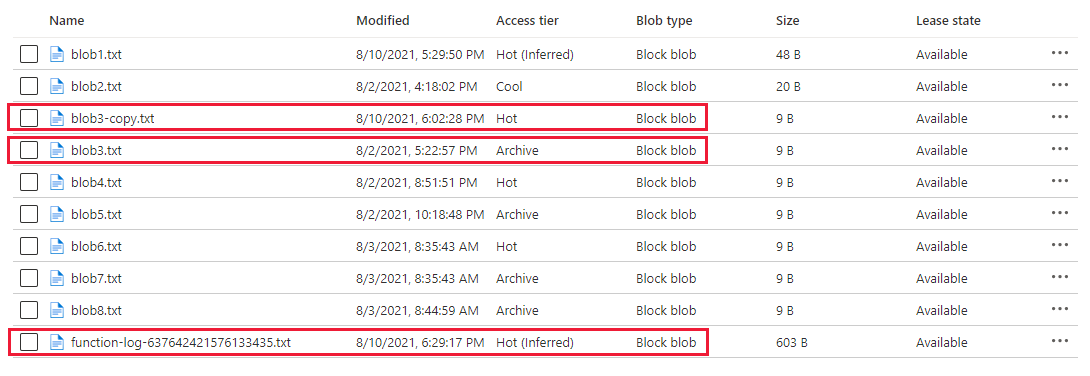
After the rehydration is complete, the log blob is written to the same container as the blob that you rehydrated. For example, after you rehydrate a blob with a copy operation, you can see in the Azure portal that the original source blob remains in the archive tier, the fully rehydrated destination blob appears in the targeted online tier, and the log blob that was created by the Azure Function also appears in the list.
Keep in mind that rehydrating a blob can take up to 15 hours, depending on the rehydration priority setting. If you set the rehydration priority to High, rehydration may complete in under one hour for blobs that are less than 10 GB in size. However, a high-priority rehydration incurs a greater cost. For more information, see Overview of blob rehydration from the archive tier.
Tip
Although the goal of this how-to is to handle these events in the context of blob rehydration, for testing purposes it may also be helpful to observe these events in response to uploading a blob or changing an online blob's tier (i.e., from hot to cool), because the event fires immediately.
For more information on how to filter events in Event Grid, see How to filter events for Azure Event Grid.